Collector for ArcGIS gives you a new way to use your iPhone or Android smartphone to map information. With it, you can capture and update both tabular and spatial information using the built-in GPS capabilities of the device or by tapping on the map. Field crews can use Collector to plan routes, get directions to work locations, use data-driven forms to improve data input quality, capture photos and videos of assets, and seamlessly integrate information back into the organization’s GIS.
In this tutorial, you’ll learn how to create a basic Collector map from scratch. You’ll be able to use the map in the Collector for ArcGIS app to go out into the field and collect locations and a few attributes about landmarks in your community.
Getting Started
First, create a workspace and map layer for this project.
- In Windows Explorer, create a new folder named CollectorProjects.
- Open ArcCatalog and, in the Catalog tree, right-click Folder Connections, click Connect to folder, and then navigate to the CollectorProjects folder. Select it and click OK.
- Right-click the CollectorProjects folder, choose New > File Geodatabase, and name it Community.
- Right-click the Community geodatabase and create a new point feature class named CommunityArt. For coordinate system, choose WGS 1984 Web Mercator (auxiliary sphere). Click Next. Accept all the default settings until you get to the Fields panel.
- In the Fields panel, add three new fields named ArtType, ArtStyle, and Description. Make the Data Type for ArtType and ArtStyle fields Long Integer. Make the Data Type for the Description field Text.
- Leave ArcCatalog open. Click Finish to close the Feature Class Properties dialog box.
Create Domains and Subtypes
When you create a Collector map, you’ll want to make it as easy as possible for the person using Collector to capture attributes of the things they’re collecting correctly. You do this by providing organized lists of the attributes so that the person using the map can simply choose the correct attribute from the list. This makes data collection more efficient and reduces errors caused by typing on a small smartphone screen.
In this step, you’ll create three lists (called domains). Each list represents a different style of community art. You’ll also create three subject categories (called subtypes) that represent the different types of community art. Then you’ll attach the appropriate list with each category.
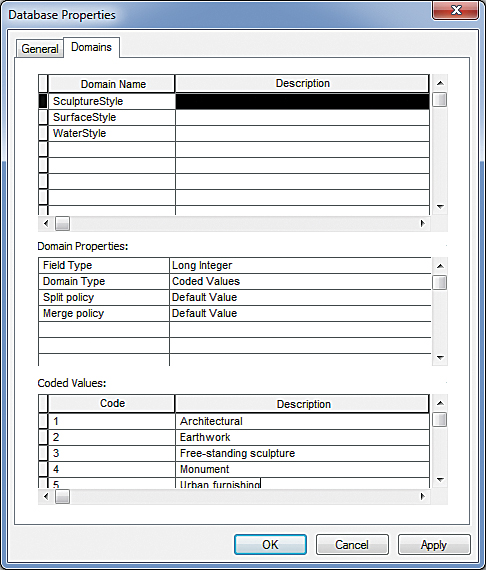
1. In the ArcCatalog Catalog tree, right-click the Community geodatabase and choose Properties. Click the Domains tab and create three new domains: SculptureStyle, SurfaceStyle, and WaterStyle. Set the Field Type to Long Integer and the Domain Type to Coded Values for all three domains.
2. Click the box to the left of SculptureStyle to select it. In the Coded Values table, create five coded values, as shown in Table 1.

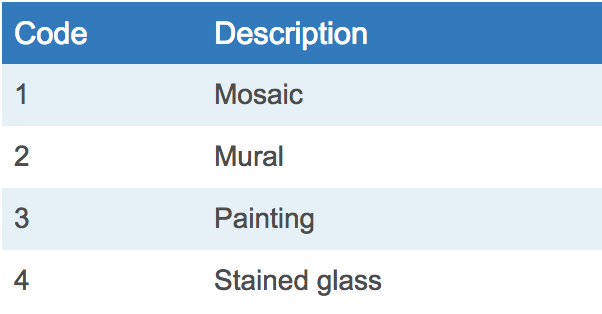
3. Click the box to the left of select SurfaceStyle and enter the values in Table 2 in the Coded Values table.
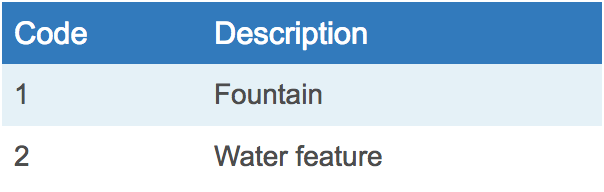
4. Click the box to the left of select WaterStyle and enter the values in Table 3 in the Coded Values table.
5. Click Apply and then OK to close the dialog box.
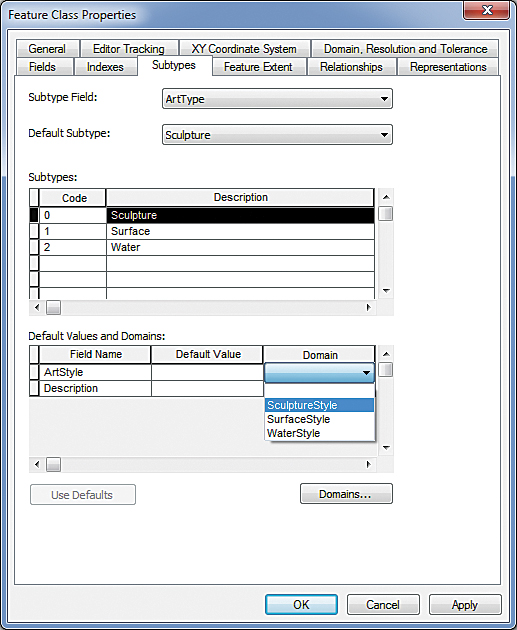
6. In the Catalog tree, right-click the CommunityArt feature class and choose Properties. Click the Subtypes tab and then click the drop-down for Subtype Field and choose ArtType. For Code 0, change New Subtype to Sculpture. Add Code 1 and add Surface for Description. Add Code 2 and add Water for Description. Click Apply.
7. Click the box to the left of Code 0 to select the Sculpture subtype. In the Default Values and Domains table below, click in the Domain box and, in the drop-down, choose SculptureStyle.
8. Choose the SurfaceStyle domain for the Surface subtype.
9. Choose the WaterStyle domain for the Water subtype. Click Apply. Click OK to close the dialog box. Close ArcCatalog.
Publish and Configure Your Map
In this step, you’ll use ArcMap to create a map that uses the CommunityArt feature class as a layer, enable it to store attachments, and publish it to your ArcGIS Online account.
- Open a blank map in ArcMap.
- Open the Catalog tree. If you don’t see the folder connection to your CollectorProjects folder, right-click Folder Connections and click Refresh.
- Expand the CollectorProjects folder and the Community geodatabase.
- Right-click the CommunityArt feature class and choose Manage > Create Attachments.
- Drag and drop the CommunityArt feature class onto your map.
- Choose File > Sign In and log in to your organizational account if necessary.
- Click File > Share As > Service and click Next. In the next panel, click Publish as a Service.
- In the Publish a Service dialog box, click the drop-down for Choose a connection and choose My Hosted Services (My Organization). Your organizational account should be listed under Choose a connection.
- For Service name, enter CommunityArt. Click Continue.
- In the Service Editor panel, click Capabilities and check Feature Access and uncheck Tiled Mapping.
- Click Item Description. For Summary, put Collector map for Community Art, for Tags, put Art, Community. Click Sharing and check My Organization, not Everyone.
- Click Analyze at the top of the Service Editor dialog box. Click Analyze and review any messages. You should only have two medium and one low severity messages because in this tutorial, you are not using a feature template set and you are not publishing any data.
- Click Publish.
Configure Your Collector Map in ArcGIS Online.
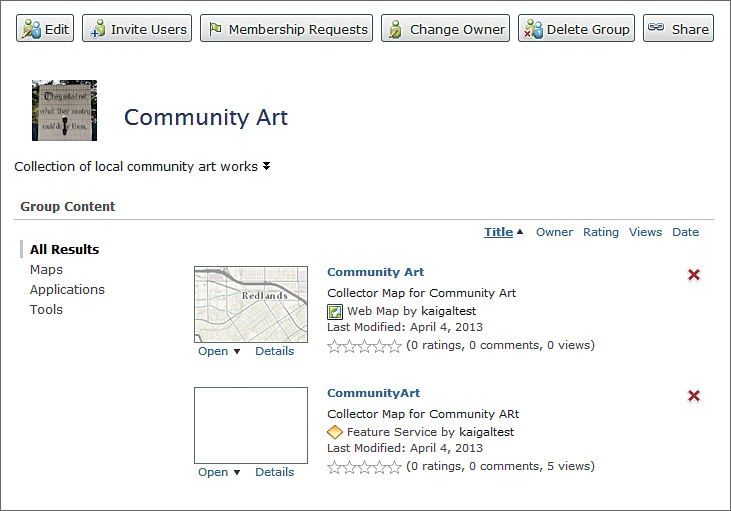
Once the service is published, open ArcGIS Online (and sign in if necessary). Click the My Content drop-down and My Content and verify your service has published and the CommunityArt feature service is being shared with your organization.
It’s likely that you’ll want to send other people out into the field with Collector to use your Collector maps. The best way to accomplish this is to create a group and invite your field team to the group. This way, you can have different field teams working on different projects.
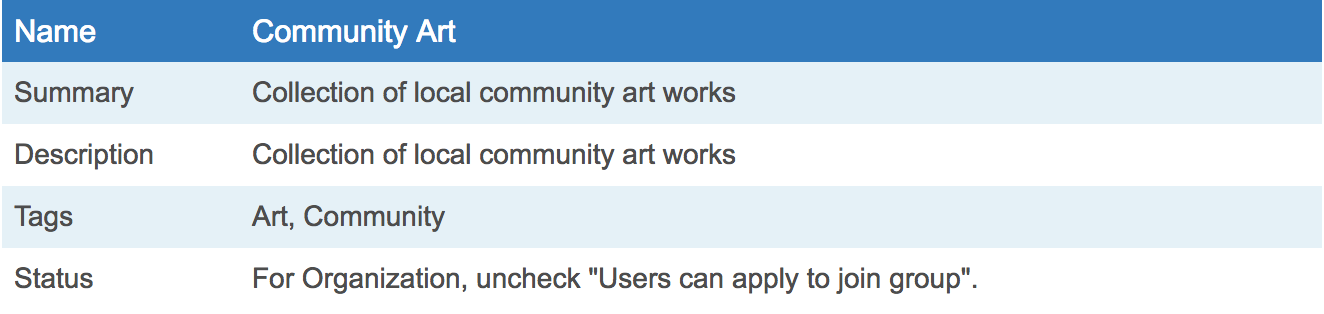
1. Now create a Group by clicking Groups and then Create a Group and use the values in Table 4.
4. Next, click Map to open a new map. Click the Add drop-down and then Search for Layers. Search for CommunityArt in your organization. Click Go. Click Add to add CommunityArt to the map.
5. Click the Details button and choose the Show Contents of Map icon.
6. Click the CommunityArt layer to see the three types of community art. Move your cursor over the CommunityArt layer name in the table of contents and click the arrow that appears to the right. Choose Change Symbols.

5. Click Sculpture. In the Change Label and Symbol pop-up, click Change Symbol. In the Change Symbol pop-up, choose Shapes from the drop-down. Choose a red symbol and increase the size of the symbol to 36 pixels. Click Done. Click OK.
6. Change the symbol for Surface to the same symbol style at 36 pixels but make it green.
7. Make the symbol for Water the same style and size as Sculpture and Surface but make the color blue. Click Done Changing Symbols.
8. Click Save, then Save As. For title, type Community Art; for Tags, type Art Community; and for Summary, type Collector Map for Community Art. Zoom the map in to your community and click Save Map.
9. Click Share and check My Organization, Members of these groups, and the Community Art group. Click Close.
Test Your Collector Map
Note: If you haven’t used the Collector app before, take a few minutes and go through the basics of using the app by viewing the video on the Collector for ArcGIS page.
- Go outside and open Collector for ArcGIS on your iPhone or Android device. Log in to your ArcGIS Online organization account.
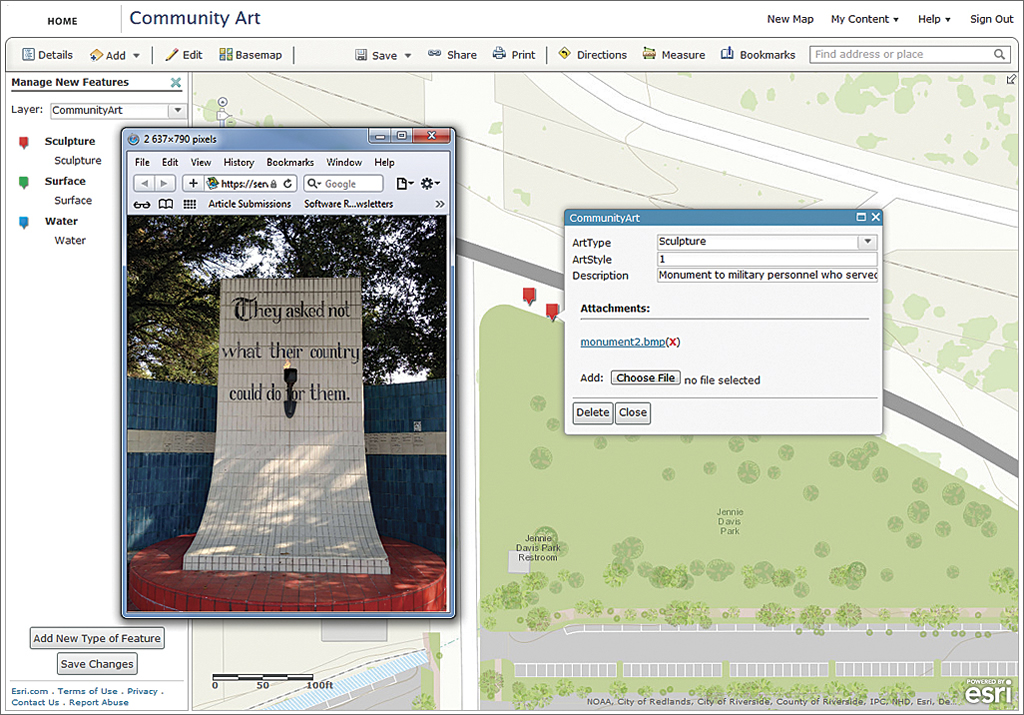
- Tap the Community Art map to open it. Stand near the item you want to collect information for and tap the My Location tool to show your location on the map. If you need to collect something that you can’t stand next to, you can zoom in and tap on the map to add a new item.
- Tap the Collect tool to collect information about the artwork.
- Tap in the Type of Art field and select Sculpture, Surface, or Water. Tap in ArtStyle field and select the appropriate style of art. Now tap the Camera tool, tap Add, then tap Take Photo or Video. Take a picture of the artwork, then tap Use. Tap Done and Done again.
- Move to another location and repeat the process.
- Once you’re finished collecting, close Collector and return to your desktop or laptop. Log in to your ArcGIS Online organization account. Open the Community Art map.
- The locations you created with Collector should now appear on your Community Art map on ArcGIS Online. You can explore the collected data, edit it, and share the map with other people in your organization.
Conclusion
This tutorial introduces how to create and share your own Collector map and use it with Collector for ArcGIS. Using domains and subtypes will help you create a proper data dictionary for the types of information you want to collect in the field, simplify the data collection process for your field team, and help reduce errors.
Using groups in ArcGIS Online will improve your ability to manage multiple field data collection projects and control access to Collector maps. With Collector for ArcGIS, you can also get directions from your location to features in your map or between features, change visibility for features on your map, create and use bookmarks for easy navigation to points of interest, and track where field staff go while they’re working in the field. For more information about Collector for ArcGIS, visit resources.arcgis.com/en/collector/.