What You Will Need
- ArcGIS for Desktop (basic, standards, or advanced license level)
- An ArcGIS Online for organizations account
- Familiarity with ArcMap
- The sample dataset
This exercise uses emergency response data that is summarized by street address to consolidate multiple reports with the same address. Using this technique, many more points can be mapped by geocoding many fewer records by summarizing records of responses to the same address. It uses ArcGIS for Desktop with ArcGIS Online.
Getting Started
Download the sample dataset [ZIP]. Unzip the archive on a local computer and note the folder directory structure. The \KFD\KFD_AGOL\ folder be used to store all data generated during the Desktop exercise.
- Start ArcMap in ArcGIS for Desktop and create a new blank map document.
- Click the Add Data button and navigate to \KFD\KFD\KFD_AGOL\. Load only these layer files: Kent Fire Department, KFD Fire RDs, and KFD Fire Stations. Do not load KFD Incidents file (which will be populated later).
- Inspect the layers and verify that they are linked to the data. If you need to repair a link to source data, right-click on that layer and choose Data > Repair Data Source and navigate to KFD\KFD\KFD_AGOL\GDBFiles\WASP83NF\Protection.gdb. You should see eight fire stations, and a fire district boundary.
Check Coordinate Systems
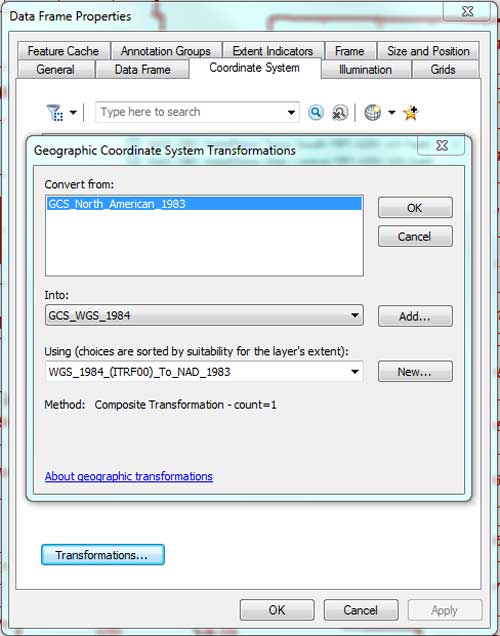
The layers added to the map are in Washington State Plane North American 1983 (NAD83) US Feet, so the map’s data frame will also be in that projected coordinate system. ArcGIS Online uses the World Geodetic System 1984, a geographic coordinate system. Since the data will use both NAD 1983 and WGS 1984 datums, one of those datums will require transformation.
- Open the data frame properties, select the Coordinate System tab. It should show that the coordinate system is NAD_1983_StatePlane_Washington_North_FIPS_ 4601_Feet.
- Click the Transformation button. In the Geographic Coordinate System Transformation dialog, Convert from: should be set to GCS_North_American_1983.
- Click the Add button. Choose World > WGS 1984. Click OK.
- Under Using (choices are sorted by suitability for the layer’s extent): click the dropdown and choose WGS_1984_(ITRF00)_To_NAD_1983 which should be at the top of the list.
- Click OK twice to save these changes. Save the map.
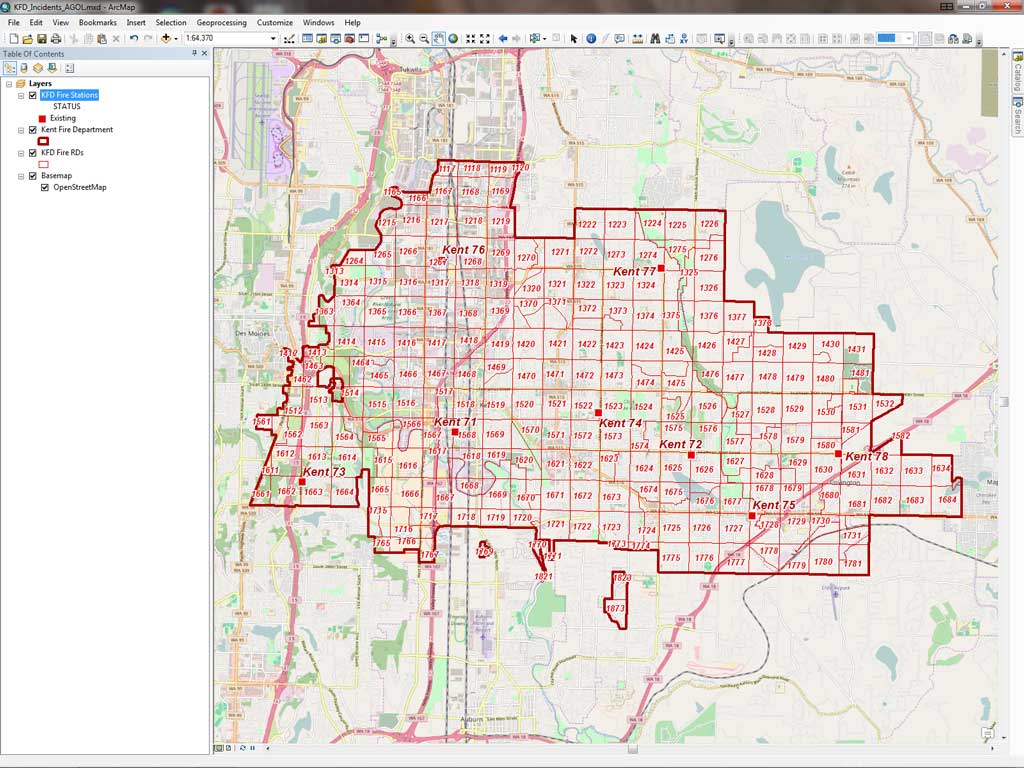
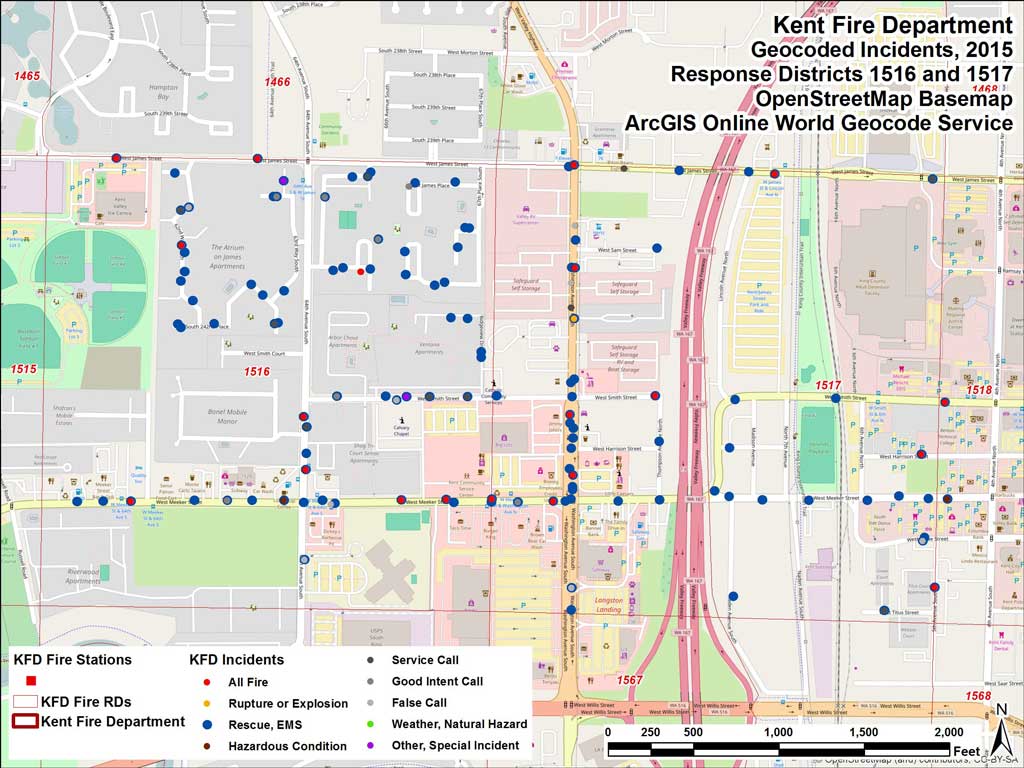
Look at the KFD Fire RDs layer which shows the Kent Fire Department Response Districts. Kent Fire Department uses these 0.5 mile squares to assign primary, support, and multiple alarm run orders to manage individual station response loads and tabulate station performance.
This exercise will geocode 1,028 responses in RD 1516 and RD 1517, located north and west of Station 71. Save the map document in the KFD_AGOL folder with the name KFD_Incidents_AGOL. Make sure you save your work to the file, folder, feature class, and table names specified to avoid problems.
Set Up the Map Document and Environment
Choose File > Map Document Properties and add a title, summary, description, author, and tags for the map document. Open Catalog and set the default geodatabase to Incidents.gdb and check the box next to relative pathnames. Click OK to apply your updates and save your project. Finally sign into your ArcGIS Online account so you can use its geocoding utility. This will require less than 10 credits.
Preparing Incident Data for Geocoding
Click the Add Data dropdown and select Add Basemap and add the Open StreetMap basemap because you will be performing street-level address geocoding. If necessary, zoom to extent of the Kent Fire Department layer that shows the department’s service area. Look at relationships between KFD Fire Stations, the KFD RDs, and underlying streets. Save the map.

Load Incident Data from Excel
Load the Microsoft Excel spreadsheet containing selected incidents by clicking Add Data and navigate to KFD_AGOL\XLSFiles\, open KFD_Incidents.xls, and select KFD_Incidents$. After adding KFD_Insidents$ to the map document, open the worksheet and sort the Address2 field in ascending order. Notice that this field contains many multiple records with the same addresses. Only one record will be needed to geocode each location. To protect the data format before summarizing the Address2 field, let’s export this worksheet as a geodatabase table.
Export Data from Excel to a Geodatabase Table
- Make sure the KFD_Incidents$ table is visible.
- Right-click the KFD_Incidents$ table in the TOC and choose Data > Export.
- Save the exported file as KFD_Incidents_XY in Incidents.gdb.
- Click Yes when asked if you want to load this new table in the map.
- Open the table and verify that it contains all 1,028 exported records.
Notice that each duplicate Address2 record contains the same values for City, County, State, and Zip_5. If they did not, additional steps might be required to edit or perform additional rematching steps. Remove KFD_Incidents$ from the TOC and save the map.
Summarize the Address2 Field
- To summarize all incident addresses, right-click Address2 and select Summarize.
- Expand City, County, State, and Zip_5 and check First. Remember, each of these fields contain identical text for each unique address string.
- Save the summary output as KFD_Incidents_Address2_Sum_1_XY in Incidents.gdb.
- When the summarized table is complete, add it to the map document.
This naming conventions references the source table (KFD_Incidents_Address2_Sum1_XY), the summarized field (Address2), the sequential summary (Sum1), and it identifies the dataset as a table only (XY). It is long, yet it is very descriptive.
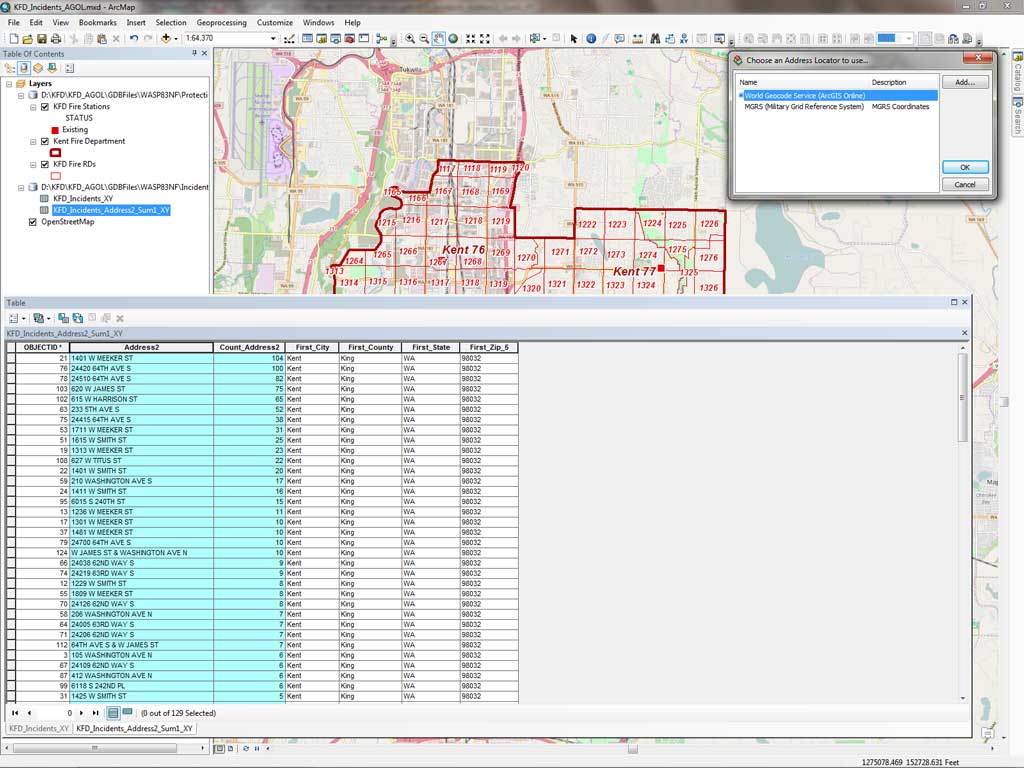
Open KFD_Incidents_Address2_Sum_1_XY, and sort Count_Address2 in descending order. Notice that the summary table contains only 129 unique addresses, while the source table, KFD_Incidents_XY, contains 1,028 responses. Geocoding summary addresses, calculating the coordinates for those addresses, joining coordinates back into the response table, and posting that table as an XY event theme will save considerable credits. Saving the geocoded coordinates in a reference table will allow the coordinates for those addresses to be used for geocoding responses in other years and requiring only new addresses to be geocoded.
Geocode Addresses
In the TOC, right-click KFD_Incidents_Address2_Sum1_XY and choose Geocode Addresses. Select the World Geocode Service (ArcGIS Online). Sign into ArcGIS Online. In the Geocode Address wizard, make the following choices, scrolling down the dialog as necessary:
- Set Address to Address2.
- Skip Neighborhood
- Set City to First_City,
- Set Subregion to First_County,
- Set Region to First_State
- Set Postal to First_Zip_5
- Skip PostalExt
Save the geocoded points in Incidents.gdb and name the file KFD_Incidents_Address2_Sum1_X. Click OK when done These settings provide a very precise geocoding schema and the match rate should be 100 percent. If you want to try rematching, set only the Address parameter and leave the others alone. Click OK to continue and watch the geocoding process. The summary geocoded points will be in the WGS 1984 geographic coordinate system. You could consider reprojecting these points to save them in a local coordinate system.
Review Geocoded Addresses
If you need to rematch to fix ties or unmatched records, click the Rematch button and explore the Interactive Rematch wizard. In the address area, verify and, if necessary, correct information for each problem record. Click inside the Candidates area, select the best candidate, and click Match. When finished, close Interactive Rematch and save the map.
Preview geocoding results on the map. Zoom to the extent of geocoded locations, if desired. All 129 points should map just north west of Station 71 in or near FD 1516 and FD 1517. Open and inspect the Geocoding Results table. Locate longitude and latitude fields X and Y. These fields contain WGS 1984 geographic coordinates that will be joined to KFD_Incidents_XY.
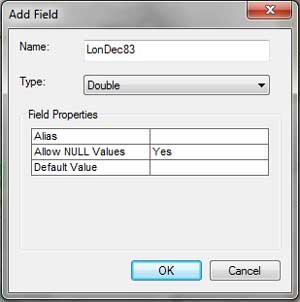
Create Longitude, Latitude Fields in Incidents Table
Verify that the KFD_Incidents_XY and KFD_Incidents_Address2_Sum1_X tables are visible. Open the KFD_Incidents_XY table and add two new fields, LonDec84 and LatDec84, to KFD_Incidents_XY to store coordinates. Set both field types to Double. Verify the Names and formats of both fields.
Join Geocoded Attributes to Incident Table
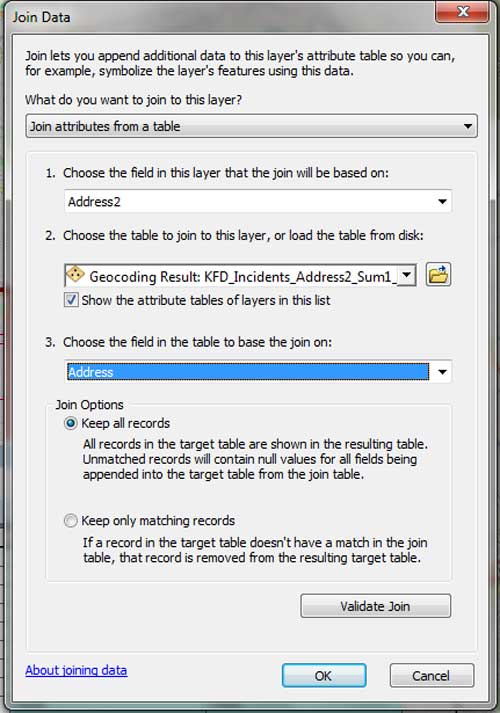
- In the TOC, right-click KFD_Incidents_XY and choose Joins and Relates > Join. In the Join Data wizard, Assigning Address2 to Item 1 (the join field)
- KFD_Incidents_Address2_Sum1_X to Item 2 (the join to table)
- Assign Address (not Address2) to item 3 the join on field and make sure Keep all records is selected.
- Click OK to create the join and inspect the resulting KFD_Incidents_XY table.
- Save the map.
Calculating Coordinates Using Joined Data
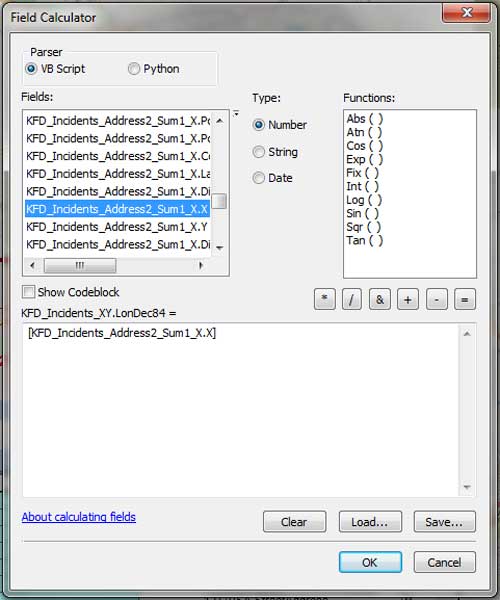
With the KFD_Incidents_XY table open, locate and right-click LonDec84. Choose Field Calculator. In the Field Calculator, scroll down through fields and locate KFD_Incidents_Address2_Sum1_X.X. Load it into the calculation window and click OK. Next, calculate LatDec83, using KFD_Incidents_Address2_Sum1_X.Y. Verify that LonDec84 and LatDec84 contain valid coordinates, remove the join, and save your project. This step shows the importance of applying naming conventions carefully.
Display XY Incident Data
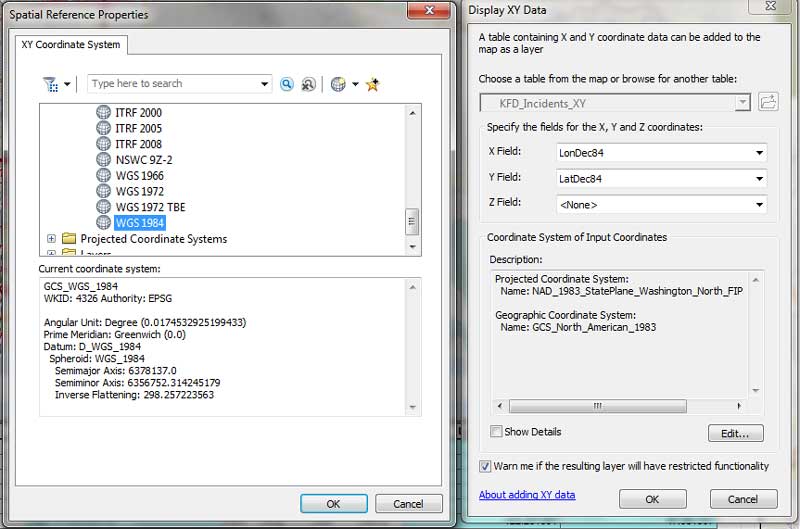
Inspect the unjoined KFD_Incidents_XY table, right-click its name in the TOC, and open Display XY Data. In the Display XY Data wizard, make sure the X Field is set to LonDec84 and the Y Field is set to LatDec84. Z Field set to . Click the Edit button to edit the Coordinate System. Choose Geographic Coordinate System > World > WGS 1984. Before clicking OK, check these entries carefully. This step is crucial.
Export XY Incident Data to a Feature Class
- With no features selected, open the KFD_Incidents_XY Events table and inspect the 1,028 records, noting field IncTypeNo.
- Right-click the KFD_Incidents_XY Events table and choose Data > Export Data.
- Save the exported points as KFD_Incidents_X in Incidents.gdb.
- Choose Use the coordinate system as the data frame.
- Click OK.
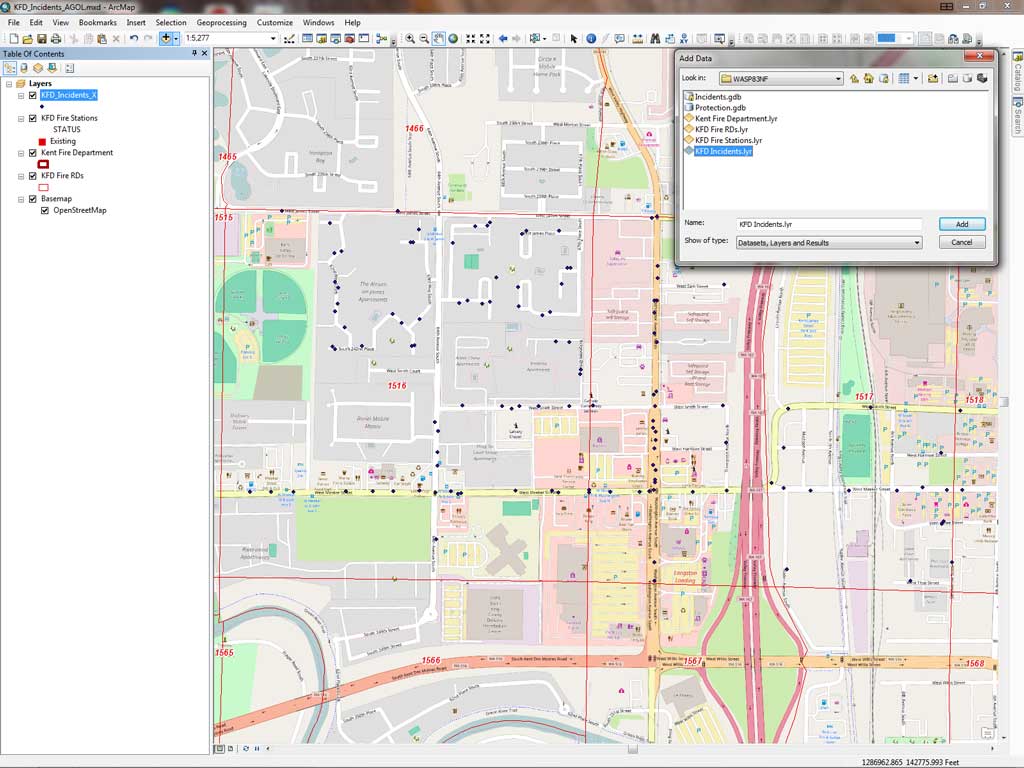
- Add the exported incident points into the map. Zoom to this layer and inspect the locations mapped. All points should fall in or near FD 1516 or FD 1517.
Mapping Incidents by NFIRS Type
The last step will be to assign a meaningful thematic legend. The National Fire Incident Reporting System (NFIRS) uses a three-digit system to identify emergency incidents by incident type. The IncTypeNo field in KFD_Incidents_X references an empty layer file that assigns incidents to nine type groups.
Click Add Data, navigate to KFD_ARCGIS ONLINE_GDBFiles\WASP83NF and locate KFD Incidents.lyr, and add it to the map. If you have followed all naming conventions specified previously, the KFD_Incidents_X should map correctly. If you encounter a broken link, right-click the layer file, choose Properties > Data > Repair Data Sources and connect the layer file to KFD_Incidents_X.
Inspect Map and Attribute Data
If you are curious, look at the symbology properties for KFD_Incidents to see how NFIRS type numbers are used, right-click on the layer file, click on the Symbology tab, and click the Advanced button > Symbol levels. This will show how the larger size Rescue, EMS incidents symbols map below symbols for less frequent types of incidents. After inspecting the mapped incidents and save the map. Click Cancel. Save the map one final time.
Conclusion
By summarizing 1,028 incidents, this exercise showed that geocoding only unique 129 records was required to map all incidents and this process consumed only four ArcGIS Online credits. This exercise uses a subset of Kent Fire Department incident data. The full Kent Fire incident dataset included nearly 16,000 incidents that represented more than 6,200 unique addresses. The overall geocoding efficiency ratio using the method described here is approximately 2.5, which is still considerable improved in efficiency and produces a reference set that can be used to summarize and geocode only new incident addresses.