ArcGIS for AutoCAD is a free plug-in application from Esri that works within Autodesk’s AutoCAD application. The 400 Release of ArcGIS for AutoCAD is available for download. To read more about what is new you can check out my previous blog article. This article provides you with a simple step by step tutorial to get you started with using the basics of the new ArcGIS for AutoCAD version 400. Each section includes a companion video that provides an example of the steps included in each section. You are encouraged to work through the steps below on your own computer, but the videos are also there for you to view anytime.”
1. Add a Coordinate System and Map Layer
- With ArcGIS for AutoCAD installed, open a new AutoCAD drawing.
- Select the ArcGIS tab from the ribbon.
- Select the [Coordinate System] button from the Project section of the ArcGIS ribbon (far left).
- In the dialog, set coordinate system Units filter to “FOOT_US” (units should match the units of your drawing)
- In the dialog, set Coordinate System Category to State Plane.
- Type in “California” in the search box.
- Select: NAD 1983 (2011) StatePlane California V FIPS 0405 (US Feet) WKID:6424
- Select “Zoom” from the ArcGIS Ribbon under the “Navigate” section to zoom to the extent of the Project Area
- Notice: A blue box is displayed. This is the default project area that covers the entire extent of the coordinate system.
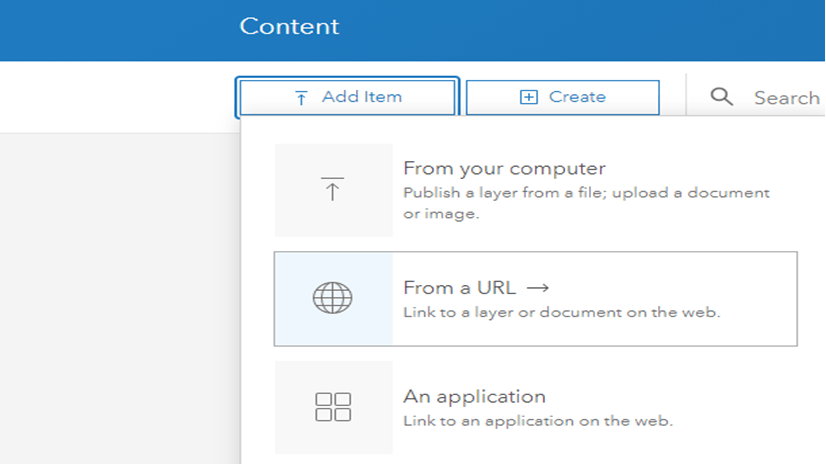
- Select the [Add Data] button from the Contents section of the ArcGIS ribbon tab.
- If not already selected, set the Portal to ArcGIS Online with the pull down menu in the upper right hand corner of the browser pane.
- In Living Atlas category of thumbnails, browse to Esri World Imagery (or enter search “ESRI World Imagery”).
- Add the map layer to your drawing by selecting the upper portion of the thumbnail image.
2. Add attributed ArcGIS web feature layer
- Use your AutoCAD tools, zoom in to a tighter view of the Los Angeles Basin.
- From the ArcGIS Ribbon, use the [Project Area] menu button and choose the [Set From View] option . The Project Area defines a geographic extent to limit the number of features drawn from web feature layers.
- Open the Esri Contents Pane by choosing the [Contents] button from the ArcGIS ribbon. The Esri Contents Pane is used to manage the ArcGIS layers in your drawing.
- Select the [Add Data] button to add a web feature layer to the drawing.
- In the Add Data window, select the View All option at the bottom of the Living Atlas column.
- Select the filter button and filter the content for just Feature Layers.
- Enter “Freeways” in the Search box
- Add the USA Freeway System by selecting the upper part of the item’s thumbnail map.
All Freeway Features will be added into the drawing that are inside or crossing the blue project area rectangle that we set in a previous step.
- Select the [Identify Features] button, in the “Edit” section of the ArcGIS ribbon, to view the GIS attributes for your entities.
- Select one or more of the freeway feature-entities added to the drawing.
- If your selected entities belong to more than one sub-layer, you can filter your choices using the layer list on the left side of the dialog.
- These features are simple AutoCAD entities. Each feature layer and sub-layer is associated with a unique AutoCAD layer. The symbology is controlled using AutoCAD entity and layer properties.
3. Add ArcGIS Online Subscription content (requires named user)
In this exercise you can take advantage of your ArcGIS named user subscription to access subscription or premium content available from Esri’s rich collection of curated data in the Living Atlas and/or your own organizations content.
- Select the [ Add Data] button
- Search for the “Live Traffic” layer from the Living Atlas section
- When you attempt to add it to your drawing you’ll be prompted for your named user credentials
- If you don’t have an ArcGIS online named user subscription sign up for Esri ArcGIS Online Free Trial
- Using your new, or existing Esri named user, sign into ArcGIS Online by selecting the [Sign in] button located at the upper right-hand corner of the Add Data browser window
- Select the [Contents] button from the content section of the ArcGIS Ribbon.
- From the Contents Pane right-click on the Live Traffic Layer and Select the Identify Layer Option from the context menu and then select one or more of the Live Traffic Incident Symbols in the Live Traffic Map to view the incident reports.
- You are strongly encouraged to browse the Living atlas and the greater ArcGIS Online community for more, Free, subscription and premium content in the form of Feature, Maps and Imagery. (Soils, Wetlands, Survey Control and many more Global, National, Regional and local data sets…)
4. Edit an ArcGIS web feature layer and use the locate tool
This exercise will step through the process of editing GIS features accessed through an ArcGIS web feature layer.
- Open a new AutoCAD drawing
- Select the List Coordinate System option from the pull-down menu of the [Coordinate System] button on the ArcGIS Ribbon. Notice: there is currently no coordinate system defined in this drawing
- Select the [Add Data By URL] option from the pull-down menu of the [Add Data] button on the ArcGIS Ribbon
- Supply this URL to the command prompt:
https://services.arcgis.com/FQD0rKU8X5sAQfh8/arcgis/rest/services/AFABeta400Buildings/FeatureServer/0 - Alternately you can search for “AFABeta400Buildings” feature layer in the Add Data Browser dialog in the All Items section of the browsing dialog, and add the layer. You may have to scroll to the right to see the All Items section.
Note: Once added to your drawing you may notice a message is displayed that describes any limitations of the feature layer you are adding to your drawing. Many ArcGIS feature layers support true curves, splines and 3D features, but some like this hosted feature layer will tesselate curves and omit z values upon storage in the ArcGIS Layer as configured by the GIS administrator. Layers that support curves and 3D entities will generate and store true 3D curves and likewise create 3D curved entities.
- Select the [List Coordinate System] button
Note: The drawing’s coordinate system has been set to the coordinate system of the Layer that we added.
- To provide more context, add the World Imagery map layer to the drawing using the [Add Data] button.
- Use the AutoCAD Layer command or any other AutoCAD method to change the current AutoCAD drafting layer to:
ESRI_AFA400Beta_OfficeNote: (any closed linear object drawn on this layer will be considered a new building feature with an Office sub-type). - To draw your own building feature, first Select the LOCATE tool from the ArcGIS Ribbon to zoom to the location of your choice.
- Enter an address or favorite place and select one of the candidates returned in the Location pane to zoom to that location.
- Reset the Project Area to include your address or place by selection the [Set Project Button] from the ribbon.
- Use AutoCAD to draw a closed polygon on the
Esri_AFA400Beta_OfficeAutoCAD layer. You can use AutoCAD tools to draw a circle, rectangle, or thePLINEcommand, be sure to use the close option if drawing a polyline. - Select the Identify Features button and pick the feature to edit the attributes of that feature. Change the type value to School. This changes the subtype of the feature and also the AutoCAD layer since subtypes are designated by separate layers in order to maintain separate symbology.
- Changing the layer property of the feature, in turn updates the subtype.
- After creating your polygon feature, you can synchronize the single web feature layer from the contents pane or, Select the [Synchronize All] button from the edit section of the ArcGIS Ribbon
- If you’d like to see what other beta participants may be doing, Zoom out to the extent of the world.
- To zoom out, Right-click on the World Imagery Layer and select the Zoom to Layer option.
- Reset the Project Area to be the entire by selecting the Project Area button on the Ribbon
- Select the [Discard All Edits] button on the Edit section of the Ribbon. This will both ignore any edits, but also redraw all the features from the web feature layers in the drawing within the new Project Area.
Note: You will only see features in your drawing that are inside your selected project area. - In the Esri Contents Pane right-click and select the Table View tool from the task buttons under the
AFA400BetaLayer - View the current records in this feature layer that you’ve added into your drawing based on your current project area.
- If you want to explore this same beta data set in another way, open this same data set in Esri’s map viewer on ArcGIS Online.
- Right click on the AFA400Beta layer in the Esri Contents pane, and select the properties option.
- In the upper right hand corner of the Properties dialog select the View Service properties text link.
- On the resulting web page that is displayed you can select the [Open In Map Viewer] button on the upper right hand portion of the page which should be the default action.
- From this map you can also view and edit this same feature layer.
- To see changes made in the map viewer back in ArcGIS for AutoCAD re-select the [Synchronize] or [Discard All Edits] buttons on the ArcGIS Ribbon back in AutoCAD. You can also refresh individual layers using these same options on the Esri Contents pane.
5. Browse for content in your ArcGIS Enterprise Portal (requires Enterprise login)
This exercise is essentially an invitation for you to add a connection to your existing Enterprise Portal if you have one and explore…
- Open a new AutoCAD Drawing
- Select the [Add Data] button from the ArcGIS Ribbon
- In the upper right-hand corner of the add data browser pull down the ArcGIS Online/ArcGIS Enterprise selection box next to the Sign-in / Sign-out button and select the Add Portal Option.
- Enter the URL to your Enterprise Portal (https://(myportal).com/portal)
- Browse for content when signed in vs signed out
- When signed in you will see My Content, Favorites, Groups based on your named user identity, similar to what you would see with and ArcGIS Online subscription.
- You can move back and forth between any saved portal organizations using the pull-down menu in the upper-right-hand corner of the Add Data browser.
6. Create ArcGIS data inside an AutoCAD drawing
One of the primary uses of ArcGIS for AutoCAD is to create ArcGIS attributed feature classes using just standard AutoCAD and the free ArcGIS for AutoCAD plug-in. Using ArcGIS for AutoCAD can eliminate the need to use shapefiles or other intermediate files when sharing GIS data between AutoCAD and ArcGIS Desktop. ArcGIS Desktop also EXPORTS ArcGIS data into AutoCAD files using this same attributed feature class data encoding format by default.
This exercise will start with a simple AutoCAD file shared on ArcGIS Online.
- In a web browser navigate to this CAD Drawing File Item on ArcGIS Online: https://pm.maps.arcgis.com/home/item.html?id=637f28e4d1134d48b53410f6d13ac83e
- Use the Download Option and unzip the file on your file system
Note: Some operating systems may require that you unblock the resulting file from the zipped directory before you can access the file. Right-click to access the properties of the file and un-checking the block option. - Use AutoCAD to open the included AutoCAD drawing file:
AFA400Beta.dwg - From the ArcGIS Ribbon, Select the [Block to Feature Layer] option under the [New Feature Layer] button . This will create ArcGIS feature layers from each unique AutoCAD block name in the drawing.
- Select the [Table View] task button on the resulting
Animal_Sightingfeature layer of the Esri Contents pane to view the ArcGIS feature layer attribute table generated from the blocks and block attributes. - Right-Click the Layer in the Contents pane and pick the All sub-option of the Select tool to select all the AutoCAD entities that qualify as
Animal_Sightingfeatures. - The Query Filter in the feature layer’s properties defines criteria for membership of a feature layer. You can create and modify these definitions to include or exclude entities in your feature layer.
- Modify the Query Filter of the layer by deleting the current membership criteria that was based on block name, and then add instead a more general criterion where the AutoCAD Layer name
Animals.
Note: In this case the attribute schema was automatically created from existing AutoCAD block attribute definitions on the blocks. - Add a new field to the schema of this feature layer by pushing the [+ Add new field] button at the bottom of the fields section of the Feature Layer Properties Dialog. Add a new field of type double, called “Size”.
- Modify the Query Filter of the layer by deleting the current membership criteria that was based on block name, and then add instead a more general criterion where the AutoCAD Layer name
- Verify you have modified the filter query for the Animal_Sightings in your drawing. On the Contents pane right click again and pick the All sub-option of the Select tool and you will see that both the blocks on that layer and the points on that layer now qualify as Animal_Sightings and both the block insert entities and the point entities can retain ArcGIS feature attributes.
- Select the [New Feature Layer] button from the ArcGIS Ribbon to create a new linear feature layer called Walk. Define the Query Filter to include both AutoCAD layers Evening Walk or Morning Walk using the [+ Add New Condition] button to add two layer conditions one for each AutoCAD layer.
- Select the [+ Add New Field] button. You will need to click into the field name control of the new field you added to replace the default FieldName with the new NAME. Likewise change the default field type from INTEGER to TEXT.
- Enter the ArcGIS for AutoCAD command called:
ESRI_PICKLABELto associate the existing pieces of text near the walking paths for each feature. You want to associate the NAME field of the Walk feature layer, with one of the texts entities near each line. Select all of the line features and then it will zoom to each feature and prompt you to graphically select the text entity that will be used to populate the targeted field. The command will use the value of the text to populate the feature’s field value forNAME, and likewise will update the text value if the field value is modified.
- Use the ArcGIS for AutoCAD command:
Esri_RelateTextto link any number of Text entities together. When any of the text entities are modified for any reason the other related text entities will also update. This includes text linked to feature attribute fields. Invoke the command and select the two text labels next to the morning walk path. From now on those two values will update if one of them updates. There is now a chain of updates that happens for the two text entities and the field value so that they will all have the same value. - Use AutoCAD to modify the text values and the [Identify Features] button on the ArcGIS Ribbon to modify the values of the walk’s Name field and notice the values of the text entities near the lines.
(Optional): If you have access to ArcGIS Desktop, save the drawing to a new name and Open the drawing in ArcGIS Desktop to see the ArcGIS feature classes you have created in this drawing.


Article Discussion: