 You’ve likely seen a picture or news report showing a truck stuck under a bridge or overpass, because it was too tall to go through. Luckily, accidents like these can be prevented if custom travel modes are used in Navigator for ArcGIS.
Navigator is a mobile app that provides field workers with directions to where they need to be. Workers can search and navigate directly to your organization’s assets, either using Esri-provided maps or your own custom navigation maps that you can create in ArcGIS Pro.
The app already comes with a few common travel modes that your workers can use to calculate a precise route based on how they travel to a destination. For example, in Navigator they can specify which type of vehicle they use, such as truck or car, and whether they want the shortest or fastest route.
But with the 1.4 release of ArcGIS Pro, you can now create your own custom travel modes that will give workers even more precise routes. For instance, you could create a travel mode with a specific height restriction that would enable your truck driver to follow a route that avoids roads with low bridges. This would prevent accidents and increase driver safety. This is just one use case for custom travel modes though. You could also create travel modes for:
- Emergency vehicles
- Hazmat routing
- Driving bonded or leased roads
- Avoiding gravel roads
- Oversized vehicle routing
So how can you make a custom travel mode? We’ll explain how to make a travel mode that prevents trucks from getting stuck under bridges when you are using Esri’s StreetMap Premium for ArcGIS data. StreetMap Premium is high-quality street data that you can use for display, routing, and geocoding.
In ArcGIS Pro 1.4 or later, open the network dataset layer properties, and click the Travel Modes section on the bottom.
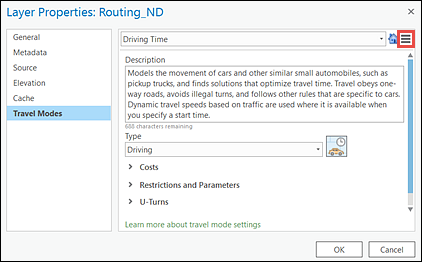
To create a new travel mode, click the burger menu in the top right, and then New. You’ll see some fields for your new travel mode in the dialog.

Give the travel mode a name and description that will inform your workers what type of travel it’s meant for. For example, you could name this travel mode “Trucking Height Restriction” and give it the description “Use this travel mode to avoid roads with low bridges while driving a tall truck.”
Then, set the rules for the travel mode by specifying Type and Restrictions and Parameters. For Type, set the transportation method that this mode is intended for: trucking. To set Restrictions and Parameters, first expand this section. A list of travel mode attributes that you can adjust appears. Which attributes you see depends on the attributes of your network dataset. The StreetMap Premium network dataset includes the Height Restriction attribute. Check the box next to this attribute and select it. Two fields appear under the attribute: Restriction Usage and Vehicle Height.
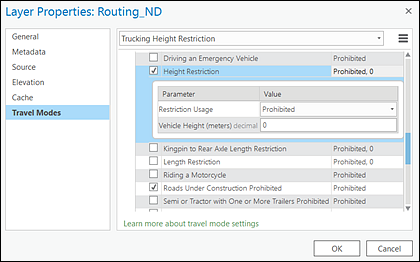
Restriction Usage indicates whether the value of an attribute should be prohibited, avoided, or preferred. Since you never want a truck to go on a road with an overpass that is lower than the truck, set Restriction Usage to “Prohibited.”
For Vehicle Height, say your workers’ trucks are about 14.5 feet. Enter 4.4 for this parameter, since all Restrictions and Parameters are in terms of meters for StreetMap Premium. When you are finished, click OK, and there you have it: a custom travel mode that allows your drivers to avoid roads with low clearances.
When you package your navigation map using the Create Mobile Map Package geoprocessing tool, your custom travel mode will be included in the map. So when your workers are using Navigator in the field, they just have to select your new travel mode from the Travel options dialog in the app. Check out Navigator’s Guided Tour for information about how to access this option on Android or iOS devices.
Using custom travel modes in Navigator will let your workers get the most precise routes possible, which will increase worker safety and reliability, promote efficiency, and save your organization time and money. And with the 1.4 release of ArcGIS Pro, you can now make these travel modes that your workers can use in Navigator.
For a video of how to create custom travel modes, and custom navigation maps in general, check out the training seminar Navigator for ArcGIS: Creating Custom Navigation Maps (discussion about travel modes starts at 17:57). You can also see step-by-step instructions for how to create custom navigation maps in Navigator’s Prepare maps help.
Have questions about custom travel modes and how your organization could benefit from them? As always, post them on the GeoNet Navigator group and join the conversation!
Article Discussion: