Previously, we wrote about migrating to new machines by creating highly available or multi-machine deployments.
While this approach gets the job done, it will require changes to your production environment and will introduce a small amount of downtime.
A safer, yet slightly more involved workflow to migrate to new machines is to use the WebGIS DR Utility, which is included with the install of Portal. The utility serves two main purposes:
- create backups of your deployment and restore them in the event of a failure
- maintain a replicated standby environment for disaster recovery
Learn more about the WebGIS DR utility
In order to use the DR tool to migrate machines, there are certain prerequisites depending on the version you’re using. You can check them in the table titled Must this item or setting be identical across deployments when running the webgisdr utility? located in the documentation.
The main settings that must be identical between the original environment and the new environment are the public URL that users use to reach the ArcGIS Enterprise portal, and the services URLs used to federate ArcGIS Server sites with the portal.
This blog will cover migrating your existing deployment to new machines utilizing the WebGIS DR tool.
While the process described here will migrate a single machine deployment to a new single machine deployment, the tool supports moving between any combination of single machine and highly available deployments:
- Single machine deployment to single machine deployment
- Single machine deployment to highly available deployment
- Highly available deployment to highly available deployment
- Highly available deployment to single machine deployment
Pros and cons of this approach
The benefit to using the DR tool to migrate machines is that administrators can isolate the new machines to migrate to without making any changes to production. They can validate whether the migration succeeded before switching over to the new environment.
This approach is slightly more complicated than migrating using the Join Site workflow, as the steps are dependent on your deployment type. You will modify the etc\hosts file on the new machine and on any of your development test machines to manage hostname resolution. At the end of the workflow, you’ll change your organization’s DNS entries as well.
Hostname resolution
In order to set up the second environment, the components in the new environment must be configured with the same public URLs as the primary environment. There are a few different ways you can do this:
Option 1: Use an etc\hosts entry to resolve the fully qualified domain name of the public URLs to a different endpoint
You can take advantage of the etc\hosts file on the new machines to resolve the FQDN of the desired public URL to a different component, such as another web adaptor or reverse proxy. The etc\hosts file is described in more details below, and is the basis for the workflow described in this blog.
Option 2: Redirect traffic until the software is configured
If you are able to redirect traffic away from your production environment for a short amount of time, configure the component that is directing traffic to your production environment to send traffic to your non-production environment. This may mean you need to re-register the web adaptor with the new machines or update your reverse proxy or load balancer to send traffic to the new machines within the non-production environment. This only needs to be done when you are ready to federate Portal and Server and set the server as the hosting server. After you federate and set the hosting server, you can send traffic back to the production environment. An outline of these steps would be:
- Provision your new machines within the non-production environment
- Install the software on the machines
- Create the Portal site, ArcGIS Server site, and register the ArcGIS Data Store with the Server site
- Redirect traffic to the non-production environment
- If you’re using the ArcGIS Web Adaptor, register the web adaptor with the new machines. If you’re using a reverse proxy or load balancer, update the configuration to send traffic to the new machines.
- If you’re at 10.8, you can better advertise the state of the deployment by taking advantage of banners and access notices.
- Federate Portal and Server in the non-production environment via using the same public URL for the Services URL as the production environment
- The administration URL used during federation must be a URL that only resolves to the non-production machines. The administration URL can also be updated following the migration with no interruption in service
- Set the federated server as the hosting server in the target Portal
- Redirect traffic back to the production environment
- If you’re using the web adaptor, register the web adaptor with the original machines. If you’re using a reverse proxy or load balancer, update the configuration to send traffic to the original machines

This approach may be the easiest, but it can present issues for organizations who cannot easily make changes to their production environment.
Option 3: Configure your DNS so that the standby machines resolve the public URL to a different IP address than the primary machines
The last approach that can help configure the standby environment is using DNS to resolve the FQDN of the public URLs differently depending on if you’re on the primary machines or the standby machines. This is commonly referred as a split DNS or split-horizon DNS. Another web adaptor, reverse proxy, or load balancer is required for this method, as the public URL has to be accessible to federate Portal and Server. This approach is functionally equivalent to modifying the etc\hosts file, but managed via DNS rather than an etc\hosts file.

Etc\hosts file
A quick word on the use of the etc\hosts file, located under C:\Windows\System32\drivers\etc on Windows and the \etc folder on Linux: it’s used to resolve hostnames by entering IP addresses and associating the IP addresses to hostnames.
For example, if my machine name has an IP address of 10.0.0.1 and is resolved to enterprise.domain.com via DNS, I can add an entry to the etc\hosts file on the machine to resolve the machine’s IP address to a different hostname:
10.0.0.1 alias.domain.com
If I ping alias.domain.com in a command prompt the etc\hosts file is resolving alias.domain.com to 10.0.0.1, which is enterprise.domain.com. If I had a web server running on the machine, I can reach the web server via alias.domain.com or enterprise.domain.com.
Understanding Data Store backups
The ArcGIS Enterprise portal, ArcGIS Server, and ArcGIS Data Store all have ways to create backups of those individual components. Your portal and server sites can be backed up using the exportSite operation within their respective Administrator Directories.
By default, ArcGIS Data Store automatically creates a full backup every four days and retains seven days’ worth of backups. However, if you’re configuring the WebGIS DR tool to create backups of your deployment, individual backups are not necessary, since all of the data required to restore your deployment is in the WebGIS DR backup.
If the ArcGIS Data Store backups are taking up considerable amount of room on your machine, you can consider reducing the amount of backups that are retained using the updatebackupretaindays utility within the ArcGIS Data Store tools directory.
Managing user data
A challenge with this approach is how to protect user data and content during the migration.
Even though the WebGIS DR tool is moving all of your content to your new environment for you, there’s nothing in place to prohibit users from creating, modifying, or deleting existing data during the migration. This means that once you switch over to the new environment, anything that has been updated may be lost.
Prior to version 10.8, there is no way to control when users can modify data within the enterprise so clear messaging needs to ensure that users are aware that anything they create or change may need to be re-done once the migration is complete.
In order to mitigate that problem, we’ve introduced read-only mode for ArcGIS Enterprise at 10.8. Turning on read-only mode is a way to ensure that the state of content within a deployment is frozen at a point in time.
Read-only mode prohibits anyone (including administrators!) from creating, modifying, or deleting content within the deployment, or making any administrative changes. You can read more about read-only mode here.
This blog has been updated to reflect when you should enable read-only mode, which can only be done at 10.8.
The WebGIS DR approach
When you want to migrate machines, you’ll be in one of two scenarios: You will either have a single-machine environment where all software components and Web Adaptors are on one machine (as installed by ArcGIS Enterprise Builder), or a distributed deployment, where your ArcGIS Web Adaptors or reverse proxy are on a separate machine from the rest of the components.
We’ll first go over how this method can be used on a single-machine deployment.
Steps to migrate single-machine deployments
If you are migrating a single-machine base deployment, the easiest approach is to use the same name between the new and old environment using the \etc\hosts file. There are two common patterns with single machine deployments:
- The fully qualified domain name of the machine matches the host in the URL used to access the deployment
- The fully qualified domain name of the machine does not match the host in the URL used to access deployment is accessed. Users access the deployment via an alias or CNAME record.
The way you add entries into the etc\hosts file is different, depending on your environment.
Machine hostname matches URL used to access the deployment
For example, let’s say you have a deployment on a machine called enterprise.domain.com running on the Windows Server 2008 R2 operating system. The hostname of the machine matches the hostname in the URL that users use to reach the deployment:

The deployment’s URLs are as follows:
- Users reach the Portal at https://enterprise.domain.com/portal
- Users reach the Server services at https://enterprise.domain.com/server/rest
- Server admins and publishers reach ArcGIS Server Manager at https://enterprise.domain.com:6443/arcgis/manager
- Portal admins reach the ArcGIS Portal Administrator Directory at https://enterprise.domain.com:7443/arcgis/portaladmin
You can migrate this deployment using the following steps.
1. Within your existing environment, turn on read-only mode. Note: you must be at version 10.8.
2. Acquire your new machine. This could be a virtual machine or physical machine. In this example, the machine’s hostname is enterprise1.domain.com, its IP address is 10.0.0.2, and it’s running Windows Server 2016.
3. Before you install any software on the new machine, update its etc\hosts file to resolve the IP address of the new machine to enterprise.domain.com:
10.0.0.2 enterprise.domain.com
4. Repeat this on any other machine you might use to test and validate the new system (other than the existing production machine, of course).
5. Install your ArcGIS Enterprise software on it. If you’re using the ArcGIS Enterprise Builder, run the Setup and then the Configuration Wizard.
6. Once the environment is configured, you can only reach the new environment via the enterprise.domain.com hostname from the machine itself or from any other machine that you’ve added the entry to. Any machines without the entry will resolve enterprise.domain.com to your “old” production environment via DNS:

7. Create a backup with the WebGIS DR tool. The thing to consider here is timing: Once you take a backup with the DR tool, only the content present in the deployment will be moved over. If content is created after this point, it may not be moved over unless you take and restore a new backup. It’s best to take a backup during a period of downtime.
8. Restore the backup on the new machine with the DR tool. This will create a replica of the existing deployment on the new machine.
9. Validate that users, content, groups, and services are accessible on the new machine, using any machine on which you’ve added that etc/hosts entry. Again, only machines with the 10.0.0.2 enterprise.domain.com entry in the hosts file will resolve enterprise.domain.com to the new machine. Otherwise, those requests will go to the “old” machine.
10. Once the environment has been validated and you’re ready to switch over, update DNS to resolve enterprise.domain.com to the new machine. All requests to enterprise.domain.com will now resolve to the new machine, including all the content from the old environment.
11. Remove the 10.0.0.2 enterprise.domain.com entry from the etc/hosts file on the new machine, and on any other machine to which you added it.

Deployment is accessed via an alias
On the other hand, let’s say you have a deployment on a machine called machinename.domain.local running on the Windows Server 2008 R2 operating system. Your DNS stores a CNAME, or alias, for that machine as enterprise.domain.com:
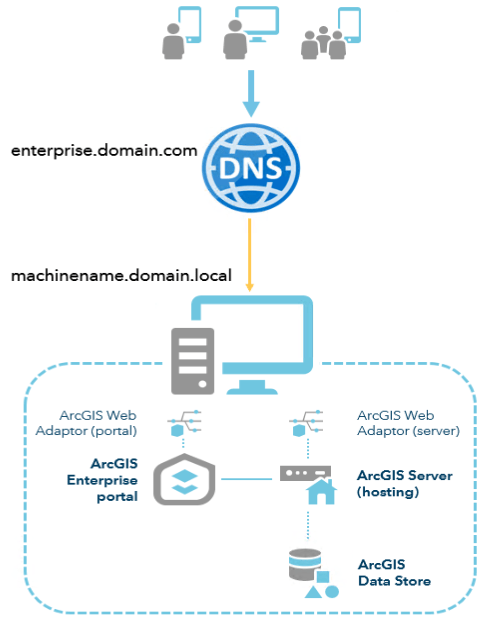
The deployment’s URLs are as follows:
- Users reach the Portal at https://enterprise.domain.com/portal
- Users reach the Server services at https://enterprise.domain.com/server/rest
- Server admins and publishers reach ArcGIS Server Manager at https://machinename.domain.local:6443/arcgis/manager
- Portal admins reach the ArcGIS Portal Administrator Directory at https://machinename.domain.local:7443/arcgis/portaladmin
You can migrate this deployment using the following steps.
1. Within your existing environment, turn on read-only mode. Note: you must be at version 10.8.
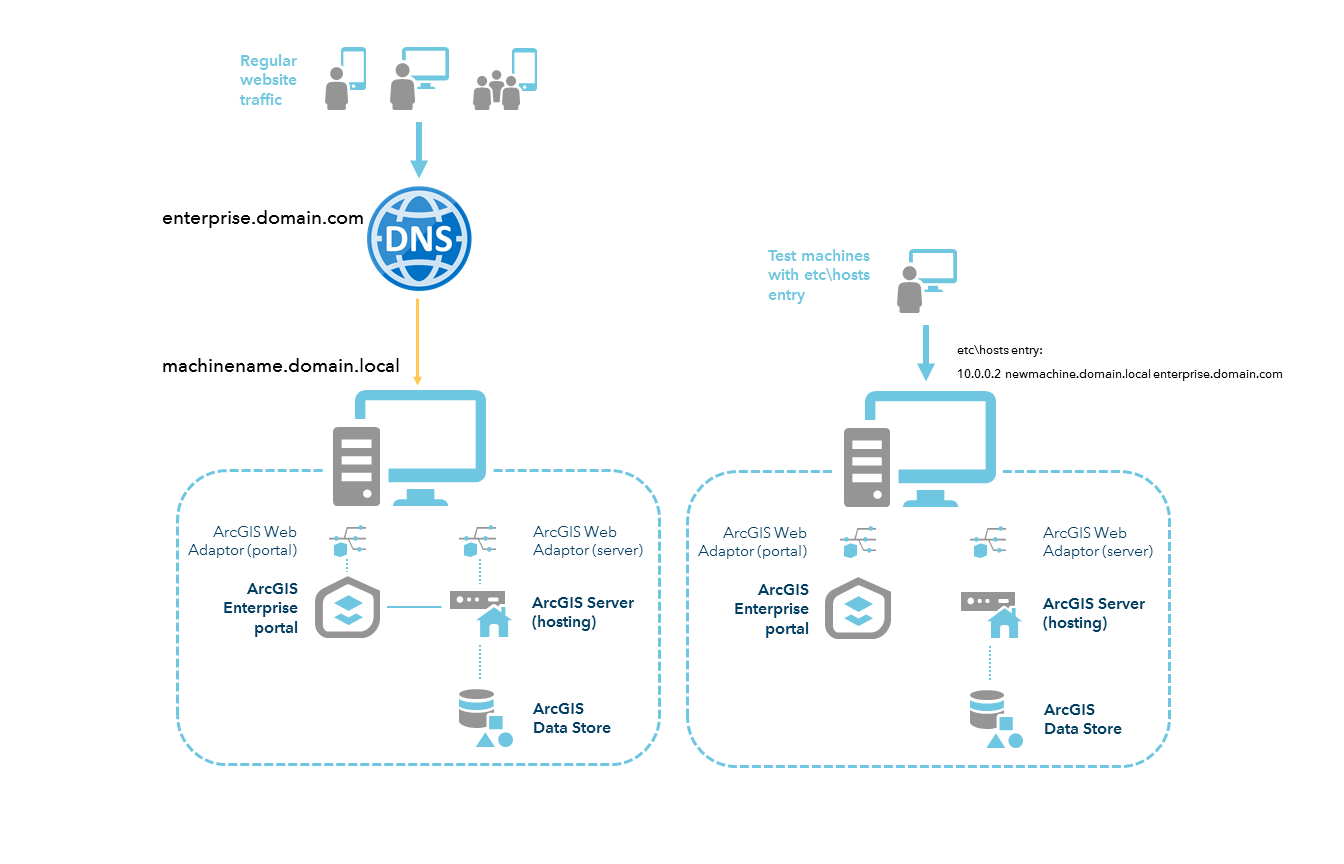
2. Acquire your new machine. This could be a virtual machine or physical machine. In this example, the machine’s hostname is newmachine.domain.local, its IP address is 10.0.0.2, and it’s running Windows Server 2016.
3. Before you install any software on the new machine, update its etc\hosts file to resolve the IP address of the new machine to newmachine.domain.local as well as enterprise.domain.com:
10.0.0.2 newmachine.domain.local enterprise.domain.com
Listing the local hostname into the etc\hosts file first ensures that the software will store that name in configuration files, rather than the DNS alias. Adding the DNS alias ensures the deployment can be configured with the DNS alias without impacting production.
4. Repeat this on any other machine you might use to test and validate the new system (other than the existing production machine, of course).
5. Install your ArcGIS Enterprise software on it. Use the DNS alias when registering the Web Adaptor.
6. Once the environment is configured, you can only reach the new environment via the enterprise.domain.com hostname from the machine itself or from any other machine that you’ve added the entry to. Any machines without the entry will resolve enterprise.domain.com to your “old” production environment via DNS:
7. Create a backup with the WebGIS DR tool. The thing to consider here is timing: Once you take a backup with the DR tool, only the content present in the deployment will be moved over. If you can’t or didn’t take advantage of read-only mode and content is created after this point, it may not be moved over unless you take and restore a new backup. It’s best to take a backup during a period of downtime.
8. Restore the backup on the new machine with the DR tool. This will create a replica of the existing deployment on the new machine.
9. Validate that users, content, groups, and services are accessible on the new machine, using any machine on which you’ve added that etc/hosts entry. Again, only machines with the 10.0.0.2 enterprise.domain.com entry in the hosts file will resolve enterprise.domain.com to the new machine. Otherwise, those requests will go to the “old” machine.
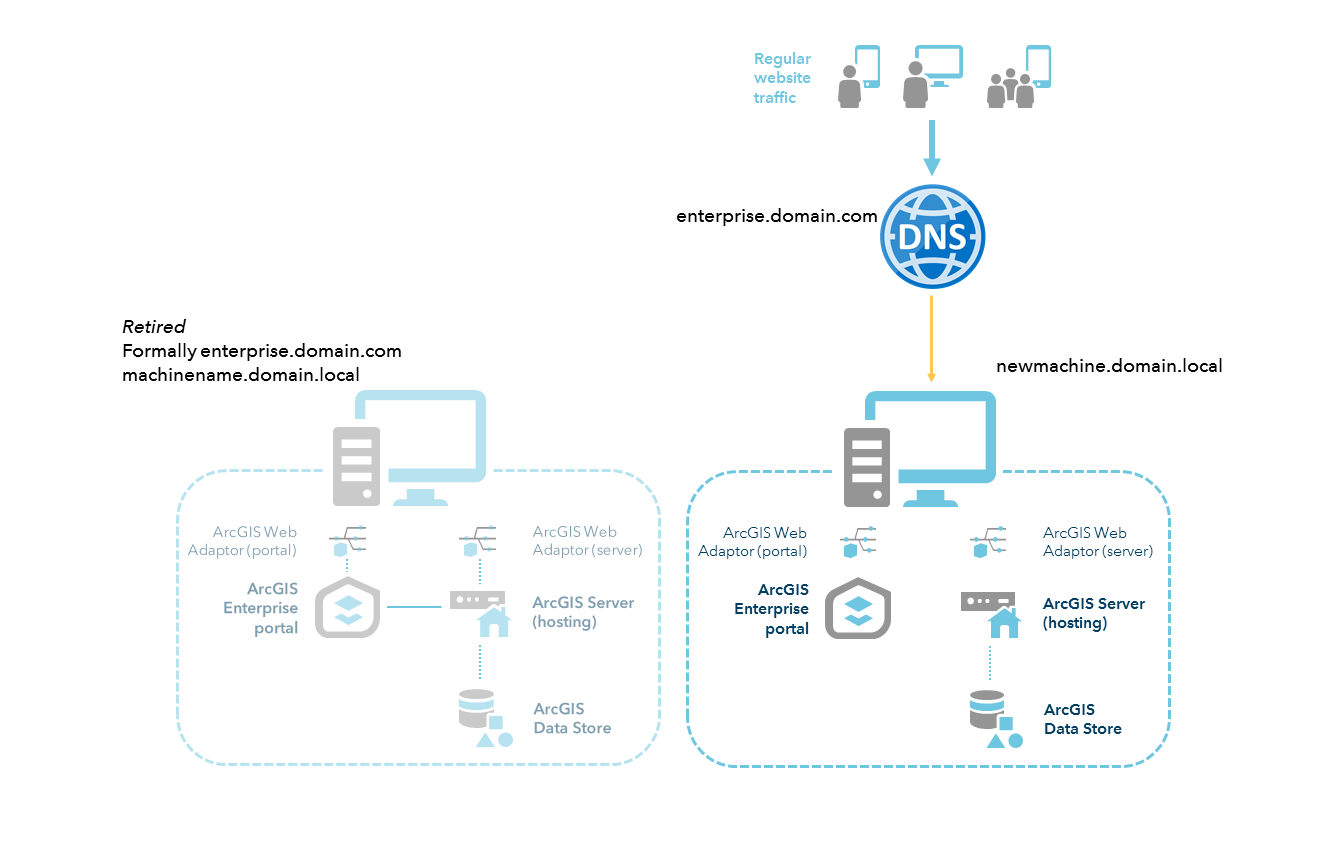
10. Once the environment has been validated and you’re ready to switch over, update DNS to resolve enterprise.domain.com to the new machine. All requests to enterprise.domain.com will now resolve to the new machine, including all the content from the old environment.
11. Remove the 10.0.0.2 newmachine.domain.local enterprise.domain.com entry from the etc/hosts file on the new machine, and on any other machine to which you added it.
Steps to migrate distributed environments
If you have a distributed environment, you only need to modify the etc\hosts file to make sure that the component acting as the “front-end” for your deployment (its ArcGIS Web Adaptors or reverse proxy) is resolving to the original name.
These steps assume you’re on at least 10.5, which is when the WebGIS DR tool added support for different machine names. As a reminder, there’s a complete table for compatibility located in the documentation.
Let’s say you have two ArcGIS Web Adaptors on a machine called enterprise.domain.com, and your ArcGIS Enterprise portal, ArcGIS Server, and ArcGIS Data Store on a machine called m1.domain.com. Both are running Windows 2008 R2, and you’d like to migrate to Windows Server 2016.

The deployment’s URLs are as follows:
- Users reach the Portal at https://enterprise.domain.com/portal
- Users reach the Server services at https://enterprise.domain.com/server/rest
- Server admins and publishers reach ArcGIS Server Manager at https://m1.domain.com:6443/arcgis/manager
- Portal admins reach the ArcGIS Portal Administrator Directory at https://m1.domain.com:7443/arcgis/portaladmin
Here’s how you’ll migrate this deployment.
1. Within your existing environment, turn on read-only mode if your deployment is at version 10.8.
2. Acquire two new machines, one to host ArcGIS Web Adaptors and the other to run the rest of the components. The only IP address that matters in this case is the Web Adaptor machine, because the only settings that needs to be matched between deployment are the https://enterprise.domain.com/portal and https://enterprise.domain.com/server. Let’s say the IP address of the new Web Adaptor machine is 10.0.0.2.
3. Update the etc\hosts file on each new machine to resolve the IP address of the Web Adaptor machine to enterprise.domain.com:
10.0.0.2 enterprise.domain.com
4. Install the two Web Adaptor instances on enterprise1.domain.com, and install the Portal, Server, and Data Store software on m2.domain.com.
5. Create the Portal and Server sites, register the Data Store to Server, and finally, configure the Web Adaptors on enterprise1.domain.com by reaching the configuration page via https://enterprise.domain.com/portal/webadaptor and https://enterprise.domain.com/server/webadaptor. The requests will be resolved to the new Web Adaptor machine (which is actually enterprise1.domain.com) via the etc\hosts file.

6. Federate your server site with the portal, and make sure that you use https://enterprise.domain.com/server as the services URL. The admin URL can either be https://enterprise.domain.com/server or https://m2.esri.com:6443/arcgis.
7. Create a backup of the old deployment with the WebGISDR tool. As with the single-machine example, consider that once you take a backup with the DR tool, only the content present in the deployment will be moved over. If content is created after this point, it may not be moved over unless you take and restore a new backup. It’s best to take a backup during downtime.
8. Restore the backup onto the new deployment with the DR tool. Validate that your users, content, groups, and services are accessible on the new deployment. Again, be aware that only machines with the 10.0.0.2 enterprise.domain.com entry in the hosts file will resolve enterprise.domain.com to the new machine. Otherwise, those requests will go to the primary machine. The DR tool restore will preserve the m2.domain.com machine within the deployment.
9. Once the environment has been validated and you’re ready to switch over, update DNS to resolve enterprise.domain.com to the new machine hosting the Web Adaptor and remove the etc\hosts entry on that machine as well as on m2.domain.com.
All requests to enterprise.domain.com will now resolve to the new machine, which will direct the traffic to m2.domain.com. There, you’ll be able to work with all the content from the old environment on your brand new machines.

As you can tell, the steps involved with this approach will likely take more time than the Join Site approach we detailed in our previous blog. But because your users continue to use the old production machines up until the moment you switch your DNS resolution to the new machines, there should be zero downtime involved here.
If ensuring continuous service is your goal, we recommend this method to migrate your deployment to new machines.
For more information about preventing data loss and downtime, visit the ArcGIS Enterprise documentation on high availability and disaster recovery.
Thanks for reading!
About the authors


Article Discussion: