My favorite feature
Mission Server’s 10.8.1 release was a huge release for us, it was packed full of great new features and enhancements. But, can you guess which one was my favorite (It’s definitely not in the title of the blog)? Yup, you guessed it… all of them. Roll the credits.
Okay, okay, I know what you’re thinking: ‘Shane, aren’t you the Product Engineer for Mission Server? Aren’t you obligated to say that?’
To that, I wave my hand and say: ‘These aren’t the droids you’re looking for…’
Okay maybe these are the droids you’re looking for. But, if I had to pick one new feature that stands out above the rest, it would be my ability to use Mission Server to generate a configuration file for my proxy server.
Why
The reason why I or anyone else in my organization would use a proxy server with Mission Server can be a simple or complex topic.
As an IT administrator I could be on the lookout for enhancing my network’s security, increasing my network’s ability to handle traffic, or, simply because it sounds so… cool.
The good news is that Mission Server is so cool it can make my life even easier when it comes to configuring an Apache HTTPD Proxy Server (or similar) with my Mission Server.
How? Let’s find out.
Getting there
First, I can begin to configure my proxy server by navigating to Mission Server’s Admin API.
If you don’t know how to get there, too bad, only cool folks (shout out to all my portal administrators) allowed… Okay I take that back, you’re pretty cool too so please stick around… you will need an account with administrative privileges, though.
So, if you want to know how to get there, all you have to do is close your eyes, click your heels three times, and think to yourself ‘There’s no place like’… where were we? Oh, yes, the Admin API.
To get to Mission Server’s Admin API I’ll need to type a URL into my browser. First, I’ll need to know the Fully Qualified Domain Name (FQDN) of my Mission Server. I’ve disguised my Mission Server’s FQDN so that it’s super secret… since you’ve stuck around this long, I guess I’ll share it with you, it’s example.missionserver.com.
As an example, I would simply need to type something like https://{FQDN}:20443/arcgis/admin into my browser to navigate to Mission Server’s Admin API.
In this instance, I’ll type: https://example.missionserver.com:20443/arcgis/admin into my browser, once I’m there, I’ll need to log in.

Okay, I’m in.
Next, I’ll need to click on Generate Proxy Configuration and start filling out that sweet, sweet form.
The form
To fill out the form, I’ll need to know a few things:
- My proxy’s FQDN
- My desired top level context
- Whether or not I want to set the Context URLs
- The desired format of my configuration file

My proxy’s FQDN
My proxy’s FQDN will usually be the hostname of my computer that has my proxy server installed onto it.
If I ever want to know the hostname of my machine, I can find it by opening up a terminal on my proxy server’s computer and typing the command hostname.
My proxy’s FQDN is example.proxy.com.
Armed with my FQDN, I can move on to our top level context.
My top level context
The top context I define will be the very beginning of the URL where requests will be sent to my proxy.
I can think of the top context as the front door to my proxy. Once I enter the front door, the doorman will show me the way to Mission Server’s doors. I think I’ll use something incredibly creative for my top context, mission.
Now, my proxy will take any request destined for Mission Server at the location https://example.proxy.com/mission and route it appropriately.
Or will it?
Setting the Context URLs
The truth is, my proxy given the two parameters above will not route requests properly… yet. This is because my Mission Server needs to be aware that we would like our requests to travel through a proxy server first.
In order to ensure both https and wss requests are routed properly, I’ll want to set my Context URLs. There are two Context URLs Mission Server needs to know in order to provide our client applications, ArcGIS Responder and ArcGIS Mission Manger, the correct information when connecting to Mission Server.
The first context URL is the WebContextURL. When I set the WebContextURL, Mission Server will let our client applications know ‘Hey, there’s a proxy at https:// ready to receive your http requests, you should go there instead’.
The second context URL is the WebSocketContextURL. Yes, Mission Server makes good use of WebSockets, more specifically, secure WebSocket connections. Secure WebSocket (wss) connections are the bread and butter of how Mission Server provides near real-time information to our client applications, so it’s vitally important I have this set. When I set the WebSocketContextURL it tells the client applications ‘Go here to make a wss connection`.
Here’s where it gets good, though.
Traditionally (before 10.8.1), I would need to set the two ContextURLs manually. I would do this by navigating to System>Properties>Edit and submitting a json object that looks like this:
{
    "WebContextURL":"https://example.proxy.com/mission",
    "WebSocketContextURL":"wss://example.proxy.com/mission"
}
The good news is, I do not need to do this anymore.
When I check the box SetContextURLs in the form, this tells my handy dandy tool to set both WebContextURL and WebSocketContextURL for us, no hassle involved.
Pretty sweet, ey?
The format of our configuration file
This one is pretty straight forward. I can choose to view our generated configuration file in either html or json formats. I prefer to download it by selecting the option file, though. When I select file, the configuration file should automatically download to my default downloads folder.
The final step
Once I have gathered all of the information above, I can begin to fill out the form accordingly.

Once I hit ‘Submit’, I’ll be presented with what I’ve been waiting for, the configuration file.
The configuration file
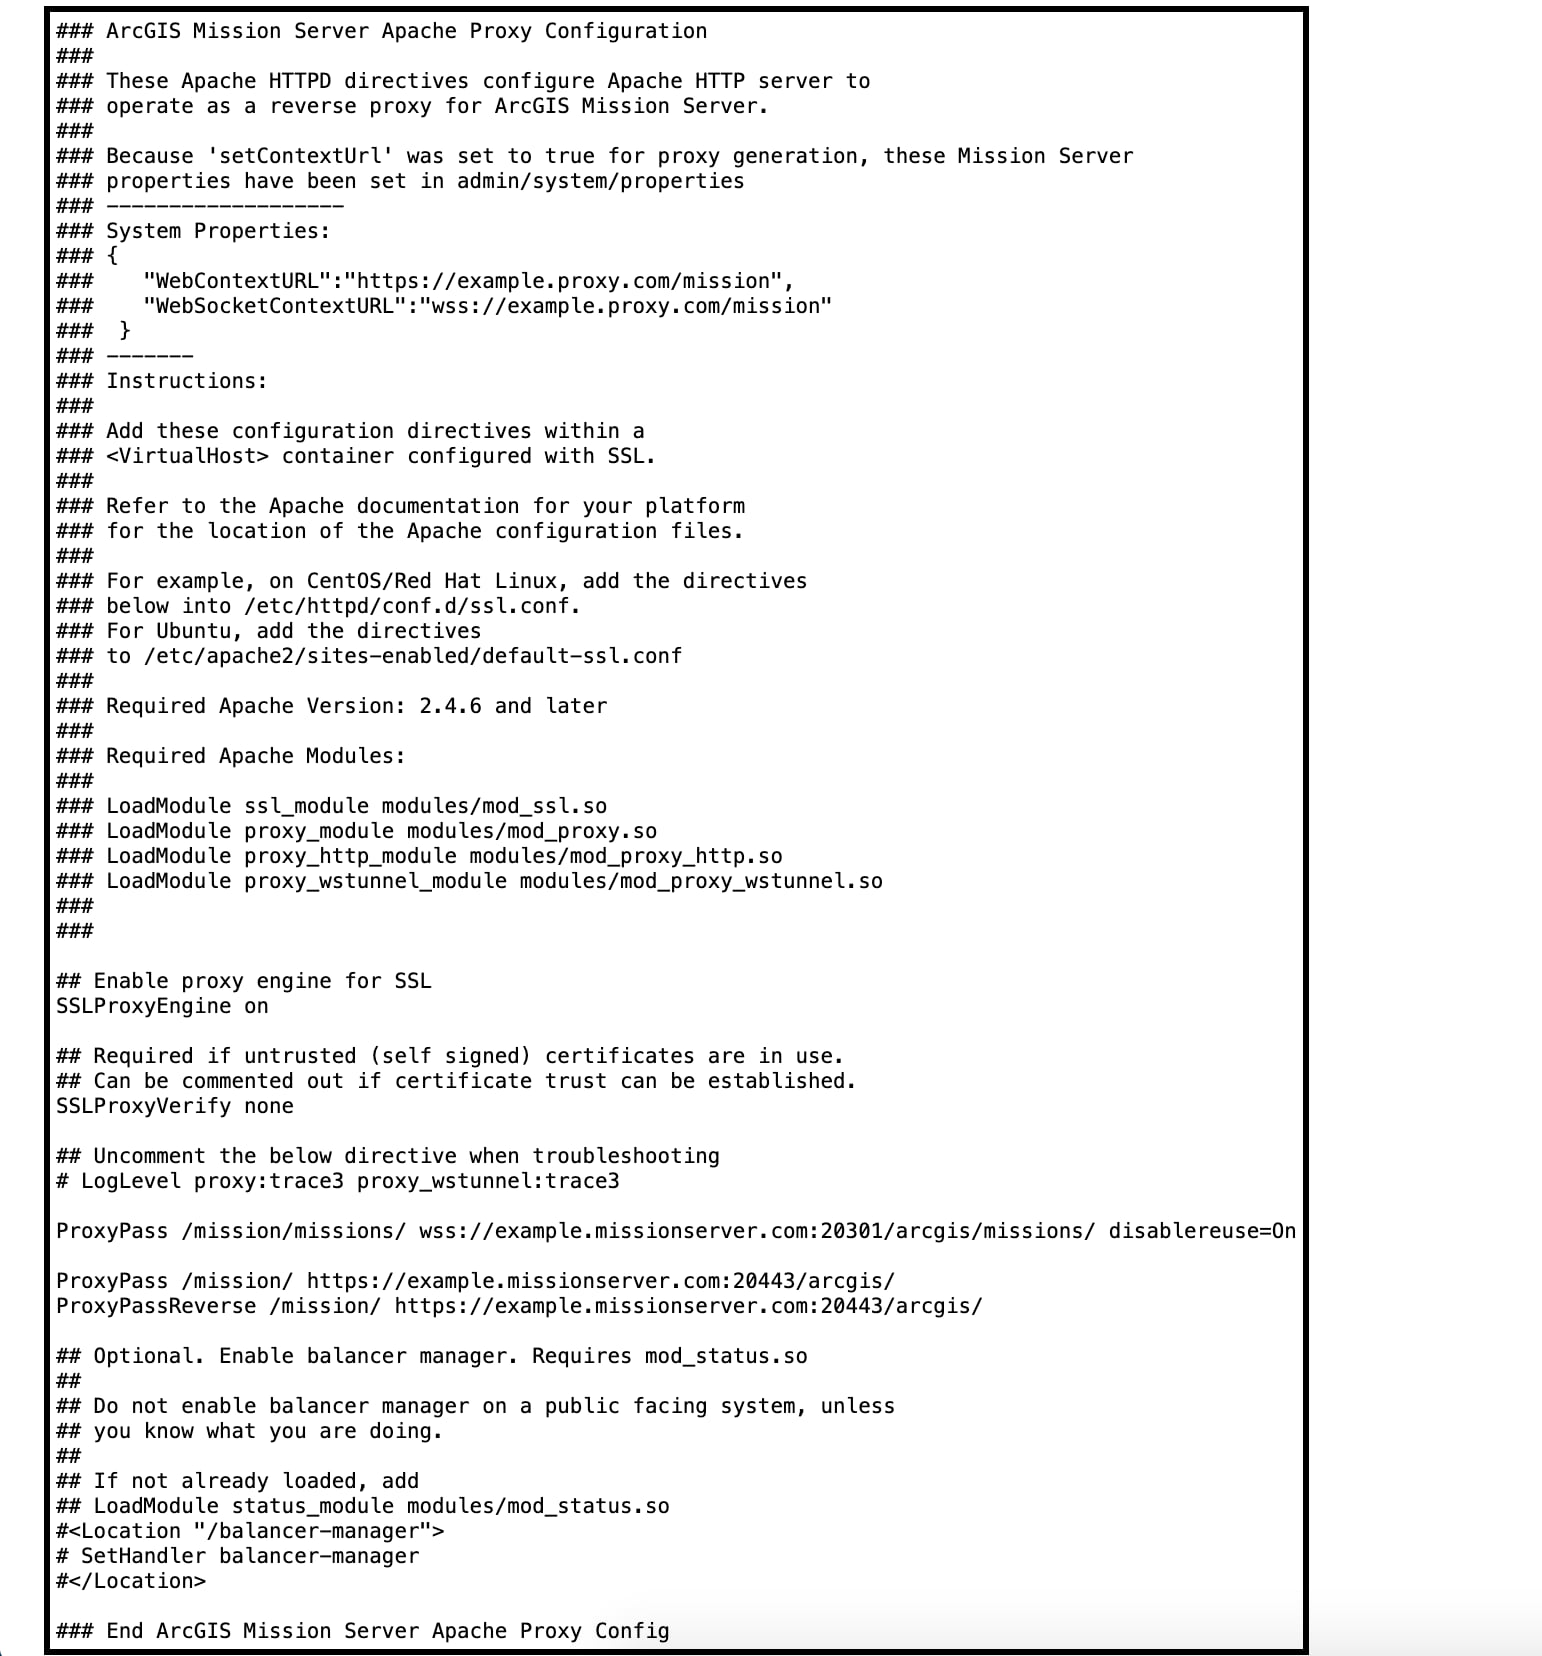
My generated configuration file doesn’t only contain the instructions for my proxy, it’s also packed full of information. When I view my configuration file, I can see that it contains information on which modules that I need enabled, where to put the directives, and whether or not the WebSocketContextURLs have been set.
If I follow the instructions inside the configuration file, I should be able to successfully configure my proxy with my Mission Server.
It’s important to note that, although my configuration file is written with Apache HTTPD in mind, I can use the information inside the file to configure other popular proxies my organization might use.
Check out the image below as an example:
An aside
If I want to configure a proxy server that isn’t Apache HTTPD using this method, I am certainly able to. All I have to do is read the directives found inside the configuration file to see what type of requests need to be routed and where and apply them to my proxy configuration.
It might be helpful if I break down which requests need to go where more specifically.
For https requests, I will need a rule/directive in my proxy that will pass https requests and their parameters destined for Mission Server to the correct port and context. The correct port and context is :20443/arcgis.
I’ll use my Mission Server described above as an example https://example.missionserver.com:20443/arcgis.
Similarly, for wss requests I will need a rule/directive in my proxy that will pass wss requests and their parameters destined for Mission Server to the correct port and context as well. The correct port and context is :20301/arcgis.
Again, I’ll use my Mission Server described above as an example: wss://example.missionserver.com:20301/arcgis.
Conclusion
Mission Accomplished (sorry, I had to). Now I’m ready to leverage all the benefits my proxy server has to offer, all with a couple of very easy steps. I hope you find this feature as helpful as I do. Thank you for choosing Mission and thank you for reading my very first blog!
Cheers!

Article Discussion: