The June 2019 update of ArcGIS Online has optimized the mobile experience, making it easier to perform tasks on mobile phones and tablets. Enhancements have been made sitewide, especially on the Gallery, Content, and Organization tabs. This article highlights some common administrative workflows that you can now complete on a mobile device.
Let’s walk through five administrative tasks using a mobile device.
- Add members to join your organization
Invite one or more members to your organization from a mobile device. The mobile experience follows the same workflow as the full-screen experience. Begin by choosing one of three methods to invite member: Add member with no invitation, invite members via email, or invite members to join using an account of their choice. Compile the list of new members by filling out member information and selecting a User Type and Role. Repeat to add multiple members. Once the member list is complete, set member properties, including assigning licenses, groups, credits, and preferences. Select send invitations and have your new members sign in to ArcGIS Online and their other licensed apps. The image below shows three steps in the invite process on mobile screens.

2. Assign up to 100 licenses at a time
Easily assign and manage member licenses from your mobile device. Begin by finding members, using filtering options. Use multiple filters or filter for administrative groups to find the exact members who need a license. For example, if your field crew needs access to Workforce for ArcGIS, find the group that contains your field crew and use it to identify the right users.

Once members have been selected you can now assign licenses to up to 100 members at a time.

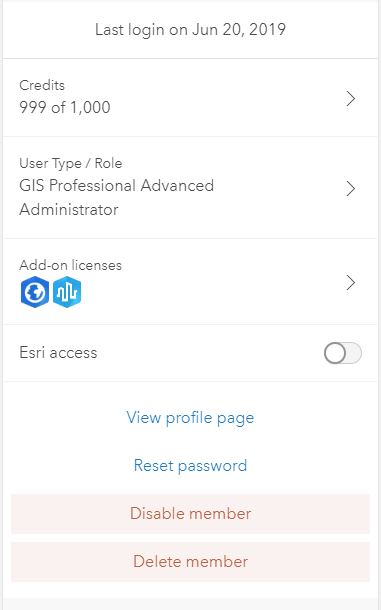
3. Change a member’s user type or role
A member’s user type or role can be easily updated from a mobile device. As an example, imagine that you are getting started with some field work and need help performing administrative tasks for a large group of users. You can update one of your GIS analyst’s roles to Administrator to help with these tasks while getting the group up and running. First search or browse for the specific user. Tap their profile and select User Type / Role. This will open a pane to update the user type and role. From the drop-down list, change the user’s role from Publisher to Administrator.

4. Reset a password
Quickly reset member passwords from a mobile device from the user’s profile as described in the workflow above. From the member profile tab, you can access a variety of administrative tasks like reset a password, delete or disable an account, and allocate credits. Select the reset password option to have a temporary password emailed to the user to reset their password.
5. Change owners of items or groups
You can make changes to item and group settings on mobile devices from the Content and Groups tab. The Overview, Usage, and Settings tabs are available with capabilities to make edits or updates when viewing items. Find the content item or group that needs to change and select Change Owner. A search window opens. Start searching based on first name, last name, or user name to find a new owner. Select the new owner and save.


Commenting is not enabled for this article.