Almost every ArcGIS Instant Apps include a search tool so users can find addresses and features in the app. By default, the search tool is configured to search all sources in your orgranization. You can fine-tune the search options to find only the most relevant results. This blog demonstrates three common ways to refine search functionality so your audience can easily discover the right information.
Limit available search locators and results
As a default, all locators available in your organization appear as options in the search tool. When configuring your app for use by the general public, we recommend offering only one locator. Otherwise, your users may be confused by the menu of options that appears when entering an address. You can configure the search tool to use only certain locators, which improves the accuracy of search results. As an example, let’s look at how to limit available locators in the Zone Lookup app.
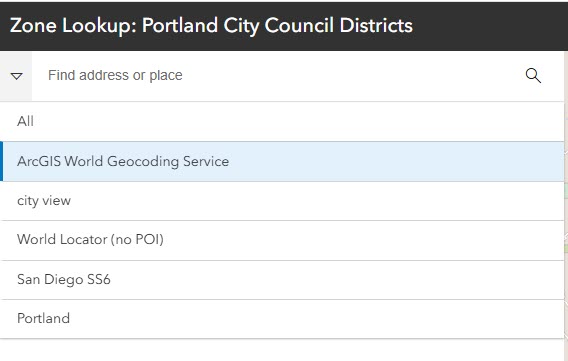
- Review all available locators. In the Zone Lookup app’s configuration panel, click the Interactivity section to access the search setup. Notice there are a few locators listed in the organization. The search default source is set to use them all.
Note. If you have administrative privileges to view and change organization settings, you can modify the default locators on the Utility Settings tab.
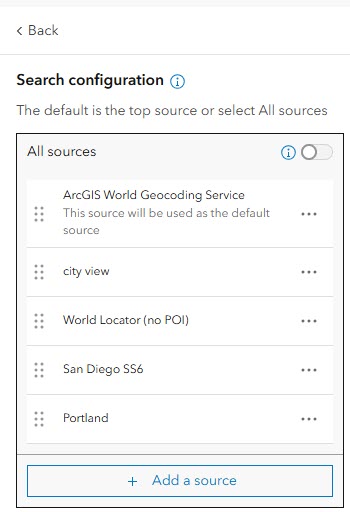
2.Remove unnecessary locators. In this example, I want users to search for their address using the ArcGIS World Geocoding Service. Delete the leftover locators to streamline the app user’s workflow when they search for their address.
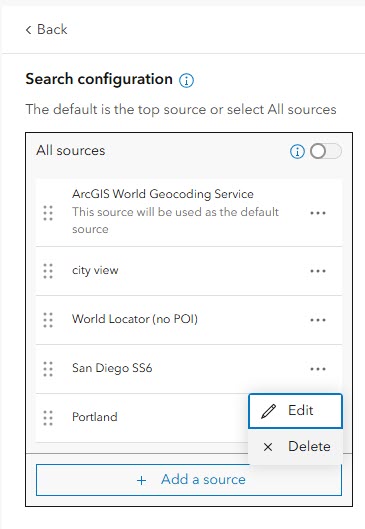
3. Configure the locator. Next to the selected locator, use the edit menu to open the search setting options. Change the default settings to best fit your audience’s needs. For example, you can add helpful placeholder text to prompt users for appropriate search values.
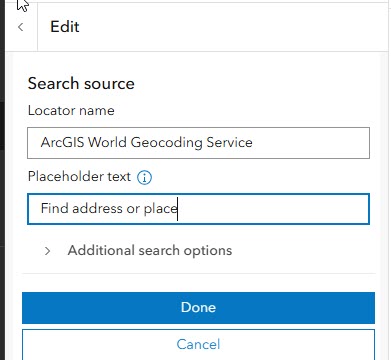
Let’s quickly review the other options you can configure, some are available under Additional search options within each search source
- Name: If you have multiple locators, give each one a meaningful name.
- Zoom Scale: Choose a scale that the search result will zoom to.
- Enable Suggestions: Display potential matches as users type search text.
- Minimum suggested characters: Set how many characters need to be entered to generate a search result. Default is 3. Integer fields require an exact match.
- Maximum Suggestions: Control the total number of suggestions. We recommend keeping this number under 5.
- Maximum Results: Configure the maximum amount of search results returned.
- Constrain search within map: Limit the search to find only locations within the default spatial extent of the map. For example, enable this constraint to search the locator data only for addresses that are within the map area that you see when you click the Home button.
- Country Code: Limit the returned results to a specific country. If you want your search to find Ottawa, Kansas instead of Ottawa, Ontario, specify USA as the country code. Find a list of country codes .
Selecting the correct search locators and expertly configuring them improves your app’s user experience.
Configure a custom locator view
Refining the search tool in the app configuration panel allows you to fine-tune and limit the search experience for that specific app. For additional refinement options, you can create a locator view to use a customized locator in multiple apps.
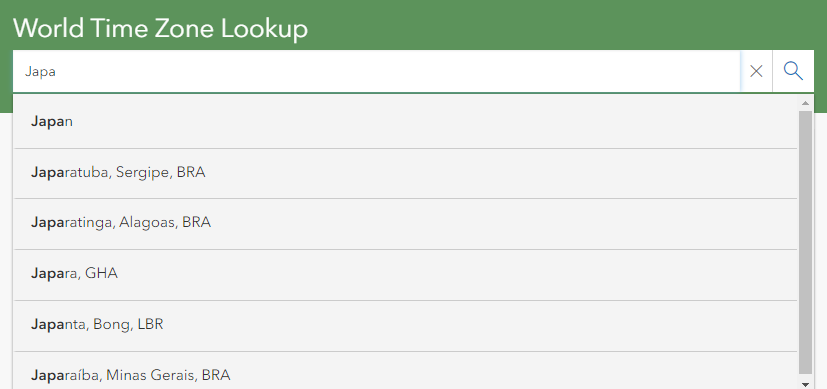
The ArcGIS World Geocoding Service supports multiple methods to find addresses, including the ability to search for street addresses, points of interest, intersections, and more. Using the app configuration options can refine search results, such as limiting a search to a specific country or map extent, but there are situations that require more refinement. As an example, in this Time Zone Lookup app, the search is configured to return all possible search options, including places of interest. When I want to search the current time in Japan, the suggestions offer Japanese food as an option before the country of Japan. You can create a locator view as a quick way to adjust the World Geocoder by excluding places of interest to better fit the needs of your audience.
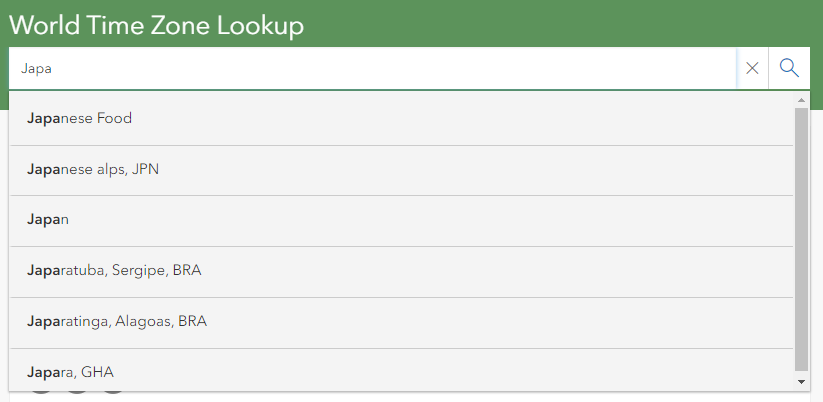
Here is a quick overview of how to create a custom locator view. (For detailed steps, see ArcGIS Blog: Customize your Geocoding experience with Locator Views.)
- Create a locator view. On the Content page, click New Item, choose Locator, and specify the item details.
- Define the locator view. On the item page Settings tab, choose to find only specific types of locations (such as Addresses, Coordinates, or Places of Interest) within a relevant area.
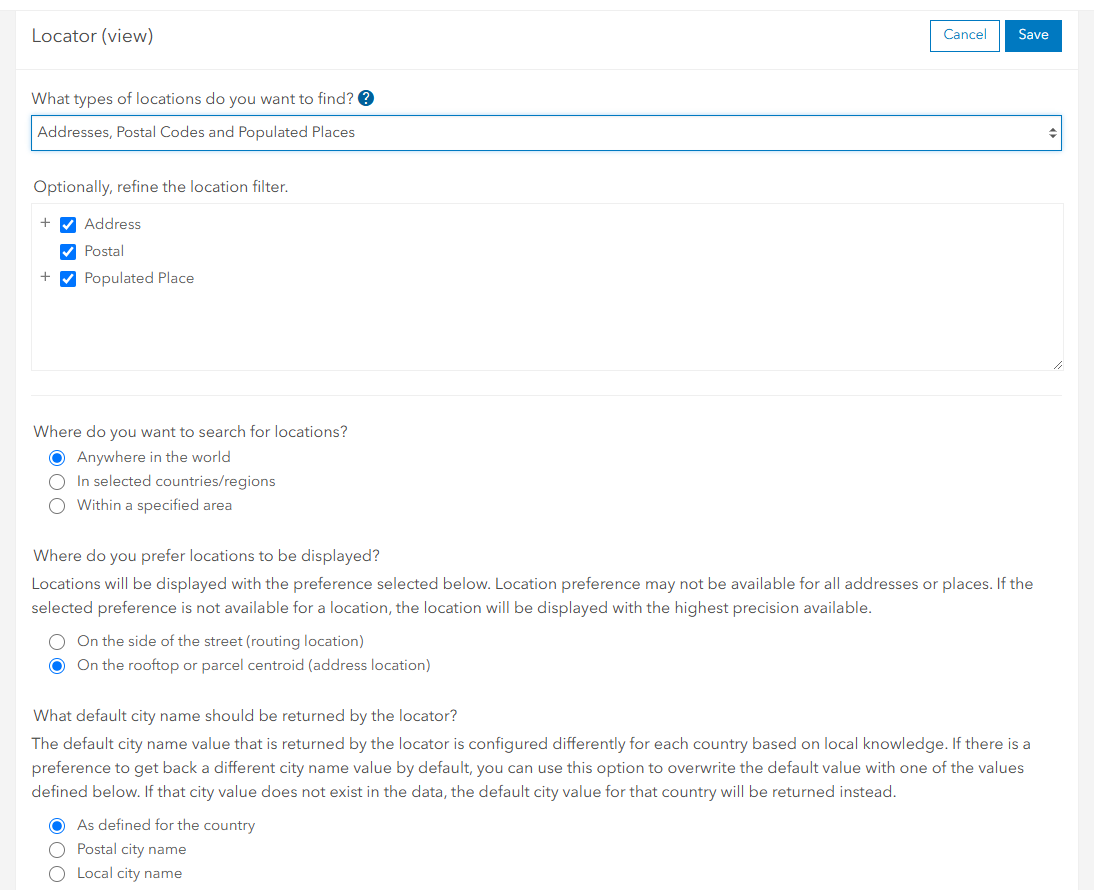
- Share the item with your organization. On the item page Overview tab, share the locator view with your organization (or with everyone, if your app will be available to the public). You need to share the locator view so the intended audience can access your custom locator in your app.
- Configure it for use in your organization. Ask your administrator to add the shared locator to your organization in the organization settings. (On the Utility Services tab, in the Geocoding section, click Add Locator.)
- Configure your app to use the locator view. Once you’ve created a locator view, it will be available in the search configuration options. The image below displays the same app using a custom locator view that excludes points of interest, thereby producing a more relevant set of suggestions.
- Test your app, perform a search in the updated Time Zone Lookup app.
Configure a new search source
You can use the search configuration to add additional search sources like feature layers or other locators that aren’t listed in your organization. Using feature layers as a search source allows your app users to search for a specific feature based on an attribute value. When the search tool finds the feature, it’s highlighted in the map and automatically opens a pop-up with details about the feature. Check out this Attachment Viewer app configured so the search queries the well feature layer. Well IDs are used for the search instead of an address or coordinate so users can find a specific well based on the ID system that exists in the data and view the attribute information in a pop-up.
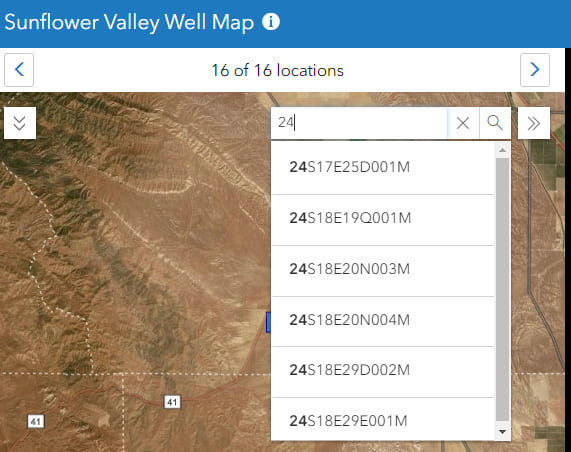
To configure feature search in your app, follow these steps in the search section under interactivity.
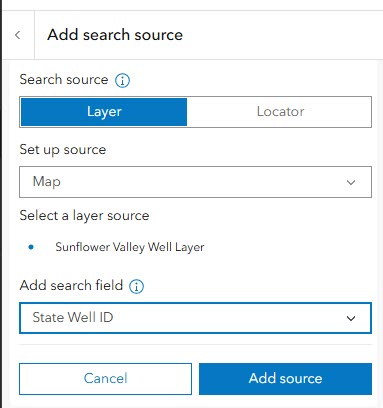
- Add a new search source: Click on the ‘Add’ button in the Search Configuration to add a new search source. In the Add a search source menu, choose to use a layer in the map. Select the search field from the layer. Click ‘Add source’ to continue configuring options.
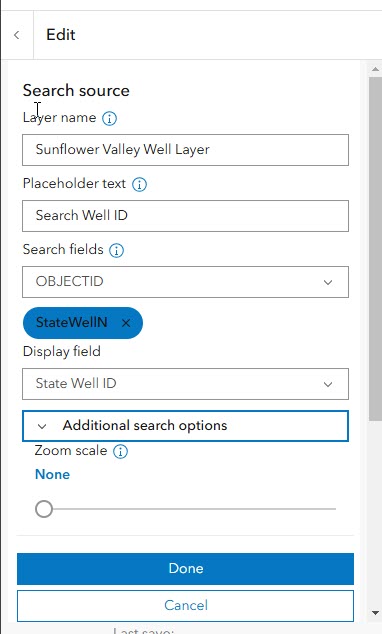
2. Configure the feature search settings. Update the layer name if needed. For placeholder text, provide an instruction so users know what to search (such as “Search Well ID”). You can add more search fields at this step. Select the field which will be used as the display field (this includes suggestions). Expand Addtional search options to continue configuring search options. Click done when complete.
3. Test your app, verify the search behaves the way you intended.
Try out one or more of these search configuration methods to refine search capabilities in your apps and improve the user experience.


Commenting is not enabled for this article.