Part 1 of this blog series (Deep Learning with ArcGIS Pro Tips & Tricks: Part 1) covered how to set up your environment to perform deep learning. At this point you should have a CUDA-capable GPU, a recent version of ArcGIS Pro, and the deep learning framework for ArcGIS Pro installed. If we were implementing deep learning from scratch, the next step would be to draw hundreds to thousands of training samples. But with Esri’s pre-trained, publicly available deep learning models, we can start identifying features in our imagery with one tool in ArcGIS Pro. There are out-of-the-box models available for building footprint extraction, road extraction, land cover classification, detecting human settlements, and more. The available models can be viewed and downloaded from the ArcGIS Living Atlas by anyone with an ArcGIS Online subscription.
To use the inferencing tools in ArcGIS Pro, we will work through the following checklist:
- Download a deep learning model package (dlpk)
- Confirm your imagery is suitable for deep learning
- Determine the resolution of your imagery
- Review input parameters for the Detect Objects using Deep Learning geoprocessing tool
- Run the Detect Objects using Deep Learning geoprocessing tool
Key Definitions
.emd: Esri Model Definition
TensorFlow: TensorFlow is an end-to-end open source platform for machine learning. It has a comprehensive, flexible ecosystem of tools, libraries and community resources that lets researchers push the state-of-the-art in ML and developers easily build and deploy ML powered applications. (tensorflow.org)
Keras: Keras is an open-source software library that provides a Python interface for artificial neural networks. Keras acts as an interface for the TensorFlow library.
.pb: TensorFlow deep learning model file extension
.h5: Keras deep learning model file extension
.py: Python script
GeoAi: Geographical Artificial Intelligence
Dlpk: Esri Deep learning package
CNN: Convolutional neural networks
Mask R-CNN: Mask RCNN is a deep neural network aimed to solve instance segmentation problem in machine learning or computer vision. In other words, it can separate different objects in a image or a video. You give it a image, it gives you the object bounding boxes, classes and masks. (Simple Understanding of Mask RCNN, Xiang Zhang Apr 22, 2018)
Epoch: The number of epochs is a hyperparameter that defines the number times that the learning algorithm will work through the entire training dataset (Difference Between a Batch and an Epoch in a Neural Network, Jason Brownlee, July 20, 2018)
Download deep learning model package
A deep learning model package (.dlpk) contains the files and data required to run deep learning inferencing tools for object detection or image classification. The package can be uploaded to your portal as a DLPK item and used as the input to deep learning raster analysis tools.
Deep learning model packages must contain an Esri model definition file (.emd) and a trained model file. The trained model file extension depends on the framework you used to train the model. For example, if you trained your model using TensorFlow, the model file will be a .pb file, while a model trained using Keras will generate an .h5 file. Depending on the model framework and options you used to train your model, you may need to include a Python raster function (.py) or additional files. You can include multiple trained model files in a single deep learning model package. (Note that a forthcoming blog post in this series will cover how to train your own model).
Most packages can be opened in any version of ArcGIS Pro. By default, the contents of a package are stored in the <User Documents>\ArcGIS\Packages folder. You can change this location in the Share and download options. Functionality in the package that is not supported at the version of ArcGIS Pro being used to consume the package is not available.
The easiest way to find Esri’s out-of-the box models is through the catalog pane in ArcGIS Pro:
- Open a new or an existing ArcGIS Pro Project
- Navigate to the Catalog Pane
- Click Portal
- Select Living Atlas Icon
- Type dlpk in the search bar & hit enter
A list of publicly available dlpks will show in your search results. To view, download or review the properties of a .dlpk, or to add or remove files from your .dlpk, right-click the .dlpk in the Catalog pane and click Properties.

Properties include the following information:
- Input—The .emd file, trained model file, and any additional files that may be required to run the inferencing tools.
- Framework—The deep learning framework used to train the model.
- ModelConfiguration—The type of model training performed (object detection, pixel classification, or feature classification).
- Description—A description of the model. This is optional and editable.
- Summary—A brief summary of the model. This is optional and editable.
- Tags—Any tags used to identify the package. This is useful for .dlpk package items stored on your portal.
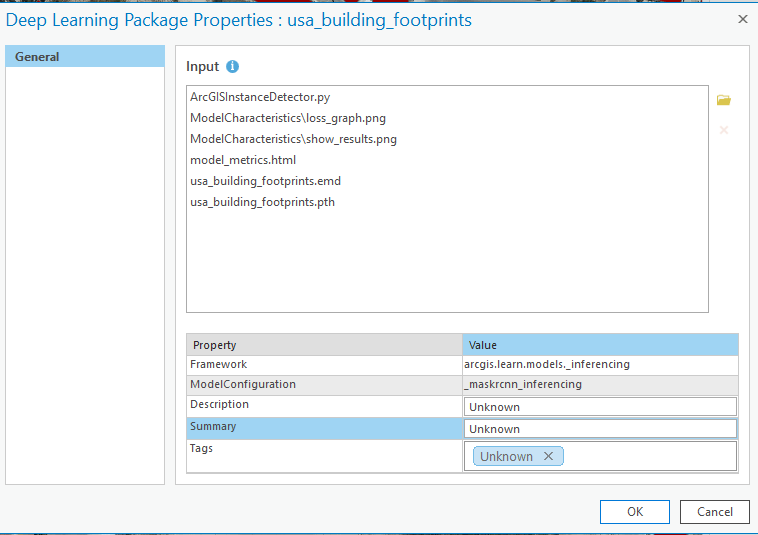
Any property that is edited in the Properties window is updated when you click OK. If the .dlpk item is being accessed from your portal in the Catalog pane, the portal item is updated.
Note that Esri provides out-of-the-box .dlpks that you can use in your deep learning workflow. They can be found under the dlpk section in Esri’s Living Atlas.
Confirm your imagery is suitable for deep learning
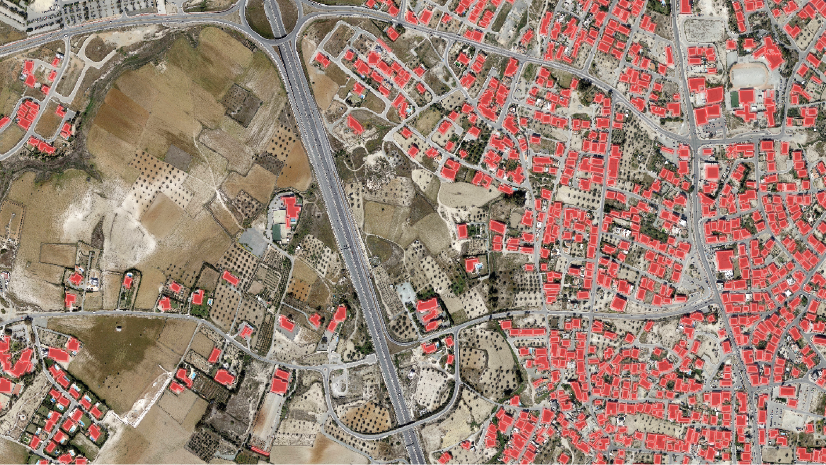
To get the best result from an inferencing workflow, you need to first visually inspect your imagery. Deep learning models are optimized to detect features that you can see with your eyes. In this part of the blog, we will focus on a hot topic in GeoAI: building detection. We will be covering the required imagery resolution for Esri’s out-of-the-box Building Footprint Extraction – USA deep learning package, but these tips are relevant to any deep learning model.
First, confirm you are able to visually locate buildings in your raw imagery. As an example, the image below shows some buildings in Cyprus.
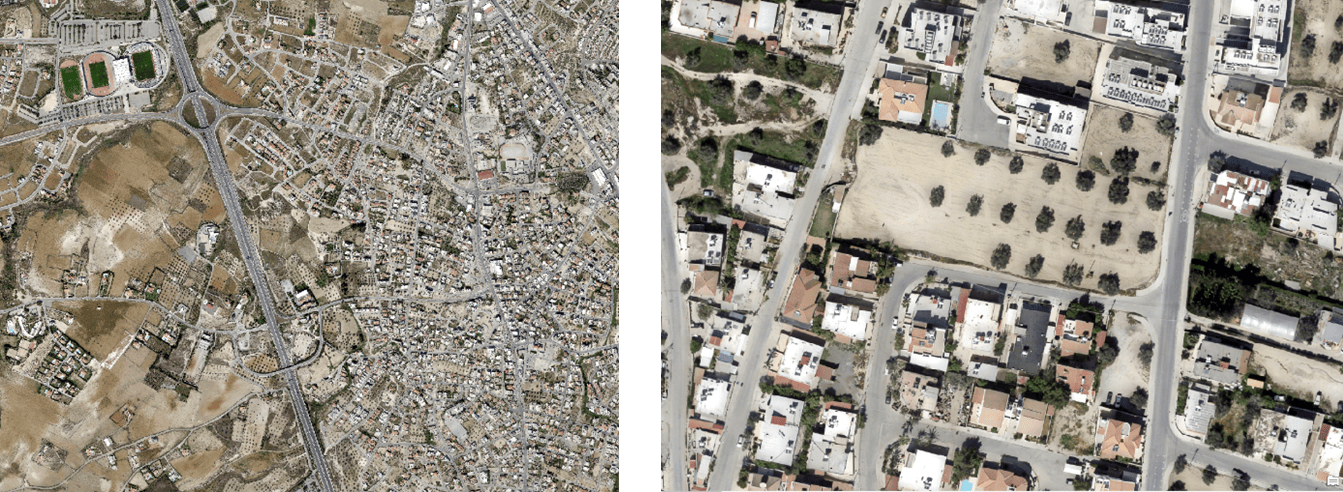
We are able to distinguish the individual rooftops from each other and the surroundings, so this image is a good candidate for building footprint extraction.
Determine the resolution of your imagery
The Building Footprint Extraction – USA deep learning package is designed to work with high-resolution images (10–40 cm). Other dlpks have different recommended resolutions – check the dlpk’s item details page for more information. To determine your imagery’s resolution:
- In your ArcGIS Pro project, insert a map if you haven’t already done so.
- Drag and drop your image onto the map frame.
- Select your image in the table of content, then browse to the image properties.
- Browse to the Source tab and expand Raster Information.
- Locate Cell Size X and Cell Size Y in the Raster Information
- If the cell size is between 0.1 and 0.4 m, you can proceed with the Building Footprint Extraction dlpk.
- If not, you might need to follow one of the below workflows:
- If your cell size is much larger than 0.5 m, you may need to acquire new imagery with higher resolution (remember that larger cell size = lower resolution).
- If your cell size is smaller than 0.1 m, resample it to the 0.1-0.5m range.
- Or train your own model based on your imagery resolution. More info can be found under Train Deep Learning Model.

Follow the Building Footprint Extraction – USA link to download the package. Esri provides a variety of other deep learning packages that can be found under ArcGIS Living Atlas of the World. Note that the downloaded model uses the Mask R-CNN model architecture implemented using ArcGIS API for Python.
Understand parameters for inferencing
With all the prerequisites covered, lets dive into the Detect Objects Using Deep Learning geoprocessing tool parameters. A key element of this process is understanding the different parameters that come with the tool:
- Padding
- Batch size
- Threshold
- Return bbox
Understanding these parameters will allow you to make smart adjustments and get the most accurate output possible.
Note that no deep learning approach will give you 100 percent accurate results, but adjusting your model parameters and iterating through the process can optimize the accuracy of your model. Below we will discuss the importance of each parameter and how to adjust the inputs based on your imagery and environment.
Padding
The first parameter is the padding of the model. Padding is the border area from which the model will discard detections, as they tend to be of truncated buildings that span multiple tiles during inferencing. We stride over the padded region, so buildings that are discarded because they lie at the edge in one pass of the model inferencing, are detected in the second pass of the inferencing when they lie at the center of the tiles due to this striding. This means that with the padding parameter being adjusted, the model will adjust the stride of each tile as it runs the inferencing workflow. For example, if we introduce a padding of 32 px (pixels) on a model that is inferencing 128 px tiles, the model will stride the tile by 32 px inside the 4 edges of the tile. If the centroid of the detected feature is within the padded tile, it will pass as a building in this example.

If you are new to deep learning, feel free to leave the default value of padding.
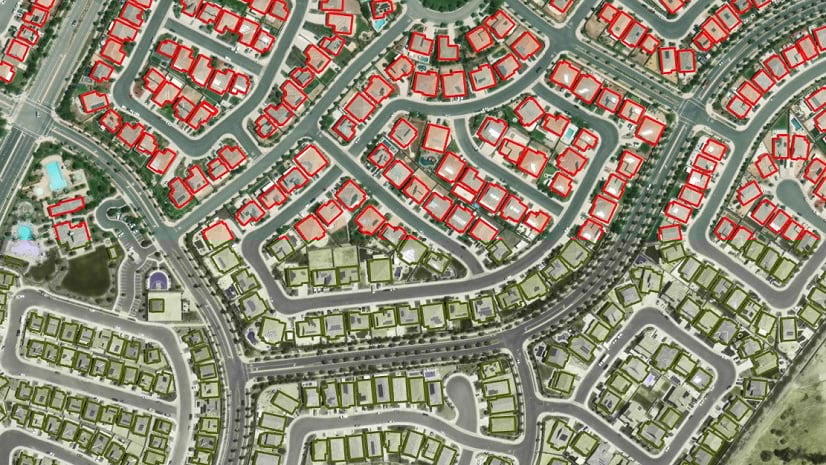
If you’d like to experiment with the tool to see the effect of changing the padding, try running the tool on small areas with padding set to different multiples of 8. In the graphic below, we are demonstrating how a padding of64 px is treated while inferencing.

For example, if the default is 32 px, try running the tool with paddings of 24 px and 16 px and compare the results. Check the images below to see the output of a model run with a padding of 32 px (in green) vs 8 px (in purple).


Batch size
Batch size is a term used in machine learning and refers to the number of image tiles the GPU can process at once while inferencing. The imagery is chopped up into tiles during inferencing, and the number of tiles the GPU can inference in one batch is called the batch size. If you run into out-of-memory errors with the tool, you need to reduce the batch size.
The batch size your computer can handle will depend on the GPU available in your machine. To determine the optimal batch size, you may need to run the tool a few times on a small geographical extent while monitoring your GPU metrics. Start your testing with a small batch size and increase the number as you go to maximize the GPU RAM usage. We will cover how to monitor your GPU RAM usage in the “Run the Detect Objects Using Deep Learning geoprocessing tool” section below.
Threshold
Prediction models output a level of confidence for each feature (i.e. building) they detect. The threshold parameter sets the minimum level of confidence that will be included in the output. For instance, if you set the threshold to 0.9, any feature the model is less than 90% confident in will be eliminated. Another approach is to run the model with a lower threshold than your ultimate target, and then set a definition query on the output feature layer using the confidence attribute to display only features above a certain confidence threshold.
Return bounding box (return_bbox)
Return bounding box is a Boolean parameter with a True or False input. If True, the Detect Objects Using Deep Learning geoprocessing tool will return a bounding box around the detected feature rather than the feature itself.
Run Detect Objects Using Deep Learning
Now that you are familiar with the parameters for the Detect Objects Using Deep Learning tool, you are ready to start the inferencing process:
- From the Analysis tab on the main ribbon, click Tools.
- Under Find Tools, type Detect Objects Using Deep Learning and open the tool.
- Fill in the parameters as follows:
- Input Raster: Input your high resolution imagery.
- Output Detected Object: Specify an output location for the detected features.
- Model Definition: Import the previously downloaded dlpk.
- padding: 32 (See details above or leave the default)
- batch_size: 16 (Leave the default if you have a Nvidia RTX 5000 GPU or equivalent. Decrease the batch size if you run into CUDA out-of-memory errors.)
- threshold:9 (See details above or leave the default)
- return_bboxes: False (See details above or leave the default)
- Check the Non Maximum Suppression This option is essential to merge overlapping detected features.
- Leave the other parameters as defaults. Do not run the tool yet.

- Click the Environments tab
- If you are trying to determine the optimal batch size for your environment, zoom in to a small extent of your image where you can see about a dozen buildings and then set the Processing Extent to Current Display Extent. If you are confident in your batch size, leave the default Processing Extent settings.
- For Processor Type, pick GPU.
- GPU ID: 0 (for further explanation of this setting refer to the section in Part 1 of this blog series on installing CUDA).
- Run the tool.

To determine the optimal batch size for your GPU as discussed above, follow these steps as the tool is running:
- Open the command prompt window.
- Type nvidia-smi and press Enter.
- Under the Memory-Usage section, if you see there is some memory not being used, increase your batch size. If you see that the memory usage is at its max and the tool fails, decrease your batch size.

Now that you know how to adjust the parameters to complete inferencing in ArcGIS Pro, you can iterate until you are happy with the output of the model. In the next blog post in this series, we will take this output and use ArcGIS Pro spatial analysis tools to further refine your result, including detecting and removing irregularities and misidentified features.


Hi Kate and Rami,
Do you know if the Esri World Imagery Basemap is an appropriate input for the Detect Objects using Deep learning tool?
We receive an error 999999 message when running the tool. Our model definition is the USA Building Footprints.dlpk.
Thanks!
Alison
Hi Alison –
Inferencing on the world imagery basemap has been disabled. Currently, programmatic requests made against the world imagery basemap is violating the terms of use of the basemap. Hope this helps, and I’m glad you are trying out the workflows
-Vinay