We all know how important imagery can be for spatial analysis, and a video is a simply a series of images (frames) captured at a specific rate, such as 30 frames per second. While video data contains important visual information, the application of this information in a GIS is limited unless you know when and where the video was collected.
High-performance, sophisticated systems provide video data that comes with this “when and where” metadata already embedded in the video, but lower-cost sensor systems with a GPS and an inertial measurement unit (IMU) are often deployed without embedded metadata. In order to use video data with Full Motion Video capabilities in ArcGIS, the video stream and metadata must be combined into a single compliant video file (compliant with a standard known as MISB). This can be done using the Video Multiplexer geoprocessing tool, available with the Image Analyst extension.


You can play a video in the Full Motion Video (FMV) player without any metadata. However, if your video has the proper metadata, you can display the video footprint, sensor location and track, and look angle on your map as you play the video. You can also add features directly in your video and see them displayed on your map, or vice versa. The Video Multiplexer tool embeds geospatial information from a metadata file into a video to produce a geo-enabled video file, which can be visualized and used for data capture in the FMV player.
You can get oriented with Video Multiplexer tool with the video multiplexer tutorial. Tutorials can be great teaching mechanisms, but in order to learn all about a workflow we sometimes need a little more than a perfect sample dataset that works like a charm. In this blog, we’ll go over some tips and tricks for working with the Video Multiplexer tool to make sure you can be successful with your own data.
Minimum Metadata Requirements
Below you will see the minimum metadata requirements to use with the Video Multiplexer tool. With this metadata, the Video Multiplexer can calculate the video frame corners, and thus the size, shape, and position of the video frame outline that can be displayed on a map. Without this data, a video frame footprint cannot be calculated.
| Precision Time Stamp | Coordinated Universal Time (UTC) represented in the number of microseconds elapsed since midnight (00:00:00), January 1, 1970. Derived from the POSIX IEEE 1003.1 standard. Resolution: 1 microsecond. |
| Platform Heading Angle |
Aircraft heading angle. Relative between longitudinal axis and True North measured in the horizontal plane. 90 represents East. |
| Platform Pitch Angle |
Aircraft pitch angle, relative to the horizon, determined by the rotation around the side-to-side axis of the collection platform, also described as nose up or nose down. A positive angle means the aircraft is pointing above the horizon, a negative angle is pointing below the horizon. |
| Platform Roll Angle |
Aircraft roll angle determined by the rotation around the front-to-back axis of the collection platform. This occurs when one airplane wing is higher or lower relative to the other wing. |
| Sensor Latitude | The latitudinal position of the sensor aboard the aircraft. Based on WGS84 ellipsoid coordinate system. |
| Sensor Longitude | The longitudinal position of the sensor aboard the aircraft. Based on WGS84 ellipsoid coordinate system. |
| True Altitude or Sensor Ellipsoid Height |
The height above mean sea level, in meters, of the sensor aboard the aircraft. |
| Sensor Horizontal Field of View | Horizontal field of view of imaging sensor, in degrees. |
| Sensor Vertical Field of View | Vertical field of view of imaging sensor, in degrees. |
| Sensor Relative Azimuth Angle |
Relative rotation angle of sensor to platform longitudinal axis. Rotation angle between platform longitudinal axis and camera pointing direction as seen from above the platform, in degrees. |
| Sensor Relative Elevation Angle |
Relative Elevation Angle of sensor to platform longitudinal-transverse plane. Negative angles down, in nano degrees. |
| Sensor Relative Roll Angle |
Relative roll angle of sensor to aircraft platform. Twisting angle of camera about lens axis. Top of image is zero degrees. Positive angles are clockwise when looking from behind the camera. |
Note: If your sensor is secured to the airborne platform, and is not using a Gimbal, then Sensor Relative Azimuth, Elevation and Roll are not required.
The parameters above are well described in the MISB standards document. You can download the zip file titled MISP-2016.1 from the MISB website, unzip the file and look for a folder called MISP-2016.1CompositeDocuments. Within that folder is a PDF called ST0601.9.pdf, which contains a reference to all of the MISB fields supported by the FMV tool set. It also includes descriptions of the parameters and useful diagrams.
The Precision Time stamp field
Assuming you have all the required metadata, one of the most important steps in formatting your metadata for the Multiplexer tool is making sure the Precision Time stamp is in UNIX Coordinated Universal Time (UTC), in microseconds, with 16 digits with no decimal places. If your time stamp is currently in human-readable format (e.g. 3/13/2018 4:15:03 PM) and you need to convert it to UNIX, you can use an online tool or an Excel formula.
For accurate results, your existing timestamps should include date and time with seconds (dd/mm/yyyy hh:mm:ss).
…using an online tool
The Epoch Converter converts human-readable timestamps to UNIX timestamps individually or in batches. Copy/paste your timestamp rows from your Excel sheet into the batch converter and choose to export the UNIX results to a CSV file. You can then simply copy/paste the new UNIX timestamps back into your metadata file.
* Note that the Epoch Converter generates results in milliseconds rather than microseconds. You must multiply the results by 1,000 to convert to microseconds, a requirement for the Multiplexer tool.
…using an Excel formula
If you don’t want to do a batch conversion or your video is too long to fit into the batch converter, you can manually calculate the UNIX timestamp in your Excel document using a simple formula. This is great if you have video frames with distinct time stamps.
- In your document, select a blank cell where you want to begin entering the UNIX timestamps.
- Type the following formula and hit Enter:
=(A2-DATE(1970,1,1))*86400000000 - Be sure to modify the formula for the cell location of your first timestamp and the date you typed in.
- Then drag the autofill handle to the bottom of your range of timestamps or simply double-click the autofill handle to fill in the remaining values.


… using interpolation in Excel
If you can’t use the Excel formula method because you have multiple frames with the same time stamp, you can use an interpolation method to get a smoother, slicker video output.
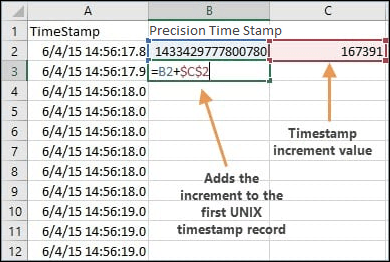
- Create a new column in your document called “Precision Time stamp”. Use the Epoch Converter to convert the first and last timestamps in your document, then paste these values into the new column next to their respective records (the first and last).
- Subtract the first timestamp (smaller value) from the last timestamp (larger value) to get the timestamp range.
- Divide the timestamp range by the total number of records minus 1. For example, if there are 1000 records, divide the timestamp range by 999. This is the timestamp increment. Paste this value in a blank cell in your document. As an example, let’s say you put it in cell C2.
- In the Precision Time stamp column, click to select the second record in the column, which should be blank. Assuming your increment value is in cell C2, and your Precision Time stamp column is column B, type in the following formula for cell B3 (the blank cell):
=B2+$C$2
The $ symbol in the formula ensures that, when you get to the next step, all the remaining cells will point to the same value (in C2). Hit Enter to commit the formula for the Precision Time stamp cell. - Drag the autofill handle from the second record to the bottom of your range of timestamps or simply double-click the autofill handle to fill in the remaining values.

…after you converted
Make sure your UTC Precision Time stamps have no decimal places and are not using scientific format (e.g. 1.459E+15). To do this, format the cells as “Number” and change the number of decimal places to 0.

Other Important Odds and Ends
To wrap it up, here are some final tips to remember when working with the Multiplexer tool:
- If you reopen an existing CSV file, Excel will re-apply the conversion to scientific notation, so you’ll have to repeat the process to format the cells as “Number” every time you open the file, unless you do not hit SAVE after opening.
- Confirm that longitude and latitude values are in decimal degrees. For batch conversion from another coordinate system, check out the Earth Point conversion tool.
- Confirm the other metadata values appear valid, such as heading, pitch and roll in degrees, sensor altitude in meters above sea level, etc.
- Save the Excel spreadsheet as a CSV by choosing “Save As”, navigate to the output directory, specify a filename, and an output file format as CSV. Excel will ask you to confirm the CSV format. Choose Yes.
- Close the CSV file before using it in the Video Multiplexer tool. If you have the file open while attempting to run the tool, you will get an error.
More Resources
Make sure you check out the Full Motion Video tutorials for guided instruction on working with geo-enabled videos in ArcGIS Pro. Enjoy your geo-enabled videos!
Acknowledgements
Many thanks to Julia Lenhardt for her assistance, and the Motion Imagery team for their editorial comments.

Article Discussion: