For the 100.6.0 release of ArcGIS Runtime SDK for .NET, I was tasked with writing documentation for using dictionary styles. Since I can’t learn without getting my hands dirty, I used this as an opportunity to create my own custom dictionary style. As a casual ArcGIS Pro user and someone who’d sooner peek into a badger den than crack open an SQLite database, I was anticipating a little discomfort. Ultimately, I found it fairly easy, and actually a lot of fun to implement. I hope describing my steps here helps get you started and inspires you to find a use for dictionary styles in your projects.
TL;DR: I made a custom dictionary renderer to display restaurants, feel free to download it from ArcGIS Online and try it out.
Update (September 30, 2020): I’ve edited this article (and the download for the .stylx file) to use version 3.0 of the dictionary style. The changes are minimal but were enough to frustrate users trying to implement these instructions with a newer version style file. For those who may still need to use the older version, I’ve indicated the correct syntax for version 2.0 where it differs. The dictionary renderer toolkit describes how to upgrade a style to version 3.0.
Webster defines “symbol” as …
OK, so it’s not that kind of dictionary. While not nearly as wordy and weighing significantly less, an ArcGIS dictionary style shares one important quality with a traditional dictionary, the ability to look up information using a provided value. I’m not just talking about looking up a symbol using a unique identifier … any style can do that. What makes a dictionary style special is built-in logic to determine which symbol to return based on input values. The symbol generated may be the result of several symbol primitives, cobbled together to appropriately represent all of the input values.
For my custom style, I thought it would be cool to create a dictionary style for symbolizing restaurants. I wanted each restaurant symbol to impart as much information as possible. Things like: food style, open and close time, star rating, price range, and so on.

Like a standard mobile style file, a dictionary style contains a collection of symbols and is stored as an SQLite database with a .stylx extension. In addition, it contains instructions for constructing symbols based on multiple input attributes. Until recently, the logic to apply symbols from a dictionary style hid deep in the bowels of ArcGIS and was limited to styles based on a handful of military specifications. This logic now enjoys the light of day as a JSON configuration string and an Arcade script that happily coexist with the symbols in the style. This means that not only the symbols, but also the way in which they are applied can be customized and packaged into the style.
Let’s give it a try
To create your own custom dictionary style, you’ll need the following.
- ArcGIS Pro
- An SQLite database editing tool (such as DB Browser for SQLite)
- A text editor (I like Visual Studio Code or Notepad++)
- An existing dictionary style (like one of the military styles hosted on ArcGIS Online)
- A cold beverage (optional)
Find your style
The best way to start your custom style is by copying an existing dictionary style. Even if you aren’t going to use any of the existing symbols, configuration, or script in the style, you need the framework provided by an existing dictionary style. The available military styles contain a meta table with required fields like dictionary_configurations and dictionary_script.
- Make a copy of an existing dictionary style file, such as
MIL2525C.stylx, for example. I gave the copied file a name that described my style, “RestaurantStyle.stylx”.
Before you can start making changes to your style, you need to make it editable. A field in the style’s meta table determines if the style can be edited.
- Launch a database browser for SQLite. I used DB Browser for SQLite, a free and easy-to-use utility. Open your .stylx file in the database browser. Note that the tool probably won’t recognize .stylx files as a type of SQLite database, so you may need to set the filter in the browse dialog to “all files”.
- When the database opens, browse to the
metatable. In DB Browser for SQLite, you click the Browse Data tab then select the table from the drop-down. For now, you only need to change thereadonlyvalue to false, but while you’re at it, you should probably also go ahead and changedictionary_nameto reflect the purpose of your style. I called mine “RESTAURANT-INFO” (catchy name, right?). - Make sure to apply your changes to the database! In DB Browser for SQLite, there’s a Write Changes button to apply your edits.

We’ll return to the meta table of our style later when we tinker with the style configuration and Arcade script.
Add symbols to the style
Now that your new style is editable, you can bring it into ArcGIS Pro and load it up with the symbols you want to display. More accurately, the individual symbol components (“primitives”) that will be used to generate the complete symbol. This is likely to be the most time-consuming part of the process, not because it’s difficult, but because (if you’re like me) you’ll spend time tweaking and obsessing over the details of each symbol.
- Start ArcGIS Pro with a new project and add your new style to the project: From the Catalog tree, expand Styles, right-click and choose Add > Add Style. Navigate to your .stylx file and add it to the project.
- Right-click the new style in the catalog and choose Manage. This will launch a window that shows all the symbols in the style.
- Select all the current symbols (ctrl-A, for example) and delete them.

To keep things simple, you might want to create just a subset of all the symbols you’d like for the style. That way, you can move on to creating the logic to generate symbols from attributes and test how they’re applied. You can always return to flesh out the style with additional symbols once you’re confident that your dictionary style works as expected.
- Create all the individual symbols you need. I organized mine into categories (Style, Hours, Price, and so on). While the name for each symbol isn’t too important, you need to assign a unique (and meaningful) key for each. Your style’s script will rely on these keys to return the correct symbol components. The keys in my style are generally a combination of the category and name.
- Remember that you are building a collection of symbol primitives that will be combined to create a multilayer symbol. When you create each of these symbol components, you need to position them so they fit with the others. Tweak symbol properties like
Offset XandOffset Yto position things in the correct space.
For my restaurant style, I laid out where each component should go: food style, rating, price, and so on. Each of these categories of symbol has its own position that won’t overlap with the others.

Configure it out
Now that you have a few symbols in the style, you can update the style configuration to specify which attributes are needed for the dictionary script. You can then add script logic that uses the names in the configuration to determine which symbol components to return. OK … that sounds a little confusing, but trust me, it’ll make sense soon.
- Return to your SQLite browser tool and make sure your style (.stylx file) is open.
- Find the
dictionary_configurationfield in themetatable. Copy the configuration value (a JSON string) and paste it into a text editor. Remember that this configuration is from the military style, so there’s a lot going on. Depending on your needs, you can probably pare it down to a handful of required fields and settings.
- Once you have the configuration the way you like it, paste it back into the
dictionary_configurationfield in themetatable.
Play with Arcade
The names you added to your configuration can now be used as variables in the style’s Arcade script. Let’s add some logic to the script that uses those values to determine which symbols to return.
- Find the
dictionary_scriptfield in themetatable. Copy the value (an Arcade script) and paste it into a text editor. This script is from the military style, and it’s waaaay more complex than what we need for restaurants. - Scroll to the bottom of the script and look at the last line:
return keys;.
Whatever logic you decide to add to your script, ultimately, it just has to return a semi-colon delimited list of keys that correspond to keys you assigned to symbols in the style. This can be zero keys, one key, or several. All the symbols identified by the list will be used to create the output multilayer symbol.
- Delete all the text in the script, it looks scary … let’s start with a blank canvas.
Some keys for your symbols might be built using the input attribute you’re evaluating. For food style, for example, I use the style input to determine the corresponding symbol by building the key with the input value. If the style attribute value is “thai”, the script creates the key “style-thai”, for example.
Other keys might need to be determined with additional logic. For my star rating symbol, for example, I had to return a symbol for the nearest 1/2 star. My script uses a branching statement to round the input rating to the nearest .5 stars and returns the appropriate key. I do the same for healthgrade, returning a key for a letter grade based on the raw input score (0-100).
Of course, you can make the logic as complicated as you need to. For open and close times, for example, I use an Arcade function to get the current day of the week and then return the symbol keys for today’s open and close time.
- Use the script shown below as a model to create a list of keys to return (“key1;key2;keyN”). The last line of your script should return the list.
- Paste the edited Arcade script back into the
dictionary_scriptfield in themetatable. - Don’t forget to write your changes back to the style!
Except for the inevitable tweaking you’ll want to do, your dictionary style is complete! The only thing left to do now is to test it with a dataset containing the expected information to symbolize.
Let’s find a place to eat
You’re now ready to test the style! When applied to a dataset with the expected attributes, you should see symbols generated for features based on your script’s logic for the input values. If you want to be extra smart, you can provide default values for when an expected input isn’t found (I’ll leave that for homework).
- Start ArcGIS Pro again and open the project you created earlier.
- Add a map with a layer for testing your dictionary symbology. For me, this was a dataset I found on ArcGIS Online of local restaurants. I published my restaurant data as a hosted feature layer, feel free to use that layer for testing if you like.
I had to spend some time editing the data to include the attributes I needed, such as rating, price, hours, and so on to make sure all the inputs for my dictionary style was in place. If the attribute names match with the names in the configuration, the dictionary style will automatically use them. If not, don’t worry, you can point ArcGIS Pro (or your ArcGIS Runtime app) to the correct field for each expected input.
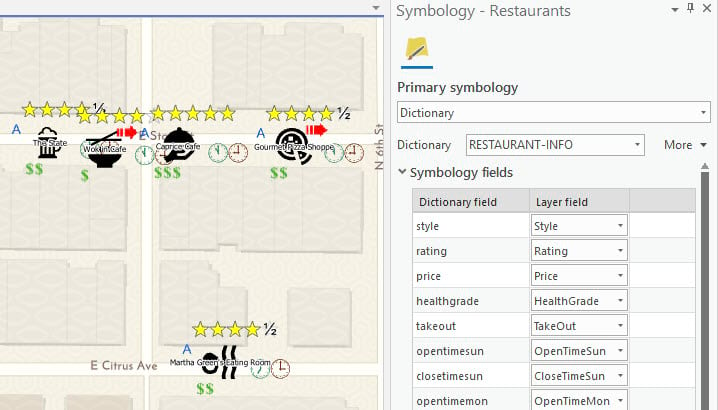
- Open the symbology panel for your layer (right-click the layer, choose Symbology).
- In the primary symbology dropdown list, choose Dictionary.
- Choose your dictionary style in the Dictionary dropdown. It will appear with the name you provided earlier for the
dictionary_namefield in themetatable. The dictionary symbology should immediately be applied. - You’ll see all the values you provided in the configuration and dropdown lists for providing attributes for each.
Nicely done! If your symbols don’t appear, you might want to try commenting out all of your Arcade script except code that returns a single key. If you can get that symbol to work, start uncommenting other portions of the code and return additional keys.
Please feel free to email (ttilton@esri.com) if you have questions or problems. I’ll do my best to help you troubleshoot. I’d also love to hear about any interesting dictionary styles you implement!

Commenting is not enabled for this article.