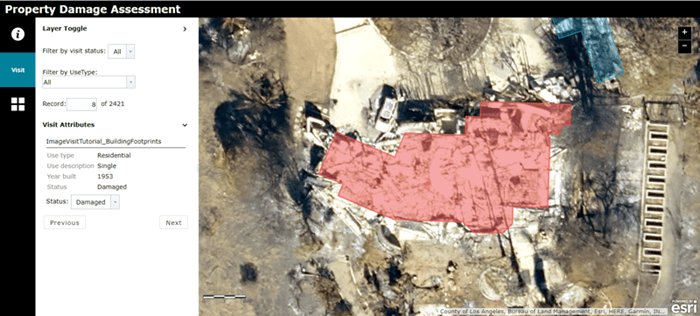
A previous blog showed you how to use deep learning in the aftermath of a natural disaster to efficiently speed up disaster response and recovery efforts. Here, we’ll show you how to make a key part of deep learning—labeling training samples—faster and easier using one of Esri’s configurable apps.
ArcGIS Pro has labeling and training workflows for deep learning that were seriously enhanced and streamlined in the 2.5 release. Sometimes, though, it’s helpful to perform the process on a lightweight client like a browser, using an app that’s easy to share with people who can contribute to your labeling effort.
Providing the right quantity and quality of training samples is essential to successfully train a deep learning model that will accurately identify features. That generally means providing a lot (!) of training samples that have all been manually classified. For the Woolsey fires scenario, we had to skim through almost 10 sq. miles of imagery and categorize over a thousand building footprints as either damaged or undamaged. Challenging? Yes! But we managed to crowdsource this process in twenty minutes by using the Image Visit configurable app template to create a labeling app.

What is the Image Visit configurable app?
The Image Visit configurable app lets users quickly review imagery at a predetermined sequence of locations, editing attributes as needed. If you’re using a dynamic image service, the image for the upcoming location is pre-loaded to minimize wait time. It uses a feature service to drive the app, visiting each feature in turn.
We used this functionality to create an app that drives users to each training sample, lets them classify the training sample as damaged or undamaged property, and stores the results as a hosted feature service.
How we built the labeling app
To create the labeling app, there were four steps:
- Prepare our data—We used a shapefile of building footprints provided by Los Angeles County to create a hosted feature service that contained all our samples.
- Configure our web map—We gathered and configured our feature service and imagery into a web map (which is the basis for the labeling app).
- Build the app—We configured an out-of-the-box web app template as a labeling app.
- Use the app—We were able to quickly review and label our training samples.
That’s it! Now multiple users can quickly label training samples, with all results stored in a feature service. Try it out yourself—take a demo version of the app for a spin, or follow this Image Visit tutorial to make your own.


Commenting is not enabled for this article.