ArcGIS Field Maps

Create a map for geological data collection

Geologists collect rocks, minerals, fossils, and other specimens in the field to better understand the geological processes that shape our world. Traditionally, geologists collect data and compile field notes using paper-based notebooks and forms.

ArcGIS Field Maps is an app that allows for more streamlined field data collection. Using Field Maps, geologists gain a more organized data collection process by using digital maps and forms that can quickly be shared with others. Let’s explore how you can use Field Maps to collect geological data!

Imagine you’re a mineralogy teacher and your class will be collecting mineral specimens at the Chambless Rock Collecting Area as part of a field-based lab assignment. This area is a popular place for collecting hematite, magnetite, and green epidote minerals. Small garnets have also been identified at this location. While at Chambless, your class will use ArcGIS Field Maps to record and collect data on the mineral specimens they find. Before your class heads to the field, you must first make the map your students will use to collect data. Let’s learn how to make the map.

Create a layer

First, you’ll create the feature layer that will be used to add mineral types in Field Maps. You’ll create this layer using ArcGIS Online.

1. Sign in to your ArcGIS Online account and, at the top of the window, click Content.

2. On the Content page, click Create and select Feature Layer.

new item button

3. Select Create a blank layer and click Next.  

create a blank layer

4. Change Layer_1 to Mineral Collection and, from the drop-down menu, select Point layer. Click Next.

add mineral collection layer

5. Add the metadata for your new layer:

layer metadata

6. Click Save.

The feature layer is created and its item page, which contains metadata and other information, opens.

Configure the fields in the Mineral Collection layer

Now that we’ve created the Mineral Collection layer, we will need to create a way to track what types of minerals are collected, by whom, and any additional field notes. To do so, we’ll configure the layer’s fields. These fields contain additional information about the minerals you will collect in the field.

1.On the item page, click the Data tab and click Fields.

data and fields tab

A list of the layer’s fields appears. By default, the layer already has a few fields. Some of these are ID fields, while others track the dates when features were created or edited.

We will add a few new fields to our layer. First, let’s add a Mineral Type field that will allow us to designate what types of minerals we’ll collect while in the field.

2. Click the Add button.

The Add Field window appears.

3. For Field Name, type mineral_type. For Display Name, type Mineral Type. For Type, select String.

4. Uncheck Allow Null Values. Unchecking this box makes filling out this field required.

5. Click Add New Field.

mineral type field

The Mineral Type field is added to the list. Next, let’s add a locality field that will allow us to input our field collection locality.

6. Click the Add button. In the Add Field window, for both Field Name and Display Name, type Locality. Keep the field type as String.

7. Uncheck Allow Null Values and click Add New Field.

locality field

The Locality field is added to the list of fields.

8. Next, let’s complete the same process for four more fields:

Uncheck Allow Null Values for all to make filling out each field required.

9. Add any additional fields to include the data you want collected during the lab.

The following are additional fields you might include:

Now that all the fields are created, we’ll create a list of the possible Mineral Type options students can choose from.

For the Mineral Type field, you want to make sure responses are minerals that are found in the collection location: Hematite, Magnetite, Green Epidote, Garnet. You will also provide an option for other minerals that students may find.

10. In the list of fields, under Display Name, click Mineral Type and click Create List.

mineral type create list

11. For Label and Code, type Hematite.

12. Click Add. In the new list value, for both Label and Code, type Magnetite.

13. Add Green Epidote, Garnet, and Other (minerals that don’t fit into a known category) to the list.

all list

14. Click Save.

These options will appear in the form students fill out while collecting mineral data.

list of values

15. If you want to edit these options, click Edit next to List of Values.

Add any additional item types that can be collected during your event and remove any that aren’t relevant. When you’re done, click Save.

The layer is now prepared, and we are ready to create the map.

Create the map

Next, we’ll enable the Mineral Collection layer for editing and add it to a new map.

1.On the item page of the Mineral Collection layer, click the Settings tab.

2. Under Feature Layer (hosted), check Enable editing and Enable Sync.

feature layer hosted

This allows community members to add data to the layer during the event. If you want to prevent them from deleting data, uncheck Delete under What kind of editing is allowed.

3. Next, click Save and return to the Overview page.

4. Add the Mineral Collection layer to a new map. To do this, click Open in Map Viewer.

open in map viewer

A blank map opens, containing the Mineral Collection layer. The layer currently has no data, so no features appear on the map. Later, you’ll add features using Field Maps.

We want the map extent to display the area where we will be collecting data

5. Click Search Search, type Chambless, CA. in the search field, and press enter.

6. Zoom out until the map displays the entire collection area.

chambless rock collecting area

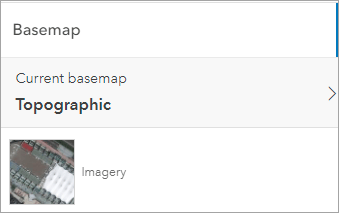
Next, let’s change the basemap so that the map shows the geologic features of the area.

7. Click Basemap Basemap and select the Imagery basemap.

imagery basemap

Next, we’ll add a chart to the map that will show the number of minerals you collect in the field.

8. In the side panel, click Configure Charts Configure charts and click Add Chart in the menu that pops up.

9. Select Bar chart and click the Data tab.

10. In the Category box, select Mineral Type.

mineral type category

Once we collect data in the field, the chart will show the number of minerals collected based on their mineral type. Later, we will also configure the style of our chart.

11. Click Save and Open Save and open and select Save.

12. In the Save map dialog box, add the following metadata:

save map form

13. Click Save map. The map is now saved.

Next steps

This blog post is the first part of the Collect Geological Data with Field Maps discovery path.

Now that you have made your map, check out the Configure a mineral collection map using Field Maps video to learn how to configure a map for use in the field.


About the author

D'Maia is a product writer with a background in Geology who is passionate about communicating technical information.

0 Comments
Inline Feedbacks
View all comments

Next Article

Multi-Scale Contour Styling in ArcGIS Pro

Read this article