
This blog post will give you a brief hands-on experience with the Image Classification Wizard in ArcGIS Pro 1.3.
Image classification is the task of extracting information classes from a raster image. The results of an image classification can be used to create thematic maps, analyze landcover, examine spatial relationships and more. For example, if you have aerial imagery of some land that includes farmland, forest, ponds, and a city, you could assign a range of pixel values to each of these landcover types, classify the aerial images, and create a series of maps that display the change in landcover over time.
Image classification is an incredibly useful and important task, but it can also be time consuming, complicated, and difficult to produce accurate results. Luckily, with the release of ArcGIS Pro 1.3, a magical new wizard has appeared to help you with your work.
The Image Classification Wizard provides a simplified user experience comprised of best practices to guide beginning and experienced users through the classification process.
Try your hand at the wizardry with this quick tutorial, or check out this help topic to learn more about the Image Classification Wizard.
It is recommended that you have some background knowledge of image classification to understand the terminology used in this blog. If you’re just getting started with imagery, check out the new ArcGIS Imagery Book filled with great interactive examples, videos, and exercises.
Set up ArcGIS Pro 1.3
- You’ll need to have ArcGIS Pro 1.3 installed on your machine. The post announcing the 1.3 release provides guidance on that. See the Get ArcGIS Pro 1.3 section.
- In order to use the Image Classification Wizard and complete this tutorial, you must have an ArcGIS Desktop license (any level) with the Spatial Analyst Extension.
- Download the zip file from ArcGIS Online that includes the ArcGIS Pro project and associated data. Extract the data to a convenient location on your machine.
- Browse to the folder location where you extracted the files, and double-click ImageClassificationWizardTutorial.aprx to open the project.
Start the Image Classification Wizard
Your project contains a number of raster imagery datasets on Lake Pontchartrain in New Orleans. These remotely sensed images contain data in red, green, and blue bands.

- Click Imagery Layer in the Contents pane. The Raster Layer contextual tab appears.
- Click the Data tab.
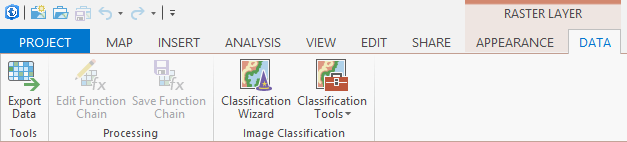
- On the Data tab, in the Image Classification group, click Classification Wizard. The Image Classification Wizard pane opens.
Complete the classification
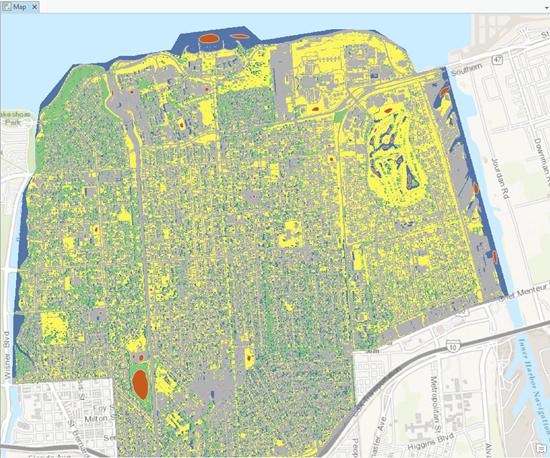
In the map view, the raster landcover data for Lake Pontchartrain is useful for those who understand what the different colors of the RGB band combinations represent. However, if the image was classified, different landcover classes become apparent to anyone looking at the map. The Image Classification Wizard walks you step-by-step through the classification process.
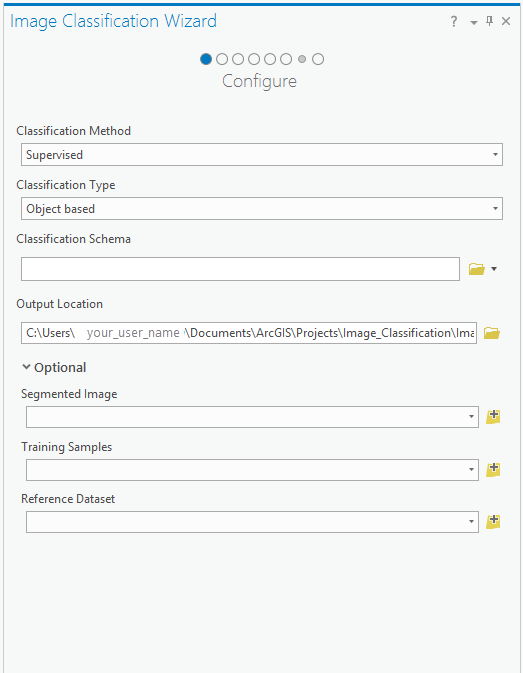
- On the Image Classification Wizard pane, on the Configure page, set the following configuration and then click Next:
- Classification Method: Supervised
The Supervised method allows you to decide which classes are in your image based on a schema that you specify. Unsupervised classification allows the computer to create classes based on differences in the spectral characteristics of the pixels.
- Classification Type: Object based
The Object based classification type groups neighboring pixels based on how similar they are in a process known as segmentation. This method tends to produce less pixelated classification results.
- Classification Schema: Click the folder to Load Schema, and browse to the file: Project > Folders > ImageClassificationWizardTutorial > myNLCDgrey.ecs. Click Select to load the schema file.
ArcGIS Pro’s default schema is from the National Land Cover Dataset (NLCD), which is focused on North America. There is a custom NLCD schema that is included with this project.
- Segmented Image: Segmented Imagery Layer
This option is present because the Classification Type you selected is Object based. If this field is left blank, the Wizard will prompt you to manually create a segmentation layer in a later step. There is a segmented image included with this project.
- Training Samples: Training Samples
You only need training samples if your Classification Method is Supervised, because these samples are generated automatically by the computer if you choose the Unsupervised method. There are training samples included with this project.
- Reference Dataset:Reference Layer 1
The Reference Dataset is the standard with which you will compare your classification results. It contains known features, collected from the field or from higher resolution imagery than your input dataset. There is a feature layer included with this project.
- On the Training samples Manager page, the National Land Cover Data (NLCD 2011) class is selected.
The Training Samples Manager page loads your configuration from the previous step. On the top of the page, you can customize your schema by adding, removing, or editing classes. On the bottom of the page, you can see, interact with, and edit your training samples.
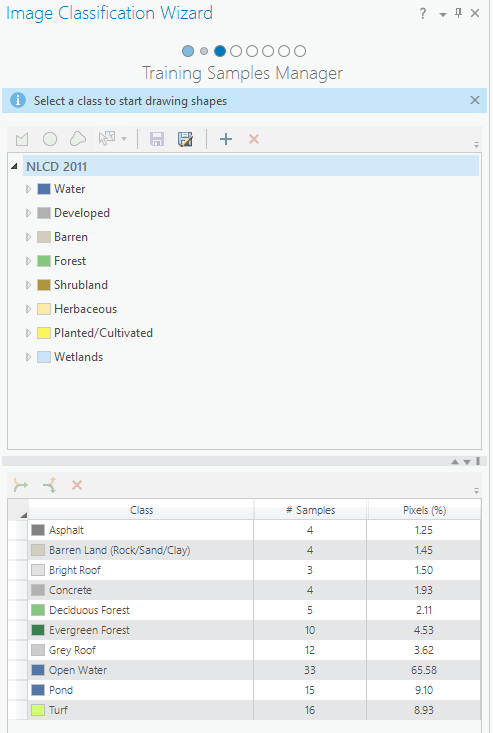
If your Training Samples Manager page looks like the image above, click Next.
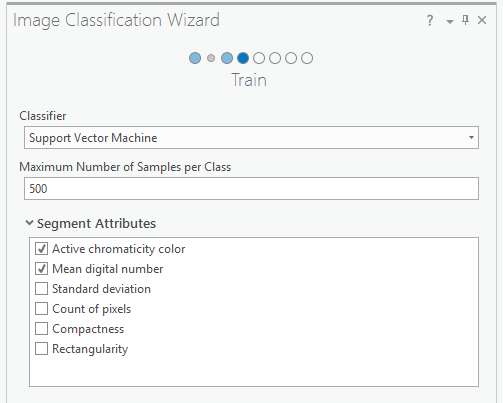
- On the Train page, accept the defaults and click Run.
The Train page is where you select a classification algorithm. When you click Run here, it will process the segmentation, and train and create a signature (.ecd) file. After the training is completed, you can use the preview layer to compare different classification algorithms. In this example you will use the Support Vector Machine (SVM) classifier which is a relatively new classification method widely used among researchers.
- Press the “L” key to toggle the transparency of the preview layer. Click Next.

Press L to toggle the preview on and off in the map view. - On the Classify page, rename the Output Classified Dataset to Output_Imagery and click Run.
Clicking Run on the Classify page saves the previewed outputs.

- When the tool succeeds, click Next to add the output layer to the map.
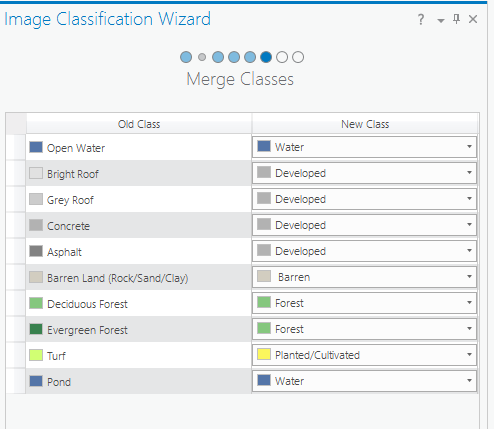
- On the Merge Classes page, you can choose to make your classes more broad, or more specific. For this tutorial, the final map should be as simple as possible for your audience, so fewer, more broad classes are ideal. Update the New Class fields as specified here, and click Next.
- Open Water: Water
- Bright Roof: Developed
- Grey Roof: Developed
- Concrete: Developed
- Asphalt: Developed
- Barren Land (rock/salt/clay): Barren
- Deciduous Forest: Forest
- Evergreen Forest: Forest
- Turf: Planted/Cultivated
- Pond: Water
As you merge or assign classes, you can press the L key to toggle the transparency of the classified image. If you want to change a class to one that is outside of the parent classes in the schema, you can do it on the Reclassifier page, which is a later step in the Wizard.
- On the Accuracy Assessment page, accept the defaults and click Run.
The Accuracy Assessment uses the Reference Data that you selected in the Configure page. The values of your reference dataset need to match the schema. The Sampling Strategy that you will use, Stratified Random, is the default sampling scheme. This scheme creates points that are randomly distributed within each class.

The Confusion Matrix gives an assessment of the accuracy of your classification, with a Cohen’s Kappa score of 1.00 being 100% accuracy. Darker blue squares represent the highest accuracy, with dark red being least accurate or false positives. You can address the errors identified by this matrix, and re-run the assessment if you wish.
The Cohen’s Kappa score of .76 is pretty good, so click Next. The Confusion Matrix also creates a standalone table with a more detailed breakdown of the matrix data that you can see in the Contents pane.
- Click Next to proceed to the Reclassifier page.
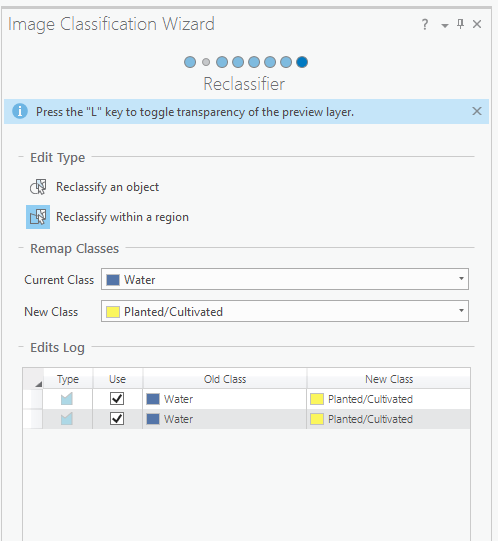
The Reclassifier page provides an opportunity to address errors in the classification result.
Here, you have some options for reclassification. Reclassify an object allows you to draw a circle around an object and change its class. Reclassify within a region allows you to draw a polygon and update the classification within that polygon. You can use the L key to toggle the transparency of the preview layer. You may need to turn off your preview layers in order to see the difference between layers when toggling.
In the example below, the Water class was reclassified as Planted/Cultivated. This might be necessary if you’re classifying a section of New Orleans where aquaculture is prevalent. Feel free to experiment with the sample data provided.
- Click Run to apply any changes you may have made. Then click Finish to exit the Image Classification Wizard.
If you liked this tutorial and are interested in similar tutorials that explore the highlighted functionality of ArcGIS Pro 1.3, you might want to try:
Commenting is not enabled for this article.