At version 4.23 of the ArcGIS API for JavaScript, we introduced the RouteLayer to give users more control and flexibility over visualizing, solving, and persisting routes. Now at version 4.24, we have integrated the RouteLayer into the Directions widget. This means that we can use the power of the RouteLayer to both add functionality to the Directions widget, and improve existing workflows.

Let’s start with the Directions widget
As mentioned above, the RouteLayer is now an integral part of the Directions widget. Users should define a RouteLayer for the widget to use. This might be an entirely new RouteLayer, a webmap operational layer, or a RouteLayer derived from a route portal item. One thing to keep in mind is that it also must be added to the map in order to visualize the route. Here is an example of adding a new, empty RouteLayer to the map and Directions widget using the new Directions.layer property.
require([
  "esri/Map",
  "esri/views/MapView",
  "esri/widgets/Directions",
  "esri/layers/RouteLayer"
], function(Map, MapView, Directions, RouteLayer) {

  // create a new empty RouteLayer
  const routeLayer = new RouteLayer();

  // new RouteLayer must be added to the map
  // for route visualization
  const map = new Map({
    basemap: "topo-vector",
    layers: [routeLayer]
  });

  const view = new MapView({
    map: map
  });

  // new RouteLayer must be added to Directions widget
  const directionsWidget = new Directions({
    layer: routeLayer,
    view
  });

  // Add the Directions widget to the top right corner of the view
  view.ui.add(directionsWidget, {
    position: "top-right"
  });
}
It is important to note that the Directions widget will automatically assign two empty stops if the assigned RouteLayer does not have any defined. An empty stop is a stop without a name or location. In the UI, these empty stops will appear as placeholders for the user to either enter a search term, or digitize a location on the map. This behavior exists in legacy mode (no RouteLayer explicitly assigned to the Directions widget) as well.
When defining the Directions widget, you may want to have one or more stops pre-set. This can be done two ways, either directly on the RouteLayer before it’s assigned to the Direction widget, or after the Directions widget has loaded. Here we added two stops on the RouteLayer:
const routeLayer = new RouteLayer({
  stops: [
    {
      geometry: { x: -87.61395, y: 41.86039 },
      name: "Soldier Field"
    },
    {
      geometry: { x: -71.26439, y: 42.09096 },
      name: "Gillette Stadium"
    }
  ]
});
Alternatively, stops can be updated, modified, or re-assigned after the Directions widget loads, using the Directions.layer property:
directionsWidget.layer.stops = [
  {
    geometry: { x: -87.61395, y: 41.86039 },
    name: "Soldier Field"
  },
  {
    geometry: { x: -71.26439, y: 42.09096 },
    name: "Gillette Stadium"
  }
]
Lastly, any stop can be modified. For example, the following will update the name and location of the first stop:
directionsWidget.layer.stops.at(0).set({
  geometry: { x: -71.09707, y: -71.09707 },
  name: "Fenway Park"
});
The new Directions widget functionality includes the ability to save routes and modify visibleElements in the Directions widget UI. The saveAs method will save the currently assigned RouteLayer as a new portal item on ArcGIS Online or Enterprise. A shared route portal-item can be shared with others, used in new or existing webmaps, and opened by other Esri applications like ArcGIS Pro, Navigator, or MapViewer. The save method is useful if a RouteLayer is already associated with a portal item, and: if the user owns the portal item, or if the user is an administrator of the org to which the portal item belongs. Then the portal item can be updated with the latest changes.
We strongly recommend associating a RouteLayer with the latest version of the Directions widget. As part of our legacy support, the Directions widget will automatically create and assign a RouteLayer, and it to the map should the user omit to set this property. This legacy behavior is deprecated and subject to removal at a future release. Lastly, the temporary RouteLayer created to support this legacy behavior will also be removed from the view when the Directions widget is destroyed.
Additionally, three properties on the Directions widget, routeServiceUrl, routeSymbol, and stopSymbols, have been deprecated and are only honored when the Directions widget is used in “legacy” mode as detailed previously. If a RouteLayer is not explicitly associated with the Directions widget, use routeServiceUrl, routeSymbol, and stopSymbols. When a RouteLayer is explicitly associated with the Directions widget use the defaultSymbols and url properties directly on the layer.
Recap: comparing the Directions widget between versions 4.23 and 4.24
| Directions Widget | 4.23 | 4.24 |
| Persistence | No | Yes (save / saveAs) |
| Modify UI visibleElements | No | Yes |
| Symbology | routeSymbol, stopSymbol | RouteLayer.defaultSymbols |
| URL | routeServiceUrl | RouteLayer.url |
| LayerList support | No | Yes |
| Need RouteLayer | No | Yes |
Now for the RouteLayer
RouteLayer received many enhancements in 4.24. First, RouteLayer can now use custom symbology with the defaultSymbols property. This property defines the symbols used for stops, barriers, and directions whenever the RouteLayer is recomputed. The LayerList widget also supports RouteLayers, and RouteLayers now work in both 2D MapViews and 3D SceneViews.
Let’s look at an interesting example with an existing RouteLayer from a portal item. We want to overwrite the symbology to suit the look and feel of our app. The new property defaultSymbols (which is of type RouteSymbols) allows us to define, or overwrite, the RouteLayer symbology. If you look at the RouteSymbols doc you can find all the types supported based on the geometry type. Here is an example of using SimpleLineSymbol, PictureMarkerSymbol, SimpleMarkerSymbol, and CIMSymbol to overwrite the symbol in the existing RouteLayer portal item (this could also be configured using the Directions.layer property after the Directions widget is loaded with a RouteLayer):
const routeLayer = new RouteLayer({
  portalItem: {
    id: "fd4188722f3e4e14986abca86cad80c6"
  },
  defaultSymbols: {
    directionLines: {
      type: "simple-line",
      color: [0, 128, 0, 0.75],
      width: 6,
      cap: "square",
      join: "miter"
    },
    pointBarriers: {
      type: "picture-marker",
      url: "https://freesvg.org/img/cybergedeon-flame-color.png",
      height: 60,
      width: 45
    },
    stops: {
      first: {
        type: "picture-marker",
        url: "https://freesvg.org/img/1540864318.png",
        height: 100,
        width: 100
      },
      middle: {
        type: "cim",
        data: {
          type: "CIMSymbolReference",
          symbol: navyPierJSON
        }
      },
      last: {
        type: "simple-marker",
        style: "diamond",
        size: 42,
        color: "#FFEF00",
        outline: {
          color: "#32527b",
          width: 5
        }
      }
    }
  }
});
Now we have a way to customize the symbology of RouteLayers, both with and without the Directions widget. We can even toggle the visibility of a RouteLayer with the LayerList widget, and define custom actions.
Recap: comparing the RouteLayer between versions 4.23 and 4.24
| RouteLayer | 4.23 | 4.24 |
| 2D MapView support | Yes | Yes |
| 3D SceneView support | No | Yes |
| Symbology | No | defaultSymbols |
| Styling | blendMode, effect | blendMode, effect |
| LayerList support | No | Yes |
Time for a real-life demo
We’ve seen what’s new and improved in routing with the ArcGIS API for JavaScript. We’ve told you that these changes are for the better. Now, let’s see a real-life demonstration and see some of these capabilities in action.
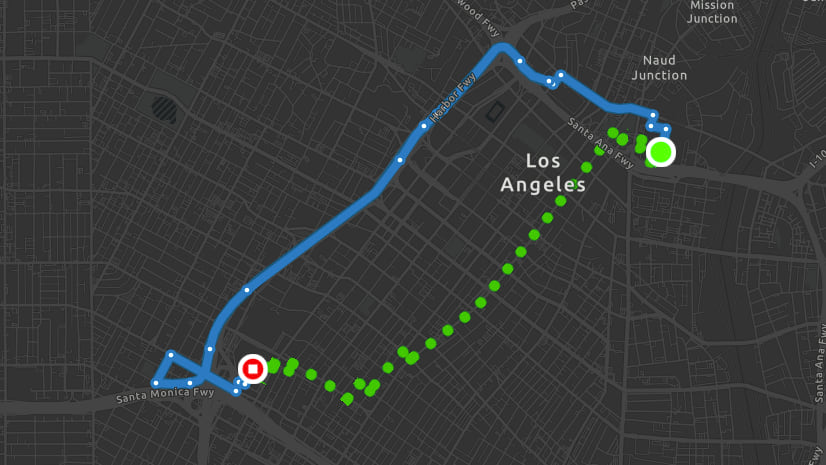
Here’s a routing app based in Chicago. The app has a map with three RouteLayers. Two are previously solved routes, accessed from a portal-item, and the third is a new route. All routes are added to the map and are visible in the LayerList widget. The LayerList widget allows us to toggle the visibility of layers and define custom actions. In this app we have defined a custom action to zoom to the selected RouteLayer, apply a bloom effect, and lastly assign the layer to the Directions widget. Once the layer is assigned to the Directions widget, users can view the driving directions, and/or update the route. For example, a user could add or remove a stop and recompute directions. There are also a few barriers that we need to watch out for (some are on fire). Click on the image below to run the app.

The first route goes from Sears Tower to Navy Pier to the Hancock Building. This route is already added to the Directions widget, so we can see the route details there, and either modify the route, or save the route. The other two routes go from Sears Tower to Soldier Field, and Soldier Field to the Museum of Science and Industry in Hyde Park. Let’s take a look at the different ways the RouteLayers are constructed. One is from a portal, one is from a portal with overwritten symbology, and the last one is a newly created RouteLayer:
const routeLayer = new RouteLayer({
  portalItem: {
    id: "fd4188722f3e4e14986abca86cad80c6"
  },
  defaultSymbols: {
    directionLines: {
      type: "simple-line",
      color: [0, 128, 0, 0.75],
      width: 6,
      cap: "square",
      join: "miter"
    },
    directionPoints: {
      type: "simple-marker",
      size: 0,
      color: [0, 0, 0, 0]
    },
    routeInfo: {
      type: "simple-line",
      width: 0
    },
    pointBarriers: {
      type: "picture-marker",
      url: "https://freesvg.org/img/cybergedeon-flame-color.png",
      height: 60,
      width: 45
    },
    polylineBarriers: {
      type: "simple-line",
      cap: "butt",
      join: "bevel",
      marker: {
        color: "orange",
        placement: "begin-end",
        style: "x"
      },
      style: "solid",
      width: 5,
      color: "red"

    },
    stops: {
      first: {
        type: "picture-marker",
        url: "https://freesvg.org/img/1540864318.png",
        height: 100,
        width: 100
      },
      middle: {
        type: "cim",
        data: {
          type: "CIMSymbolReference",
          symbol: navyPierJSON
        }
      },
      last: {
        type: "simple-marker",
        style: "diamond",
        size: 42,
        color: "#FFEF00",
        outline: {
          color: "#32527b",
          width: 5
        }
      }
    }
  }
});

const routeLayer2 = new RouteLayer({
  portalItem: {
    id: "a1b6fee5f4e545d8b7fa4074accedb10"
  }
});

const routeLayer3 = new RouteLayer({
  stops: [
    {
       geometry: { x: -87.61395, y: 41.86039 },
       name: "Soldier Field"
    },
    {
       geometry: { x: -87.58425, y: 41.79169 },
       name: "Museum of Science and Industry"
    }
  ]
});
We’ll then add the first RouteLayer to the Directions widget, but not to the map yet, because we want to overwrite the symbology before we add it to the map so that the updated symbology gets visualized.
const map = new Map({
  basemap: "topo-vector"
});

const view = new MapView({
  center: [-87.62235, 41.88951],
  zoom: 14,
  container: "viewDiv",
  map: map
});

// new RouteLayer must be added to Directions widget
let directionsWidget = new Directions({
  layer: routeLayer,
  apiKey,
  view
});
We create an asynchronous function to load and solve the relevant routes. This is because we’re using an await method to pause the code until the promise is resolved. After a RouteLayer is loaded and solved, we still need to update it before adding it to the map. We don’t need to load or solve the second RouteLayer, because that’s already been done when that RouteLayer was created (and we’re not updating it at all).
handleRoutes();

async function handleRoutes() {

  await Promise.all([
    routeLayer.load(),
    routeLayer2.load(),
    routeLayer3.load()
  ]);

  const [result, result3] = await Promise.all([
    routeLayer.solve({ apiKey }),
    routeLayer3.solve({ apiKey })
  ]);

  routeLayer.update(result);
  routeLayer3.update(result3);

  map.addMany([routeLayer3, routeLayer2, routeLayer]);
}
In the LayerList widget on the left, the arrow-shaped navigation icon toggles a bloom effect on and off, and zooms to the route. The RouteLayer will also be assigned to the Directions widget, resulting in the listing of stops, turn-by-turn driving directions, and the ability to re-route.
This is achieved by adding a custom action with the listItemCreatedFunction. This adds the navigation icon to the right of each RouteLayer in the LayerList widget. Then we add an event listener for clicking on the navigation icon. We then do 3 things: add bloom effect, add the RouteLayer to the Directions widget, and then zoom the view to the (slightly increased) route extent. If the bloom effect is already enabled, clicking the navigation icon will remove it.
const routeLayers = [routeLayer, routeLayer2, routeLayer3];

const layerList = new LayerList({
  view,
  listItemCreatedFunction: (event) => {
    event.item.actionsSections = [
      [
        {
          title: "Show Directions and Zoom to Route",
          className: "esri-icon-navigation",
          id: "show-directions"
        }
      ]
    ]
  }
});

view.ui.add(layerList, "top-left");

layerList.on("trigger-action", (event) => {
  for (const layer of routeLayers) {
    if (layer === event.item.layer) {
      if (!layer.effect) {
        layer.effect = "bloom(1.5, 1px, 0.1)";
        directionsWidget.layer = layer;
        const extent = layer.routeInfo.geometry.extent.clone().expand(1.5);
        view.goTo(extent);
      }
      else {
        layer.effect = null;
        directionsWidget.layer = layer;
      }
    } else {
      layer.effect = null;
    }
  }
});
Conclusion
Thank you for reading until the end. There is still more to talk about, but we’ll save it for next time. To review what we discussed in this blog, here are some helpful links to additional resources:
1) Routing improvements
https://developers.arcgis.com/javascript/latest/4.24/#routing
2) Directions widget is now integrated into the RouteLayer
https://developers.arcgis.com/javascript/latest/api-reference/esri-widgets-Directions.html
https://developers.arcgis.com/javascript/latest/sample-code/widgets-directions/
https://noashx.github.io/blog/ChangingDirections.html
3) RouteLayer has new properties for route customization
https://developers.arcgis.com/javascript/latest/api-reference/esri-layers-RouteLayer.html
https://developers.arcgis.com/javascript/latest/sample-code/layers-routelayer/
https://developers.arcgis.com/javascript/latest/api-reference/esri-layers-support-RouteSymbols.html
Upcoming enhancements for the Directions widget include: a print button to print the map and turn-by-turn directions, a polyline barrier button to allow users to create barriers on-the-fly, updated default symbology, and more.
Have an idea for the routing team? Leave a comment below to let us know what you’d like to see next!


Article Discussion: