At version 4.6 of the ArcGIS API for JavaScript, we introduced the DirectLineMeasurement3D widget. This widget calculates and displays the 3D distance between two points. At version 4.7, we introduced the AreaMeasurement3D widget. This widget calculates and displays the area and perimeter of a polygon.
But what about 2D?
Now at version 4.10, we are proud to release two new measurement widgets: the AreaMeasurement2D widget and the DistanceMeasurement2D widget. You can see them in action with the Measurement in 2D sample.
The AreaMeasurement2D widget calculates and displays the area and perimeter of a polygon. The DistanceMeasurement2D widget calculates and displays the distance between two or more points. Both widgets work with geodesic and planar coordinate systems, on Earth and extraterrestrial bodies.
Widget usage
Like most widgets, you can use them immediately by adding them to the current view. Note that both of these widgets can only be used in a MapView. Here is an example:
require(["esri/widgets/AreaMeasurement2D", "esri/widgets/DistanceMeasurement2D"],
  function(AreaMeasurement2D, DistanceMeasurement2D) {

  // To add the AreaMeasurement2D widget to your map
  var areaMeasurementWidget = new AreaMeasurement2D({
    view: view
  });
  view.ui.add(areaMeasurementWidget, "top-right");

  // To add the DistanceMeasurement2D widget to the map
  var distanceMeasurementWidget = new DistanceMeasurement2D({
    view: view
  });
  view.ui.add(distanceMeasurementWidget, "top-right");

});
Both widgets are designed to be interactive drawing tools that return labeled measurements. For measuring specific features programmatically, we recommend using the appropriate geometryEngine methods (e.g. geodesicLength).
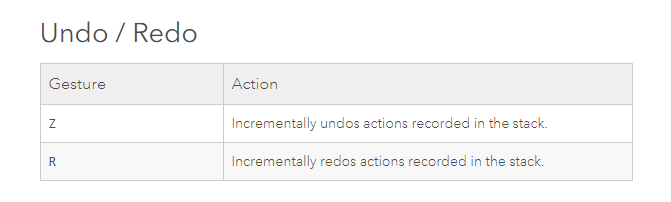
One benefit to this interactive approach to measuring is the ability to adjust measurements on the fly. There are two ways to do this. The first is the ability to undo and redo measurements using keyboard shortcuts when the measurement is still active (before double-clicking to finish the measurement).
The second is the ability to drag any measurement point and change its location (after double-clicking to finish the measurement). This updates the graphic as well as the measurement label.
Here is an example of how that looks with the DistanceMeasurement2D widget (same principle applies for the AreaMeasurement2D widget):
One last item worth mentioning is that when the unit is set to metric or imperial, the measurement label is expressed in a logical metric or imperial unit. For example, at large scales (zoomed in) the metric unit will be expressed in meters, but at small scales (zoomed out) it will automatically change to kilometers.
Widget properties and methods
Now let’s take a brief dive into the properties and methods of the widgets and explore them in more detail.
The AreaMeasurement2D widget calculates and displays the area and perimeter of a polygon. By default, the mode used to calculate the area and perimeter is set to auto. This means that when the perimeter is less than 100 km, the mode is planar. When the perimeter is greater than or equal to 100 km, the mode is geodesic. This threshold value can be modified by setting the geodesicDistanceThreshold property on the AreaMeasurement2DViewModel. Also, the mode can be set by the user in the UI of the widget, or by the developer in the code. Behind the scenes, we use the geometryEngine to perform the appropriate measurement calculations.
Similar to its 3D counterpart, you can define the default measure unit for the AreaMeasurement2D widget, or define the set of measurement unit options available to the user. All possible unit values are listed in the measure unit property; custom units that are not listed are not supported. Here are a couple of code snippets that illustrate this functionality:
// To create the AreaMeasurement2D widget that displays area in square miles
var measurementWidget = new AreaMeasurement2D({
  view: view,
  unit: "square-miles"
});

// To display the current measurement unit
console.log("Current unit: ", measurementWidget.unit);

// To create the AreaMeasurement2D widget that displays area in common US units
var measurementWidget = new AreaMeasurement2D({
  view: view,
  unitOptions: ["square-inches", "square-feet", "square-yards", "square-miles"]
});

// To display the available units to the console
console.log("All units: ", measurementWidget.unitOptions.join(", "));
The exact same options are present with the DistanceMeasurement2D widget. By default, the mode used to calculate the area and perimeter is set to auto. This means that when the distance is less than 100 km, the default mode is planar. When the distance is greater than or equal to 100 km, the default mode is geodesic. The threshold value can be modified by setting the geodesicDistanceThreshold property on the DistanceMeasurement2DViewModel.
Looking Ahead
Future releases will consider a number of new features and enhancements for measuring in both 2D and 3D. Stay tuned for a “smarter” widget, and more options for customization. Until then, happy measuring!


Commenting is not enabled for this article.