By Aileen Buckley, Mapping Center Lead
Our Geoprocessing Team here at Esri has some great tips on how you can set up your models and document them. Since I find myself repeating some of the steps each time I make a model, I thought it might be useful to create a template that I could start from — this saves me time, makes my models more consistent, and helps assure that I don’t forget a step. You can use this template, too, when you make your models and scripts. Just download the Model Template from the ArcGIS Resources – Models & Scripts page of Mapping Center.
The download contains the “Your Tools” toolbox that includes the “Model” model, the directory structure, a map document with the geoprocessing environment settings set, empty file geodatabases in the workspaces, and example documentation.
Directory Structure
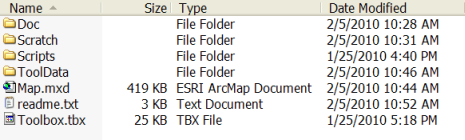
The download is organized in the way that the Geoprocessing Team suggests. There are four directories in the folder: Doc, ToolData, Scratch and Scripts. The Doc folder contains files used in the model documentation. The ToolData folder contains some sample data that you can use to try out the tools. You can also set up your model so that the output files are written into the ToolData folder. The Scratch folder is there so you can set up the model to write the intermediate outputs here. The Scripts folder contains any scripts used in your models or any script tools you add to your toolbox.
Incidentally, a tip for good practice is to store your models in file locations that contain no spaces, becuase some of the geoprocessing tools (for example, some of the map algebra tools) run into problems if you try to write the results into a folder that has spaces in its name. So instead, save your models in folders with no spaces in their names.
ArcMap Document
The ArcMap document has the sample data and the toolbox loaded for you. It also includes the environment settings (explained below). To access the model and start modifying it and its documentation, right click the Model name in the toolbox table of contents and select Edit.

Geoprocessing Environment Settings
To set up the model to read and write from the ToolData and Scratch directories, you need to set your geoprocessing environments settings. The Geoprocessing Team recommends that this be done at the ArcMap document level. To do this, click Tools on the top bar menu, click Options, and then on the Geoprocessing tab, click the Environments button. Under General Settings, set the Current Workspace to the ToolData directory and set the Scratch Workspace to the Scratch directory.
Geodatabases
The intermediate data will be written to the Scratch geodatabase — it will be deleted when the model is done running. The empty ToolData geodatabase can be used to hold your input and output files or you can replace it with your own geodatabase.
Documentation
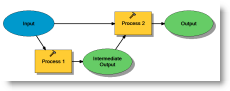
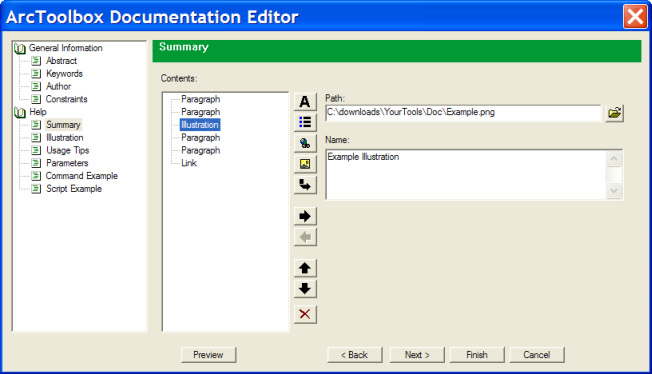
Documentation for the model should be updated so that users will know how the model works. Example illustrations are included in the Doc folder. Note that one of these illustrations is Model.png. You should include a graphic of the model you create and include it in your model documentation. I have input some dummy text and a few example illustrations in the documentation for the Model model. Replace this with your own documentation text and illustrations – tips for how to update the documentation are in the model help.
The Readme File
You can rewrite the readme.txt file so that it provides some information about your tools. This along with the toolbox and the directories can be zipped up as a package to share with others.
Thanks to Scott Murray, Software Developer, and Shitij Mehta, Product Engineer, who both work on the Esri Geoprocessing Team, for their help with this blog entry!

Article Discussion: