By Charlie Frye, Esri Chief Cartographer

This final part of the series will cover using cartographic representations for dashed lines, like the red and white cased lines in the image at the left, and for creating cul-de-sac or squared off ends to streets. Both of these effects will build on the examples in the previous two portions of this series with one exception. Because we will be using cartographic representations for the streets, we will be better able to manage line caps and therefore will not need to use the Dissolve tool to dissolve the streets by name, type, and z-level. The removal of this step is significant because now an extra dataset is not required just to have cartographic quality streets; everything needed for a high quality cartographic depiction of streets can be stored in attributes. This should come as good news to those of you who have mentioned to us, many times, that managing additional datasets for the sake of cartography is not only a data management, but a political hurdle, that you would just as soon not have to deal with.
Cul-de-sacs and street endings
Your street line data will need a new field (EOL_Type, which stands for Line type) which is of type Short Integer and uses a coded value domain to indicate the following:
0 – Not a dangle
1 – Dangle – Square End
2 – Dangle – Round End
3 – Dangle – Small cul-de-sac
4 – Dangle – Large cul-de-sac
If your maps require additional types of line end symbology for streets, you can make changes to the above list as required. To create and assign the values to this new field, follow these steps:
In ArcCatalog:
- Add a new field called EOL_Type to your street line feature class — the field should be of type Short Integer.
- Calculate all the values of the EOL _type field to 0. This will cover the general case.
- Open your feature class’s properties and click the Subtypes tab. Then click the Domains button at the bottom.
- In Workspace Domains section, scroll to the end of the first list and type a new Domain name called EOL_Type and type in the description as “Types of line symbol endings”.
- In Domain Properties section, change the Field type to Short Integer and the Domain type to Coded Values.
- Add the codes (0-4) with their descriptions as listed above (or use any modifications you have made to the list).
- Click OK to close the Workspace Domains dialog box.
- In the Feature Class Properties dialog, click the Fields tab and select the EOL_Type field which will update the Field Properties section at the bottom. In the field properties section, change the Default Value to 0, and set the domain to EOL_Type.
- Your street lines will need to be stored in a feature dataset within a geodatabase in order to do this next (required) step, which is to create a new topology in the feature dataset. If a topology already exists, then create a new feature dataset and copy your streets into it; this will just be a temporary feature dataset and topology, and you will replace your original streets with the updated version once this procedure is completed. Your topology should work with the default settings. Just add your streets feature class and then specify this one rule: “Must Not Have Dangles”. Validate the topology and close ArcCatalog.
In ArcMap:
- Add your newly created topology to a new empty map, start editing, and open the Topology toolbar.
- On the Topology toolbar, click the Error Inspector button (last button on the right).
- In the Error Inspector window (it’s docked and you may need to enlarge it to see everything):
- Change the Show option (upper left) to show your topology rule of Must Not Have Dangles.
- Click on the first row to select it, then scroll to the bottom and Shift-click on the last row, which will select all the topology errors.
- Right-click on the selected rows and choose Select Features. (See below)
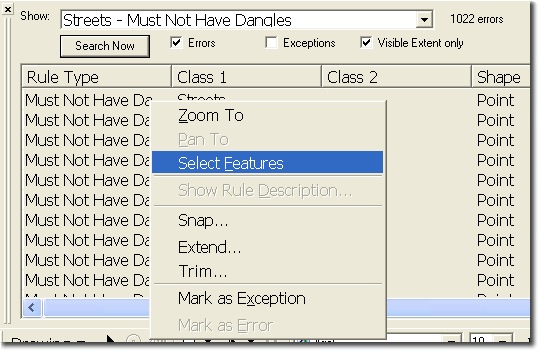
- Calculate all the values of the EOL _type field to 1. All of the potential cul-de-sacs and street ends that do not connect to anything are now identified in your data as having a value of 1 for EOL_Type.
- The only way to know whether a street is a cul-de-sac is to actually verify it, which can be done using orthoimagery (use your favorite online mapping service with imagery). Select the streets that actually are cul-de-sacs and calculate their EOL_Type field value to 3 or 4 (we found that Redlands had two sizes of cul-de-sacs — your community may have more or different shapes).
At this point you no longer need the topology created in step 5, so that can be deleted.
Assigning symbols and creating representations for street endings
The first parts of this series of blog postings described how to symbolize cased roads to show different types of roads and to show underpass/overpass relationships. Cul-de-sacs and street endings will add another wrinkle for local streets that are on ground level. To do that, however, the ground level streets layer symbology needs to have the EOL_Type field added to the list of unique values fields; this will require you to set up that layer’s symbols again. Note that you will not need to use the Z-level field since that layer is already using a definition query to determine it’s Z-level. Here is what my symbology looked like:
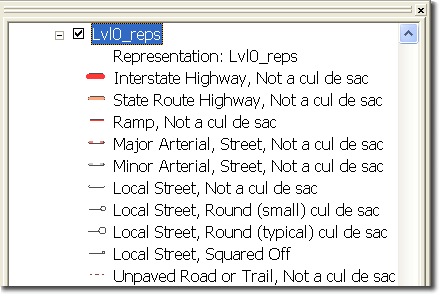
Notice there are now four different local streets (yours will each have the same symbol; the next section will cover how to define the symbols you see here).
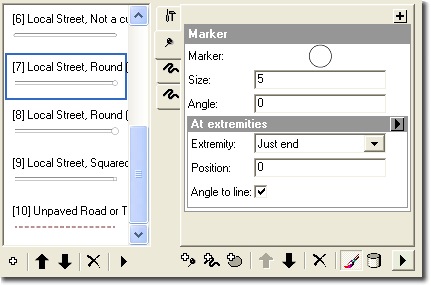
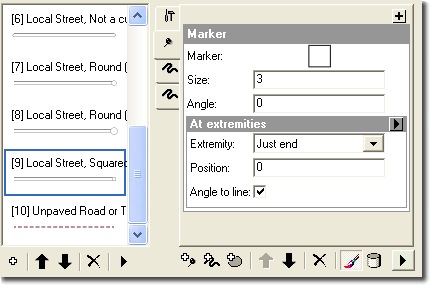
Once your symbols are set up again (don’t forget symbol level drawing settings, as described in the previous posting), create representations for this layer. Edit the representations for the local streets that have special endings as follows:
- Add a new marker layer to the representation (click the button with the “+” plus and a map pin).
- Change it’s Display option to be: At extremities (click the right arrow button).
- Change the extremity to: Just end.
- Check the Angle to Line box.
The following image show how this looks for cul-de-sacs and square ends.
Tips:
- Since we used representation markers, we needed to change the outline width of the marker symbol to match the width of our line casements. To do that click on the symbol and then click Properties, select the marker, and then change its width. For the square end marker, we made it the same size our cased line symbol.
- For our cul-de-sacs we used the Circle 1 representation marker that comes in the esri.style. We changed the color to white, and set the outline width to match the width of our road casings, then we made the large cul-de-sacs size = 7, and the small cul-de-sacs size = 5. The example we made was at 1:10,000 scale, so for a 1:24,000 scale map we recommend using slightly smaller sizes.
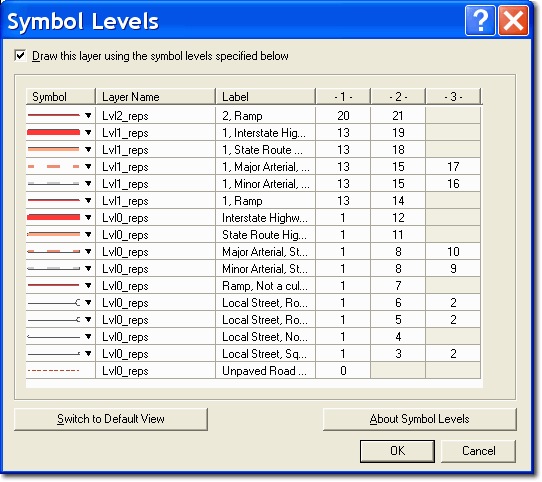
- The symbol level drawing has to be updated to incorporate the marker symbols (note the third column below where the values of “2” are entered in the rows for our special symbols.
Finally, and this is an easy one, for the dashed line symbols, just by creating cartographic representations and using the default properties for dashed lines, we get a much improved representation of how the dash patterns meet at street intersections. The reason this works is (below) the Dashes section has a property called Endings, which when set to With half pattern (the default) provides exactly what we needed.
Last, to wrap up this series, here is a PDF showing a portion of our map [1.9 Mb] that shows all of these techniques combined in examples of everything that has been covered in these three postings. It’s worth noting that this PDF has a bit larger file size than what we would normally use for the web with this kind of map, but we wanted to show the quality of the work which did not show well using the default settings for exporting to a PDF. Specifically, we used 1,200 DPI and unchecked the Compress Vector Graphics option. The original file size was 450Kb and the masking in particular looked fuzzy.

Article Discussion: