Introduction
In GIS workflows, geometry editing is important for maintaining and enhancing spatial accuracy. It involves creating, editing, and updating map features to digitize new elements, refine existing boundaries, or integrate additional geographic data.
ArcGIS Maps SDKs for Native Apps (Native Maps SDKs) offer geometry editing tools out of the box to help you quickly implement solutions to fit your workflow. The VertexTool and ReticleVertexTool are powerful tools the GeometryEditor can use for a precise editing experience. Both of these tools are primarily driven by tap interactions based on an InteractionConfiguration. However, users have been requesting more ways to trigger these interactions besides taps, such as buttons or other triggers of their choosing. We introduced the ProgrammaticReticleTool in 200.8 of Native Maps SDKs to address these requests and facilitate triggers other than taps/mouse clicks.
In this blog, we will briefly explain what the reticle is and how it works. We will then explore how to use the ProgrammaticReticleTool to implement custom geometry editing workflows such as those driven by buttons or other triggers and those using custom context menus.
It is assumed that you are already familiar with Native Maps SDKs geometry editing workflows. If you are not, please take a look at the Feature Editing Workflows presentation from the 2025 Esri Developer & Technology Summit and the Edit geometry documentation.
Note: While this blog’s concepts apply to all platforms in Native Maps SDKs (Kotlin, Qt, Swift, Flutter, and .NET), the code snippets are Kotlin.
A brief background on the reticle
The ReticleVertexTool, introduced in 200.5, enhanced the mobile editing experience by enabling a reticle-based workflow that delivers greater precision on touch-based devices.
The reticle is a visual guide displayed on top of the MapView that stays in place as you pan or zoom the map. The default crosshair appearance of the reticle gives a visual indication of the precise location where a geometry operation (such as placing or selecting a vertex) will occur.
Using the reticle you can edit geometries without your finger or stylus obstructing the area you are working on.

The ProgrammaticReticleTool, added in 200.8, has programmatic hooks which allow you to:
- Select a vertex or mid-vertex at the reticle position.
- Pick up the selected vertex or mid-vertex.
- Place a new vertex or drop the currently picked up vertex.
Note: ProgrammaticReticleTool functionality mirrors that of the ReticleVertexTool with the main difference being that ProgrammaticReticleTool can be programmatically called without the need for tap interaction.
Example workflows
In this next section, we’ll explore some example workflows to give you an idea of the range of intuitive and powerful user experiences that can be implemented with the ProgrammaticReticleTool.
We’ll look at:
- How to design a multifunctional button workflow where a single control adapts its behavior based on the reticle’s context.
- How to use a new method of identification introduced at 200.8 to leverage tap interactions to select or navigate to geometry editor elements.
- Ways to place vertices using alternative triggers beyond standard button presses.
Together, these techniques will help you build editing workflows that are both efficient and user-friendly.
To view the context of the code snippets featured in this blog, see the full code and try the app out yourself, clone the repo on GitHub.
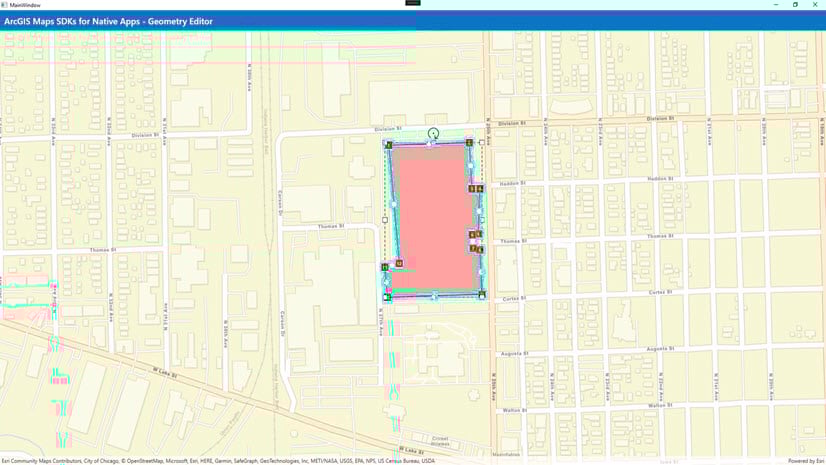
Multifunctional button workflow
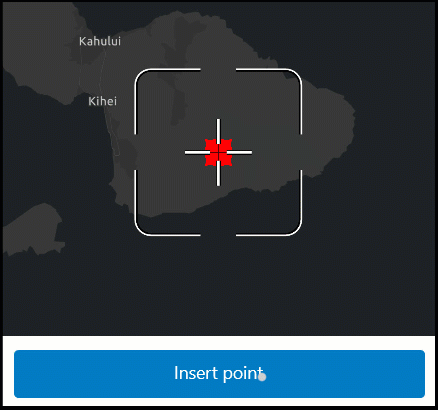
Using the GeometryEditor.hoveredElement and GeometryEditor.pickedUpElement properties and associated events, you can implement a workflow that updates button text and functionality depending on the currently hovered and picked-up elements.
For example, when the reticle is positioned over an element with which you would like to enable a user to interact, you can update button text to say “Pick up point.” When an element has been picked up, the text can be updated to say “Drop point.” If no element is hovered or picked up, you could update the button text to say “Insert point.”
Using this approach you can keep the UX clear, simple and engaging.
Picking up a point
Use the GeometryEditor.hoveredElement event to update the button text when hovering over an element. You can also check the GeometryEditor.pickedUpElement property to ensure an element is not already picked up.
The following code snippet demonstrates selection and pick up when an element is hovered and no element is currently picked up:
// Check that an element is currently hovered and no element is picked up.
if (geometryEditor.HoveredElement != null && geometryEditor.pickedUpElement.value == null)
{
    // Select the vertex or mid-vertex.
    programmaticReticleTool.selectElementAtReticle()

    // Pick up the selected element.
    programmaticReticleTool.pickUpSelectedElement()
}
Pick up and selection are limited to vertices and mid-vertices.
A vertex or mid-vertex can be selected at the reticle position using the ProgrammaticReticleTool alternatively you can use the various selection methods on the GeometryEditor such as GeometryEditor.selectVertex(partIndex: Int, vertexIndex: Int).
Placing a point
Check the GeometryEditor.pickedUpElement and update the button text to indicate whether or not a new vertex will be inserted or an existing vertex will be dropped.
Insert a new vertex or drop a picked up element using:
// Place a new vertex or drop the existing picked up vertex.
programmaticReticleTool.placeElementAtReticle()
If no element is currently picked up, a new vertex is placed; if there is currently a picked-up element, then the picked-up element is placed at the reticle position.
Note: If you want to undo a pick up action, you can return the picked-up element to its previous position by using GeometryEditor.cancelCurrentAction().
Tap to select and zoom
The v200.8 release also introduced a new method of identification on the MapView to return an IdentifyGeometryEditorResult with a collection of GeometryEditorElement objects.
You can use this new identification in conjunction with the ProgrammaticReticleTool to, for example, quickly select and change the viewpoint to the position of a tapped GeometryEditorElement.
// Identify geometry editor elements at the tapped position.
val identifyResult = mapViewProxy.identifyGeometryEditor(tapPosition, tolerance = 15.dp).getOrNull() ?: return

// Get the first geometry editor element in the result.
val topElement = identifyResult.elements.firstOrNull() ?: return

// Create a short duration to use when updating the map viewpoint.
val duration = 300.toDuration(DurationUnit.MILLISECONDS)
when (topElement) {
    is GeometryEditorVertex -> {

        // Select the identified vertex.
        geometryEditor.selectVertex(topElement.partIndex, topElement.vertexIndex)

        // Update the viewpoint.
        mapViewProxy.setViewpointAnimated(Viewpoint(topElement.point), duration)
    }
    is GeometryEditorMidVertex -> {

        // Select the identified mid-vertex.
        geometryEditor.selectMidVertex(topElement.partIndex, topElement.segmentIndex)

        // Update the viewpoint.
        mapViewProxy.setViewpointAnimated(Viewpoint(topElement.point), duration)

    }
    else -> { /* Only zoom to vertices and mid-vertices. */ }
}
The identify method lets you pick the balance between MapView interaction and other triggers that is best suited to your workflow.
You can build on this workflow by identifying geometry elements on a long press and displaying a context menu at their position to provide enhanced editing options such as vertex deletion.
In the example shown below, a context menu featuring options to zoom to or delete an identified GeometryEditorElement can be used to speed up geometry editing operations.
Using other triggers
I’ve primarily covered button-driven workflows in this blog and the example app but any trigger can be used with the programmatic calls.
The ProgrammaticReticleTool enables you to trigger selection, pick up and placement using voice activation, keyboard shortcuts or gesture-based controls to improve the accessibility of your applications.
The workflows outlined in this blog are just a few examples of possible workflows that you can implement with this API; many more possibilities are available for you to experiment with.
Summary
The ProgrammaticReticleTool is a new geometry editing tool that allows you to trigger editing actions programmatically—such as through buttons or other custom inputs—rather than relying solely on touch interactions.
With this tool you can:
- Select a vertex or mid-vertex at the reticle position.
- Pick up the selected element.
- Place a new vertex or drop a picked-up element.
The ProgrammaticReticleTool enables workflows such as:
- Multifunctional buttons that adapt their behavior based on reticle context.
- Tap-to-select-and-zoom functionality.
- Custom context menus for quick actions.
- Alternative triggers for geometry editing including gestures, voice activation and keyboard controls.
Applicable across Qt, Kotlin, Swift, Flutter and .NET Maps SDKs, the ProgrammaticReticleTool offers a flexible, precise, and customizable approach to geometry editing, empowering developers to create user-friendly, context-aware GIS editing experiences.
Tell us about your experience with the ProgrammaticReticleTool in the Esri Community forums, and if you haven’t already, check out our developer documentation for more tips and guides on how to use Kotlin Maps SDK.
Useful resources
Kotlin Maps SDK samples applications showcase capabilities and functionality offered by Native Maps SDKs via simple workflows. This blog post can be used in conjunction with the Kotlin samples applications to implement the broad range of functionality offered by Kotlin Maps SDK.
- ProgrammaticReticleToolDemo: the project described in this article
- Edit geometries with programmatic reticle tool Native Maps SDKs sample: Kotlin | .NET | Swift | Flutter
- Kotlin Maps SDK sample code
- Kotlin Maps SDK API Reference
- Sign up for an ArcGIS Location Platform or ArcGIS Online trial account


Commenting is not enabled for this article.