Introduction
One of the primary benefits of developing a mapping application with the ArcGIS Maps SDK for Qt is the cross-platform capabilities for deployment. Using C++ as your development language and Qt Creator as your Integrated Development Environment (IDE), you can target your app’s deployment device to work on the Windows, Linux, macOS, iOS, and Android operating systems.
In this blog post, we will go through the step-by-step process of creating a simple map app using the ArcGIS Maps SDK for Qt using the CMake build option in Qt Creator and deploying it on a physical Android device via a USB tether. I will be using a Windows desktop to do the development, but you could similarly do the development on a Mac or Linux machine. CMake is popular in C++ development, so I thought I would share some of the steps needed to use this build system within the Qt Creator IDE. World-wide, Android has the largest market share of mobile devices, and I figured that this would be a good deployment option for a mapping app.
This process will involve: determining if your Android device is suitable for deployment and ensuring that you are using the most recent versions of Qt Creator and the ArcGIS Maps SDK for Qt, downloading and configuring additional Android SSL libraries needed for the app, connecting your Android device to your Windows desktop via a USB cable, using an ArcGIS Maps SDK for Qt project template in Qt Creator to create a CMake based app, writing C++ code to have the map perform a zoom to location, and deploying the app to a physical android device for testing.
We have a lot of ground to cover in this blog, but the rewards will be great. There is a satisfactory feeling you get when you see your app being used on a device other than your development machine – it is quite a rush! So, let’s get started.
Determining and configuring the right hardware and software
Download the ArcGIS Maps SDK for Qt
At the time of this blog article’s publication, the current version of the ArcGIS Maps SDK for Qt is version 200.7. This is the version I will use.
Ensure you have a supported Windows version
I have chosen Windows as my development machine and I made sure that the minimum requirements outlined in the System requirements for 200.7 document in the Developing apps on Windows section have been met.
Follow the ArcGIS Maps SDK for Qt install instructions
I recommend that you review the information for the ArcGIS Maps SDK for Qt Install and setup document in the Install on Windows section to ensure that you have everything installed and configured for your app development.
Install and configure Qt Creator
I am using Qt Creator version 16.0.0 as my IDE.
The ArcGIS Maps SDK for Qt version 200.7 requires the Qt Framework Kit version 6.8.2 (or higher).
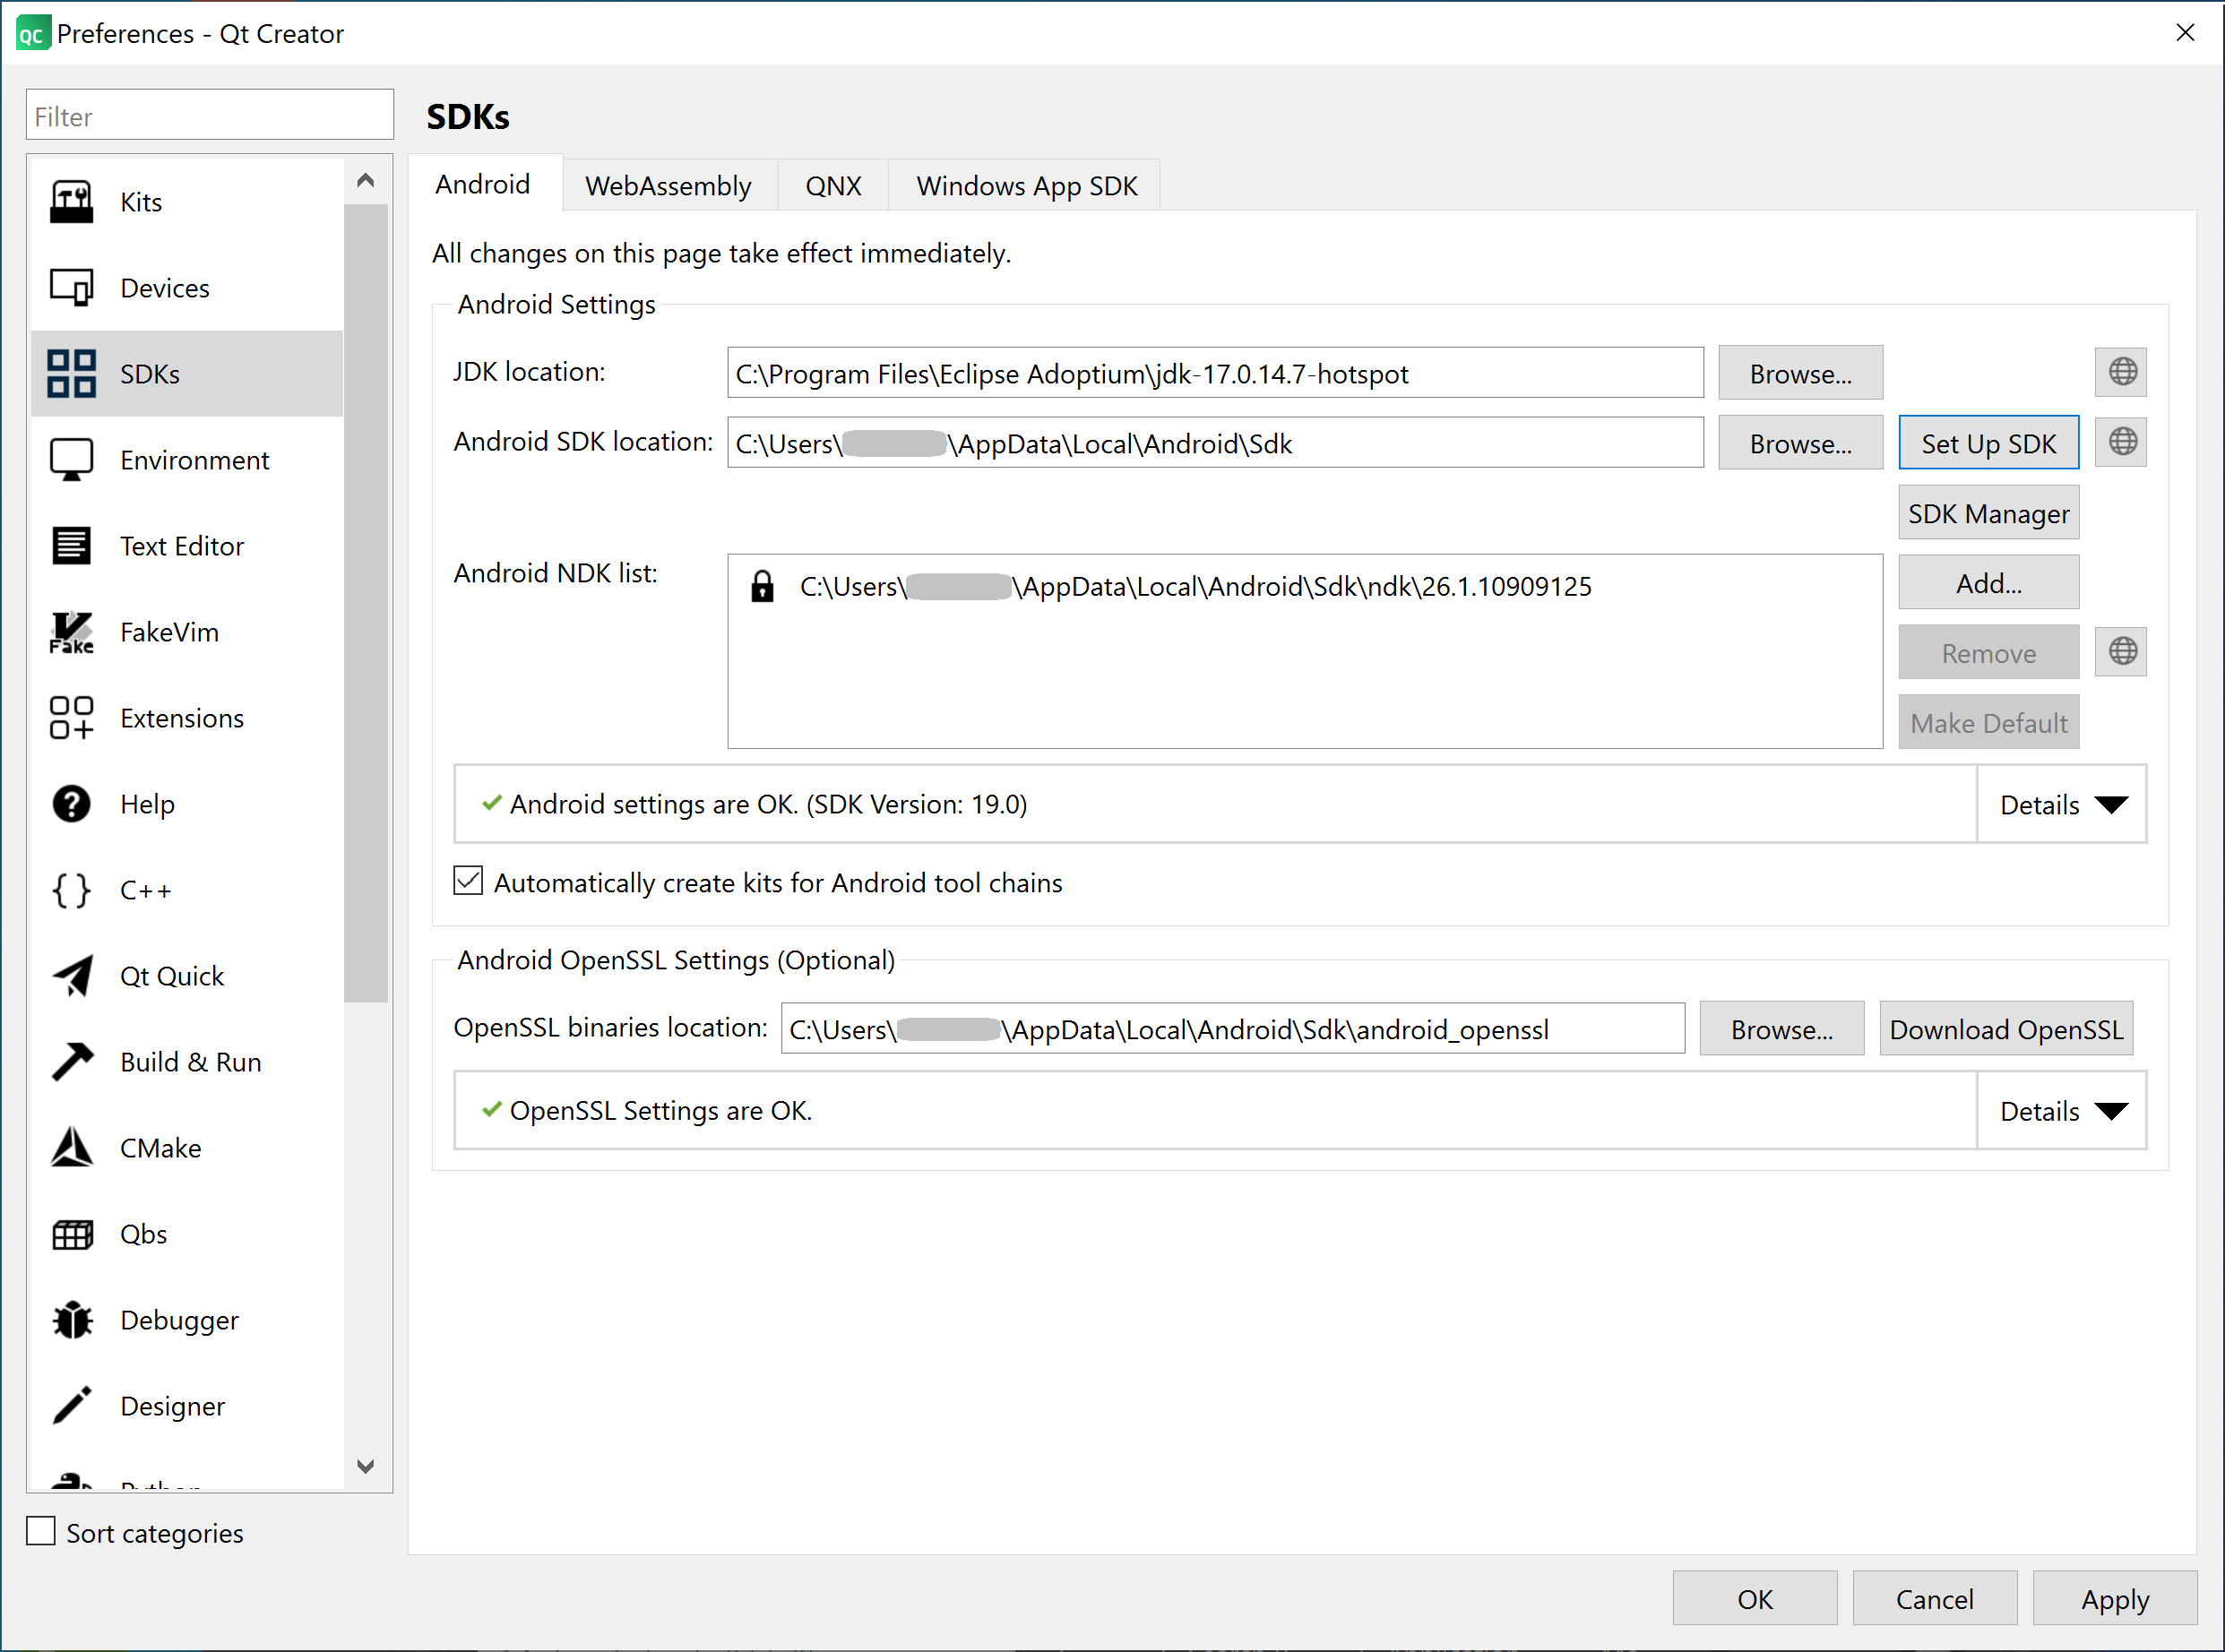
Additionally, as part of your development machines configuration to deploy on Android devices, you should ensure that you meet the minimum requirements in the document System requirements page in the Deploying apps to Android section. In my case, I have the following installed and configured in Qt Creator: Android JDK version 17.0.14.7, Android NDK version 26.1.10909125, and Android SDK version 19.0. You should ensure that your Qt Creator has similar settings by choosing Edit > Preferences from the menus. In the Preferences – Qt Creator dialog for the SDKs category with the Android tab active make sure you have all green checkmarks (no red X’s) and that each textbox is filled out with valid configuration settings.
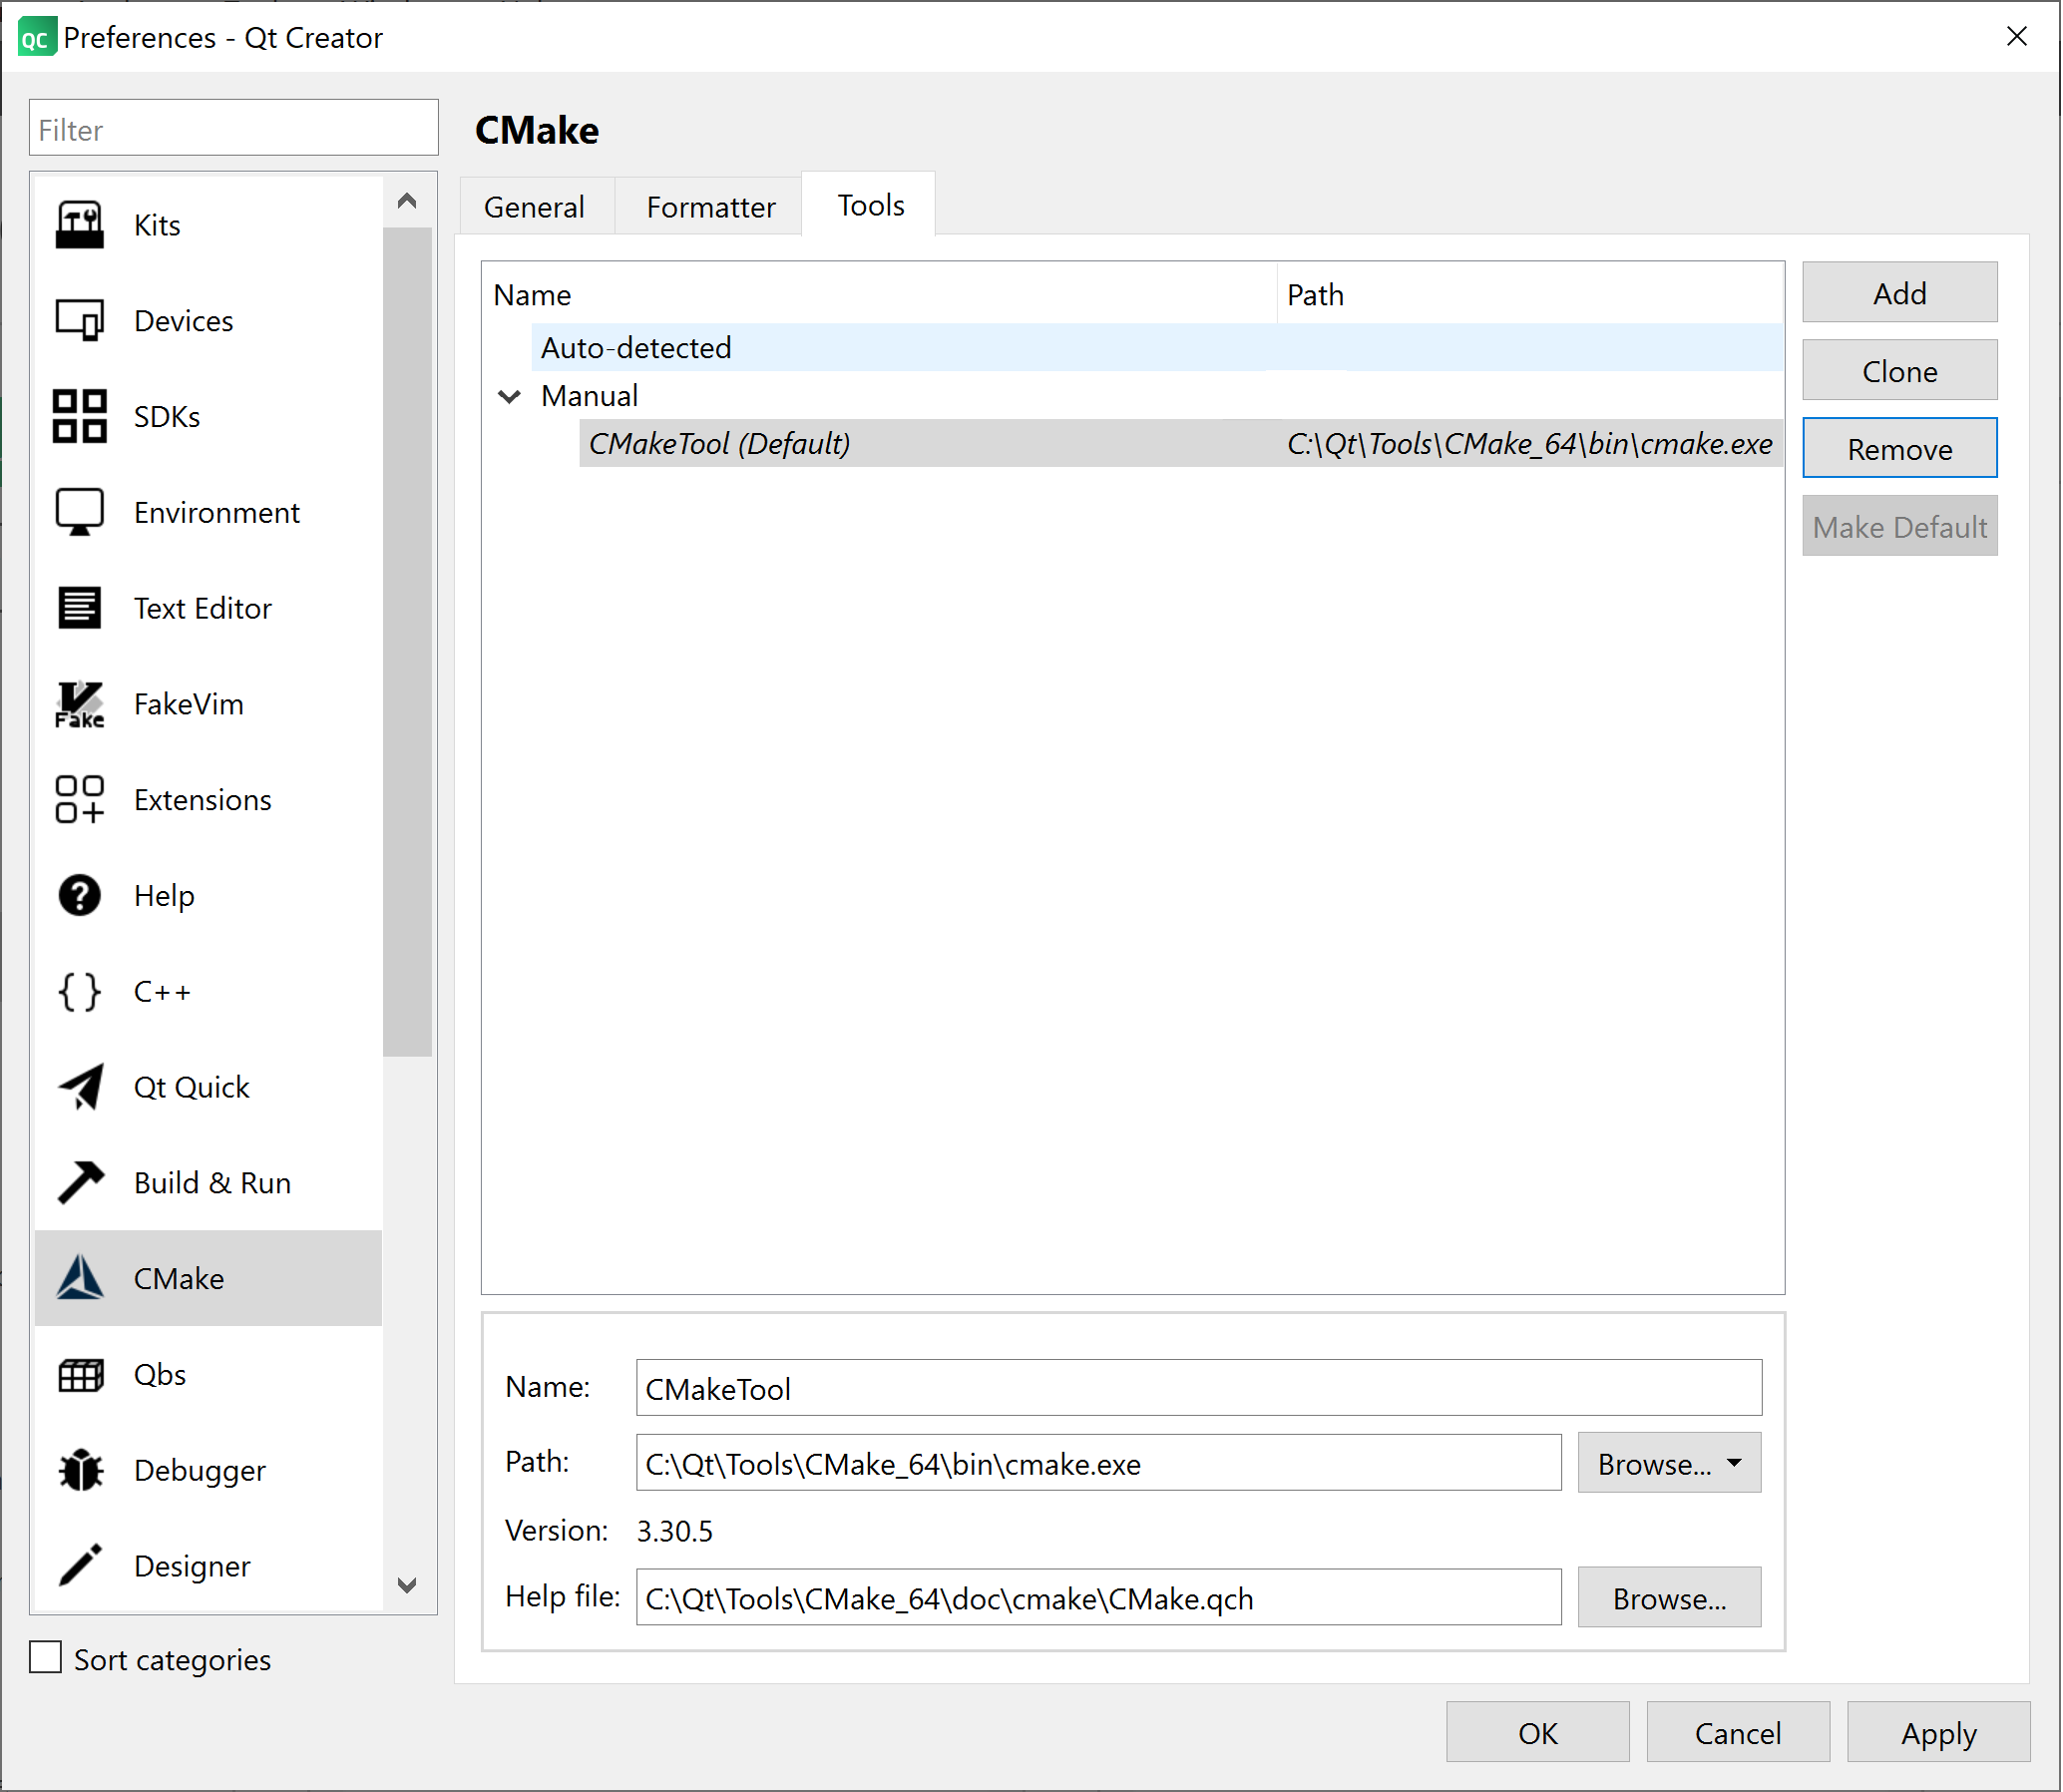
The build system we will use within Qt Creator to compile our C++ code is CMake. The ArcGIS Maps SDK for Qt documentation Install and set up in the Install on Windows section has a sub section called “Install CMake” that has useful links to configure CMake in Qt Creator. In a nutshell, you need to download the Windows version of the binaries from the CMake organization and install them on your Windows desktop. In my case, I chose the cmake_4.0.1-windows-x86.zip file and unzipped the contents in my Qt installation folder. Then in Qt Creator, I chose Edit > Preferences from the menus. In the Preferences – Qt Creator dialog for the CMake category, make the Tools tab active. Click the Add button fill-in the information for the Name, Path, and Help file textboxes. When you are done, you should see something like this:
Ensure your Android device is supported
You should ensure that your physical Android device meets the minimum requirements. In the ArcGIS Maps SDK for Qt System requirements for v200.7 documentation in the Deploying apps to Android it states that the arm-v7a, arm64-v8a, x86, and x86_64 Android chipset architectures are supported and that the minimum Android OS on the device must be version 9 (API level 28) or higher. In my case, I have a Pixel 2 mobile device for testing that has the arm64-v8a chipset architecture and running the Android 11 (API 30) OS.
The odds of you having a Pixel 2 device for testing like me is probably unlikely. You can use whatever Android device you have, if it meets the supported chipset architecture and minimum Android OS version. Make sure and write these down for your device, as you will need to know them when configuring your development project later.
Setting up the development project
Set up a project directory
At this point our Qt Creator IDE is ready to develop our Android mapping app. The first thing we want to do is create a directory on the hard drive to hold the development project. Create the following directory on your hard drive: C:\ArcGISMapsQtAndroidApp
Install additional SSL libraries
The demo app we will create makes requests to HTTPS services (via ArcGIS Online basemaps). As a result, we will use the Android OpenSSL support for Qt libraries that are available on a GitHub repo. Navigate to the GitHub repo: android_openssl. Click on the green Code button and choose Download ZIP (or you can clone the repo if you like). UnZip the file in the C:\ArcGISMapsQtAndroidApp directory. When you are done you should see the following CMake file in the location: C:\ArcGISMapsQtAndroidApp\android_openssl-master\CMakeLists.txt. You will need to know the location of the CMakeLists.txt file as you will reference in a later step in this article.
Enable USB debugging on the Android device
If you have never done development by deploying an app on an Android device from a Windows desktop, you will need to perform these generic steps on the device:
- Access Developer Options: Go to your device’s Settings, then navigate to About phone or About device. Expand the Software Information section. Tap the Build number 7 times to enable Developer Options.
- Enable USB Debugging: Go back to the main Settings screen and locate Developer options. Find the USB debugging section and turn it ON.
- Connect your Android Device to your PC: Use a USB Cable: Connect your Android phone to your computer with a USB cable.
- Authorize Connection: On your phone, you might see a notification asking if you want to allow USB debugging. Tap Allow.
Use Qt Creator to set up the development project
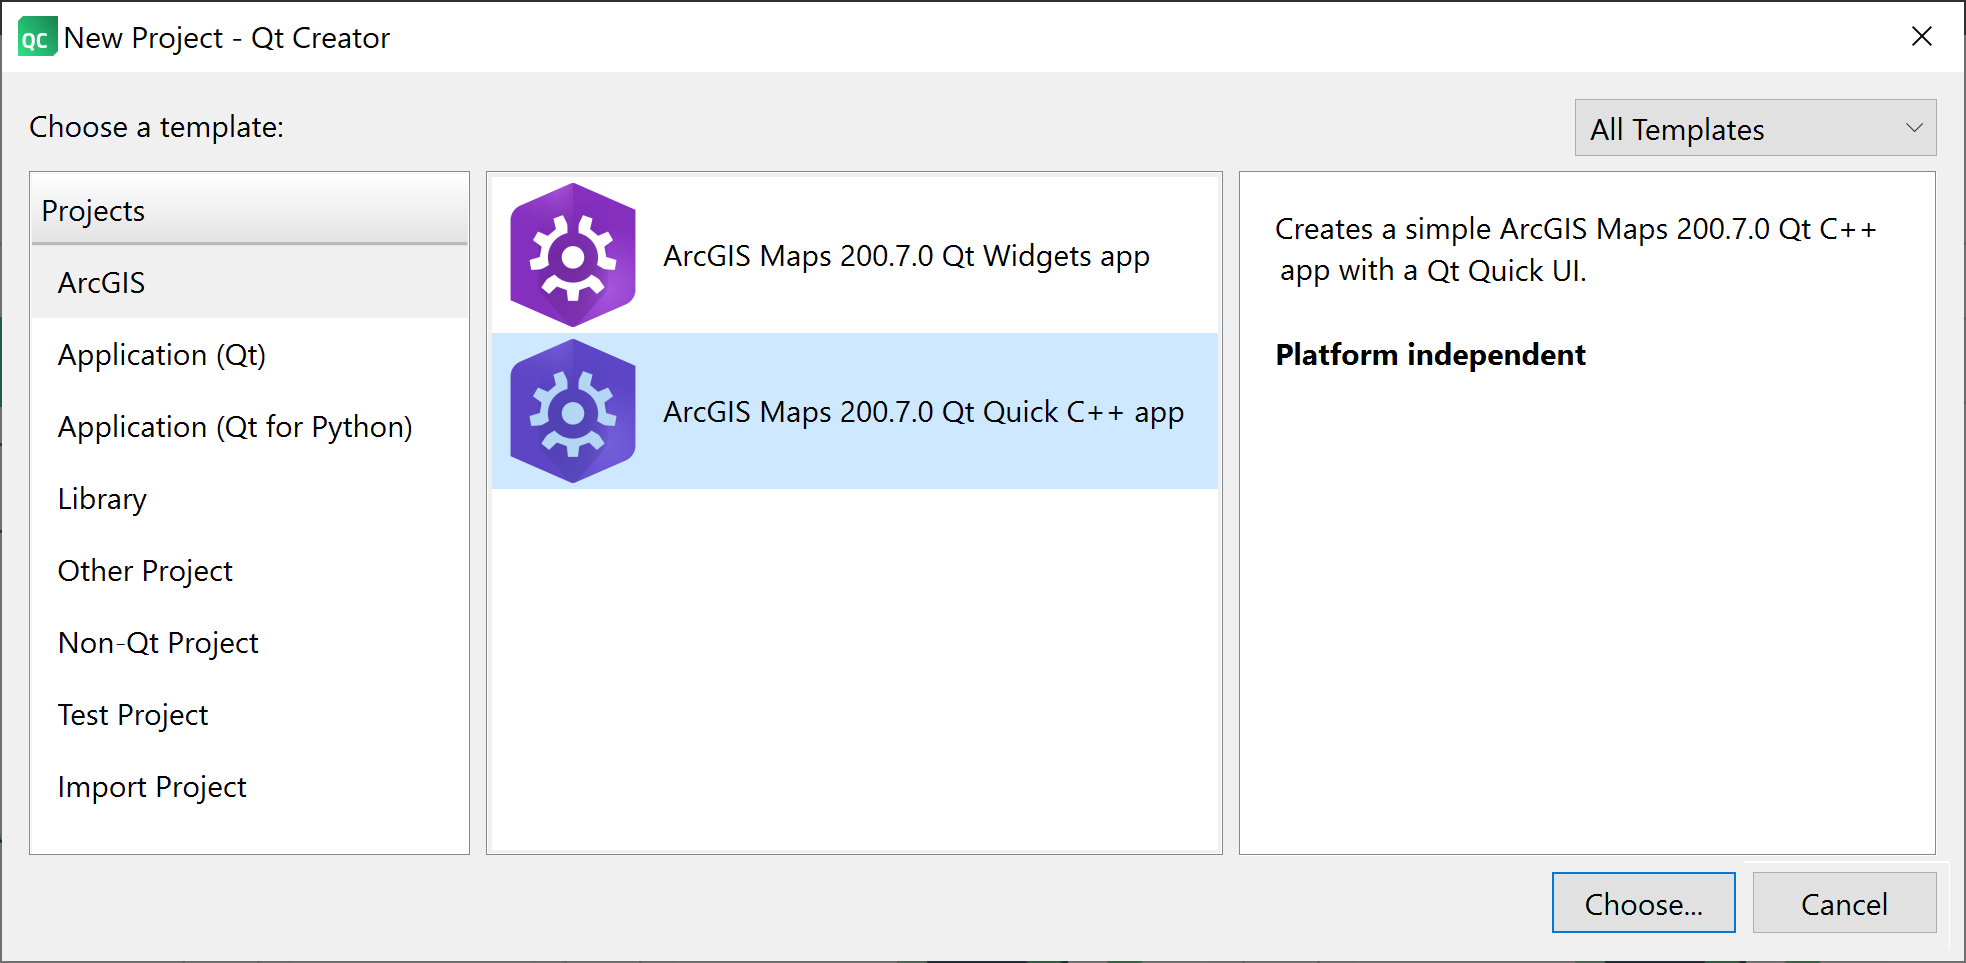
With your Android device developer mode and your device connected to the Windows desktop via a USB cord, launch Qt Creator. Choose File > New Project from the menus. This will launch the New Project – Qt Creator wizard. Select the ArcGIS tab and then click on the ArcGIS Maps 200.7 Qt Quick C++ app and click the Choose button.
Step 1 – Location
In the ArcGIS Maps 200.7.0 Qt Quick C++ app wizard dialog, specify the following and click Next:
- Name: MyMapApp
- Create in: C:\ArcGISMapsQtAndroidApp
- Use as default project location: [leave unchecked]
Step 2 – Build System
In the ArcGIS Maps 200.7.0 Qt Quick C++ app wizard dialog, specify the following and click Next:
- Build system: CMake
Step 3 – Details
In the ArcGIS Maps 200.7.0 Qt Quick app wizard dialog, specify the following and click Next:
- App Description: MyMapApp created with ArcGIS Maps SDK for Qt
- 3D project: [leave unchecked]
- ArcGIS Online Basemap: Imagery
- Access Token: [provide_your_Esri_API_key_access_token]
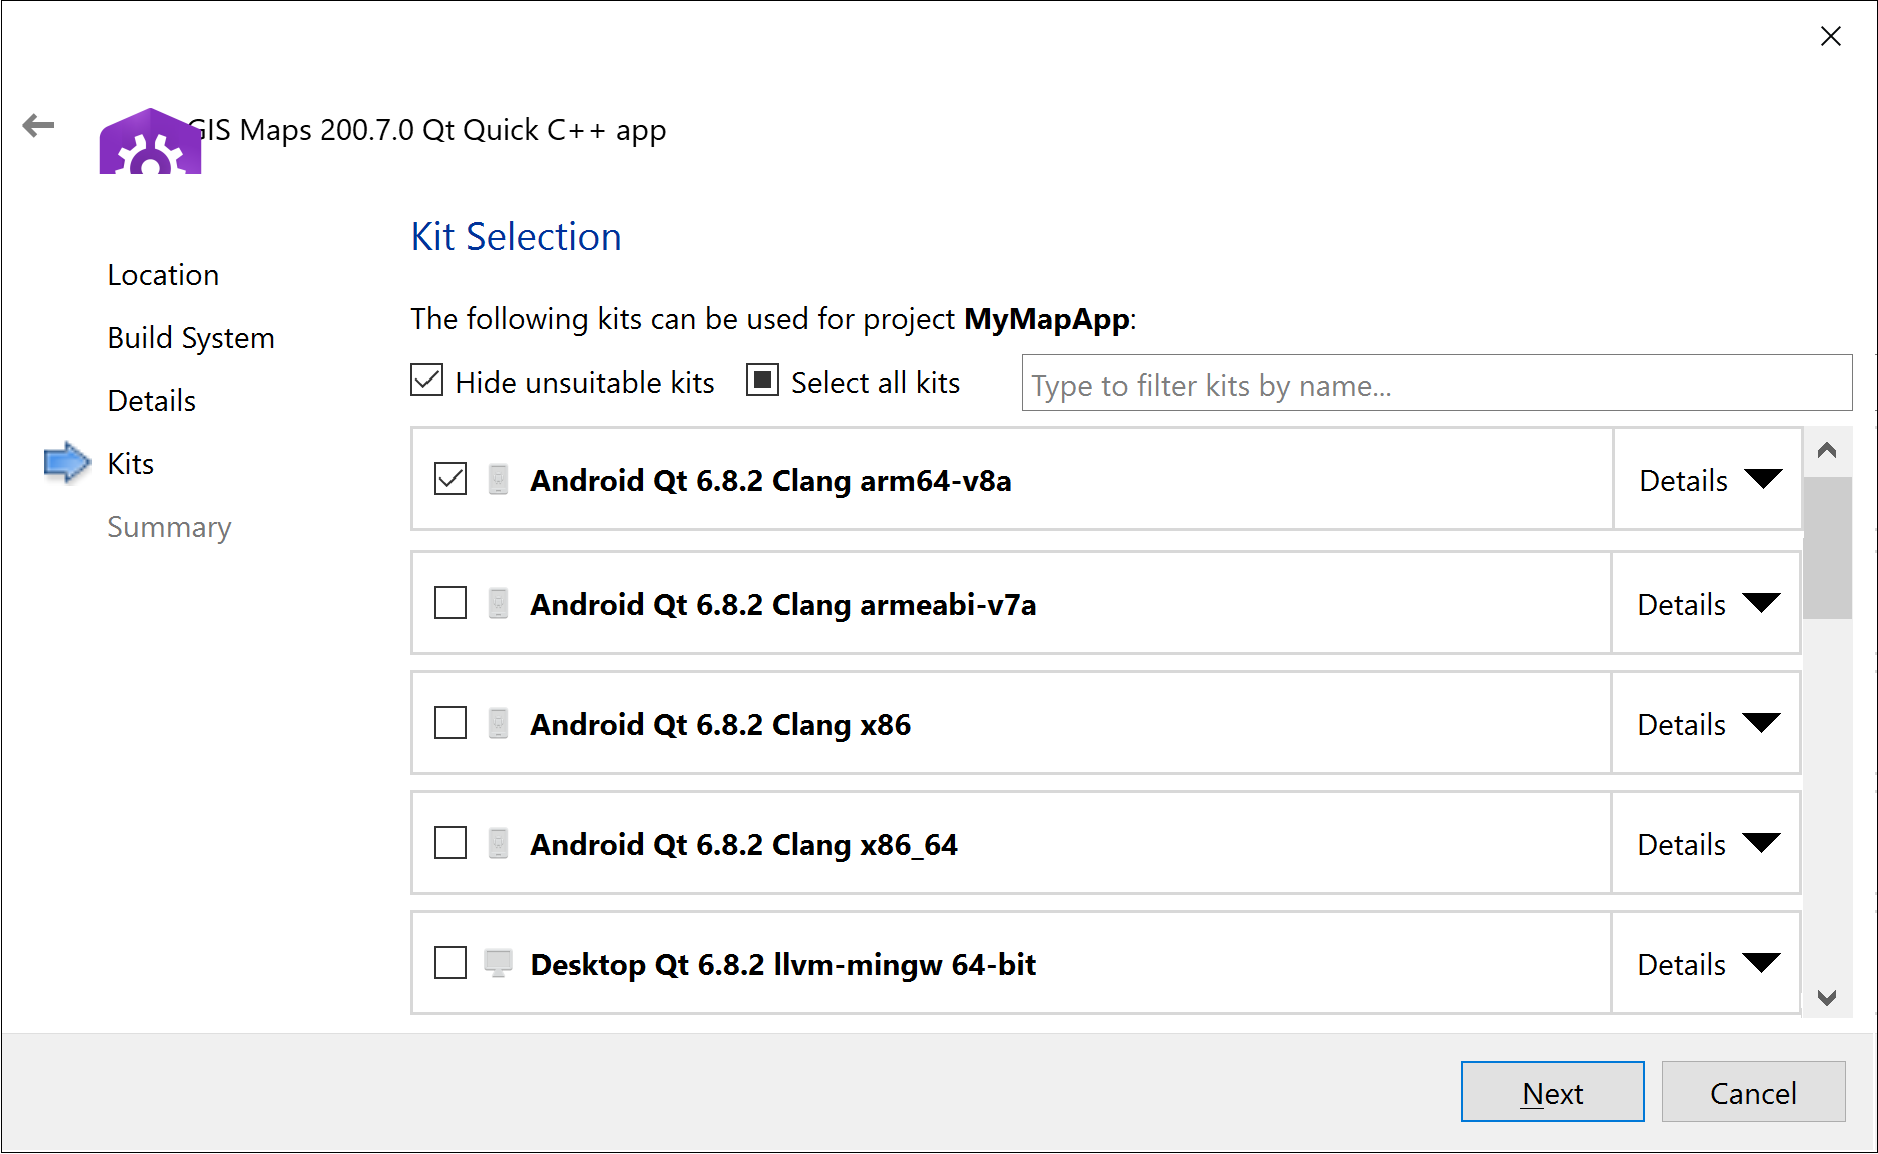
Step 4 – Kits
In the ArcGIS Maps 200.7.0 Qt Quick app wizard dialog, specify the following and click Next:
- Check on: Android Qt 6.8.2 Clang arm64-v8a <—- this works for Pixel 2, yours may be different
Step 5 – Summary
In the ArcGIS Maps 200.7.0 Qt Quick app wizard dialog, accept the defaults and click Finish:
Configure the development project to use the GitHub SSL libraries
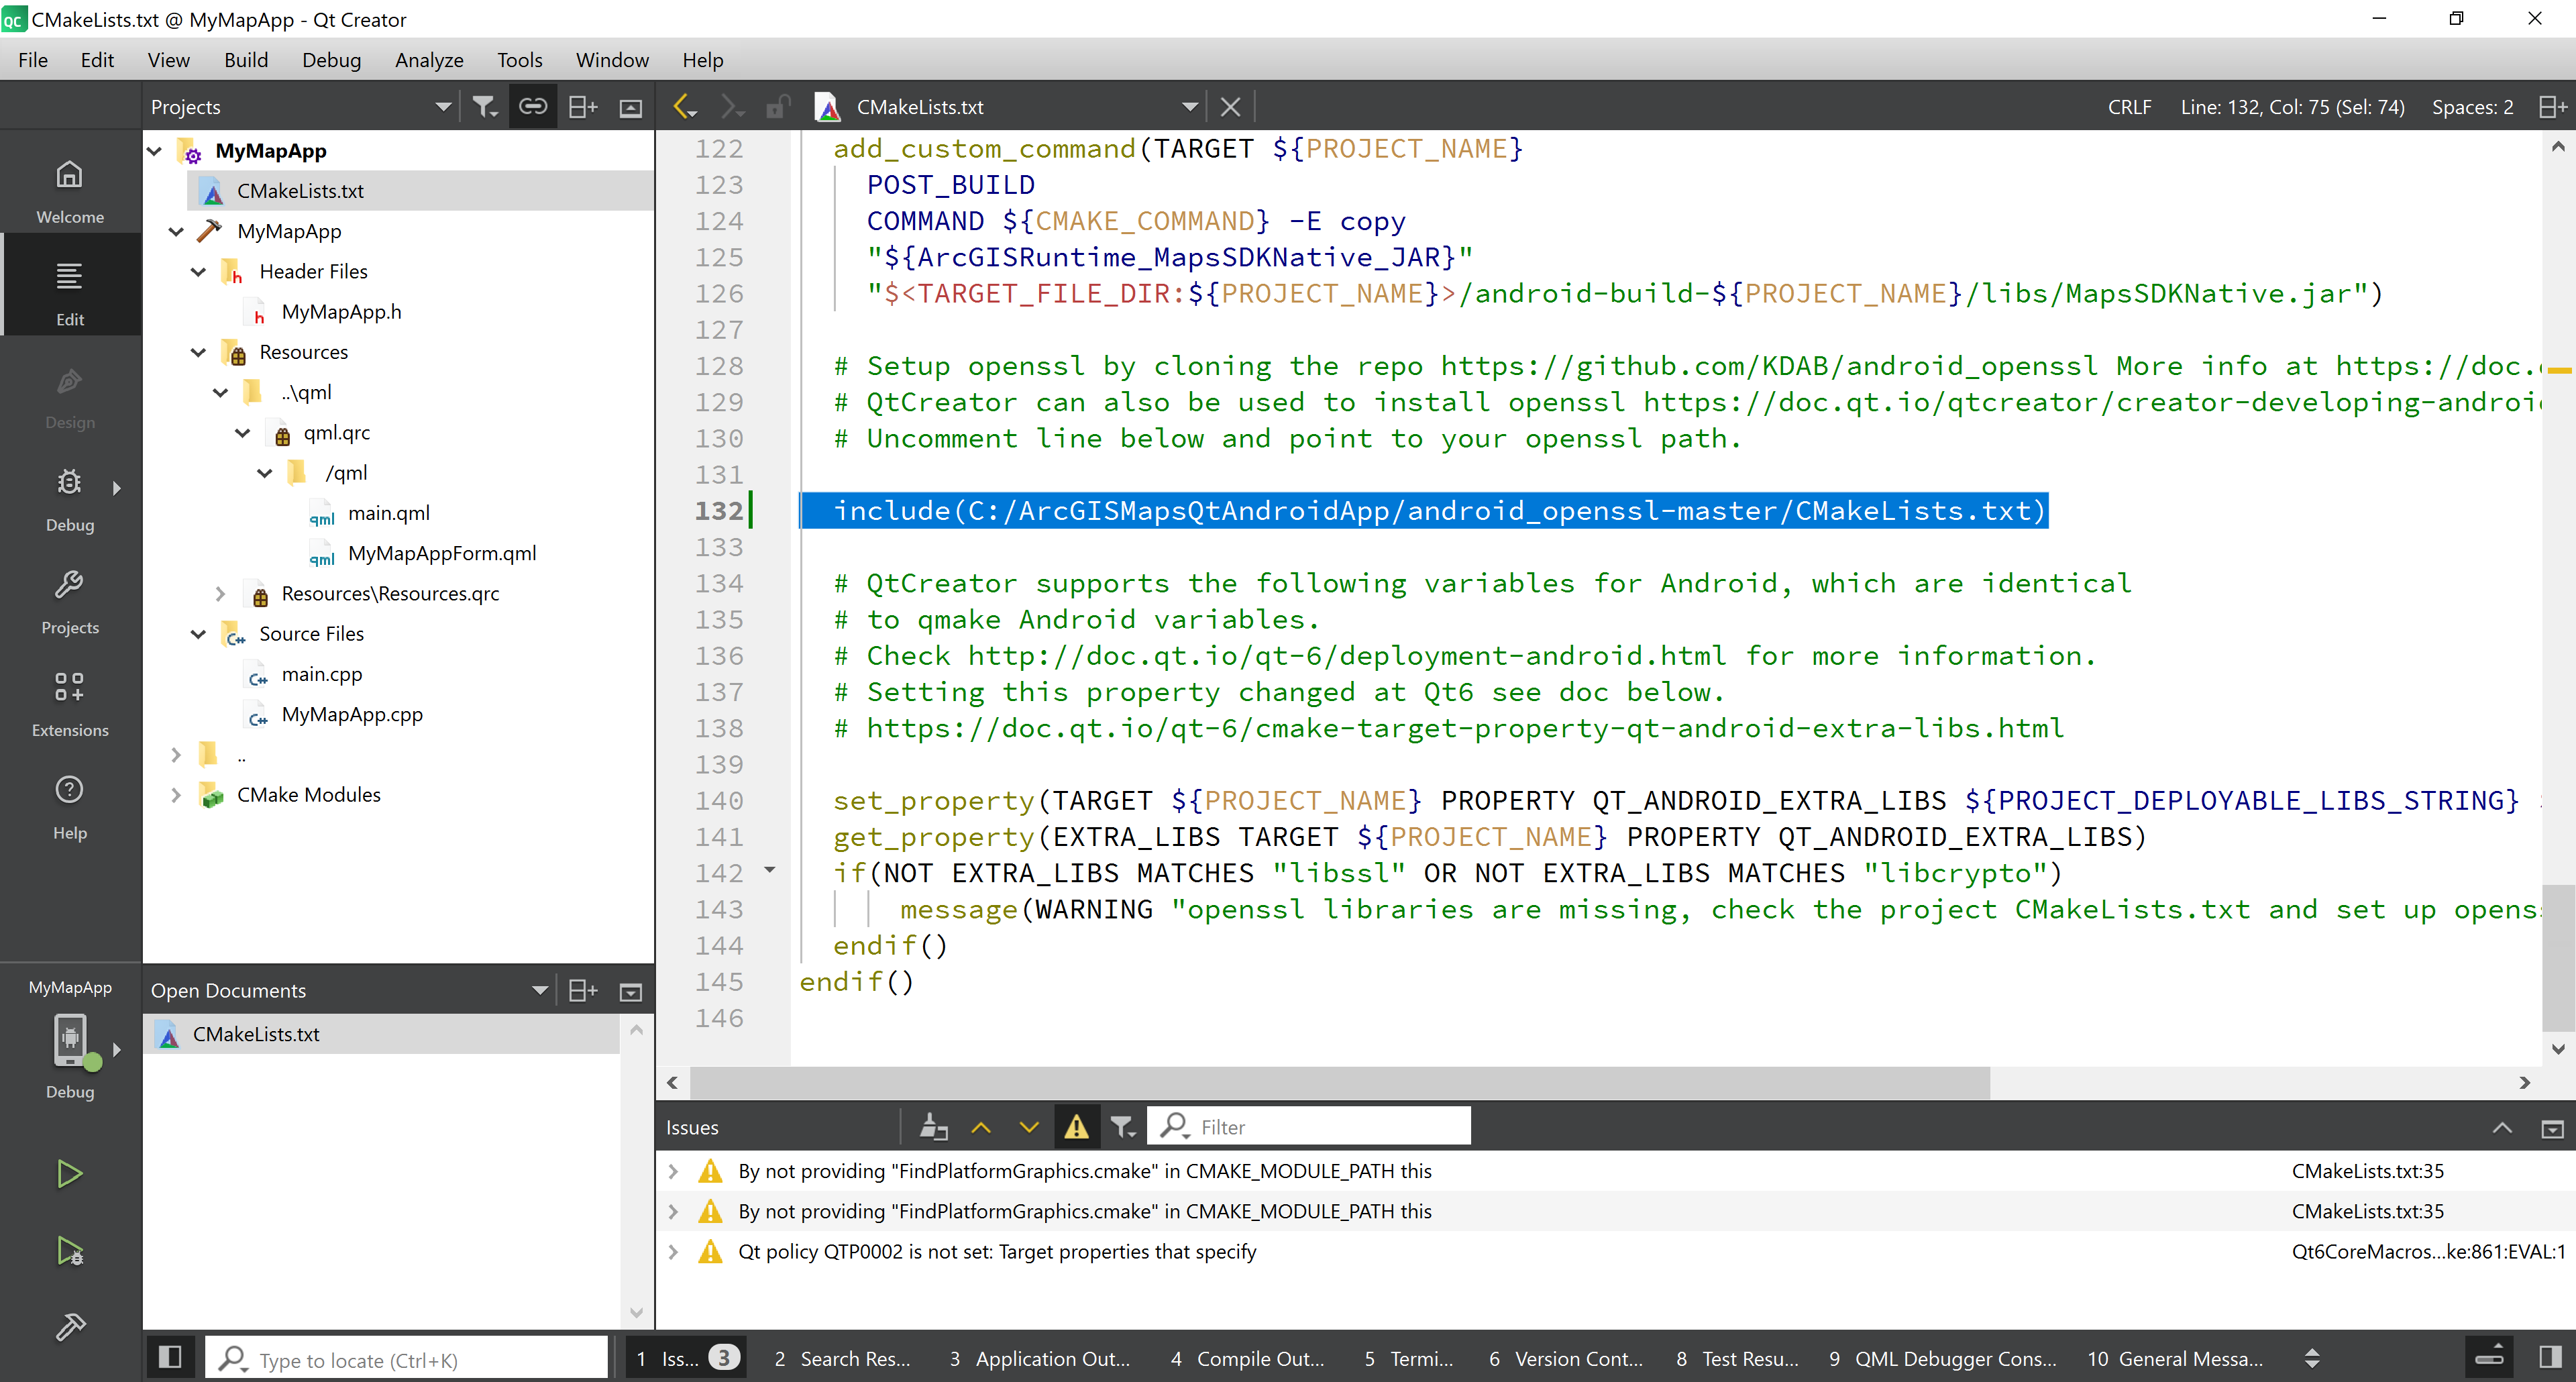
In the Projects pane, make the Edit tab active and double click on the CMakeLists.txt to open it. Scroll down near bottom of the file and modify the line of code and save the change:
#include(/CMakeLists.txt)
to be:
include(C:/ArcGISMapsQtAndroidApp/android_openssl-master/CMakeLists.txt)
In the menus, choose Build > Run CMake.
Ensure the Android device is accessible from Qt Creator
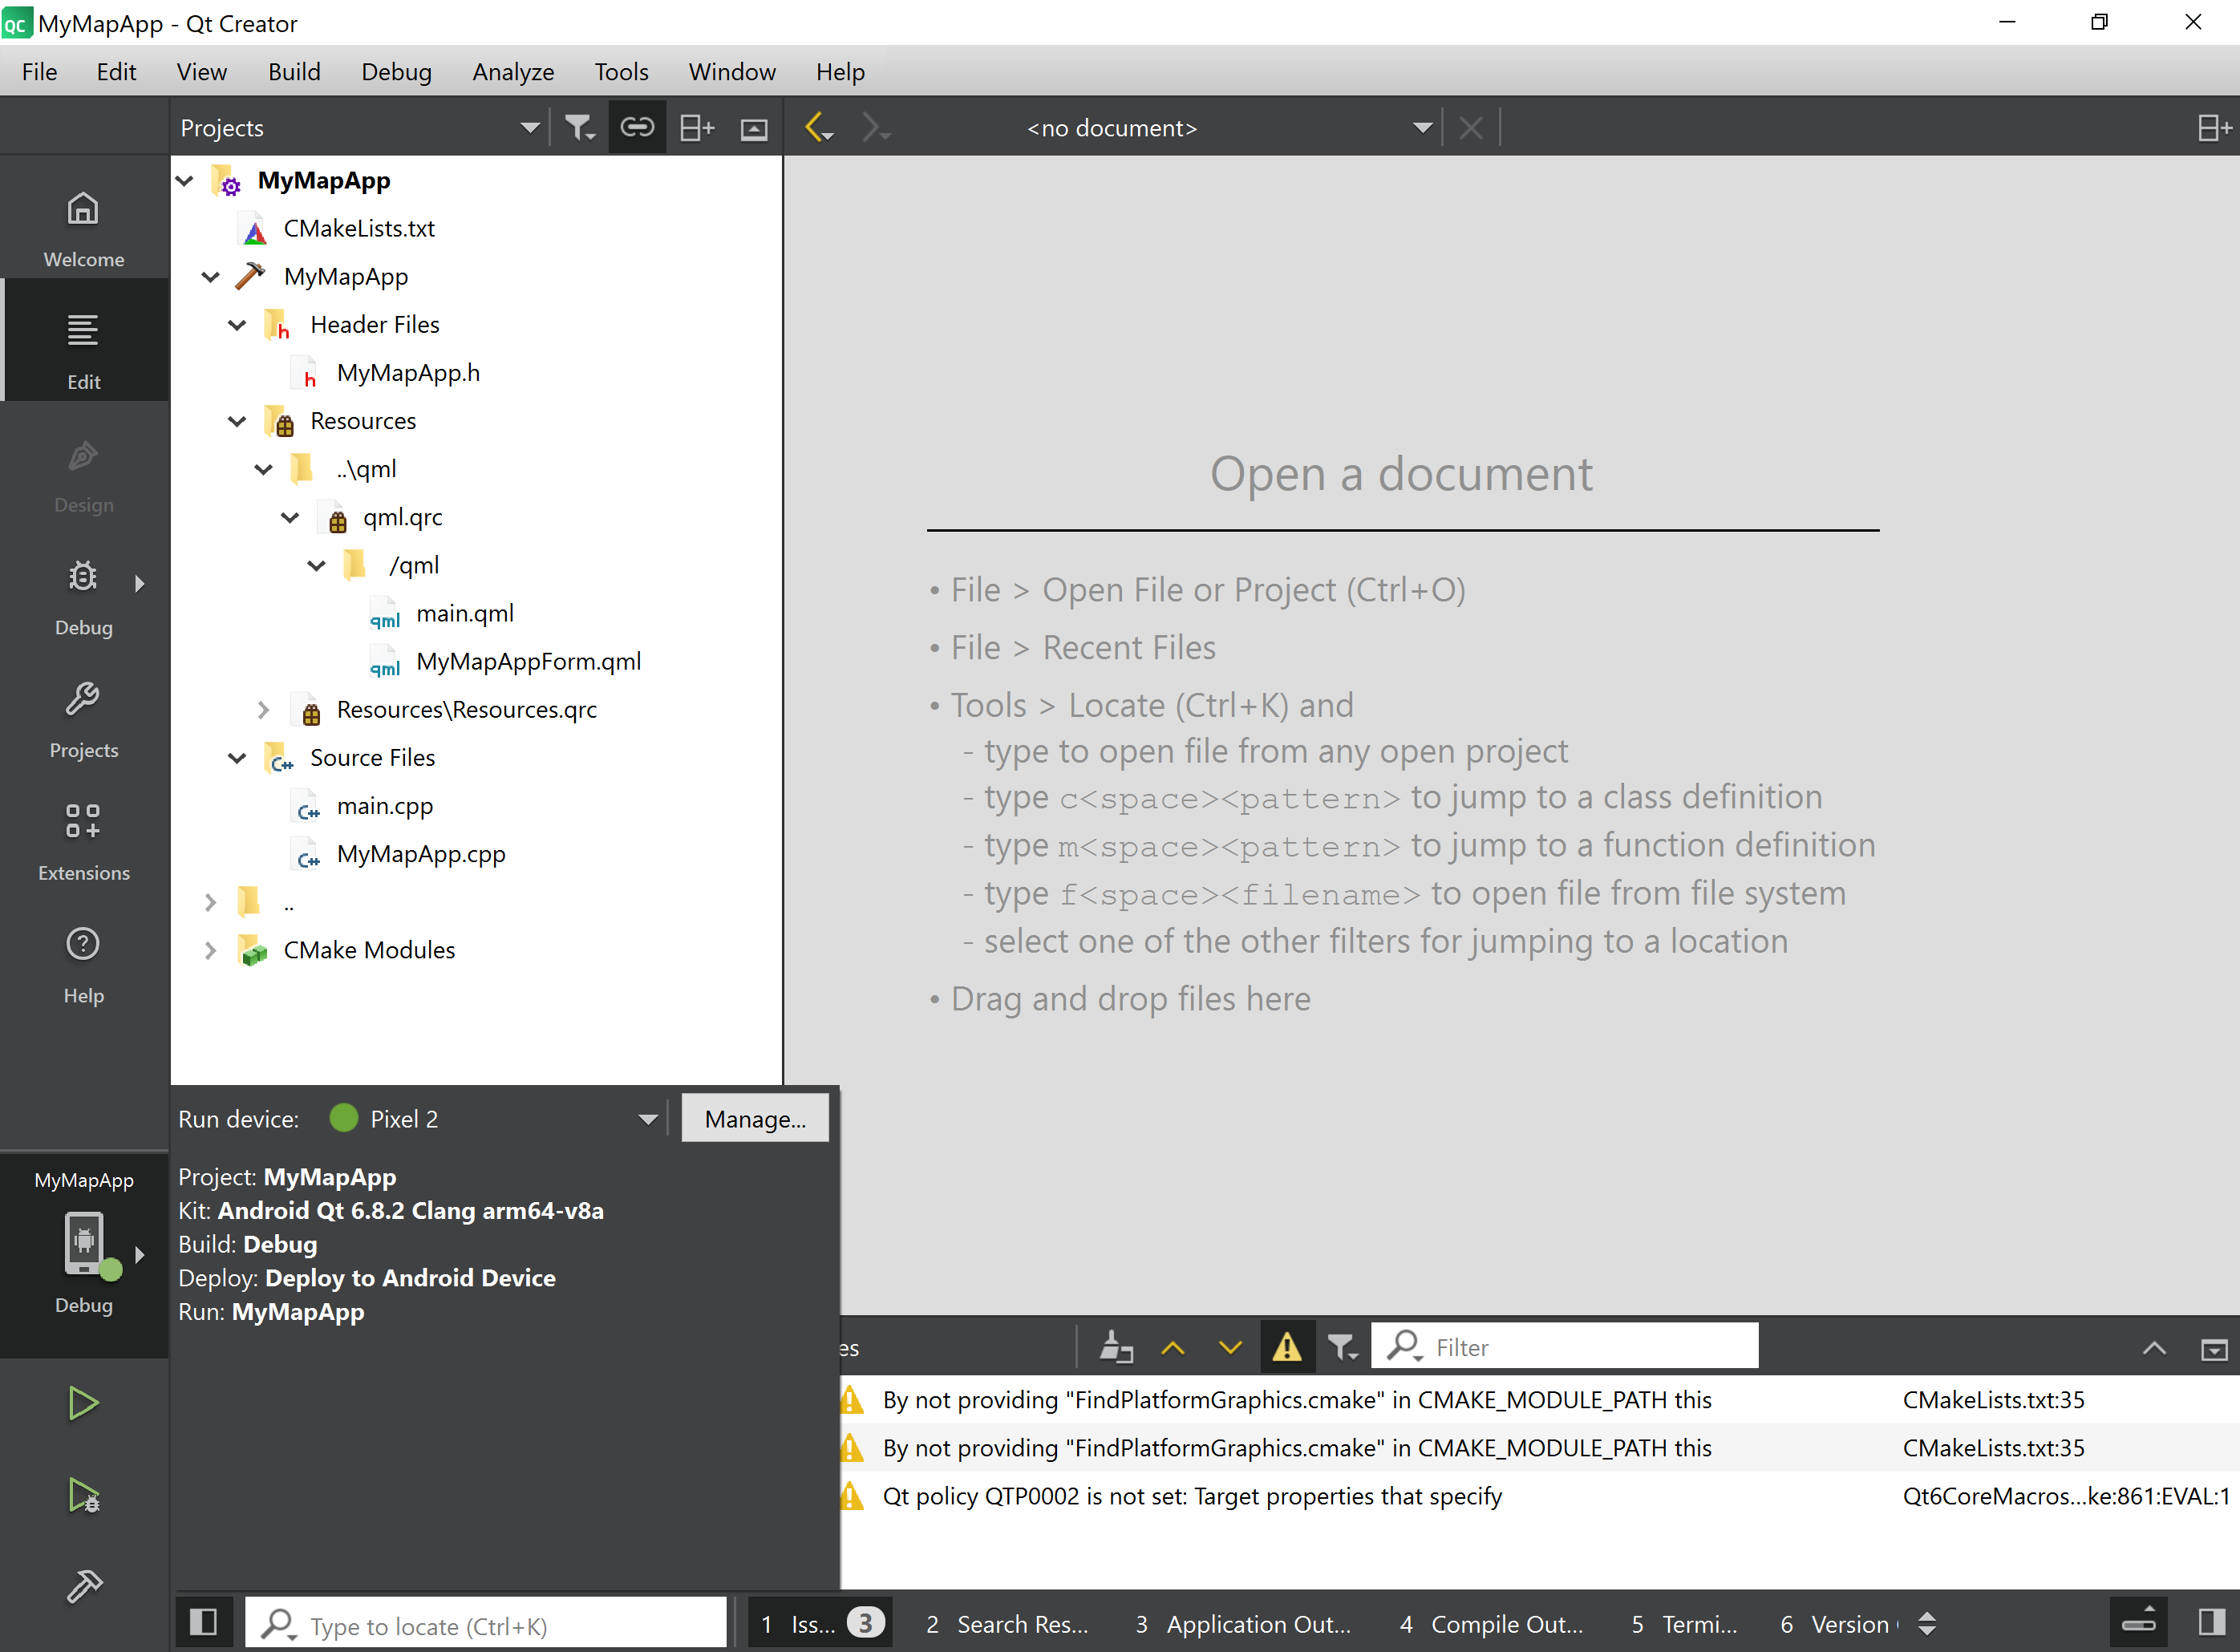
In the Projects pane, click on the MyMapApp debug icon and you should see similar information display depending on your device an build kit configuration:
- Run device: Pixel 2 <—- There should be a green circle icon
- Project: MyMapApp
- Kit: Android Qt 6.8.2 Clang arm64-v8a
- Build: Debug
- Deploy: Deploy to Android Device
- Run: MyMapApp
Add C++ code to the app
Now let’s write some C++ code in Qt Creator to have your app to do something interesting like zoom to a specific location on the map. The code steps are very similar to the Display a map tutorial in the ArcGIS Maps SDK for Qt documentation.
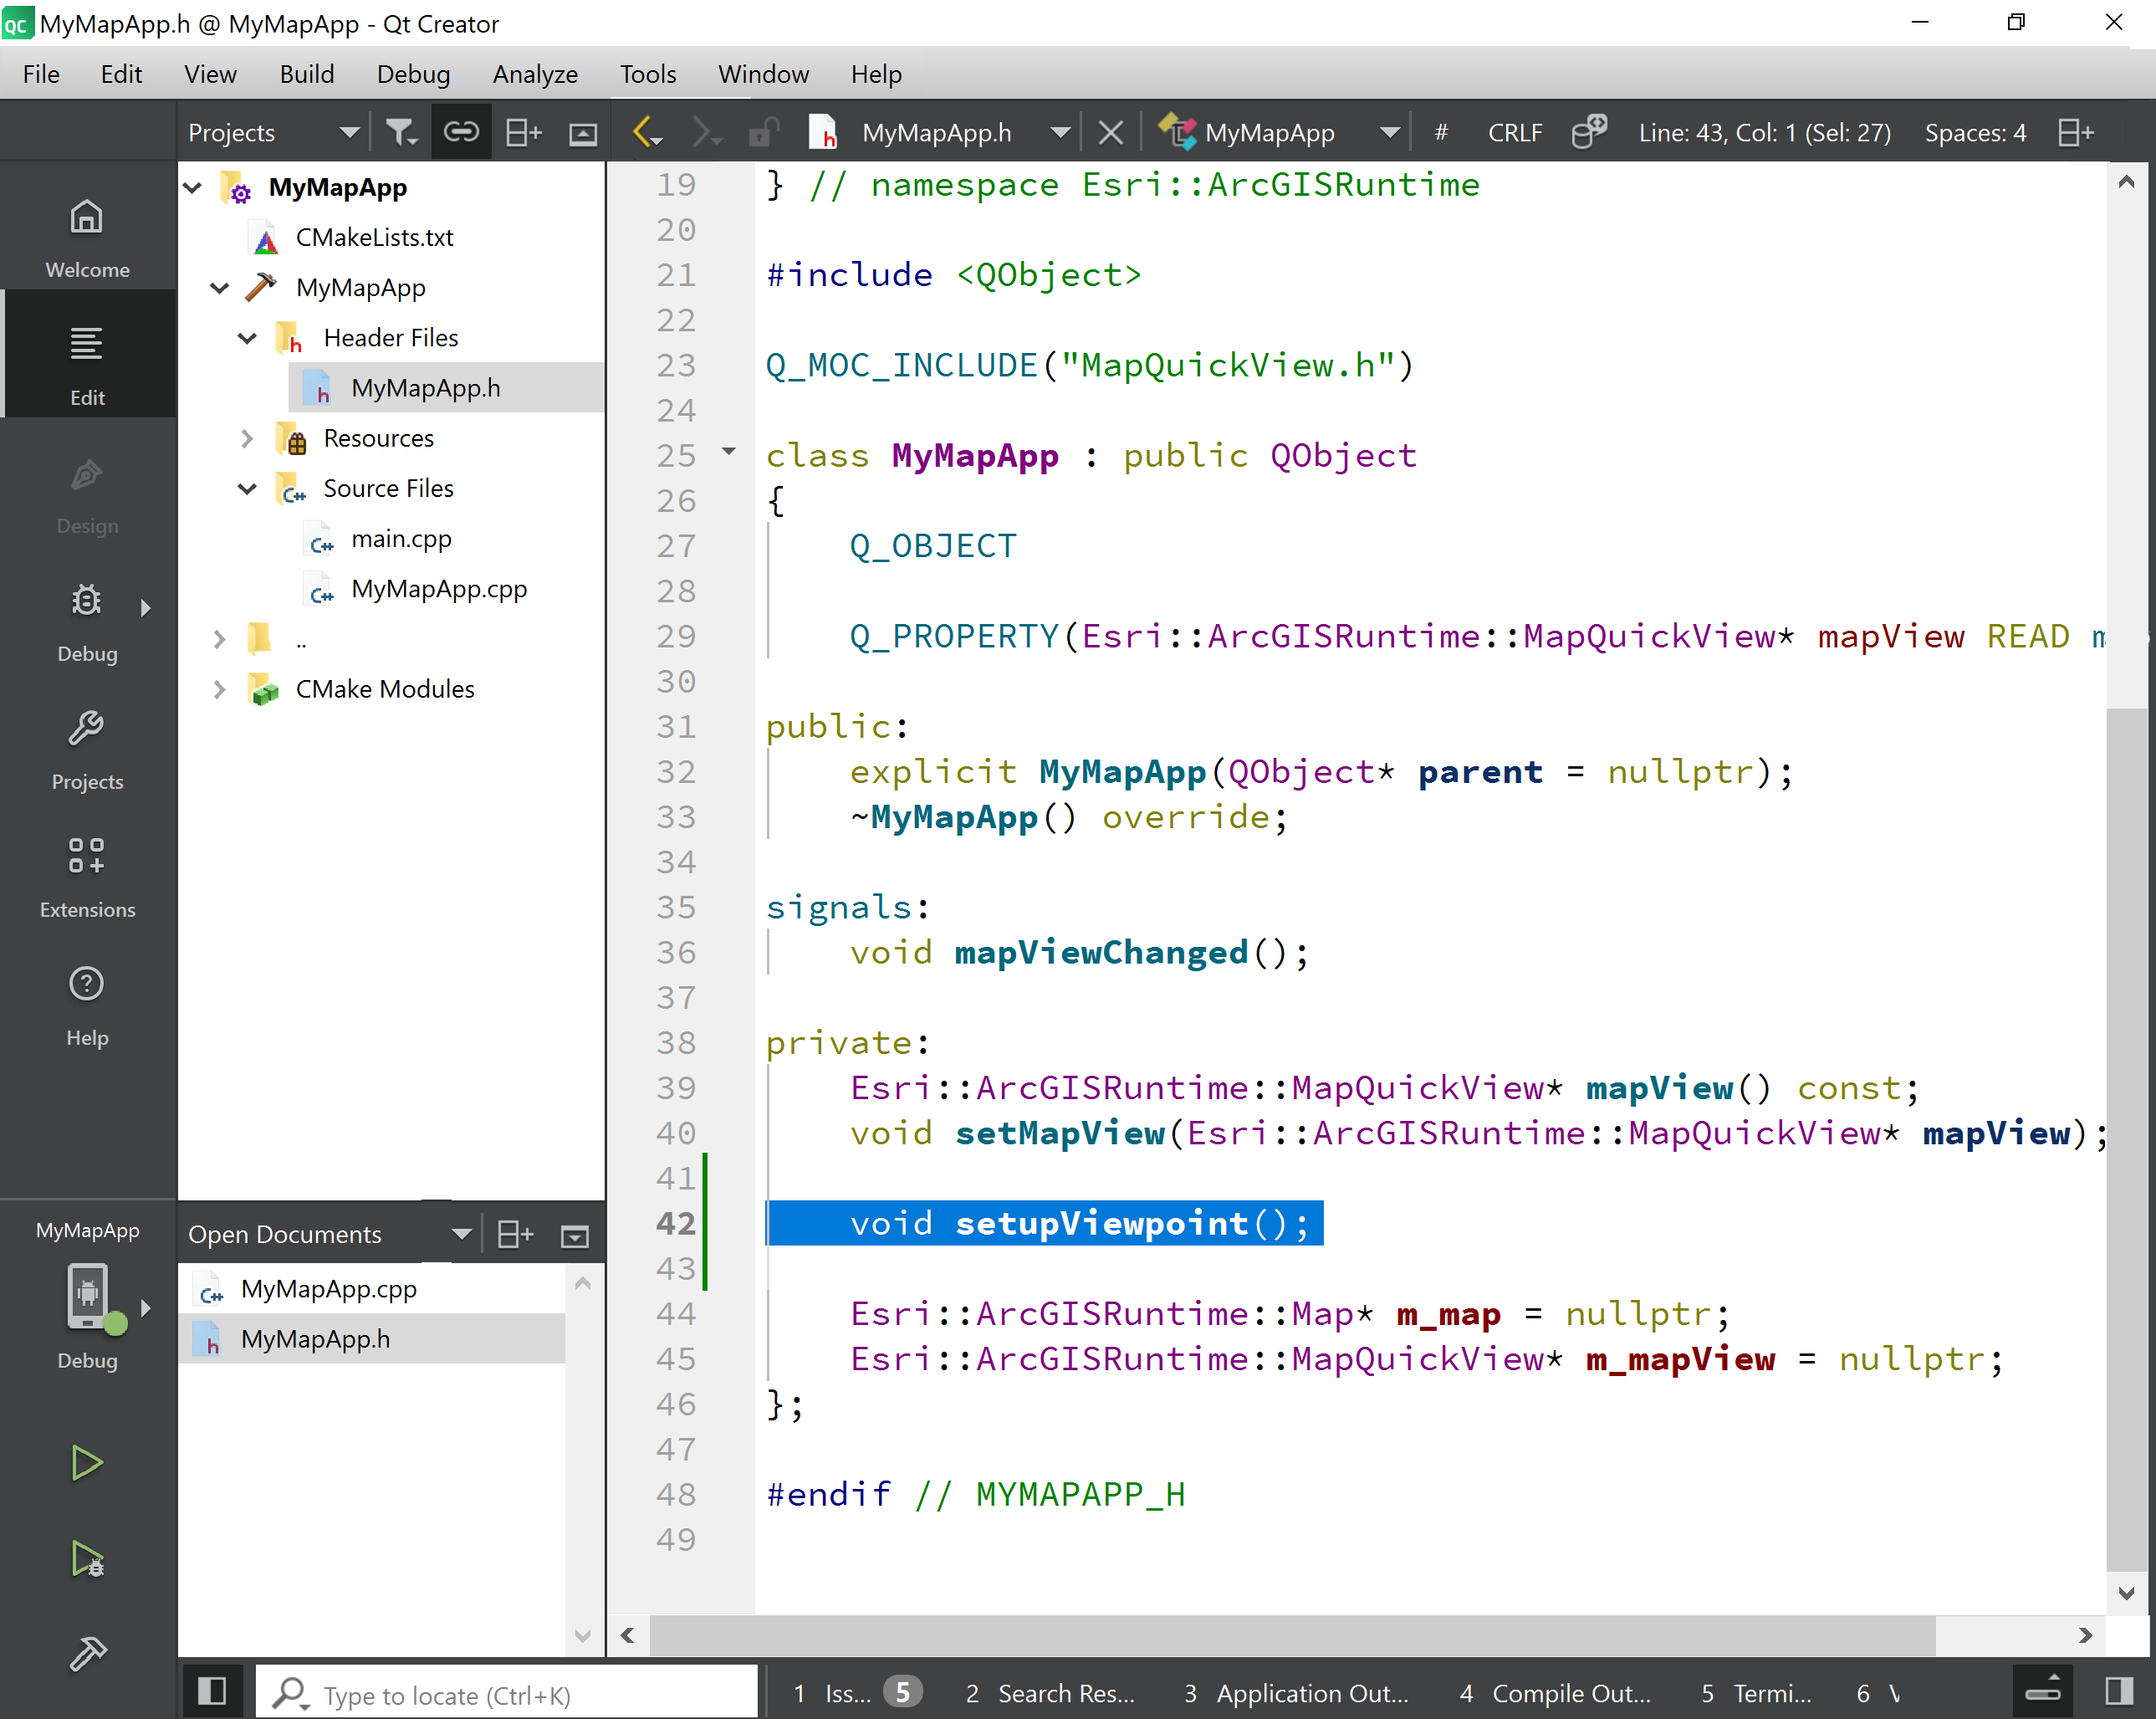
Modify MyMapApp.h
In the Projects window with the Edit tab active, expand the Header Files folder. Double-click the file MyMapApp.h to open it. Add the declaration in the private section:
void setupViewpoint();
Then save and close the file.
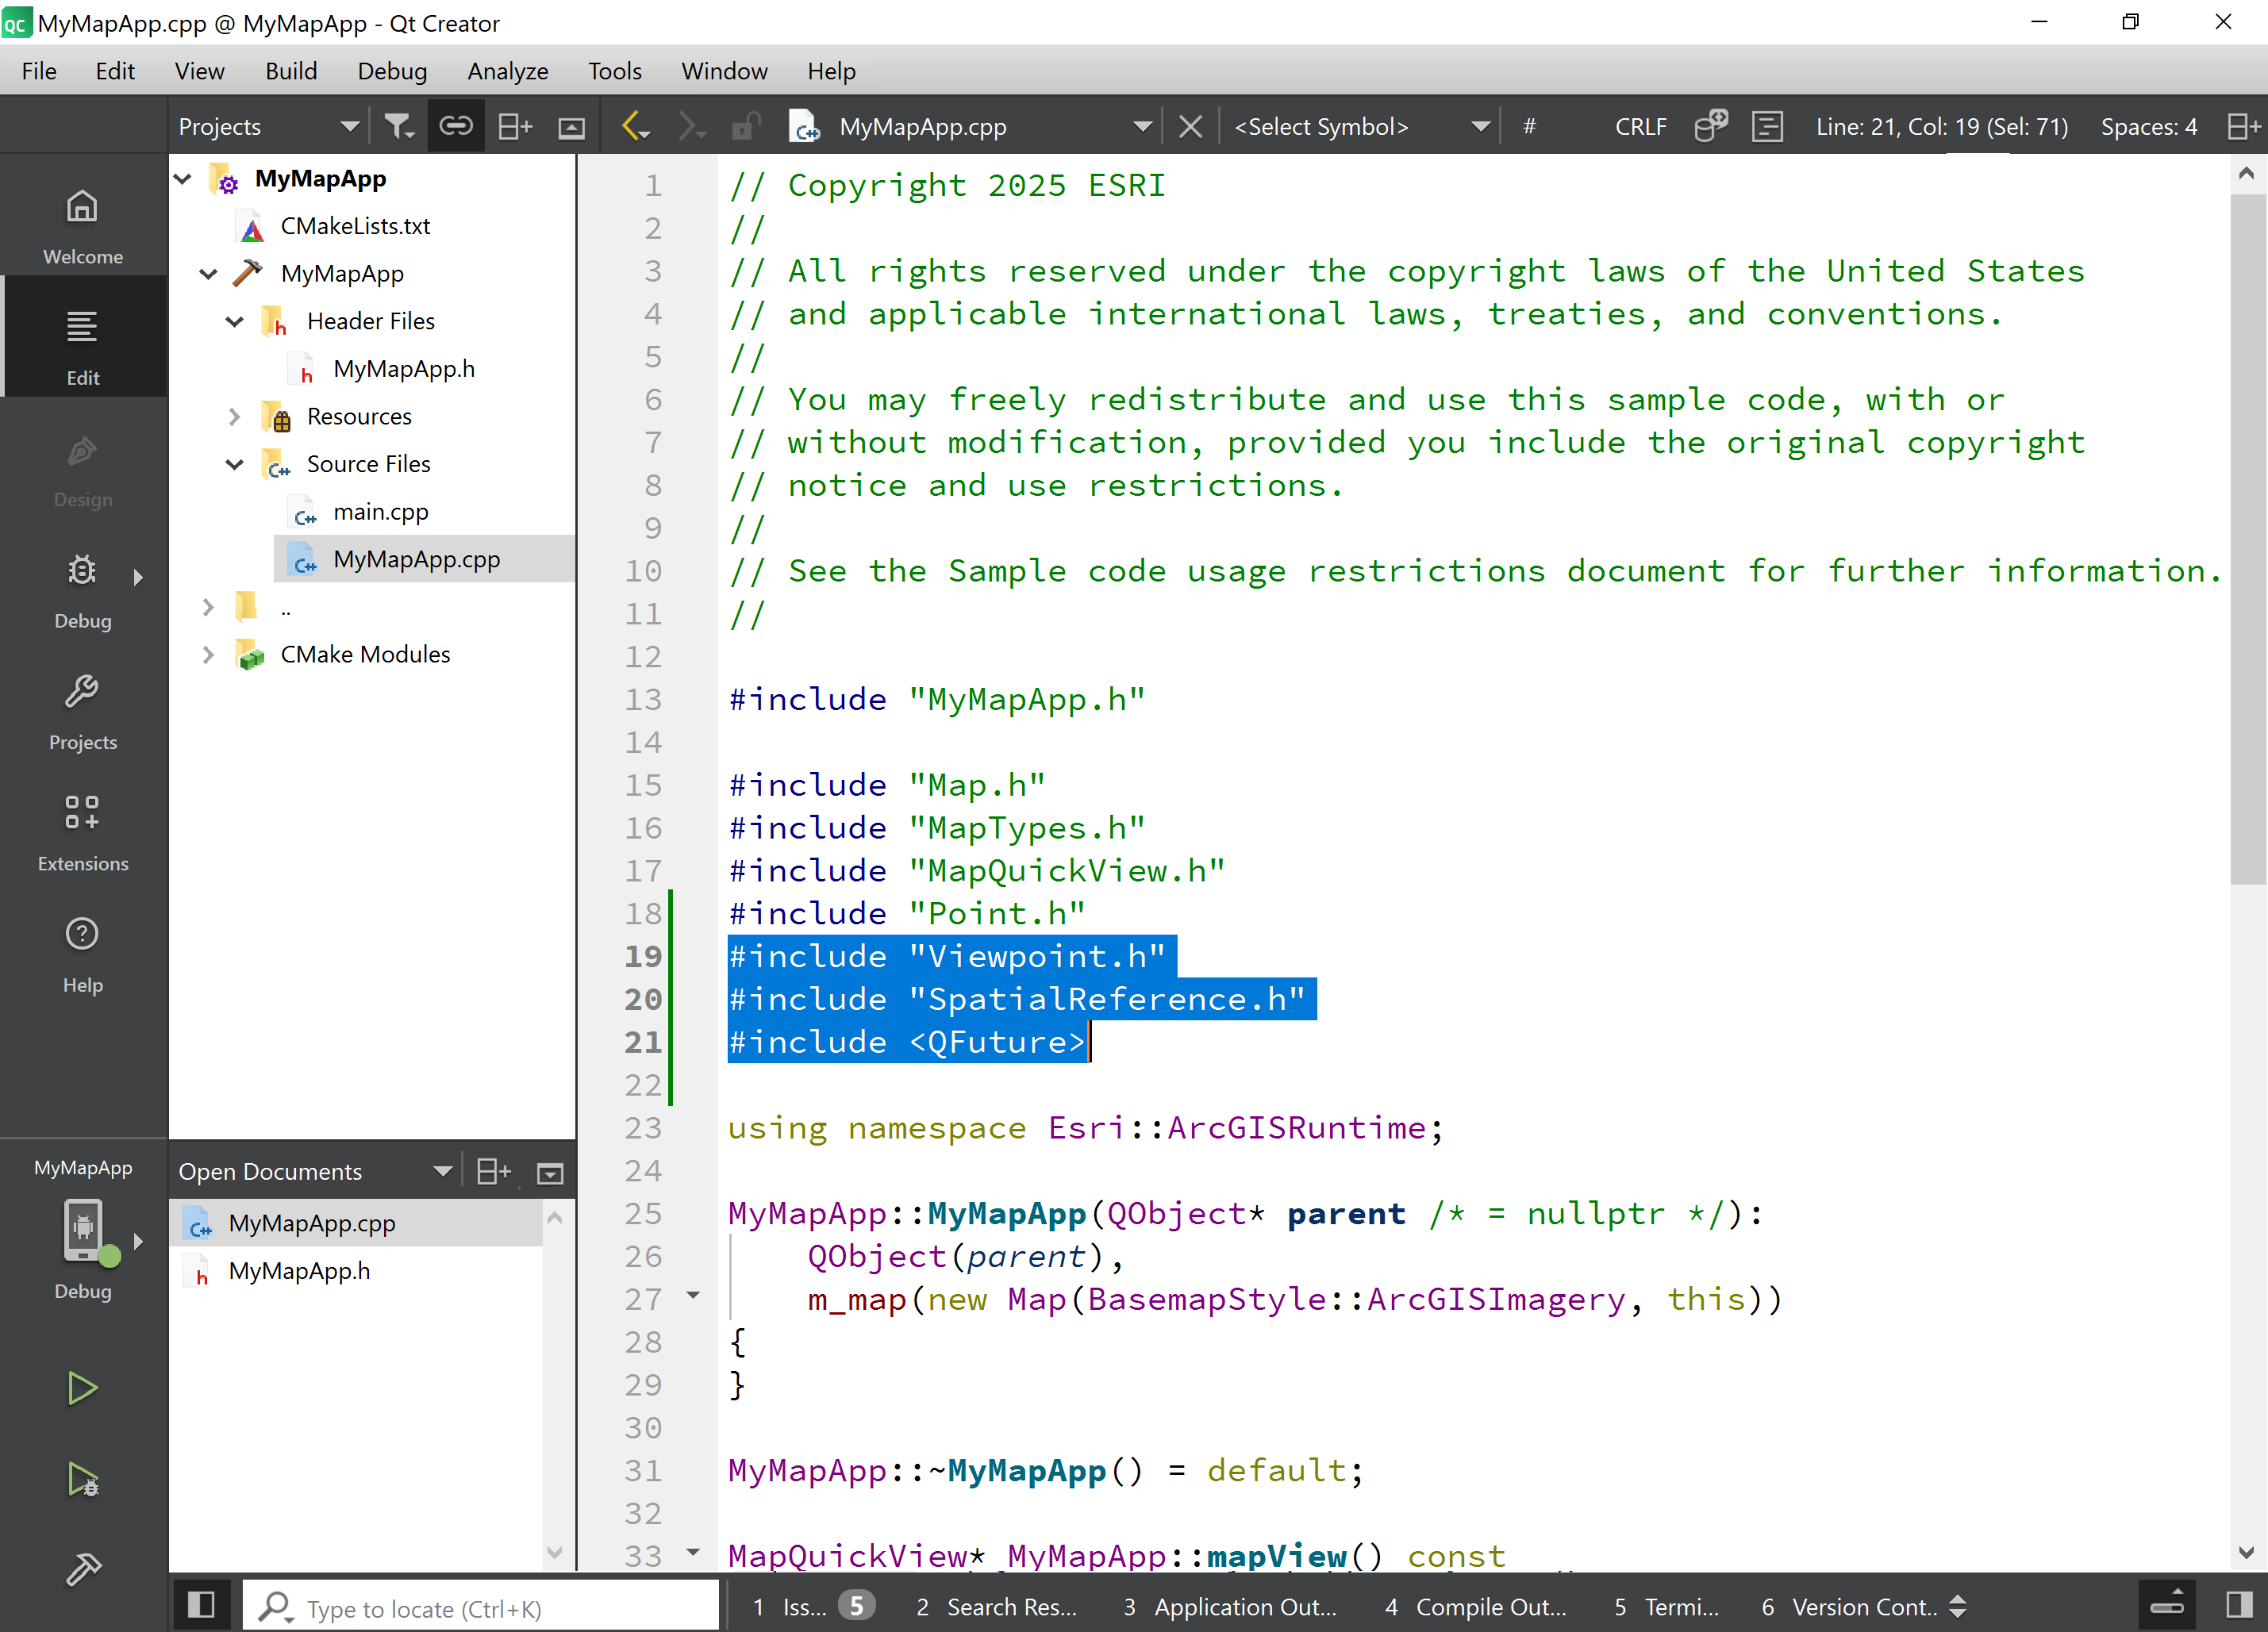
Modify MyMapApp.cpp
Now open the MyMapApp.cpp file and add the following 3 lines to add some include statements:
#include "Viewpoint.h"
#include "SpatialReference.h"
#include <QFuture>
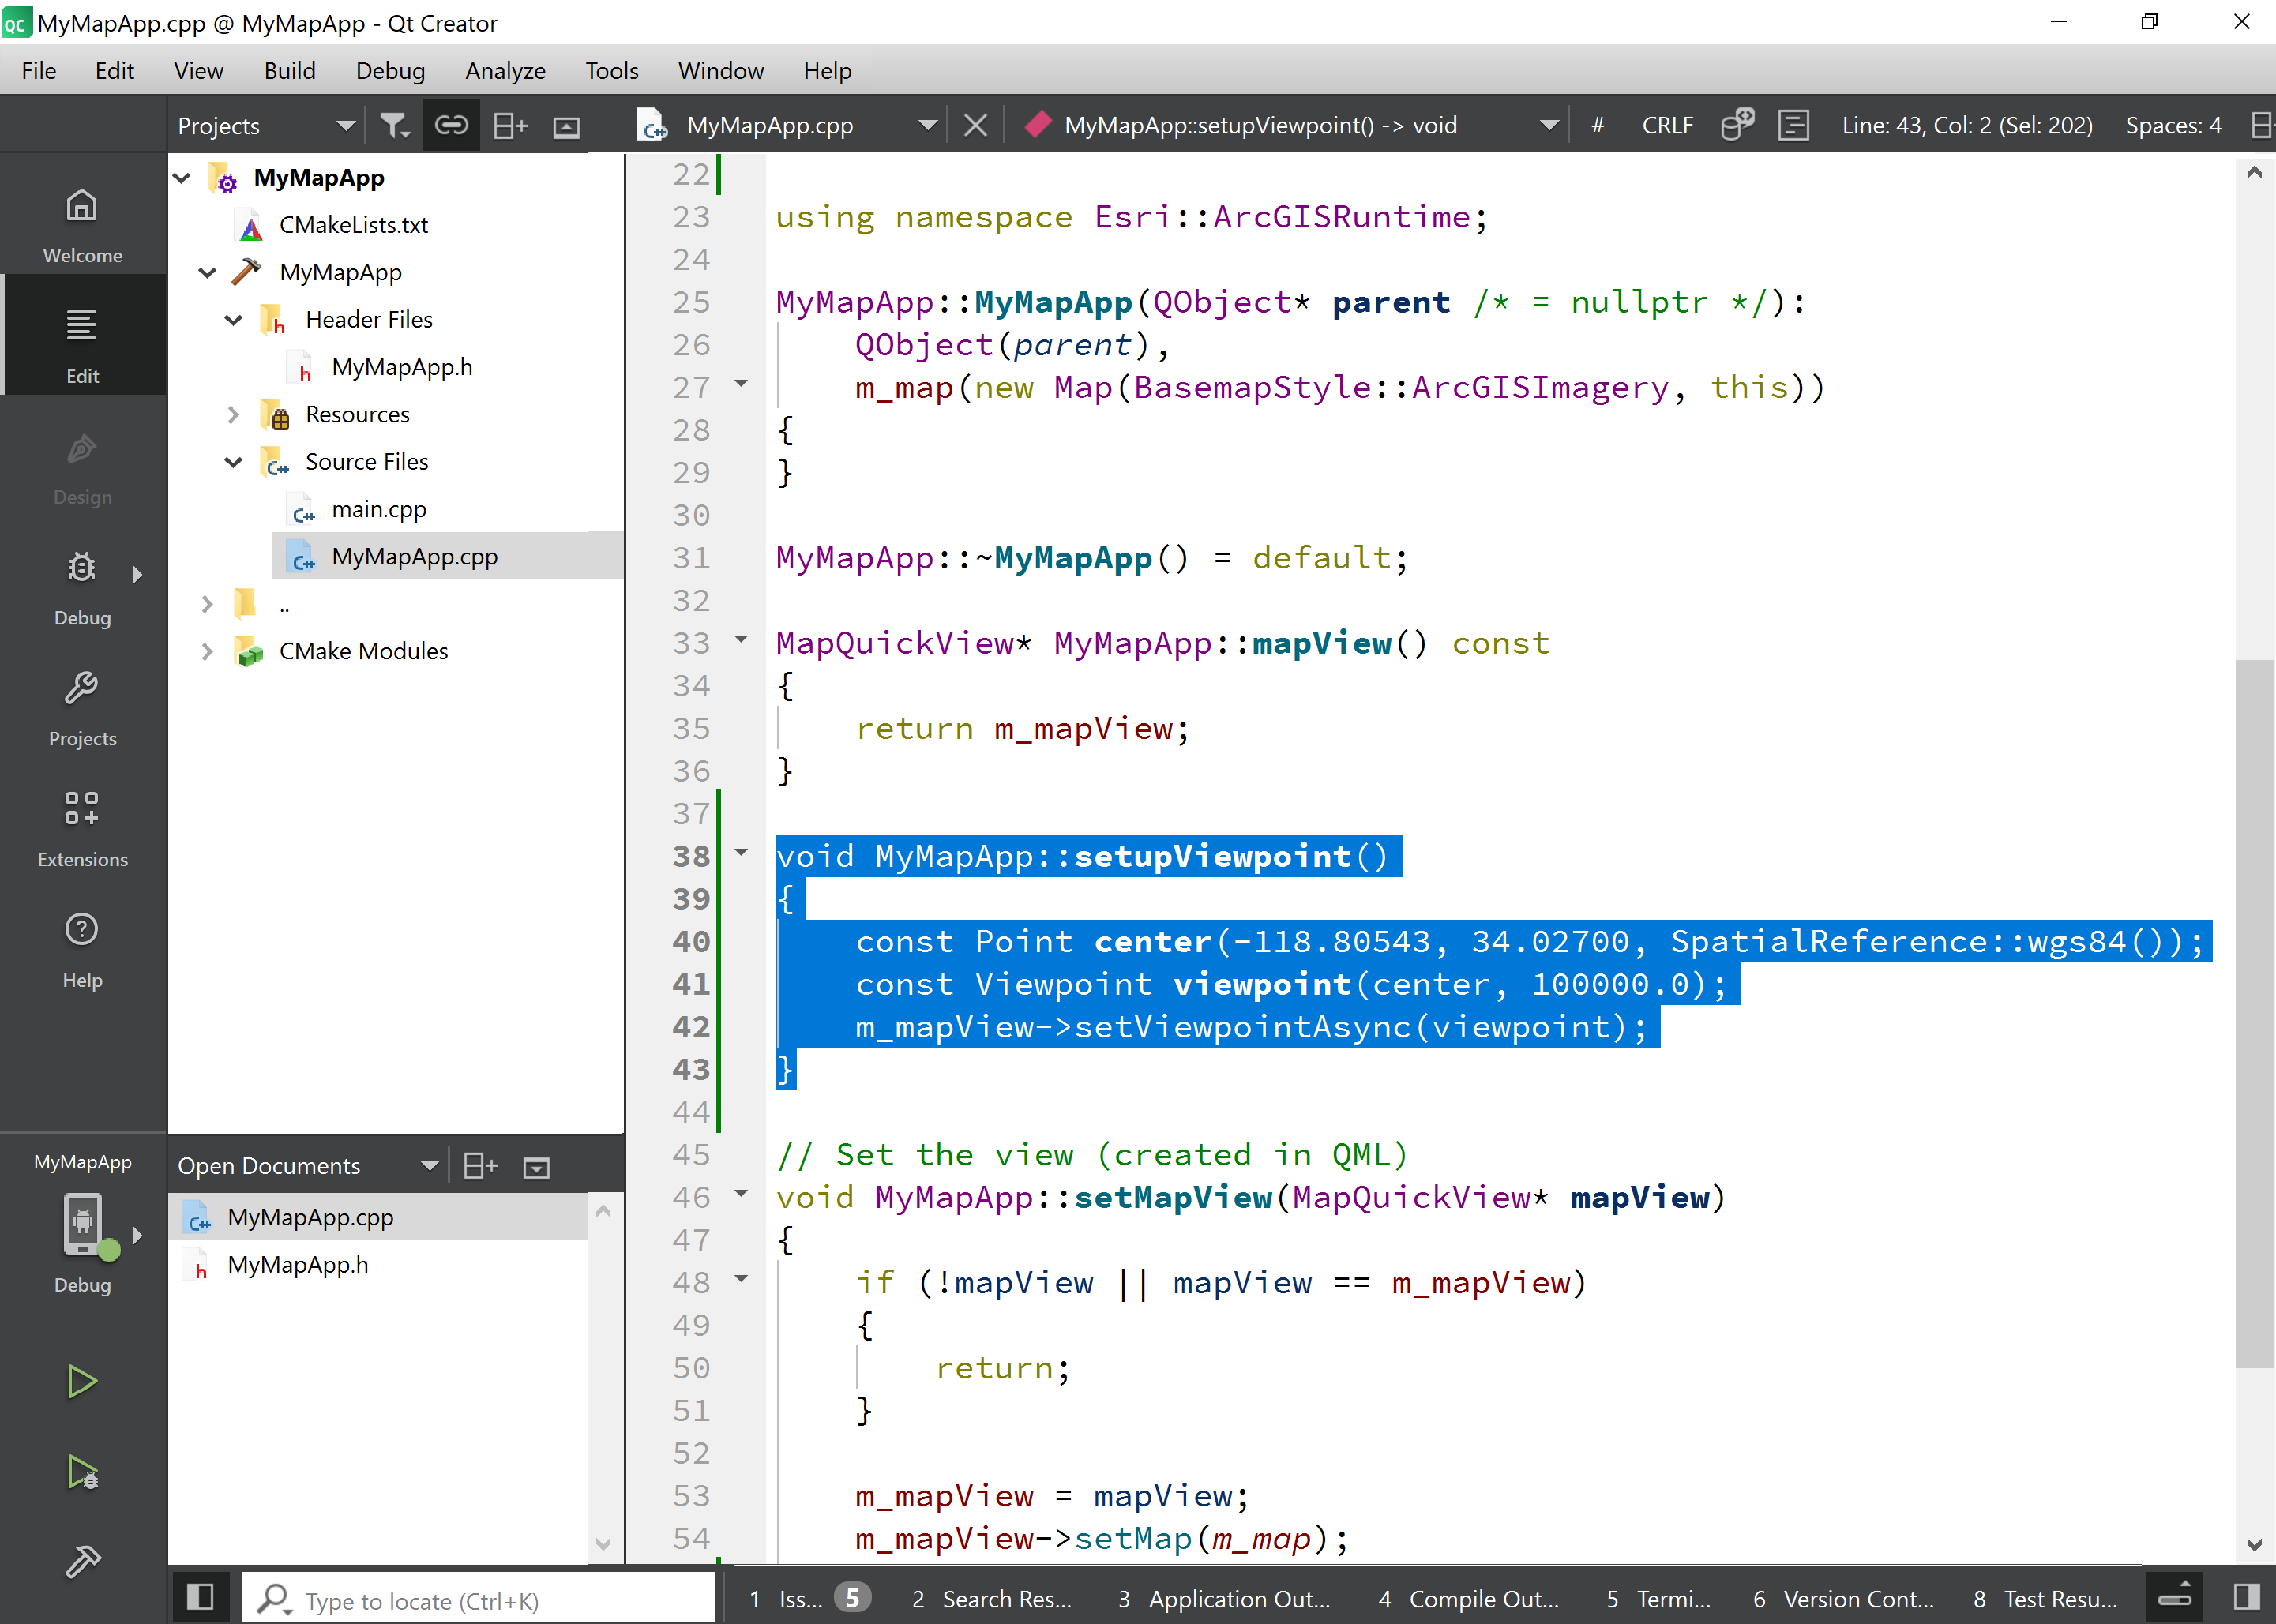
Staying in the MyMapApp.cpp file, add the following function:
void MyMapApp::setupViewpoint()
{
  const Point center(-118.80543, 34.02700, SpatialReference::wgs84());
  const Viewpoint viewpoint(center, 100000.0);
  m_mapView->setViewpointAsync(viewpoint);
}
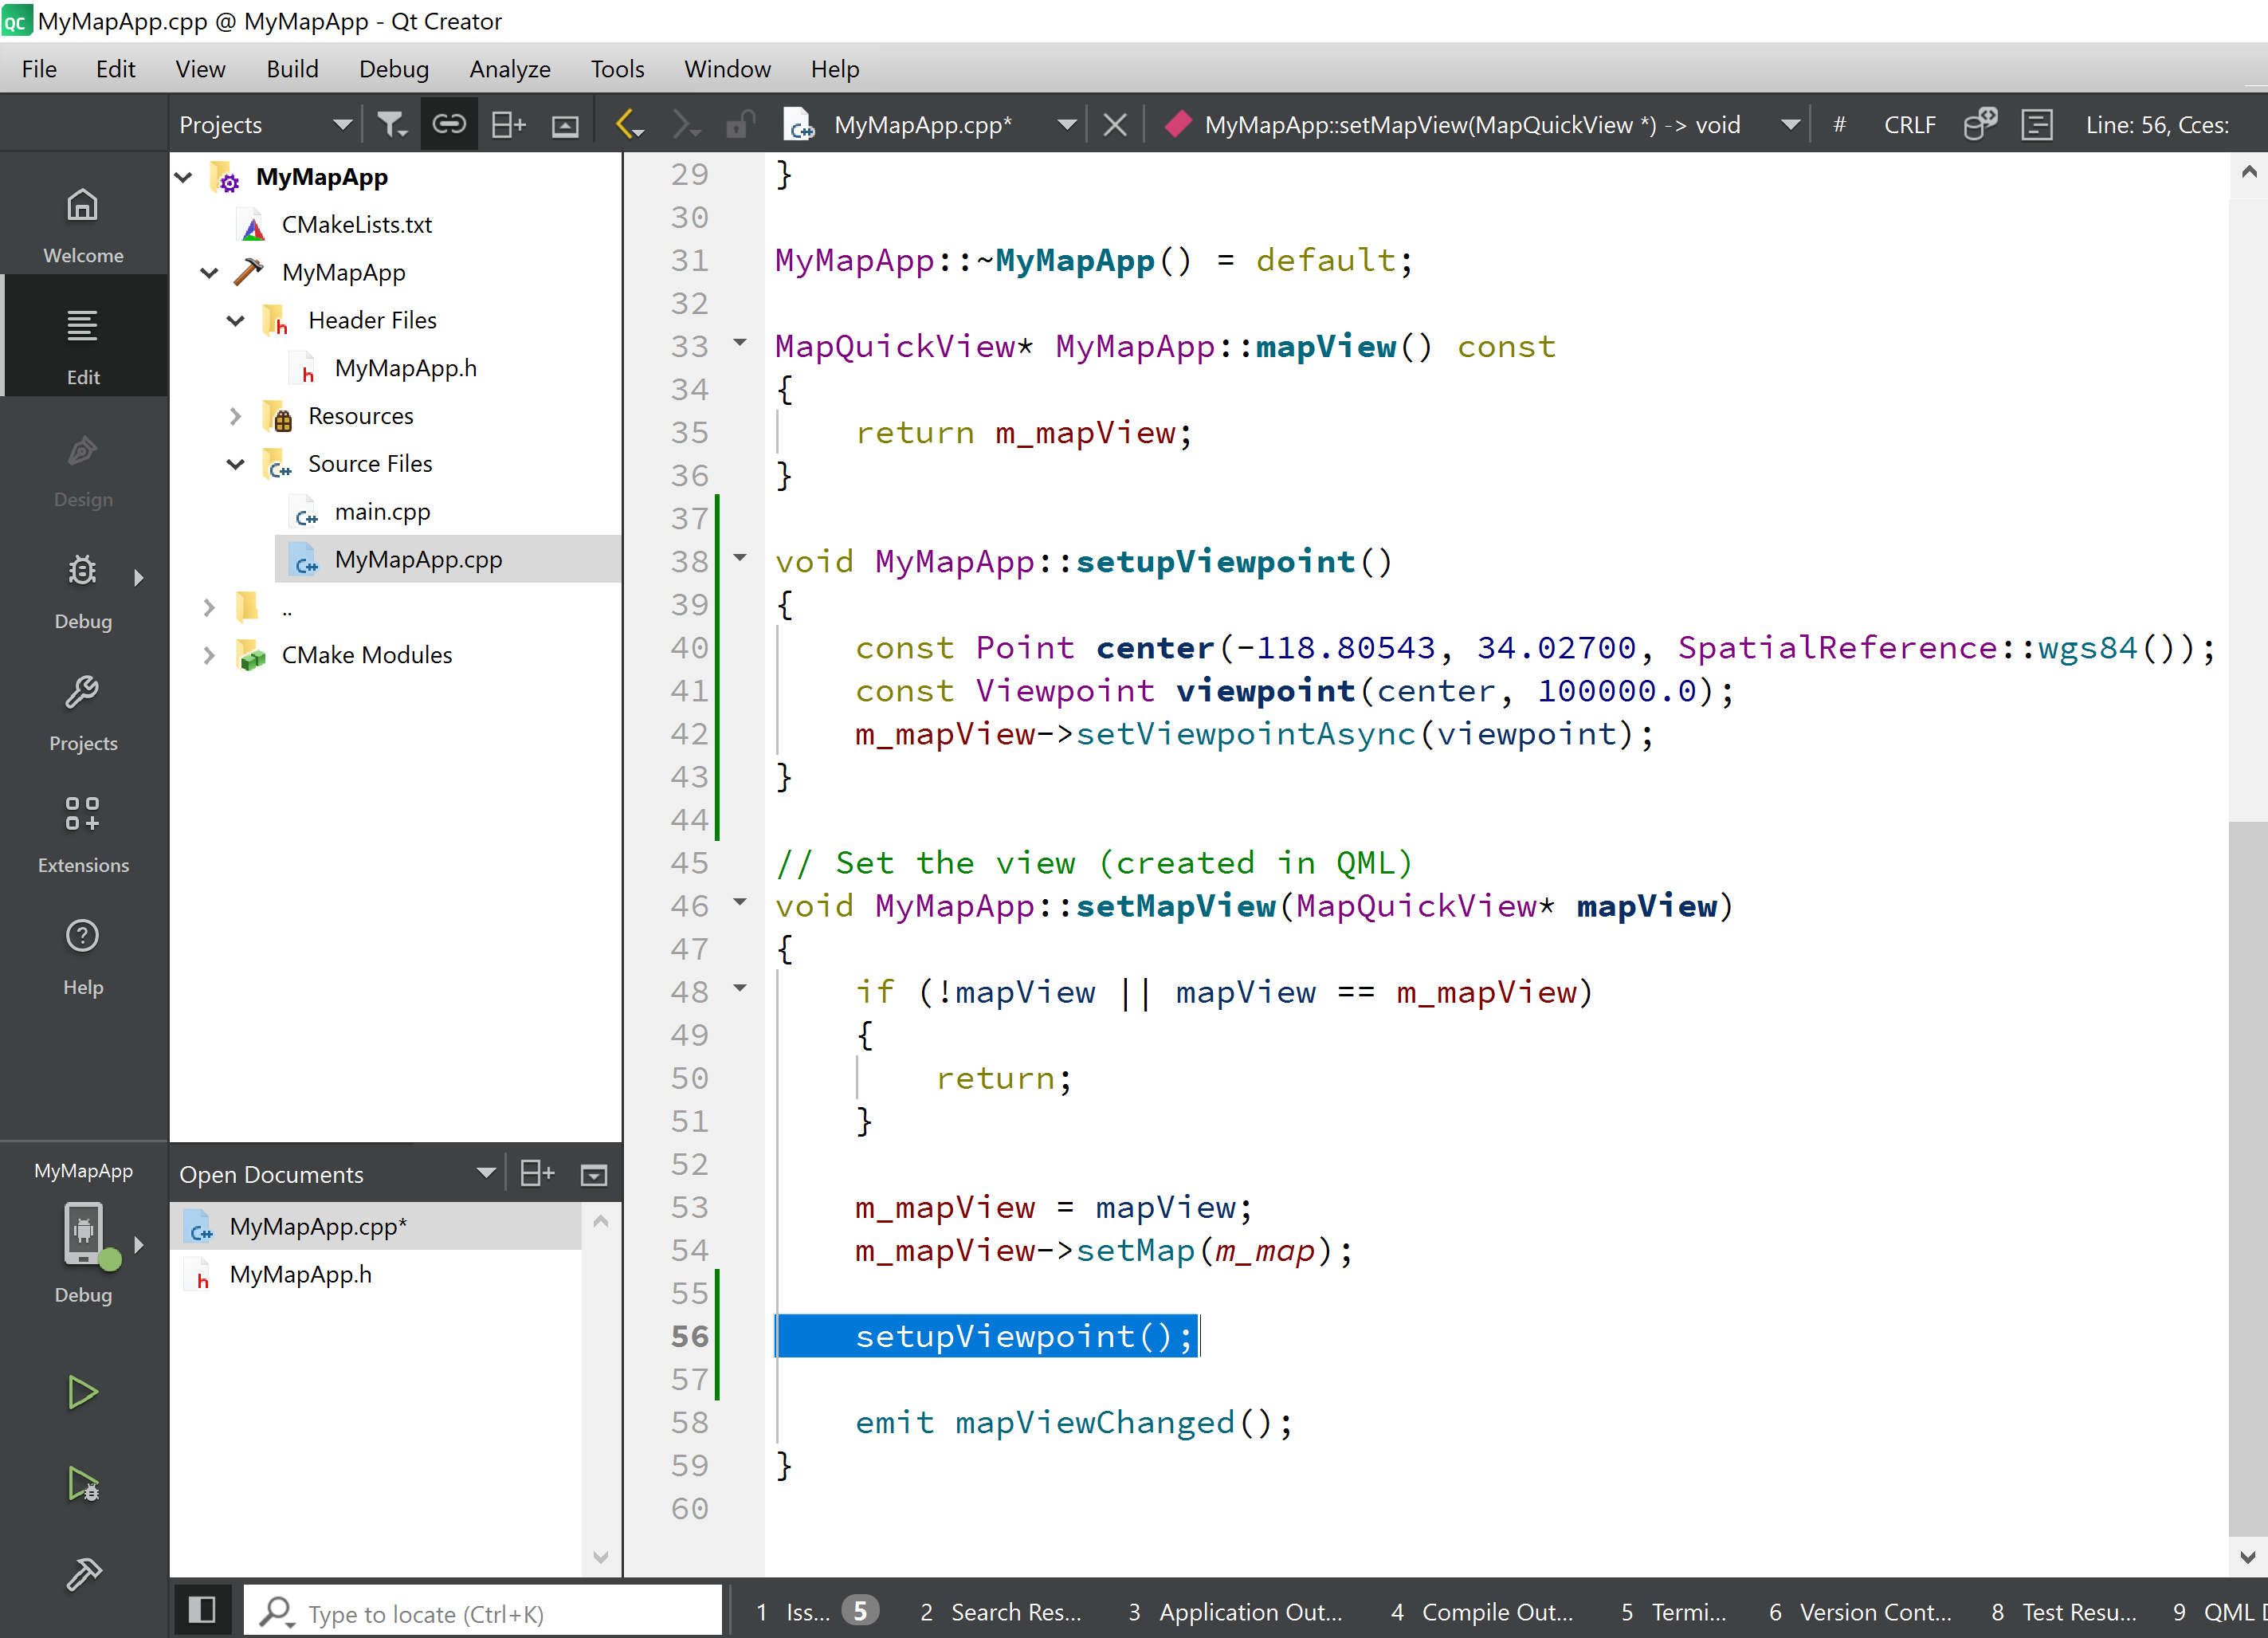
The final code change we will make in the MyMapApp.cpp file is to call the setupViewpoint() function from within the existing MyMapApp::setupMapView(MapQuickView* mapView) function.
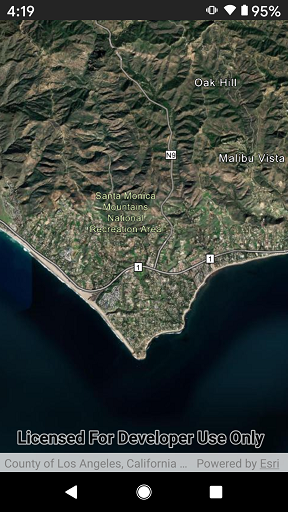
Test the app on the Android device
You are now ready to build and deploy your changes to the Android device. Do this in the menus by clicking Build > Run. You should see your app open zoomed to the Santa Monica mountains in California.
Summary
In this blog we learned how to create a simple map app using the ArcGIS Maps SDK for Qt via the CMake build system in the Qt Creator IDE and to deploy it on a physical Android device. Now that you know the basics, I encourage you to learn more about what you can do with the ArcGIS Maps SDK for Qt by reviewing these resources:

Article Discussion: