Attribute Assistant is an add-in that uses a series of predefined methods to automatically populate attributes when updating or adding new features to a geodatabase. It is one of the ArcGIS for Local Government apps preconfigured to perform common tasks with data stored in the Local Government Information Model.
Are you overwhelmed with having to maintain far too many fields in attribute tables? If you answered yes, the Attribute Assistant add-in can help.
Working with address and street centerline data goes beyond just an address or street name. In Brevard County, the address point layer has 21 unique fields that must be maintained. If more fields can be filled automatically, less time is required for each new address point/street segment. In my case, Attribute Assistant maintains 15 fields, which means I only have to fill in 6 fields.
Attribute Assistant, available at no charge from Esri, can also perform vital QA/QC tasks. All you need is a master street table containing all street names in your area. When you create a new address point or add a new street segment, Attribute Assistant checks the master street table to ensure the entry has a valid street name. If a street name is misspelled, Attribute Assistant will generate an error message and provide choices from the master street table that are similar to the entry. Combined with geodatabase domains for street types, street suffixes, and other address components, you can eliminate human error to a large extent.
How to Get Attribute Assistant?
Attribute Assistant is part of the Water Utility Network Editing Template (10.2) download. Get it from ArcGIS Online by searching the Gallery for Water Utility Network Editing Template (10.2). With the template downloaded, extract the ZIP file, close all ArcGIS applications, and navigate to the Application directory on your machine to run the AttributeAssistant.esriAddin. [If the Address Management, Capital Planning, or Water Utility Network Tools addins are installed, remove them.]
How Do I Set It Up?
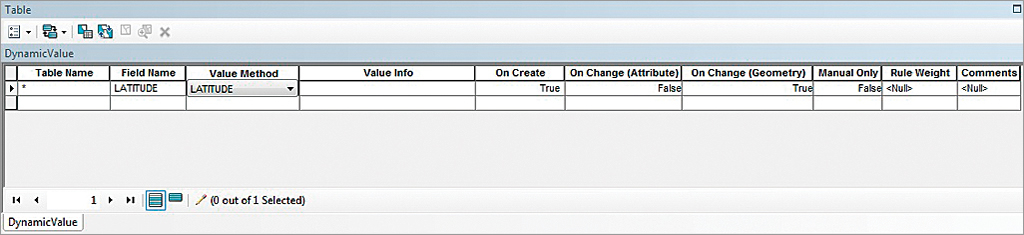
After installing Attribute Assistant, open ArcCatalog, navigate to <your directory>\MapsandGeodatabase\ LocalGovernment.gdb and add the DynamicValue table. Navigate to the geodatabase containing the address and street centerline layers and import the DynamicValue table. Although the DynamicValue table doesn’t need to be in the same geodatabase as the data being edited, it does need to be in a geodatabase. Open a new MXD or open the MXD in which address edits will be made and add the DynamicValue table. Start editing and delete all records except one empty one.
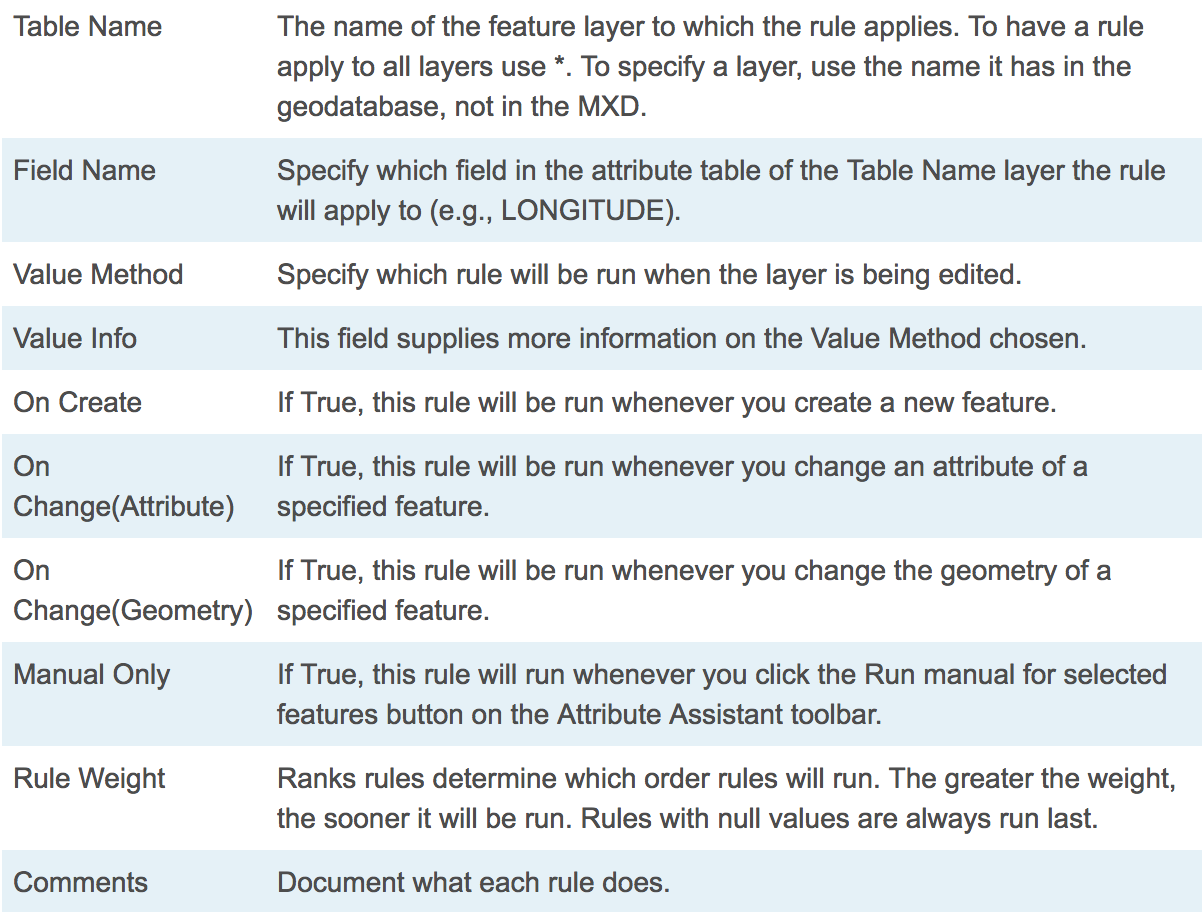
This table will contain the rules Attribute Assistant will use to determine how to handle certain fields in the layer currently being edited. Table 1 lists each field in the table with its function.
Popular Rules
Here are a few popular Attribute Assistant rules.
Time Stamp
Often you want to know when you created an address point/street segment or when you last changed it. If you have a field called CREATED, use this rule and set the On Create value to true but set the On Change value to false. Use the same approach with the EDITED field but set the On Create value to false and the On Change values to true.
Current Username
If more than one person edits data, you will want a field called CREATOR or EDITOR. Depending on the value, use your windows user name or database user name.

Intersecting Features
Many times, address points need additional information, such as a real estate number (RENUM) or ZIP code. If you have a ZIP code/parcel polygon layer, data can be automatically extracted from those layers and added to an address point. For Table Name, choose the address point layer. For Field Name, choose the field you want filled. For the Value field, use the Input|Source format (e.g., the zipcodelayer and the ZIPCODE field). This can be done with every polygon layer the new address point intersects with.
Expression
This rule uses an expression (in Visual Basic) to automatically fill a field. Often, there are separate fields for street name, house number, and street type, but you need a field that combines all these fields to create a full address. Once each separate field is filled, an expression like
placed in the Value Info field can be used to populate a FULLADDRESS field.
Validate Attribute Lookup
This is a great rule for QC/QA. It uses another table to validate a new table entry. For example, you need a table that consists of all available street names in your area of interest. Use the format Source|Field (e.g., Street_Master_Table|StreetName) in the Value Info field. In this case, the Source would be the Name field in Master_Table, and the address point layer and the Field name would be StreetName, the field to be checked.
My Rules Are Done. What Now?
Once you finish editing the DynamicValue table, save your edits. Now you are ready to find out if your rules work properly by doing some editing. Open and activate the Attribute Assistant toolbar by choosing Customize > Toolbars > Attribute Assistant in the standard menu of ArcMap. Click the Attribute Assistant toggle button to turn it on. The green plus sign indicates Attribute Assistant is active. The red exclamation point means the Attribute Assistant is off. Test each rule to ensure that everything runs smoothly and you get the results you want.
Additional Help
This article only scratches the surface of what the Attribute Assistant can do, so visit the Esri Help document on this add-in on the ArcGIS Resources pages on ArcGIS for Local Government.
About the author