Best practices that improve data management
My ArcUser tutorials on mapping and analytical tasks, often related to natural resources or public safety, always give step-by-step instructions for managing data as well as novel workflows and tips and tricks. Recently my editor asked that I summarize some of the data management best practices I included in these tutorials and that I use in my professional practice.
What Are Best Practices Anyway?
The phrase best practices is commonly used in business, industry, and education to describe methods, procedures, and workflows designed to obtain desirable results in a safe, cost/time efficient, and (when applicable) an environmentally friendly manner. In a practical sense, best practices are formally or informally implemented within industries and organizations to achieve consistent, reliable results. Within GIS and spatial analysis, best practices have evolved through the interaction between the technology’s users and its developers to continually enhance mapping and cartographic tasks.
In this article, I will explain the best practices I use whenever I start a new tutorial or mapping activity. These practices are applicable to both industry and academics and include new and traditional steps to help GIS users design and produce solid mapping projects.
I find that one of the biggest issues confronting GIS professionals is data management, which includes understanding and documenting coordinate systems. Using a well-designed file system that identifies when and from whom files were obtained and the coordinate systems used with those files, along with obtaining, updating, or creating quality metadata, will help you avoid many problems and makes most project tasks a breeze.
A Real-World Example
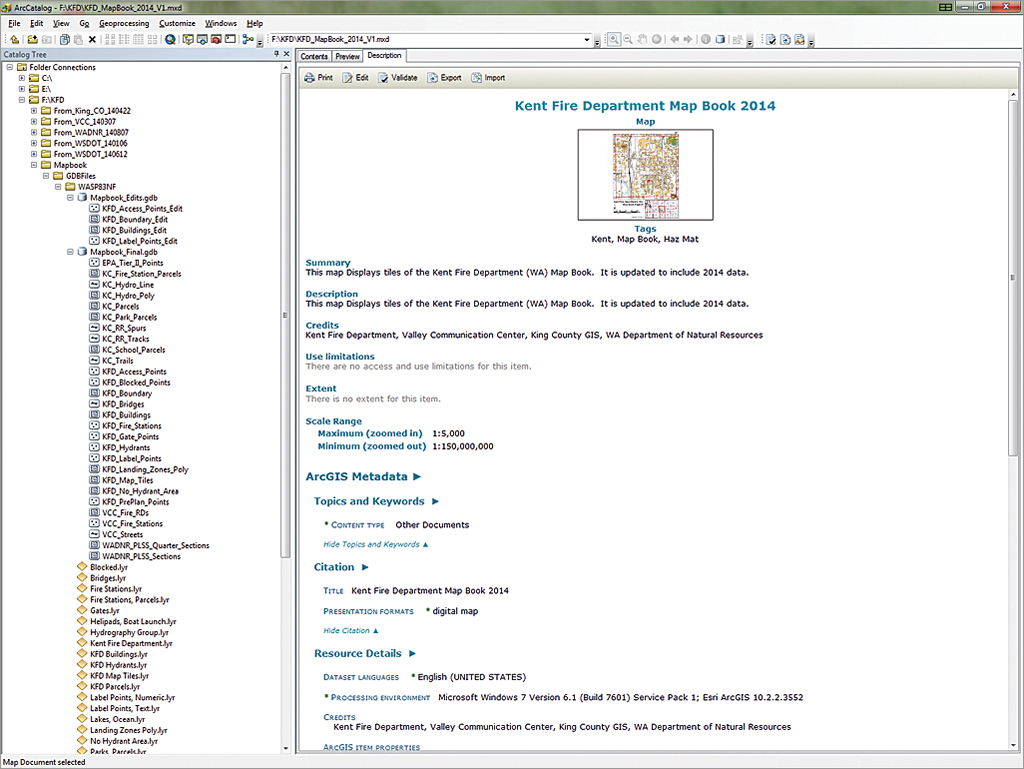
The illustrations in this article come from a public safety map book project undertaken by the Kent Fire Department (KFD) in Kent, Washington. Kent, a growing community located less than 20 miles south of Seattle, is a hub for commerce and industry and has one of the largest warehouse districts on the west coast. KFD uses digital and printed map books to guide emergency response and assist with planning. The KFD map book uses Esri’s Data Driven Pages to publish data from federal, state, and local providers.
Data Acquisition and Management
All projects begin with an idea and proceed directly to data acquisition. In public safety, mappers often rely on agency and industry providers. Whenever I obtain project data, whether downloaded from the Internet, copied from a CD or DVD, or transferred interactively from a portable drive, I always create an archive folder to store a copy of the data so that it will remain safe, secure, and unchanged. I copy project data from this archive and store it in project folders.
Coordinate Systems and Metadata
When I receive data, I immediately open it and review it in ArcCatalog. I look for metadata created by the provider. If adequate metadata is not available, I use ArcCatalog to create new metadata or to validate and edit a minimal set. If metadata is available separately from the provider, I download the file and import it or manually merge it into the source data. Sometimes, I return to a provider’s site several times to ensure I have all available supporting information.

You will often use data from many sources, and it will come to you in many ways: downloaded from the web, on DVD, or copied over the network from another department. Sometimes that data will be periodically updated.
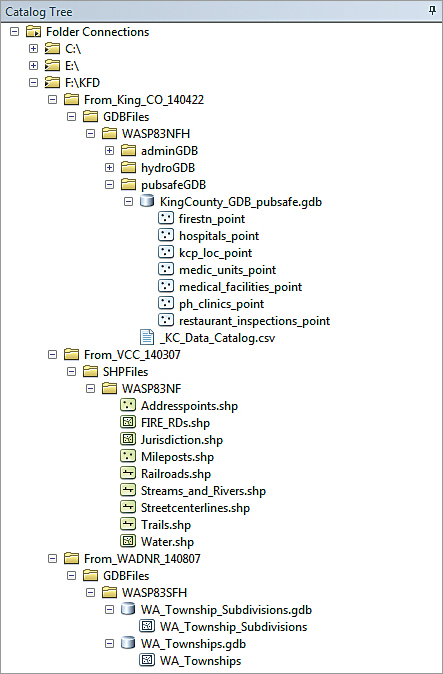
To organize project data (including updates) I create a master project folder. Data in this archive folder will remain unchanged. The master project folder contains separate subfolders for each data source. Each folder name begins with From_ which is followed by an abbreviation for the agency providing the data, and a date string in YYMMDD format denoting when I acquired that data.
If the data type and coordinate systems are known when the data is acquired, I create a subfolder with a name that denotes the data type and a subfolder with an abbreviation for the coordinate system (e.g., SHPFiles > WASP83NF for Shapefiles > North Zone U.S. Feet). If these parameters are not known, I unzip the new data in the root of the master folder, determine its format and coordinate system, create appropriately named folders, and move the data to these folders. Using this naming convention is especially important if source data is available in several different coordinate systems.
Integrating Data into Projects
After downloading and storing archived data, I employ strategies for extracting, standardizing, and editing or updating data that I may already have in my project. Typically, I open source data in ArcMap, review its geometry and attributes, and export it to the project’s database.
If the data comes in a coordinate system that differs from my project’s coordinate system, I convert the data to the desired system and apply appropriate datum transformations as needed. Because most of my data is stored in a file geodatabase, the full path is the same for all project data.
By reprojecting data from a single well-defined conversion data frame, I can control the output coordinate system of all imported and interpreted data.
As I import project data, I verify that the provider metadata is included with any new datasets. If I modify imported data, I note the changes I made. If geoprocessing tools are used to modify data, I confirm that those geoprocessing events are described in the output metadata.

Data acquisition and management practices vary by project based on your needs, the sources you used, and your preferences. In addition to carefully storing data on your local computer and keeping a secure archive copy of the source files in logical folders, also be sure to reference the organizations that supplied that data and let them know you appreciate their efforts.
Starting or Updating an ArcMap Document
When you start a new ArcMap session, the software prompts you to open a new template called Normal.mxt and allows you to set a default geodatabase. Too often we “lose” data because we fail to specify a location, and the computer stores it in a location based on another project.
If you specify a default for your new project, the chance your data will be properly stored increases significantly. You can use more than one geodatabase for a project. One geodatabase can contain finalized data, while the other one contains only layers that will be edited. This approach decreases the chances of experiencing editing disasters.
Setting the Coordinate System
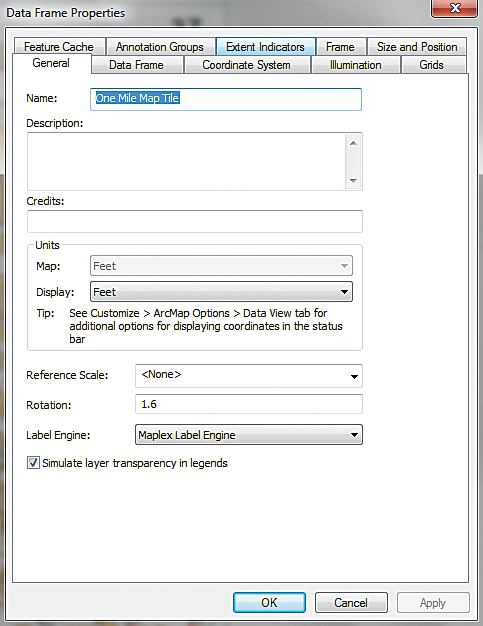
When you initially add data to a new map document, ArcMap reads the projection information for that data (if it is available) and sets the data frame coordinate system to match it. Therefore, it is a best practice to add a feature class or shapefile with a known (and the desired) coordinate system to a newly created data frame. If you are not sure which coordinate system that data frame is using, open the data frame properties, select the Coordinate System tab, and verify or (if necessary) set the coordinate system manually.
Setting Map Document Properties
In a new or existing map document, it is very important to set several Map Document Properties as soon as possible. To set document properties in ArcMap, go to File in the Standard menu and choose Map Document Properties. In the dialog box, fill in the Title field and as many fields as possible.
ArcMap uses the Title field to assign a default title to the map layout. You can change the title later if you wish. The other fields populate the map document’s metadata. Take your time completing this task. If you plan to use hyperlinks in the map and all photos or other objects to be linked will reside in a single folder, you can set the hyperlink base using the Map Document Properties.
Controlling Data Storage
Still in the Map Document Properties, look at the Default Geodatabase specified. If you set a default geodatabase when you opened the Normal.mxt template, you might not need to do anything. If you didn’t set it or realize you need to change the default geodatabase, do it now.
Next, locate the Pathnames box in the dialog. If your data is organized so that all data for the layers in your map resides in folders that are organized in a hierarchy, you can check the box to apply relative paths to search for the data in the map using that structure. If you store the ArcMap document at the base of the folder structure, ArcMap will search out folders located in this structure to find the data used in the map.
By default, ArcMap does not retain the relative path setting for all documents. If you prefer relative paths as your default, click Customize in the text menu, select ArcMap Options, click the General tab, and check the option Make relative paths the default for new map documents.
Save your project after verifying or manually setting the coordinate system and setting the Map Document Properties.
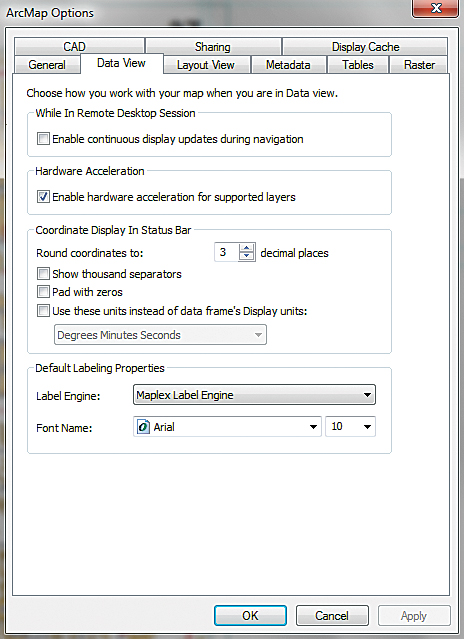
Before considering geoprocessing options, make certain that Maplex, Esri’s powerful labeling engine, is available. With ArcGIS 10.1 for Desktop, it became part of the core software and is available to all ArcGIS for Desktop users.
By default, new ArcMap documents use the Standard Label Engine, so change this returning to the Standard ArcMap menu. Choose Customize > ArcMap Options and open the Data View tab. Near the bottom of the dialog, set the Label Engine to Maplex Label Engine.
Now is also a good time to consider a different font name and size for labeling. I recommend using a simple, sans serif font such as Arial for default labeling. Consider increasing the default size to 10 points.
Remember, updating these properties for the current map will not change the label engine and font for existing map documents. Set Maplex as the labeling engine for existing maps by right-clicking on the data frame, opening Properties, selecting the General tab, and changing the Label Engine to Maplex.
While in Customize > ArcMap Options > Data View, you can also change how the coordinates display in the status bar by modifying the number of numeric characters to the right of a decimal point. If you display decimal degree units derived from GPS, you might want to limit the number of places shown.
If you want to obtain one-meter precision with decimal degree coordinates in the middle latitudes, specify five characters to the right of the decimal point. With label engine and coordinate display set, save the map document.
Setting Geoprocessing Options
ArcToolbox provides powerful and highly efficient geoprocessing tools, but to use them properly, you must set certain geoprocessing options and environment variables.
In the ArcMap Standard menu, choose Geoprocessing > Geoprocessing Options. Check the box so geoprocessing results will be written to a log file. It may be desirable to overwrite the output files from intermediate geoprocessing operations. By default, ArcMap will not overwrite existing geoprocessing output, so eliminate lots of intermediate files by checking the Overwrite box.

If you want to run geoprocessing tasks in the background, check the Background Processing Enable box. You can also turn geoprocessing notification on and off and change the length of time a message displays on your screen. Alwaysdisplay all error messages so you can figure out how to fix errors.
Experiment with these options and decide what works best for you. Keep final geoprocessing results for at least two weeks. For most processes, add the results to the map.
If you elect geoprocessing in the background and you are unsure of the status of a process, you can choose Geoprocessing > Results in the Standard menu to check it. Look at the top item in the Current Session. A small hourglass indicates that the process is running.
Next, let’s consider some default geoprocessing environment settings. These settings allow you to manage and redirect geoprocessing output, define output coordinate systems, and set the processing extent.
Open the Environments dialog box by choosing Geoprocessing > Environments in the ArcMap Standard menu or by right-clicking an open Toolbox area in the Catalog window. In the dialog box, expand the Workspace, Output Coordinates, and Processing Extent items. Verify that the Current Workspace is set to the desired geodatabase or other output location. If you are using a second output location such as a geodatabase you will use for editing, consider setting the Scratch Workspace to that location. The Scratch Workspace is used primarily by ModelBuilder to store intermediate datasets. I occasionally use it for layers that I wish to edit before they are finalized.
If you have properly defined the coordinate system of your data frame, you can use Same as Display to set the preferred Output Coordinates for all geoprocessing tasks, but make sure you verify that the listed coordinate system is correct.
To set Geoprocessing Extents, identify the layer in your map that completely covers your proposed analysis area and select it from the drop-down. Alternatively you could carefully enter the maximum and minimum bounding coordinates for the desired extent. You can also set the extents visually by zooming the display to the desired maximum extent, resizing the active mapping area if necessary, and selecting Same as Display.
Remember your Geoprocessing Options and all task parameters will be stored in the output metadata.
Summary
In this article, I shared some of my favorite data management practices. I find that GIS best practices are a moving target. I continually develop new and better ways to perform mapping and analysis tasks. The best new procedures make it onto my best practices list. The data management best practices in this article have proved valuable over time. Try them and incorporate them into your workflows as you see fit.
Acknowledgments
Special thanks to my Washington-based data providers, including Washington State Department of Transportation, Washington Department of Natural Resources, Valley Communications Center, King County GIS, and especially to the Kent Fire Department/City of Kent for their continued support and innovative approach to mapping and analysis in public safety.