
Do you want to build web mapping applications you can run on desktop, web, or mobile platforms without doing any programming whatsoever? Then this tip is for you! All you need is an ArcGIS Online or Portal for ArcGISaccount.
ArcGIS Online and Portal for ArcGIS now include Web AppBuilder for ArcGIS, which lets you create custom web mapping applications in an intuitive, easy-to-use, what you see is what you get (WYSIWYG), wizard environment. Web AppBuilder for ArcGIS is built on ArcGIS API for JavaScript and HTML5, enabling you to create apps that can run on any device. This tip shows you how to create a web mapping application based on a web map in ArcGIS Online or Portal for ArcGIS without having to write a single line of code. It’s easier than you think using these six steps:
Step One: Select a web map to build a web app and activate Web AppBuilder for ArcGIS.
- Log in to your ArcGIS Online (or Portal for ArcGIS) account.
- Navigate to your My Content page and select a web map that you want to use in your web app. Open it in the map viewer.
- Click Share, and in the Share dialog, select the group or groups you want to share the web map with, and then click Make a Web Application. In the Make a Web Application dialog, you will see that you could create a web app using the Web Application templates. But in this case, select the Web AppBuilder tab to create a new web app in Web AppBuilder for ArcGIS (see figure 1).
- On the Web AppBuilder tab, provide a title, appropriate tags, and a summary description of the web app you will create for your selected web map. Then click Get Started. This will activate the Web AppBuilder for ArcGIS “builder” application.

Figure 1: Provide metadata for your new web app.
Note that while you are still in either ArcGIS Online or Portal for ArcGIS, you are now working in the Web AppBuilder for ArcGIS application within those sites. Alternatively, you could have also activated Web AppBuilder for ArcGIS directly from the My Content page by clicking Create > App > Use the Web AppBuilder (This option is already available in ArcGIS Online and will be available in Portal 10.3.1 for ArcGIS.)
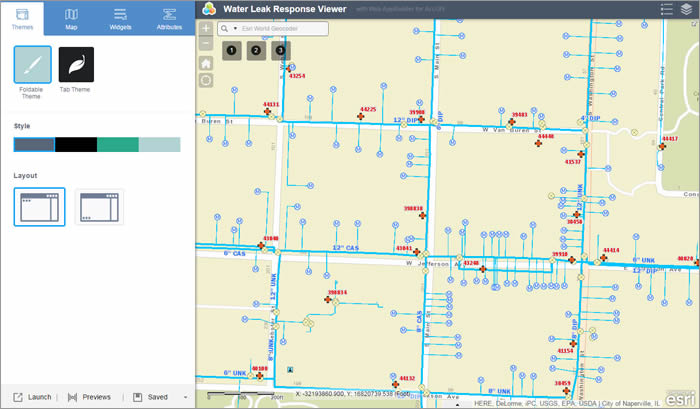
Figure 2: Web AppBuilder for ArcGIS provides a dynamic interface. As changes are made on the left panels, they will appear in the right panel of the preview window.
The Web AppBuilder for ArcGIS application layout above is divided into two general sections. To the left are the different parameter settings you can enable and configure for your new web app. To the right is a live, WYSIWYG preview of how the web app will appear after you have configured parameters for the web app.
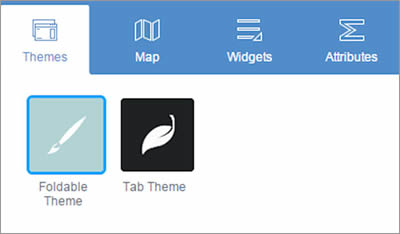
Figure 3: Define the data, functionality, and appearance of your web app using the Web AppBuilder for ArcGIS configuration property tabs.
Notice that the left section in figure 3 contains four tabs: Themes, Map, Widgets, and Attributes. These are the main areas where you can configure and customize your new web app. Both the Themes and Attributes tabs are for defining the look and feel of the web app. The Map tab defines the data content of the web app—in this case, it is the web map you selected. The Widgets tab allows you to set and configure the functionality in the new web app. When you make a change in the left section in one of the four tabs, it will be immediately visible (if applicable) and enabled in the right display preview section of Web AppBuilder for ArcGIS. This provides a very intuitive and user-friendly experience so you can see and try out the changes you just set for the web app. For example, if you were to add a new widget button to the app interface, it would appear in the app layout.
Step Two: Configure the look and feel for your web app.
Select the Themes tab. There are two default themes available: Foldable and Tab. First, click the Tab Theme button. You will notice that the app’s layout changes in the preview window on the right. Then click the Foldable Theme button. You will see that the app layout returns to the way it was. Note that each option also has its own unique style and layout options. Select a theme for your new web app along with a style and layout and then click Save in the lower part of the left section.
Next, select the Attributes tab. On this tab, you can further refine the appearance of your web app. You can add a custom logo, title, and optional subtitle and web links for your web app. Add an appropriate title for your web app, click the Logo button to add your own custom logo, and add a subtitle and web links, if desired. Click Save when you are finished with your custom settings.
Step Three: Customize the map display of your web app.
Click the Map tab. On this tab, you can change the data content for your new web app by simply clicking the Choose Web Map button. In the Choose Web Map dialog, you will see all the web maps in My Content of your ArcGIS Online (or Portal for ArcGIS) account. You can also view the web maps to which you have access in your organization, the groups you belong to, and public web maps (see figure 4). But you will use the web map you originally selected for this new web app; therefore, click Cancel.
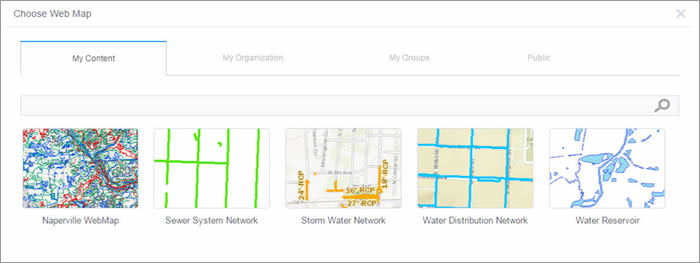
Figure 4: You can change the data content in your web app by selecting a different web map.
You can navigate and change the spatial extent of the current map display in the right-hand section of Web AppBuilder for ArcGIS. Zoom to the spatial extent that you want your new web app to show when the app starts up and click the Use Current Map View button. Click Save when you are finished.
Step Four: Configure your web app’s functionality.
Define the different capabilities available in your new web app. Click the Widgets tab. This tab lists the different functionalities that you can add to your new web app. A widget is a chunk of code that enables functionality in web apps. By selecting and adding widgets, you enable different functionalities in the app. A best practice is to create web apps that meet a specific business workflow, instead of generic apps that address multiple workflows. For example, you should create an app for editing parcels and a different one for collecting data from the field, instead of a single app that would do both.

Figure 5: Select a widget from the Widgets tab.
The Widgets tab lists several widgets that form part of the user interface (UI) of your new web app. Hover your cursor over a widget such as Geocoder. Notice that the widget becomes highlighted in red in the app preview display. Some widgets in the list appear in light blue, indicating that they are not activated, and therefore, not part of your app. To disable a widget, hover over the upper-right corner of the widget icon and click when an eye icon appears to hide it. To configure a widget’s specific properties, hover over the lower-right corner of the widget icon and click the pencil icon when it appears. At the bottom are three generic widget icons denoted by the numbers 1, 2, and 3. These are currently empty placeholders that enable you to add more widgets to the web app UI, if desired.
Click Widget 1 on the Widgets tab to make the Choose Widget dialog appear. In this dialog, you can select the widget you want to add. Select the Basemap Gallery widget and click OK. Next, the widget’s configuration properties dialog appears—this is where you can further define the properties of the widget. Select the basemaps you want available and click OK to save your widget settings. The Basemap widget now appears in the app preview display. Click the Basemap widget in the preview window to see how it would work in the web app (see figure 6).
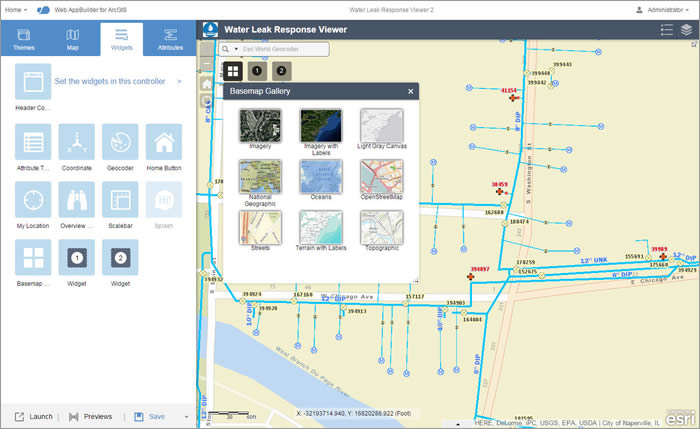
Figure 6: Preview the Basemap widget in Web AppBuilder for ArcGIS.
If you need to add more widgets to the app, you can click the Header Controller widget at the top of the Widgets tab. It contains widgets in the app title bar. Web AppBuilder for ArcGIS includes more than 20 widgets, with more being added with each new ArcGIS Online and Portal for ArcGIS update. The initial offering of widgets provides core functionalities that are typically found in GIS applications. Widget functionality includes the following:
- Display attribute table
- Basemap gallery
- Spatial bookmarks
- Display charts
- Display coordinates
- Directions
- Draw tools
- Editing tools
- Geocoding
- Time slider
- Swipe tool
- Analysis widget (ArcGIS Online only)
- Layer lists
- Legend
- Measurement tools
- Overview map
- High-quality printing
- Queries
- Scale bars
- Splash screen
- About dialog
- Header controller
- Geoprocessing
See a complete list of available widgets.
Select and add the widgets that would be appropriate for your new web app. Note that configuring some of the widgets may require additional parameters, which are all documented in the Web AppBuilder for ArcGIS online help documentation.
Click Save when you are finished. You have now completed setting the appearance, data content, and functionality of your new web app. Your custom web app is complete and ready to use!
Step Five: Save and launch your web app.
Your new web app is saved in My Content. The web app becomes a new item and can be edited within the Web AppBuilder for ArcGIS builder environment at any time. It is now live and can be accessed by whomever you shared it with. Click Launch at the bottom of the left-hand section to run your newly created web app in the web browser (see figure 7).
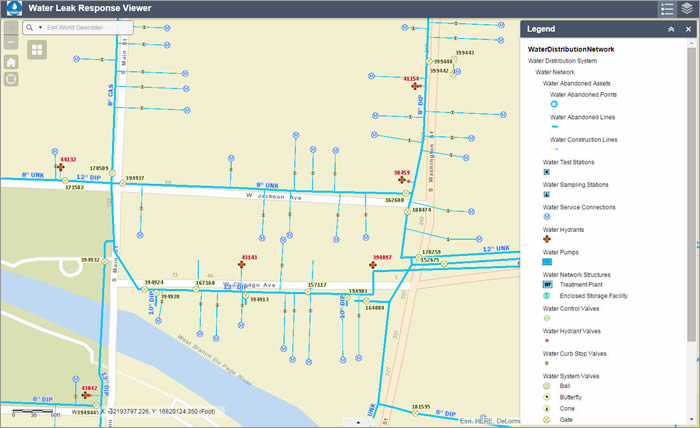
Figure 7: Here is an example of a finished web app created using Web AppBuilder for ArcGIS.
Step Six: See how your web app will appear on different devices.
Because Web AppBuilder for ArcGIS is built on ArcGIS API for JavaScript and HTML5, the new app can run on any web browser on any device. The Web AppBuilder for ArcGIS user interface provides an environment that enables you to preview how the web app will look on these different platforms.
At the bottom of the left-hand section, click the Previews button. This changes the entire Web AppBuilder for ArcGIS display interface: on the left, it shows a list of mobile devices, and on the right is a preview of how the new web app will look in the selected device (see figure 8).
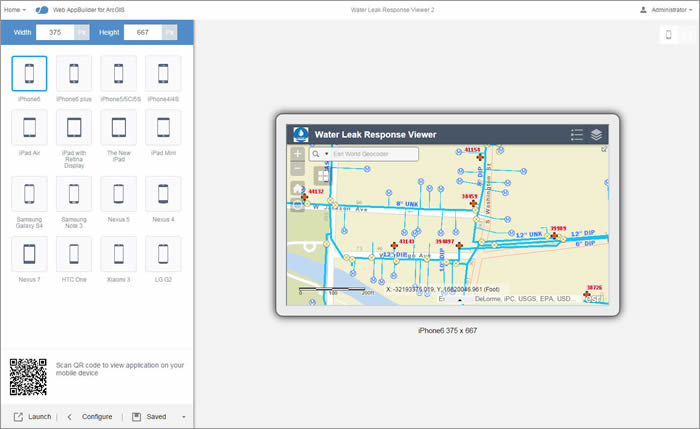
Figure 8: You can preview how the app will look on an iPhone 6.
Click Configure to return to the previous Web AppBuilder for ArcGIS interface when you are done.
See how easy it was to create, configure, and launch a custom web mapping application in Web AppBuilder for ArcGIS? Web AppBuilder for ArcGIS is also extensible, meaning you can create your own widgets and themes using the Web AppBuilder for ArcGIS Developer Edition and with ArcGIS API for JavaScript.
Here are some resources to help get you started:
