Importing ArcView GIS Projects into ArcGIS
by Mike Price, Esri Mining and Earth Science Solutions Manager

| Importing ArcView GIS Projects into ArcGIS by Mike Price, Esri Mining and Earth Science Solutions Manager | |
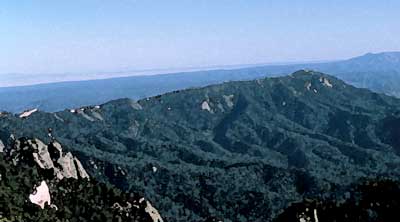
Editor's note: ArcMap is one of the three ArcGIS desktop applications in ArcInfo 8.1, ArcEditor 8.1, and ArcView 8.1. Existing ArcView GIS 3.2 projects can be re-created in ArcMap. In this article, learn how to use the ArcMap Import feature successfully and find out tips for handling more complicated data sets such as topographic hillshades and rotated point symbology. About the ExerciseThe data for this exercise describes an area at the northern end of the Sandia Mountains in New Mexico. These mountains, located on the east side of the Rio Grande Rift in a region of major crustal thinning, are a large north-trending, rotated block of igneous and metamorphic rocks overlain by marine and stream sediments. This exercise uses a subset of the U.S. Geological Survey (USGS) data from the Placitas, New Mexico 7.5-minute quadrangle map that was mapped by the New Mexico Bureau of Mines and Geology. Overlay lines and points are from the USGS 1:100,000-scale optional format digital line graph (DLG-O) set, and mineral occurrence points are from the former U.S. Bureau of Mines' Mineral Availability System (MAS). The model is registered in Universal Transverse Mercator (UTM) North American Datum of 1927 (NAD27) Zone 13. This exercise uses a 10-meter hillshade to add a three-dimensional effect to the ArcGIS model without actually adding the large digital elevation model (DEM)-based theme. Projection data has been included with all themes.
This tutorial uses the ArcView GIS project that resulted from a previous article, "Rotating Point Symbols in ArcView GIS," that ran in the October–December 1999 issue of ArcUser magazine. In that article, a table join was used to associate modified azimuths for field geologic measurements and apply rules for rotating symbols properly. ArcGIS includes logical and easy-to-use symbol rotation functionality that makes symbol rotation easy. ArcView GIS 3.2 projects with rotated symbols can be imported into ArcMap and the symbol rotation replicated. Acquiring and Organizing DataDownload the sample data for this exercise, Placitas.exe, now. The placitas.exe file is approximately 900 KB, so be patient if downloading this file using a dial up connection.
The process of moving an ArcView GIS project to ArcMap begins by checking the original project. Start ArcView GIS and load the PLACITAS project. If the path to the data files is other than c:/placitas/, either manually redirect each theme as it loads or globally change the path by editing the Placitas.apr file in WordPad or some other text editor. After changing path statements, save the project. Before importing an ArcView GIS project into ArcGIS, it is very important to ensure that all data paths are correct. For the sake of simplicity, all table joins were removed from this version of the PLACITAS project. However, when importing projects, look for table joins and remove them from the project by saving the data created by the table join as a new shapefile. Load the new shapefile into the project and delete the themes used in creating it. Importing ArcView GIS Project Data into ArcGIS
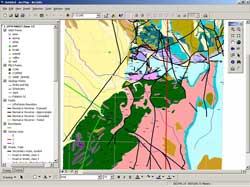
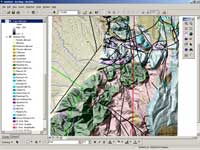
Inspect the imported layers, study the thematic legends, and turn individual data layers off and on. Look closely at the Topo Hillshade layer located near the bottom of the list of layers. The grayscale display for this layer appears incomplete or damaged. Left-click on the Topo Hillshade layer and drag this layer above the Geology Poly layer and below the line and point data layers. Note that the geologic point symbols in the Geology Points layer are oriented horizontally instead of showing rotation along strike of foliation. The following procedure will fix the hillshade and correctly rotate the symbols. Enhancing Topo Hillshade DisplayRight-click on the Topo Hillshade layer and select Properties from the context, or double-click on the Topo Hillshade text name in the Table of Contents to open the Layer Properties dialog box. Select the Symbology tab. Three options--Unique Value, Classified, and Stretch--are listed under the Show option. Change this option from Classified, the method used by ArcView GIS 3.2, to Stretched, a new feature available in ArcGIS. Applying a stretch to raster data increases the visual contrast of a raster layer. The thematic legend now displays as a continuous 8-bit grayscale with values that range from 0 to 254. With the Topo Hillshade layer positioned above the Geology Poly layer, make the hillshade partially transparent. Choose View > Toolbars > Effects to display the Effects toolbar. In the Effects toolbar, click the Layer drop-down arrow and choose Topo Hillshade as the layer to adjust. Click the Adjust Transparency button and drag the slider bar to adjust the transparency to 30 percent. Now the geology polygons on the layer beneath and the rugged terrain of the northern Sandia Mountains will both be visible.
Rotating Geology Point SymbolsMigrating ArcView GIS projects with rotated symbols is a more complicated procedure because ArcView GIS and ArcGIS use different rules for rotating point symbols. The existing ArcView GIS symbols can be imported with the project, or entirely new ArcGIS symbols from the Geology 24K palette can be used. For this exercise, the base rotation of symbols in the ArcView GIS project will be modified so that ArcGIS rotation can be applied. Right-click on the Geology Points layer and select Properties, or double-click on the Geology Points text name in the Table of Contents to open its Layer Properties. Select the tab for Symbology. All the symbols used on this layer are listed.
Apply the same 270-degree rotation to the Schistosity, Joints, and Foliation S2 symbols. Don't close the Layer Properties dialog box. Now apply the rotation to the symbols in this layer. Click on the Advanced button on the Symbology tab of the Layers Properties dialog box and choose Rotation. Under the drop-down box marked Rotate Points by Angle in this Field, select AZIMUTH and also select Geographic as the Rotation Style. Click OK to exit the Rotation dialog box and APPLY to exit the Layer Properties dialog box. Check the rotation of the symbols. They should match the original ArcView GIS project. Save the ArcMap document again. SummaryImporting existing ArcView GIS projects is easy and lets you take advantage of the more sophisticated symbology and improved cartographic display in ArcGIS. The Esri Virtual Campus is offering a new course "Migrating from ArcView GIS 3.x to ArcGIS." This six-module course introduces ArcView GIS 3.x users to the features and architecture of ArcView 8. | |||||||||||||||