This tutorial will show how to create multiple layouts in ArcGIS Pro by importing an existing ArcMap document. Individual layouts will be exported as a series of PDF maps designed for printing, posting in reports, and viewing with presentation software.
ArcGIS Pro is a 64-bit, multithreaded application that runs on Windows and allows users to share maps with others using ArcGIS Online or Portal for ArcGIS. It readily imports existing ArcMap map documents (.mxd files), including symbology, project parameters, and layouts.
Exercise Overview
The first step will be to import a legacy fire department incident response planning map that was previously created, updated, and managed in ArcMap into ArcGIS Pro. It was designed to report specific types of emergency responses. Data links will be updated to display current information using standard data grouping and symbology. Next, 2016 emergency response points will be added to the map from a Microsoft Excel worksheet. Multiple copies of this single layout will be made and prepared as individual layouts for publication to response groups.
Getting Started with an ArcMap Document
To begin, download the KFD_Pro_1 training dataset, and unzip it locally.
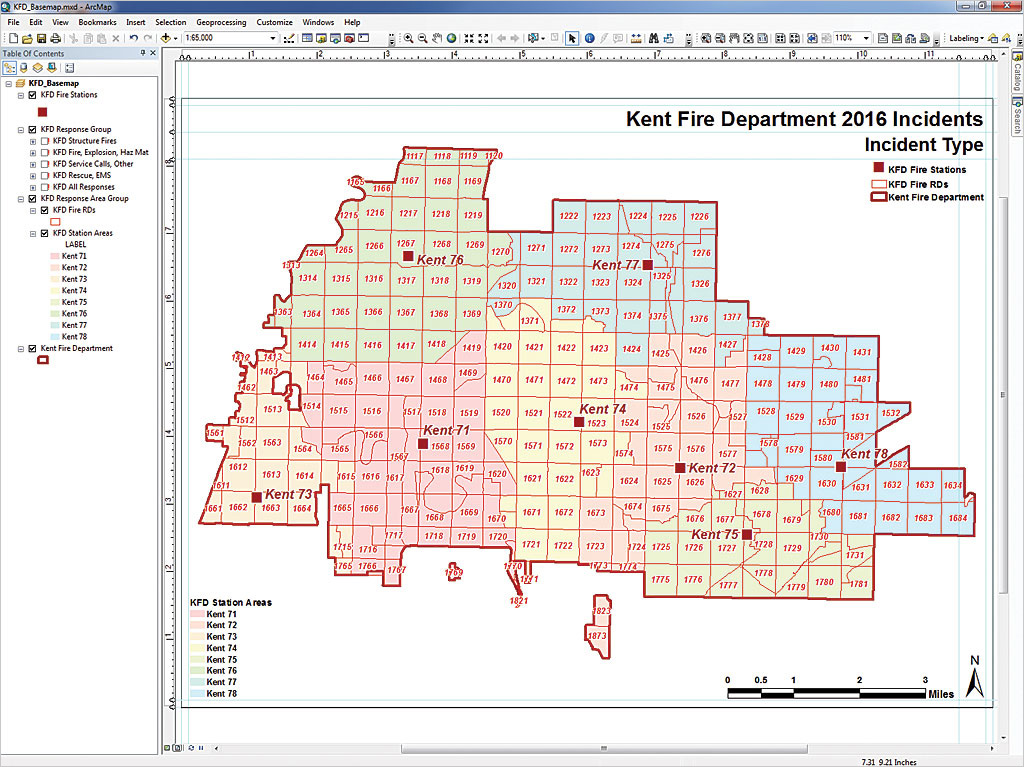
Start ArcMap and open KFD_Basemap.mxd. This map was created in ArcGIS 10.4 for Desktop and includes boundary and response information for the Kent Fire Department (KFD), located in southern King County, Washington.
This map includes one layout created in a custom 12-inch by 9-inch frame, an aspect ratio that exports as a 4-inch by 3-inch landscape graphic suitable for reports and Microsoft PowerPoint slides. It has been updated with 2016 titles and legends and includes several spatial bookmarks. In the table of contents, notice the broken data links to all response data.
After you review this MXD document, close ArcMap.
Importing the Map into ArcGIS Pro
Verify that an ArcGIS Pro license is available to you through your ArcGIS Online for organizations account. Open ArcGIS Pro. If you are not already signed in to ArcGIS Online or Portal for ArcGIS, you will be prompted to sign in.
In the ArcGIS Pro startup screen, choose Create a new project and use the Blank template. Store the new project in \KFD and name it KFD_Pro. The new KFD_Pro folder is located at the same level as the GDBFiles (containing the data files) and XLSFiles (containing the incident data) folders.
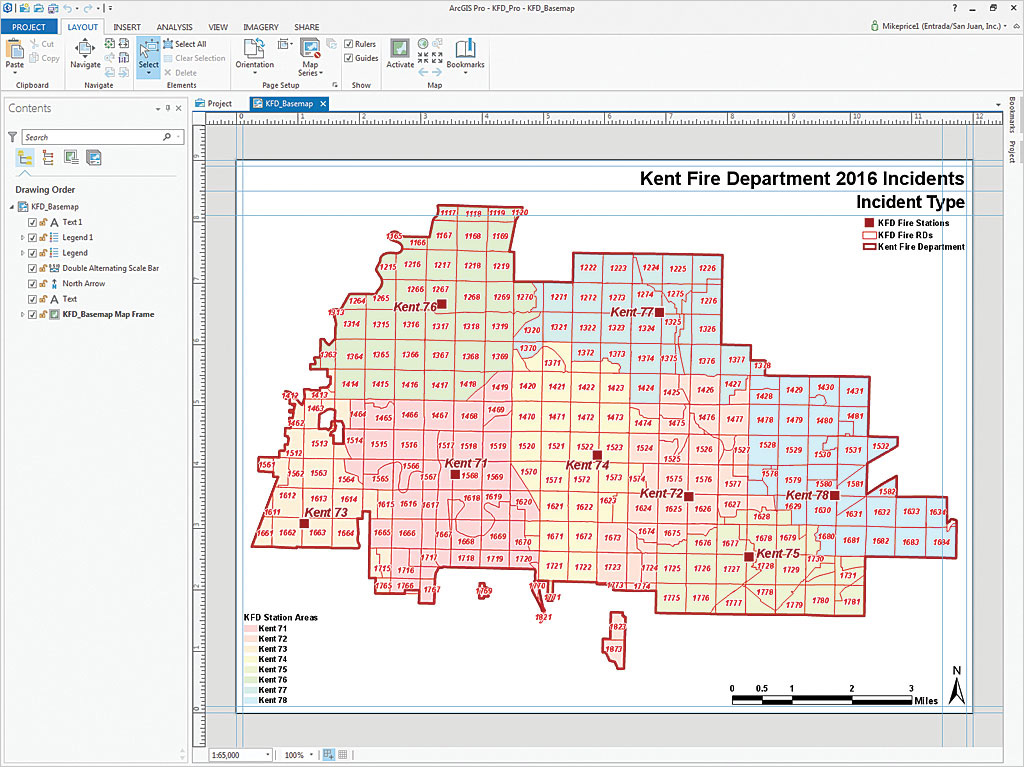
Import KFD_Basemap.mxd into the project by clicking the Insert tab on the ribbon, selecting Import Map from the Map tab and navigating to \KFD, and choosing KFD_Basemap.mxd. The imported map will look just like it did in ArcMap.
Look at the top of the Map pane to see the active KFD_Basemap Layout tab, which is highlighted in blue. On the left, the docked Contents pane shows the drawing order of items contained in the KFD_Basemap Layout. Click View tab and choose Project > Project Pane to open the Project Pane on the right side of the workspace.
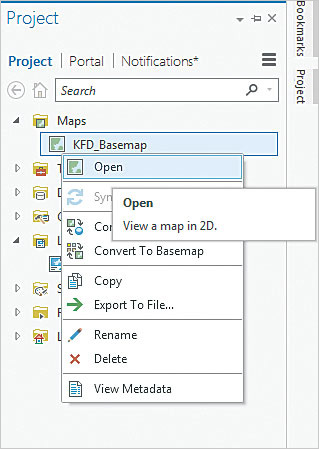
In the Project pane (not the Contents pane), expand Maps, right-click KFD_Basemap, and choose Open. The interface changes to the Map tab and the Contents pane shows how the layers are symbolized. All data sources to the layers in the KFD Response Group are broken, but don’t worry about them. They will be fixed.
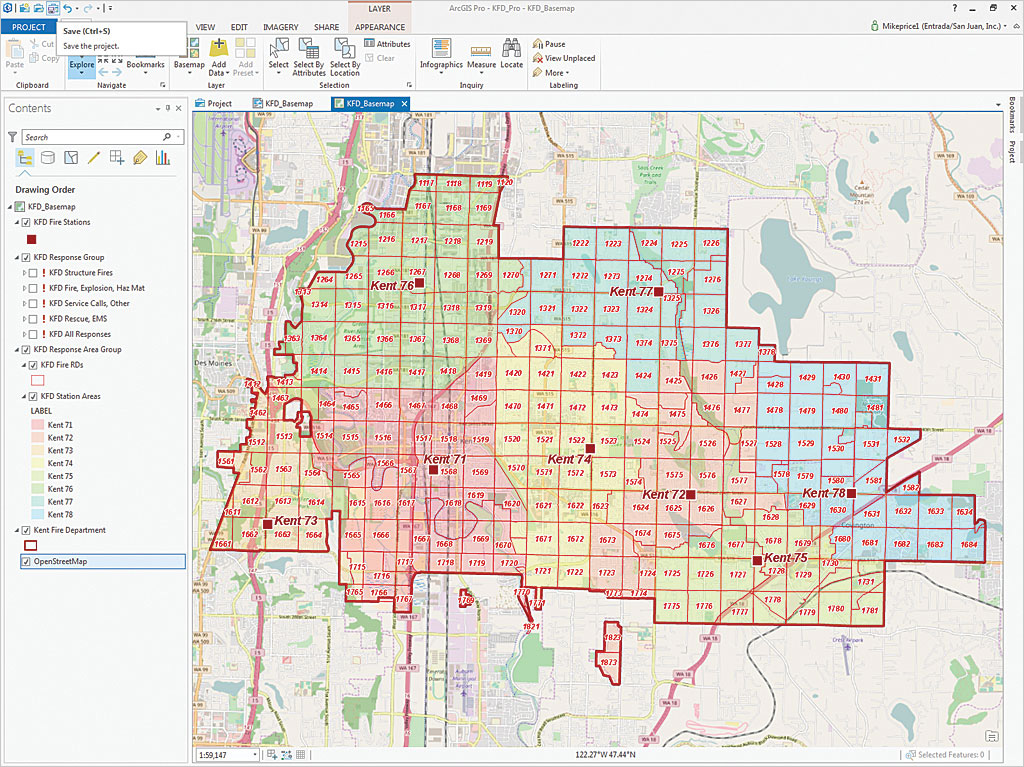
Before saving the project, add a basemap from the Living Atlas gallery. Click the Basemap drop-down. From the available basemaps, select OpenStreetMap.
Click the Save button (third folder icon in the upper left corner of the interface), or press Ctrl+S to save the updated project.
Adding, Posting, and Exploring 2016 Incidents
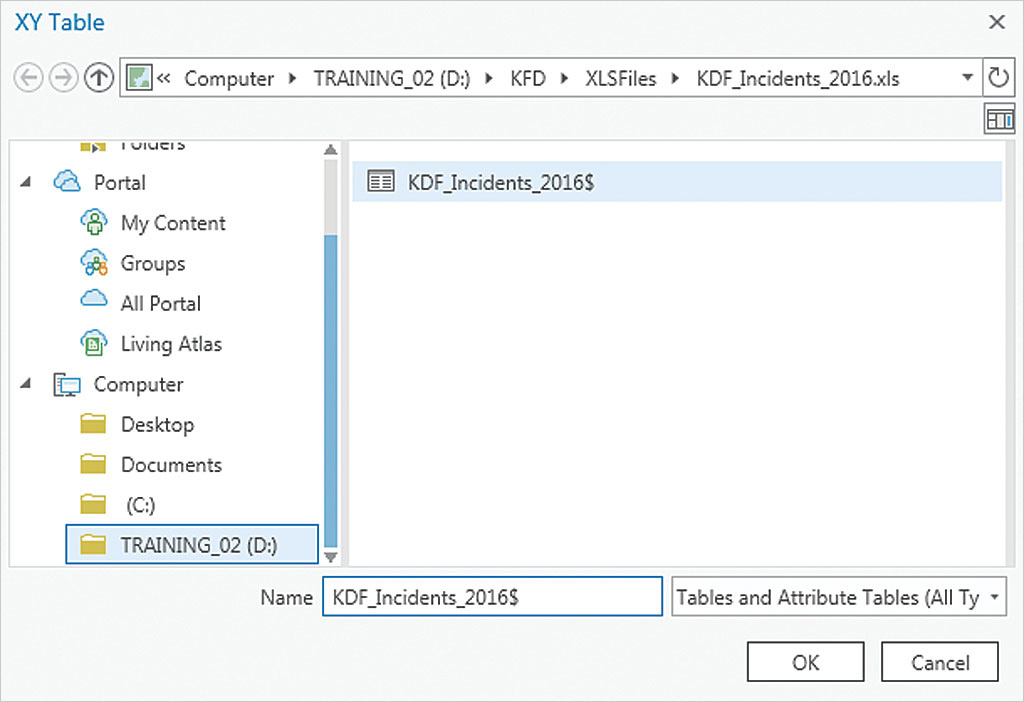
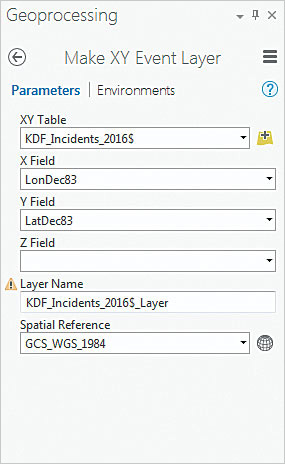
An Excel worksheet, KFD_Incidents_2016, stored in KFD\XLSFiles, contains a training subset of the 2016 incidents for the Kent Fire Department. On the Map tab, click the Add Data drop-down (in the Layer group) and select Add XY Event Data. In the Make XY Event Layer pane on the right, click the folder icon and navigate to KFD\XLSFiles. Open KFD_Incidents_2016 and select KFD_Incidents_2016$.
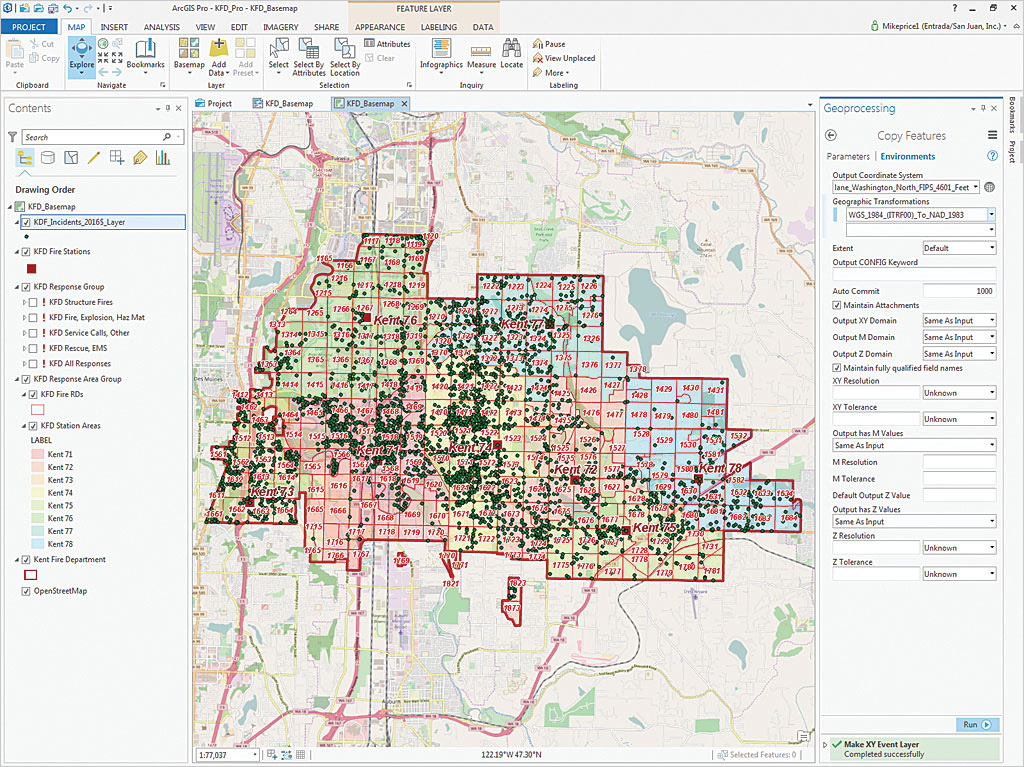
X Field and Y Field should be automatically populated. If not, choose LonDec83 from the drop-down for the X Field and choose LatDec83 from the drop-down for the Y Field. The spatial reference will remain GCS_WGS_1984. Accept the default Layer Name. Click Run. More than 6,000 incidents will be added to the map.
Several bookmarks were created in the original ArcMap document and have been exported to the ArcGIS Pro project. Click the Bookmarks drop-down to view them. The KFD Basemap 1:65000 bookmark is set at the project’s full extent. Other bookmarks show each station’s primary response area at a larger scale. Test each bookmark before returning to the 1:65000 bookmark.
Return to the Contents pane, right-click the KFD_Incidents_2016$_Layer, and open its attribute table. Explore the contents. There should be 6,347 records, and the IncTypeNo field should contain three-digit integers that range from 100 to 999. This field will be used to filter and symbolize all members of the KFD Response Group. Close the attribute table.
Exporting and Updating Incidents
The incident data from the Microsoft Excel spreadsheet that was added to the project as an XY Event Layer will be used as the source for the Response Group layers.
Return to the Contents pane, right-click KFD_Incidents_2016$_Layer, and choose Data > Export Features. The Copy Features pane appears on the right side. Set the Output Feature Class to \KFD\GDBFiles\WASP83NF Risk.gdb and name the layer KFD_Incidents_2016_X.
In the Copy Features pane, click Environments. Click the drop-down for Output Coordinate System and choose Kent Fire Department. Set the Geographic Transformation to WGS_1984_(ITRF00)_To_NAD_1983 (located near the bottom of the transformation list). This is an important step! Make sure the correct transformation is selected, accept the rest of the default settings, and click Run. After the resultant point layer is added to the map, turn off the layer and turn off KFD_Incidents_2016$_Layer.
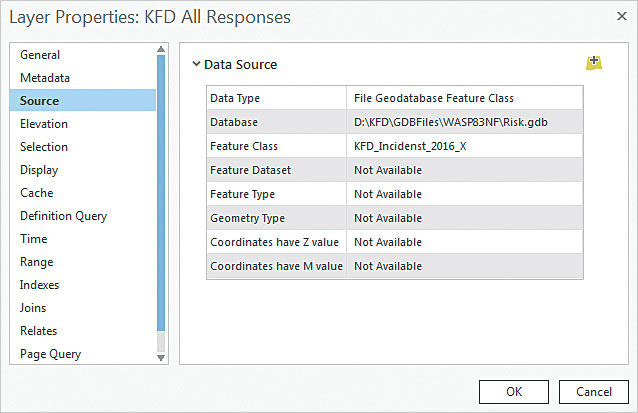
In the Contents pane, locate KFD All Responses layer in the KFD Response Group. Click the right-pointing arrow to expand its legend. Right-click this layer and open Properties. In Layer Properties, choose Source item and click the folder icon to set the source layer to KFD_Incidents_2016_X in the \KFD\GDBFiles\WASP83NF\. Click OK to update the source. Check the box to display the layer and note symbolized points.
Update the data sources for the remaining four layers in the Response Group using KFD_Incidents_2016_X as the source.
Save the map and use Bookmarks to explore individual Station Areas. Use the Bookmarks to explore the distribution of response types by station. Add more Bookmarks if you like. Explore different response types for several stations. Return to KFD 1:65000 when finished.
Creating, Updating, and Managing Multiple Layouts
In ArcGIS Pro, several layouts can be added to a project and used to map, characterize, and export specific data. Creating a template for the incident layout and then copying and pasting the template is the most efficient way to prepare a layout for each Response Group.
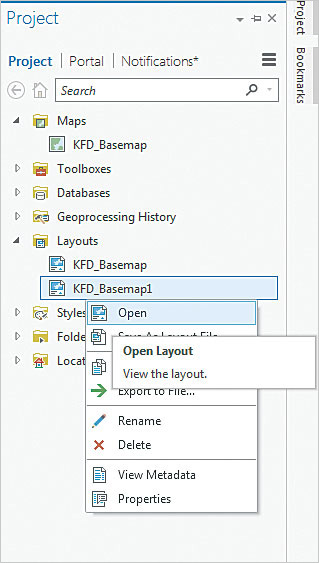
Click View tab and choose Project > Project Pane to open the Project Pane. In the Project Pane, expand Layouts (notMaps), right-click KFD_Basemap1 and select Copy. Right-click Layouts and choose Paste to add a copy with the default name of the KFD_Basemap. It will become the Incidents template. Right-click KFD_Basemap1 and choose Open.
KFD_Basemap1 becomes the current object displayed in the map canvas. The Contents pane switches to Drawing Order. In the KFD Response Group, make KFD All Responses the only visible layer.
To change the way ArcGIS Pro resizes the default legend so it can properly display all Incident legends, locate and click the small default legend to select it. The default legend is located under the Incident Type title in the upper right-hand side.
Right-click Legend in the Contents pane (not the small legend you just clicked) and choose Properties, and the Format Legend pane appears. Hover over the three icons to locate the Legend Arrangement Options icon and click it.
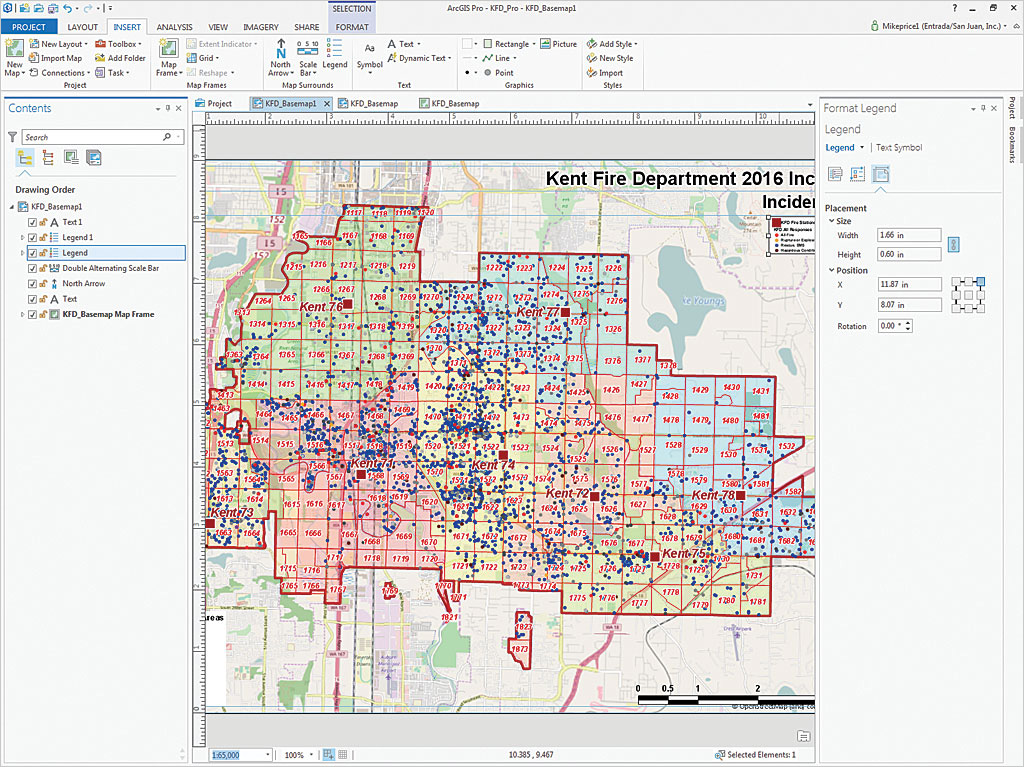
Under Arrangement, click the Fitting Strategy drop-down. Change the strategy from the default, which is Adjust columns and font size, to Adjust frame.
Hover over the icons in the Format Legend pane to locate Placement and click it. Open the rightmost Placement tool and verify that legend will be placed in the upper right corner.
Go back to the Contents pane and select Text 1, and the Format Text pane appears on the right side. In the Format Text pane, click the Options icon and change the contents of the text box under TEXT from Incidents to All Responses and click Apply.
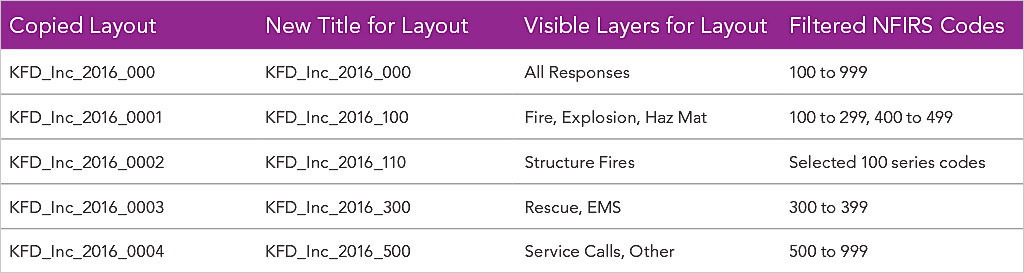
Return to the Contents pane, right-click the KFD_ Basemap1 (at the top of the Contents pane) and choose Properties. The Format Map Frame pane appears on the right side. Click the Options icon. In the text box under General, change the layout name to KFD_Inc_2016_000. In this naming convention, 000 represents the National Fire Incident Reporting System (NFIRS) numeric range for all incident types.
In the Contents pane, change the display to Element type by clicking the second icon and turn off all layers in the KFD Response Group. Save the project.
Reopen the Project pane. Locate and right-click the KFD_Inc_2016_000 layout and select Copy. Right-click Layouts and select Paste. Right-click Layouts and paste the layout on your clipboard three more times. ArcGIS Pro will sequentially number the copies. When finished, save the project again.
Return to the Project pane and right-click KFD_Inc_2016_0001 (the first incident layout copied) and choose Open. Open the rest of the copied layouts. When all layouts are open, arrange them from left to right beginning with KFD_Inc_2016_000.
In the Project pane, under Layouts, right-click the KFD_Basemap layout and choose Delete. Do not remove KFD_Basemap under Map. Save the project again.
In the Contents pane, select KFD_Inc_2016_0001. Right-click its name, open Properties, and rename it KFD_Inc_2016_100. In the Contents pane, select Text 1, and the Format Text pane opens. Use Options on this page to change the title to Fire, Explosion, Haz Mat. Change the titles of the remaining three layouts using information in Table 1. Save the project.
Exporting or Printing Multiple Layouts
To export or print the layouts, individually activate each layout, update the visible KFR Response Group item, and export or print the layout. Begin by selecting layout KFD_Inc_2016_000 layout, click the Layout tab, and click Activate Map Frame for this layout. Verify that this layout title is All Responses and in the KFD Response Group, and make KFD All Responses the only visible layer.
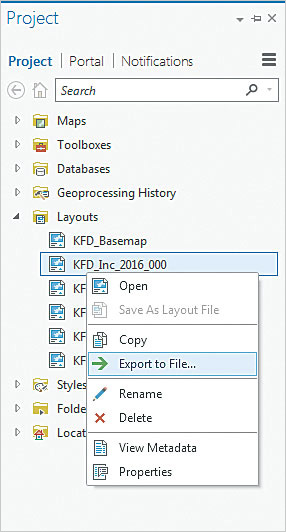
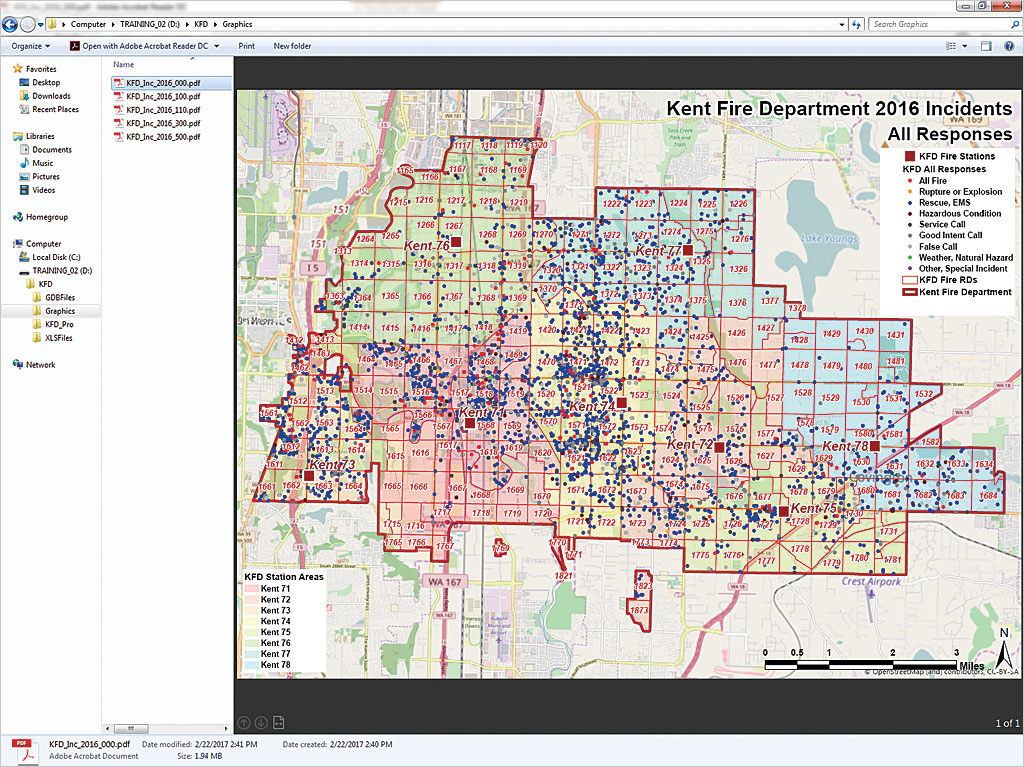
Open the Project pane, right-click layout KFD_Inc_2016_000, and choose Export to File. Navigate to \KFD and create a new folder called Graphics where the PDF files will be saved. Retain KFD_Inc_2016_000 as the name of the PDF, choose 200 dpi PDF file, and be sure that Embed Fonts is checked. Click Export to finish.
Use the same process to export PDFs for each of the remaining four layouts. Make the layer visible that matches the name of the layouts and accept the name of each layout for the PDF file name. Refer to Table 1 below to select the visible layer for each layout. When all layouts are exported, save the project once more.
Inspect the exported files to ensure they have the correct titles and symbolization. Leave ArcGIS Pro and open Windows Explorer. Navigate to KFD\Graphics and view each exported map in preview mode, Acrobat Reader, or another program that displays PDF files.
Summary
In this ArcGIS Pro exercise, you learned how to import an existing ArcMap map into ArcGIS Pro, display and save point data with x,y coordinates, create multiple map layouts, and export maps as PDF files. You can use this project to experiment with other export and printing options. You can capture screenshots of the layouts and use them in a Microsoft PowerPoint presentation.
Acknowledgments
Again, special thanks to the Kent Fire Department for allowing me to use its great data and include a subset of very recent incident data. Thanks also to Esri technical staff for their advice and support as I move into the world of ArcGIS Pro. Stay tuned for more articles.