The field data collection app ArcGIS QuickCapture was designed to support field teams that need to rapidly collect data from a moving vehicle, helicopter, bicycle, or all-terrain vehicle (ATV). It has a simple, form-based interface and is an excellent choice for collecting almost any type of data. You can capture both the location and attributes of assets or incidents as you travel.
You create the form, determining the arrangement, appearance, and color of buttons and the information collected. That information can include photos and sensor information from a device.
This exercise introduces you to QuickCapture. You will create a simple QuickCapture form that will let students capture photographs and locations of the things they might see around a school campus. You will create and configure a feature layer, make a QuickCapture project and form, collect data, and view collected data.
Create a Feature Layer
QuickCapture data is captured and saved to a feature layer. Feature layers can be created in many ways—from a template, from an existing layer, from a URL pointing to an existing service, or from scratch. For this simple example, you can use ArcGIS Online to create a feature layer from scratch provided you have privileges that allow you to create hosted feature layers.
- Begin by signing in to your ArcGIS Online organizational account. In the Content tab, click Create, then choose Feature Layer.
- In the From Template tab, choose Build a layer, then select Points. Click Create.
- Click Point layer to change the name of the feature layer to Campus Capture. Click Next when finished.
- Set the extent to where you want to collect your data using the map and then click Next. Add Campus Capture as the title and tags and a summary for this new hosted feature layer item.
- Click Done when finished.
It’s a best practice to complete the item details page for the hosted feature layer you just created, so do that and add a well-crafted thumbnail and a detailed description and set Delete Protection in the Settings tab.
Configure the Feature Layer
Next, configure the attribute fields to capture the information you desire. In this example, you will make a list of values to capture. Open the Data tab for the feature layer item and click Fields and then click Ad. For Field Name and Display Name, type “Capture”. Make the type String, shorten the length to 25 characters, and uncheck Allow Null Values. Click Add New Field.
Scroll down the list of fields and click Capture, the field you just created. Click Create List. Type “Big Tree” for Label and “Big Tree” for Code. Repeat this process to add fields for Small Tree, Shrub, Rock, Sign, Light, Art, People, Animal, and Car, clicking Add or pressing Enter after each pair. Click Save when all fields have been added. The Code can be different than the Label, but for this example they are both the same.
To symbolize the values with a unique color rather than displaying all values with a single color, click the Visualization tab. Click the Change Style button to edit the layer style. From the drop-down, select the attribute you want to symbolize. In this case, the attribute will be Capture. Change the symbols by clicking Options and editing the symbols as you desire. When you are finished, click OK, then Done. Click Save Layer to save all your changes.
Create the Project in QuickCapture Designer
In ArcGIS Online, use the App Launcher (located next to your avatar) to open QuickCapture designer. Click New Project. Choose Campus Capture and click Next. Confirm the project information, make any necessary edits, then click Create.
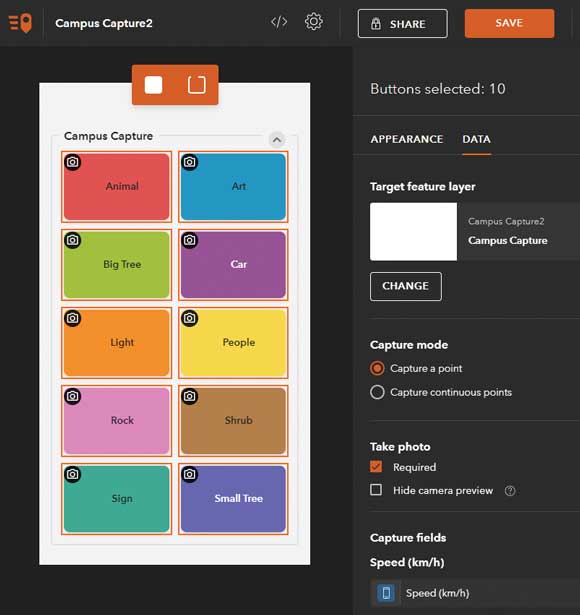
You can modify the look and feel of the app with QuickCapture designer. With the QuickCapture designer, you can change properties for individual buttons or an entire group as well as choose a variety of other settings and options.
Click the group label (Campus Capture) to apply changes to the entire button group. When selected, the group will be outlined in orange. In the group properties, set the number of columns to 2.
Press the Shift key and click to select all the buttons. Selected buttons will be outlined in orange. With all buttons selected, open the Appearance tab and choose the large button size. Click the Data tab and enable photos by sliding the button. Save the project. Click Share to make the project available to all members of your organization.
Note: When you click Save, a dialog appears from which a QR Code to open the project can be captured. The QR Code can also be obtained from the Sharing dialog, which also includes a link to the project. The QR code is handy if you have the device in hand, or the link can be emailed to members to open the project.
Open the Project in the QuickCapture App
Install the QuickCapture mobile app from the Apple or Google Play app store onto your device. Once it is installed, open the QuickCapture mobile app and sign in. Alternatively, you can open the link or QR Code to present the sign in page immediately.
If prompted, allow QuickCapture to access your location so your device’s location will be used when capturing attributes. Open the project and tap Get Projects to view available projects. Download the Campus Capture project and click the project icon to open it.
When collecting data, tap the appropriate button to capture that feature. The camera will open, so you can take a photo. When you finish, the location and photo will be stored in the feature layer, along with the date and your account name as the QuickCapture user.
View Your Results
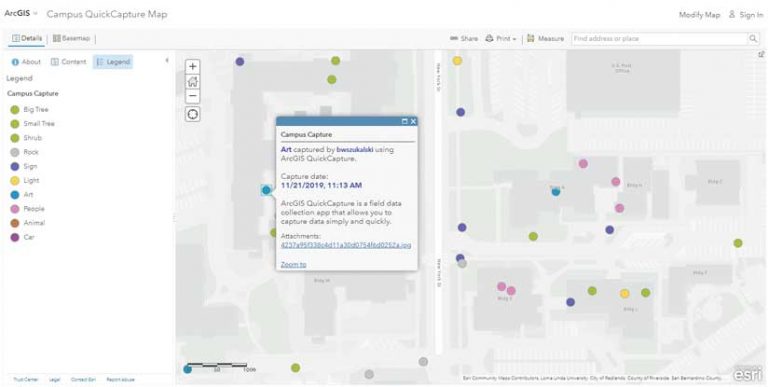
Go to ArcGIS Online and under your Contents, locate Campus Capture and click the thumbnail to open it in Map Viewer. You can also view results by opening the QuickCapture designer, hovering over the project, and clicking View Results, or you can open the feature layer in a web map.
Open this Campus Capture map (https://bit.ly/2Y9l4Kf) created for this exercise. Click on a feature and note its attachments. You can use the Attachment Viewer configurable app template to view photos and videos stored as feature attachments, making the app well suited for use with maps made using QuickCapture.
You can do a lot more with ArcGIS QuickCapture than this simple project. You can capture data for multiple feature layers, as well as line and polygon feature types. QuickCapture designer lets you add images to buttons, specify horizontal accuracy, and edit the project’s JSON.
Currently, ArcGIS QuickCapture requires a named user to open a project in the mobile app. Support for public QuickCapture projects is planned. Watch this tutorial on using ArcGIS QuickCapture.