
You can easily add GPS data, including waypoints, tracks, or routes, to your ArcGIS Online web maps. Find out how in this tip and learn to get more information out of your GPS data:
Step One: Add GPS Tracks, Waypoints, and Routes
Collect tracks, waypoints, or routes using your GPS device. To add them to your ArcGIS Online web map, export the data from your device as a GPX file—the GPS Exchange format. How you create the GPX file will depend on the GPS device and software you use.
For the purposes of this tip, a Garmin GPS device and the bundled Garmin MapSource software were used. But no matter what device you decide to use, the procedure will be similar.
Step Two: Generate the GPX File
Connect your GPS device to your computer, and use your GPS software to transfer the data from the device:

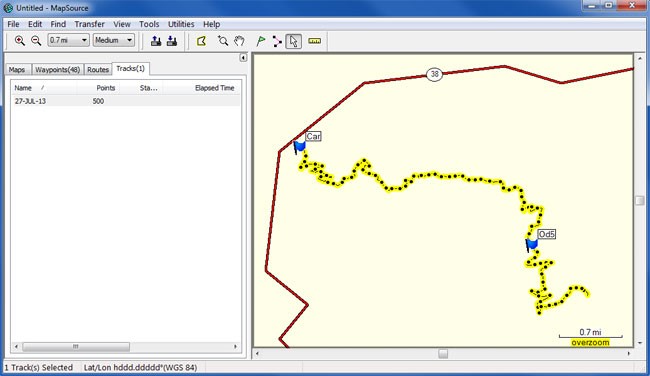
In this example, a track and waypoints have been collected during a hike and then viewed in the GPS software as shown below:
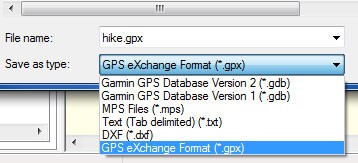
On the Save as type menu, select GPS eXchange Format as the file type. That saves the hike (the track and waypoints) as a GPX file.
Step Three: Add the GPX File to Your Map
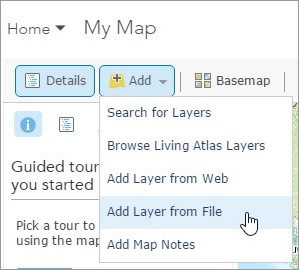
To add the GPX file to a web map, click Add in ArcGIS Online and then select Add Layer from File:
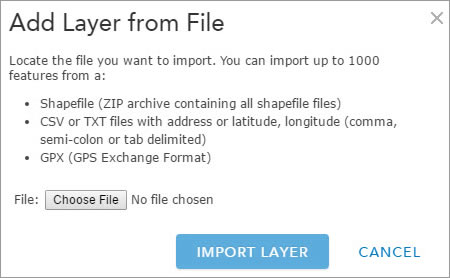
Next, browse to the location of your GPX file, select it, and click IMPORT LAYER:
Step Four: Display Your GPX File
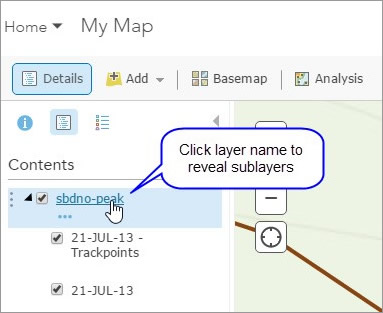
Once imported, your GPX file will display on the map. But depending on what you captured using your GPS device and exported to the GPX file, you may have sublayers you can toggle.
For example, the GPS device captured both the track and waypoints, and both were exported in the GPX file. By default, only the track was visible after importing. To display other sublayers, click the layer name to reveal them, and check those you want to display:
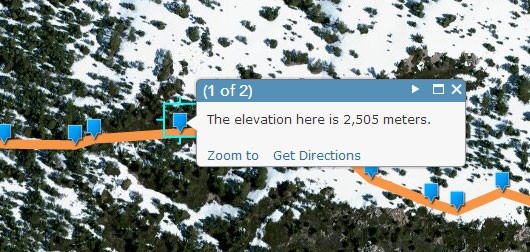
You can change symbols, adjust transparency, and configure the pop-ups, just like other layers. In the screen capture below, the symbols have been changed and the pop-up configured:
Get More out of Your GPS Data
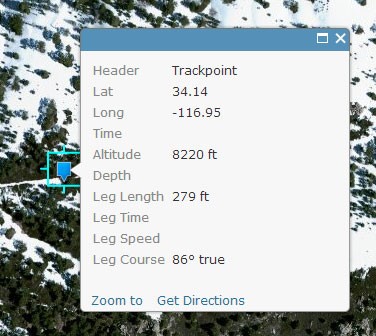
The GPX file contains more information than what is available after importing it, such as the latitude-longitude of the waypoint and other attributes. How do you get at this information?
One way is to export the GPS data as a comma-separated value (CSV) file instead of a GPX file. This provides access to all information stored by your GPS device. You can add the CSV file directly to your map by choosing Add, then Add Layer from File.
When the Garmin MapSource application was used, the latitude and longitude values were stored in a single field when saved as a CSV file. This required additional edits to separate them into unique fields, which is easily accomplished using a text editor.
Following this workflow and options, you can effectively display and make use of your GPS data.
For more information, refer to the following help topics: