In the ArcGIS for Desktop ArcMap application, a map is compiled as a set of layers. These often include a basemap layer and overlaid vector and raster layers. When raster layers or layers with full polygons fills (such as geology or soils layers) are displayed over the basemap or each other, they obscure the underlying layers. So it is sometimes useful to see what is under a layer in ArcMap.
The best way to see underlying layers is to use the Swipe Layer tool, which is on the small but powerful Effects toolbar in ArcMap. This tool allows you to use the pointer to swipe the map viewer from top to bottom. As you swipe, the top layer will be temporarily erased relative to the position of the pointer.

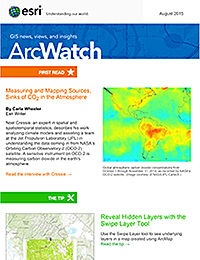
Why would you want to do this? In the example above (and throughout the rest of this tip), the Swipe Layer tool was used to verify that a scanned map of Yosemite National Park in California was correctly georeferenced to align with the basemap. Georeferencing is a process used to add spatial reference information to images so that they can be displayed in their correct location on a map.
You also can use the Swipe Layer tool to compare layers for other reasons. The tool could be used to explore satellite or aerial images of locations before and after disasters such as tornadoes, wildfires, or landslides. You could also use the tool to compare historical and current maps to see how the landscape has changed over time. Or you could swipe a layer, such as roads, over imagery to see if there are more features in the image than in the layer, indicating that the roads layer needs to be updated.
The Swipe Layer tool works with any of the layers in your ArcMap document. You can use the tool to compare a layer with a raster, vector, or basemap layer.
Using the Swipe Layer tool is easy! Just add the layer you want to swipe to your ArcMap document, access the Effects toolbar, and use the tool. Here’s how:
Step 1: Add a swipe layer to your ArcMap document.
- Open ArcMap.
- Click the Add Data button
 on the Main toolbar to add a swipe layer to ArcMap.
Step 2: Access the Effects toolbar if it is not already open.
- On the Main toolbar, click Customize > Toolbars > Effects.

The Effects toolbar will be displayed.

Step 3: Use the tool.
a. On the Effects toolbar, click the Swipe Layer drop-down arrow to select the layer you want to swipe.
b. Click the Swipe Layer tool ![]() on the toolbar and position the pointer at the top, bottom, or side of the map window. An arrow will appear indicating the direction in which to swipe the layer. The layer will be temporarily erased relative to the position of the pointer.
on the toolbar and position the pointer at the top, bottom, or side of the map window. An arrow will appear indicating the direction in which to swipe the layer. The layer will be temporarily erased relative to the position of the pointer.

c. Click and hold the left mouse button to drag the arrow across the map window. The swipe layer will temporarily disappear from view in the direction you drag the arrow.
 based on its location, allowing you to choose the direction in which you want to swipe the layer.")
In this example, the Swipe layer tool helps you to see that Mono Lake and the US Highway 395 in the scanned map align with the basemap, thus verifying that the map was georeferenced correctly.

It’s as easy as that!
Note that you can also access the Swipe Layer tool from within the Image Analysis window, where you interact with raster layers.

When you use the tool in the Image Analysis window, the layers that can be swiped will always be raster layers. When you access the tool from the Effects toolbar, it can be used with any raster or vector layer the table of contents.
To learn more, see the related online ArcGIS Help document called Interactively reveal rasters using the Swipe Layer tool.
About the author