Managing layer visibility and selections with the table of contents’ List By Visibility mode
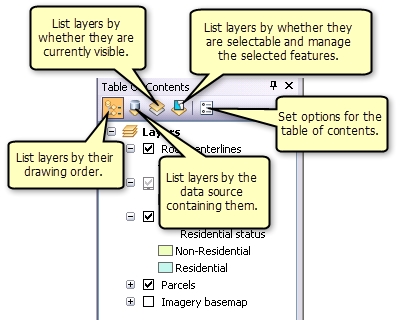
The table of contents in ArcGIS 10 has several ways of listing the layers in the map: by drawing order, source location of the data, whether layers are visible, and whether layers are selectable. A particular list type may be more useful than others depending on the current mapping task. For example, List By Drawing Order is best at setting which layers draw on top of others and List By Source works well to help repair broken data links for layers from different workspaces. In an earlier post, I focused on the table of contents’ List By Selectable mode when I wrote about refining the selected features while editing. In this post, I am going to show how I can use List By Visibility to manage layer visibility and selections.
When I first add layers to a map, I use List By Drawing Order to author the layers, such as specifying layer order and renaming the layers. Once I have set up the layers, though, I commonly switch to List By Visibility because it shows information about the features within the layers. With List By Visibility, the table of contents sorts automatically as I zoom the map and turn layers on and off. Layers are grouped by whether they are shown on the map and are categorized by Visible, Out of Scale Range, or Not Visible. In addition, List By Visible has buttons that allow me to turn a layer on or off and set whether its features can be selected on the map.
I especially like using List By Visibility when I am editing or interacting with map features, which are tasks that can be affected by whether a layer is visible or selectable. For example, a layer must be visible before I can create new features in it using editing tools, since feature templates belonging to layers that are turned off will not be displayed in the Create Features window. If I want to select features interactively, a layer needs to be visible and selectable first. When listing by visibility, I can determine which layers are visible and selectable and quickly change these properties.
Setting visible layers
Since List By Visibility always reflects the current display state of the map’s layers, I can look at the categories the layers have been placed in and the icons to the left of the layer names to know immediately which layers are being drawn on the map. Each type of layer has its own icon, such as  for a line layer or
  for a polygon layer. The icon is either colored to indicate the layer is on or gray when it is turned off. This icon is also functional; clicking it turns a layer on or off.
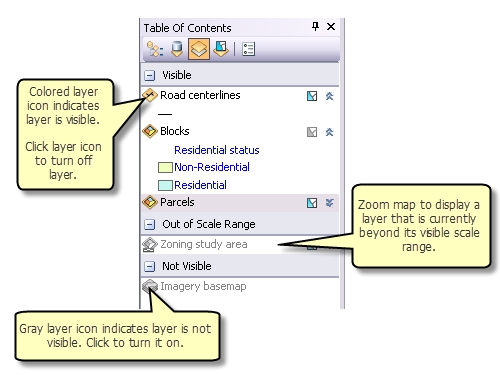
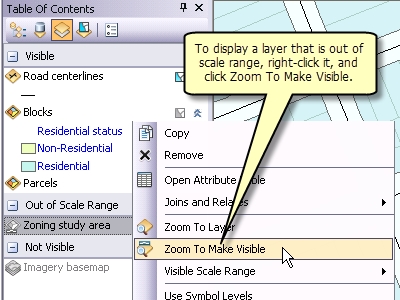
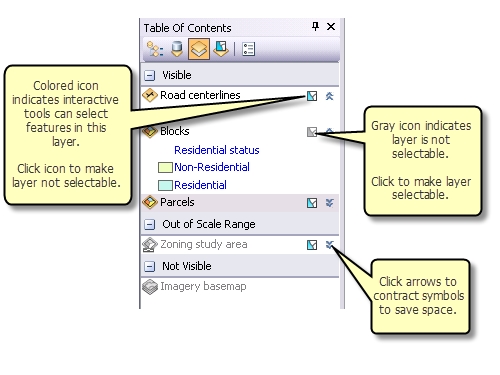
In a glance at the table of contents, I can see that the Road centerlines, Blocks, and Parcels layers are displaying on the map because they are listed under the Visible group and have a colored layer icon. The Zoning study area has a gray icon with a scale bar and is under Out of Scale Range, which means there is a visible scale range set on its Layer Properties dialog box to make it display only at appropriate map scales. To bring the layer back into view, I can right-click it and click Zoom To Make Visible to change the the map to a scale at which it will display.
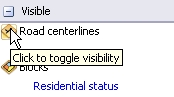
The Imagery basemap layer is listed under Not Visible because it is not displaying at all. To turn it on, I click the gray icon  to the left of the layer name. I’ll say that again. To turn a layer on or off, click the icon to the left of the layer name. Since ArcGIS 10 was released, I have heard from several users who change over to List By Drawing Order to turn layers on or off using the checkboxes without realizing that the icons can do this, too. Clicking the icon on List By Visibility is the same as checking or unchecking a box on List By Drawing Order. I can hover the pointer over a button to view a pop-up tip that explains what it does.
Since the organization of List By Visibility is controlled automatically, I cannot change the order or groupings of layers manually. In addition, layers within a group layer are listed individually, since each layer can have its own visibility and selection properties. However, I can use the Table Of Contents Options dialog box to choose to display the group layer’s name beside the layer’s entry.
Setting selectable layers
Besides using List By Visibility to turn layers on or off, I can also set whether a layer is selectable. When a layer is selectable, features can be selected using the interactive selection tools, such as those on the Tools toolbar or the Edit tool on the Editor toolbar. To make a layer selectable or not selectable, I can click the selection icon to the right of the layer name. If that icon is colored ![]() , the layer is selectable; if it is gray
, the layer is selectable; if it is gray  , the layer is not selectable. For example, I want to make some updates to the attributes of features in the Parcels layer. When I click the features on the map, I keep accidentally selecting from the Blocks layer that is drawn on top of the Parcels layer. I can click the selection icon to the right of the Blocks layer name and make that layer not selectable. This way, when I use the interactive selection tools, only the Parcels features are selected.
If I start working extensively with selections, I may want to change the table of contents to list layers by whether they are selectable. List By Selection provides a similar automatic-updating functionality as List By Visibility but has additional options for refining which features are selected. The different buttons at the top of the table of contents allow me to switch among modes quickly and utilize the layer listing type that is most useful for my present work.
Post content from Rhonda (Editing Team)
Commenting is not enabled for this article.