Working with ‘Places’ Data in Esri Basemaps
In 2024, Esri introduced new versions of our more popular basemap styles that include ‘Places’ data. ‘Places’ are a dense set of points of interest, available at large scales, sourced from several different providers. There is a lot of information in this data… maybe more than you need! But there are several ways to be selective in how you use it.
For this exercise I have created a prototype web map. It spotlights the ‘Places’ and can be used as a resource in selecting and repurposing them.

It includes a set of custom icons. You are welcome to use them, but you can replace them with your own if you prefer.
The Data
Open the Places Resource VT Layer into the Vector Tile Style Editor (VTSE) and have a look at the ‘Places’ group. It’s daunting! There are close to 600 different layers (point features) in 8 groups, and we use around 100 individual icons to display them.

Don’t be put off though – This blog is about how you can be selective in using them.
Working in This Map
This Resource Layer is available for you to use if you think it is suitable. Make sure to save a copy to your account before you start work.
Finding Specific ‘Places’ Layers
- If you have a good sense of where your layer is located, then go hunting for it in ‘Edit Layer Styles’.
OR
- If you know what symbol it uses, then click on an example on the map. The relevant category in ‘Edit Layer Styles’ will open. In many cases we use the same symbol across multiple categories, so you may need to hunt some more for the exact layer.
OR
- If you know an actual location of an example in your layer, you can click on it in the map, and it will take you directly to that layer in ‘Edit Layer Styles’.

Isolating Layers
The ‘Visibility’ toggle works on individual layers, or at the group level, and you can use that to switch off those that you don’t want.

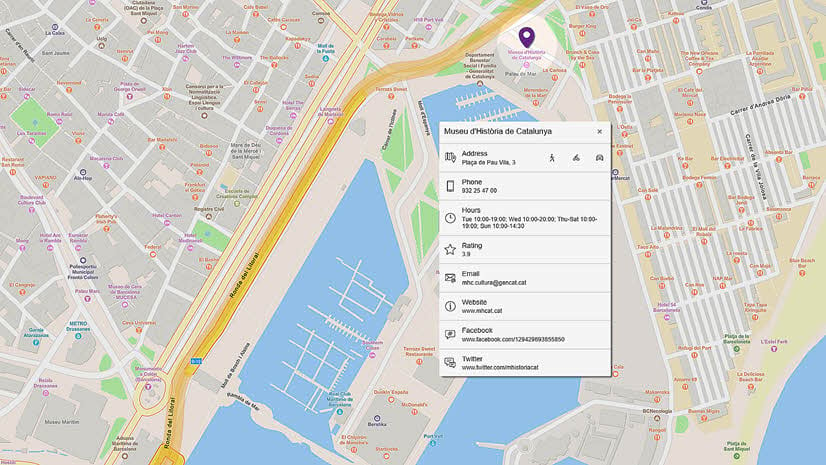
I’m using ‘Museum’ for this exercise:
- I know it’s in the ‘Recreation’ group, so I can switch off all other ‘Places’ groups.
- I want to hide all other symbols in the ‘Recreation’ group, but there are almost 100 of them!
- … So, I can switch off the whole group, then go in and switch the ‘Museum’ layer back on. You should see just that symbol on your map.
- That assumes that you only want the one layer. You can include as many as you think are appropriate in the new selection.

Adjusting the JSON
It’s optional, but you may want to clear out the redundant lines of code in the JSON. If you don’t plan to use any of the other symbols it will make the JSON and the ‘Edit Layer Styles’ option a lot easier to navigate.
- Go to ‘Edit JSON’, Search (Control ‘F’) for “visibility”: “none”. This will highlight examples of that text in the code. In turn, that identifies the symbol layers that are switched off.
- Select and delete those entire code sections. Be sure to do it cleanly!
- Update the map. If you have made any errors, it will let you know.

Transferring the symbol to another map
Your selected feature can be transferred to any map that is derived from the same Vector Tile Package (In this case that is any of our ‘Esri Vector Basemaps’, but not ‘Open Basemap’, or ‘Open Street Map’ styles).
It may need some additional work though:
- Open your target map into the VTSE.
- Open a second session of the VTSE with the source map for your symbol (This Resource Layer is an option).
- On the source map, click on an example of the symbol you want to transfer. It will open the relevant layer in ‘Edit Layer Styles’.
- Open ‘Edit JSON’. You will be taken to the correct section of code, and the layer title will be highlighted.
- Copy that whole section of code.
- Paste it into the code in your target map (taking care to position it in a suitable place in the layer hierarchy).
- Update the image. If there is a problem with your pasted code it will warn you.
Adding symbols
It is very likely that the Sprite document for your target map does not include this new symbol. The layer will appear, and possibly a label, but nothing else. You have a choice here – To build a new icon, or to download ours and add it.

Download our symbol
- In the source map, open ‘Edit icons and patterns’, and find your symbol.
- Select it. Then look for the ‘Download’ button.

Adding the symbol to the target map
- On your target map, open ‘Edit icons and patterns’, then ‘Add’
- Name the new icon, then find your downloaded file (or look for your new icon if you have built your own).
- In ‘Edit layer styles’, find the new symbol layer.
- In ‘Image’, find and select the new icon.
- If there is a label, make any design changes to it, and adjust the offset from the new icon.
Building a new icon
The image must be a PNG. In part this is because of the transparency option. A non-rectangular JPG symbol would have a white box around it.
Resolutions can vary, but a good practice is to build the original at 96 ppi and at twice the size of the final symbol. Sprite files are generated at two sizes, 96 ppi and 192 ppi, so this will accommodate both circumstances.
Now you should have the selected symbol (or symbols) with your preferred icon(s) in your choice of basemap.

Hi Andy, really interesting post that has made me want to explore the vector tile style editor more. I especially like the ability to view the symbols used in a base map and download them as assume we could then use that to build legends in our figures? Just a couple of other questions:
One thing to note is that in order to access your layer in the tile style editor is I had to update my URL on the item page so it referenced my organisational portal. I was a bit confused at first on how to open it as the “Edit in Vector Tile Style Editor” button didn’t appear until I changed this. Thought it may be worth a mention in case anyone else is unsure.
Thanks, Anthony
Thanks Anthony,
You certainly could download the symbols for a legend if you don’t have one active within Map Viewer.
Apologies for the deprecation. I put that on pre-release while other colleagues are reviewing and I forgot to remove it. It should be gone now.
Unfortunately ‘Places’ data is not available as a feature service. This document should give you more information on enhanced capability: https://developers.arcgis.com/documentation/mapping-and-location-services/mapping/basemap-places/
You can always access the VTSE independently at https://vtse.arcgis.com/ then sign-in and navigate to your document.
Andy S