Webhooks are useful tools that allow applications to send real-time (or near real-time) data to another service when a specific event occurs. With webhooks, instead of repeatedly checking for updates, the system delivers a notification once a registered event happens.
While ArcGIS Online feature layer webhooks have been available for some time, they could only be created by making an API call to the ArcGIS REST Admin directory. Now, you can create and edit webhooks in ArcGIS Online, making access easier than ever.
Who can create webhooks in ArcGIS Online?
- Organization administrators can create webhooks on all hosted feature layers.
- Hosted feature layer owners can create webhooks on their own feature layer.
- A member with update control rights. (Should belong to a shared-update group where such items are shared to that group, or have an administrative webhook custom role.) Learn more here.
Important considerations about hosted feature layer webhooks
- Webhooks can be created on a hosted feature layer, a hosted table, or a hosted feature layer view.
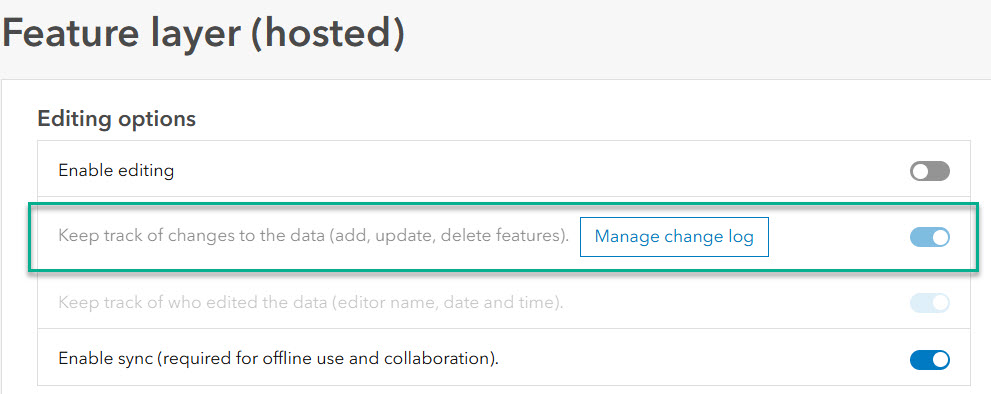
- The hosted feature layer must have “Keep track of changes to the data” enabled for a webhook to be created.
3. Ten webhooks can be created for each hosted feature layer, hosted table, or hosted feature layer view.
Webhooks show up in three different places within your organization:
-
First location: From the organization tab, click Settings sub menu, then click the Webhooks tab. (Organization => Settings => Webhooks)
This is primarily for an administrative workflow. The administrator can do the following:

- Configure the organization’s advanced settings (indicated as 1 in figure 2). Read more
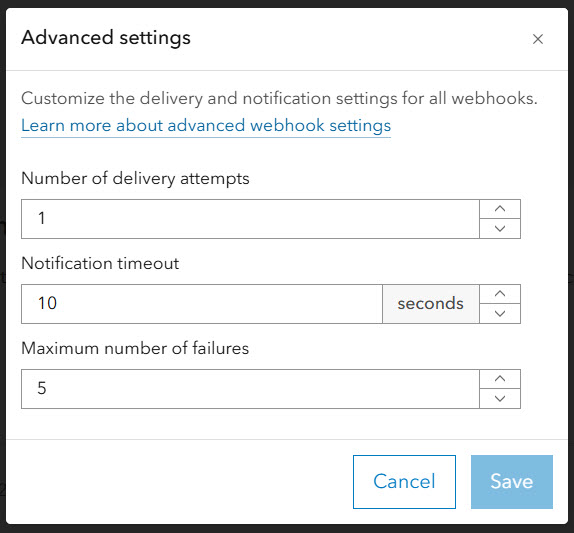
- Activate or deactivate webhooks by toggling them on and off. (indicated as 2 in figure 2)
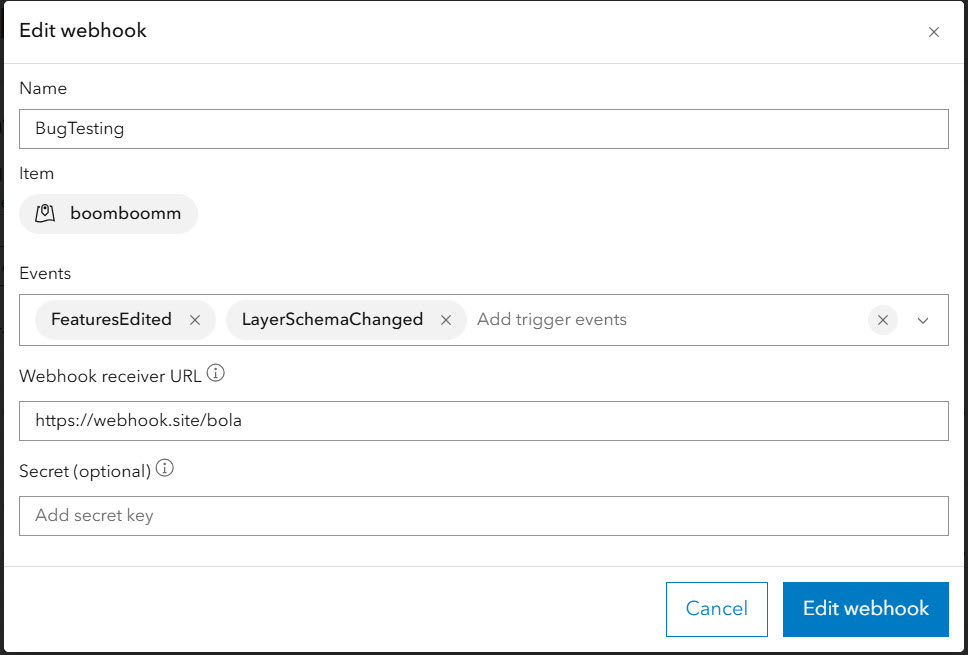
- Edit webhooks: (indicated as 3 in figure 2)
- Delete webhooks (indicated 4 in figure 2)
2. Second Location: Click My settings at the top right corner of your organization’s page, close to the profile picture, then click Webhooks tab. (My settings > Webhooks)
This location provides a personalized experience, letting users view webhooks they own.

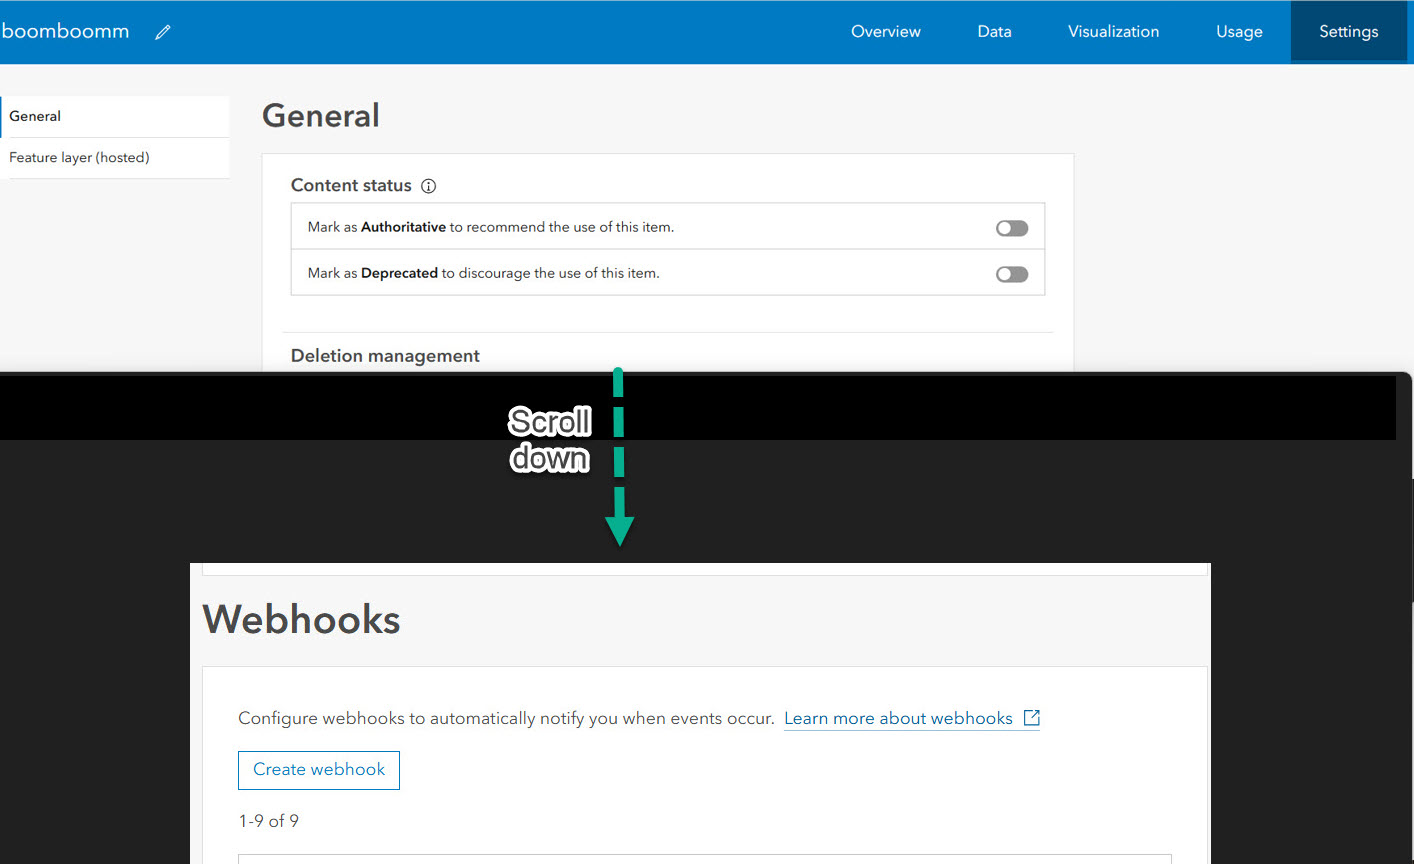
3. Third location: Navigate to the Settings page from the item’s details page, scroll all the way down to find webhooks. (item’s detail page => Settings => Webhooks)
This window lists all webhooks associated with a selected item. You must be the owner, an administrator, or a member with an update–control right to view this. You can also create a webhook on the item from here.

Webhook Events
Webhook events are specific user operations or conditions in a system or application that cause a webhook request to be sent to a predefined URL (webhook receiver).
Think of them as “when this happens, send data to that URL”.
Supported Events
| Values | Description |
| * | A wildcard event. Any event will trigger the webhook. |
| FeaturesCreated | A new feature is created. |
| FeaturesUpdated | A feature is updated. |
| FeaturesDeleted | A feature is deleted. |
| FeaturesEdited | A feature is edited (insert, update, or delete). |
| AttachmentsCreated | A new attachment is added to a feature. |
| AttachmentsUpdated | A feature attachment is updated. |
| AttachmentsDeleted | A feature attachment is deleted. |
| LayerSchemaChanged | A schema is changed in a layer. |
| LayerDefinitionChanged | A layer definition is changed. |
| FeatureServiceDefinitionChanged | A feature service is changed. |
Learn more about webhook events
Webhook Receiver
A webhook receiver is the endpoint (usually a URL) or service that receives and processes incoming webhook requests. In simple terms:
Sender: The system that sends the webhook when something happens.
Receiver: The system (or URL) that catches the webhook and does something with it.
- Webhook receiver Types
| Receiver Type | Example | What It Does |
| Custom Receivers | The custom receiver endpoint on your web server | Your server code processes the payload (Sample Esri custom receivers: |
| Third party | Zapier, Make, Microsoft Flow, Webhook.site.
(Please note that some third-party receivers have ArcGIS connectors, which allow them to connect directly to your ArcGIS Online Organization without manually copying the receiver URL, e.g., Power Automate) |
Receives webhook → triggers automation. |
| Cloud function | AWS Lambda, Google Cloud Functions. | Runs serverless code when the webhook arrives. |
Sample free receiver:
(Feel free to use any receiver of choice; we shall be using webhook.site in this blog.)
Browse to https://webhook.site/
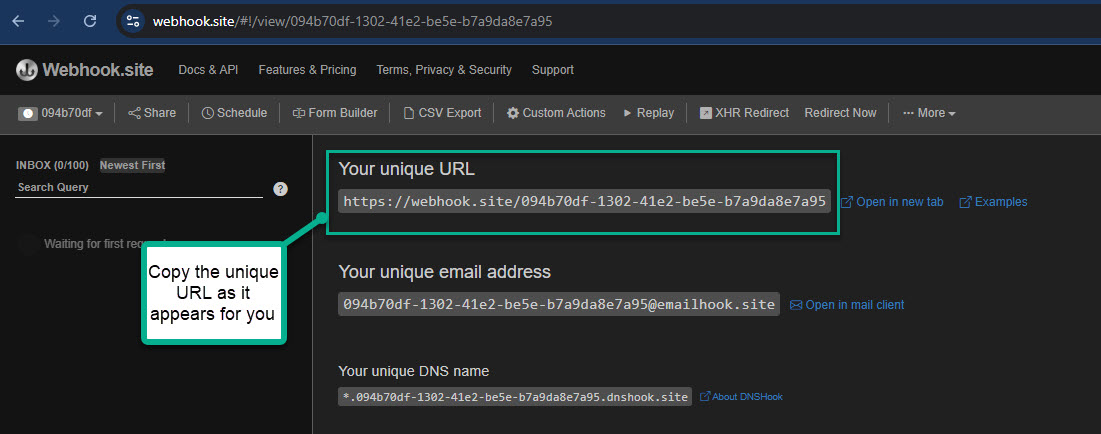
Copy the unique URL from the website and use it as the webhook receiver URL when creating your webhook. Please note that if you provide a wrong receiver URL while creating a webhook, the webhook will be created, but will be deactivated after creation.
Note: Using ‘Custom Actions’ on this receiver to send emails when an event is triggered will require a paid subscription with ‘webhook.site’. As set up in this blog, we are only using this receiver to listen and receive payloads.
How to create a webhook
Webhooks can be created on a hosted feature layer, hosted table, or hosted feature layer view.
- Navigate to the item’s details page
- Click the Settings tab
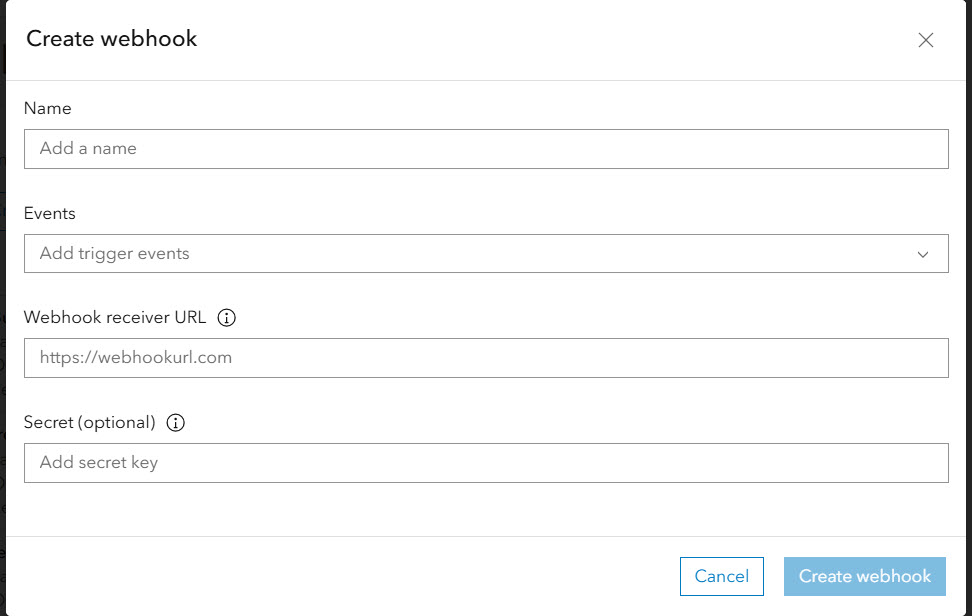
- Enter all required parameters (Name, Events, and Webhook receiver URL. Secret is optional for added security. See figure 9) and click the Create webhook button
Once the webhook is created, observe that a GET request is sent to the receiver immediately (as seen below). This is just a ping to the receiver, with no payload.
Subsequently, when events are triggered, a POST request is sent to the receiver, containing the payload (see figure 10)

Webhook Payload
A webhook payload is the data that a system sends to another application when a webhook event is triggered.
This data is usually sent in JSON (JavaScript Object Notation) format, but it can also be in XML or other formats depending on the service. The payload contains details about the event — for example, if a new user signs up, the payload might include their name, email, and signup time.
The payload carries the actual information you need to process the event.
Without the payload, the webhook would just be a “ping” with no details.
Payloads can be used directly to update databases, trigger workflows, or send notifications.
The ‘changeUrl’ is one of the contents of the payload. It is a REST API link to the changed resource, allowing you to quickly retrieve details about the event. In ArcGIS Online, the ‘changeUrl’ is encoded, so one will need to decode it, then paste it in the browser with the correct token.
sample payload:
payload=[
{
“name”:”webhookBola11″,
“layerId”:0,
“orgId”:”XXXXXXXXXX”,
“serviceName”:”webhookBola”,
“lastUpdatedTime”:1755719255181,
“changesUrl”:”https%3a%2f%2fxxxxxxx.arcgis.com%xxxxxxxx%2fArcGIS%2frest%2fservices%2fwebhookBola%2fFeatureServer%2fextractChanges%3fserverGens%3d%5b762039%2c762044%5d%26async%3dtrue%26returnAttachments%3dfalse”,
“events”:[“FeaturesCreated”,”FeaturesUpdated”,”FeaturesDeleted”]
}
]
ArcGIS Online encodes the changeURL by default, so it has to be decoded:
Copy the string into a decoder, e.g., https://meyerweb.com/eric/tools/dencoder/
Copy the decoded string and append your token, and place it into a browser. That takes you into the extractChanges endpoint:
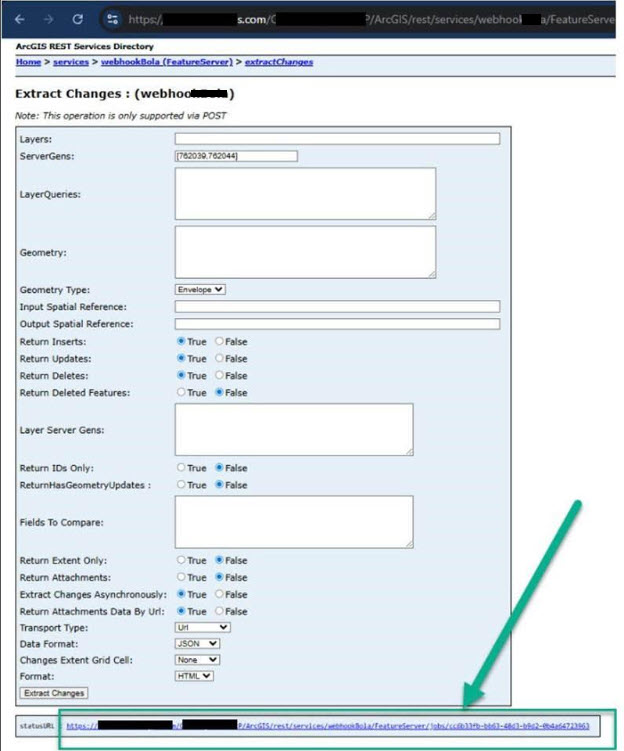
Click the statusURL link to check the status of the job:

Once the Status reads “Completed”, click the Result URL link to download the JSON file. This gets downloaded into your Download folder
Drag the JSON file from the Download folder onto your browser.

The resulting JSON can be iterated over to store essential data in a database, trigger emails, or serve as input for additional workflows — in short, webhooks make it easy to extend and automate your processes.
In today’s fast-paced digital world, webhooks enable data transfer and seamless automation, keeping systems in sync without extra effort. They’re a small tool with a big impact.

Article Discussion: