As we continue with the blog series about offline map areas prepared ahead of time, this second article will go through the process of setting up the web map that will be used, including the steps of adding the offline basemap and layers, and configuring the offline options associated with the web map.
To create a web map, you can either use ArcGIS Pro to share a web map or use Map Viewer to create and save web maps on a portal. The example in this blog article uses Map Viewer to create and configure a web map.
First make sure that all layers, including the basemap and reference layers, are enabled for offline use. See the Enabling layers and maps for offline use documentation to know which layers can be enabled for offline use and their requirements.
Now, let us continue with creating and setting up the web map.
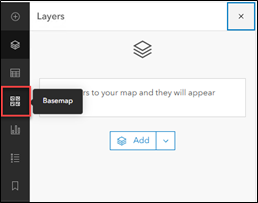
Open Map Viewer and choose an Esri basemap
If using ArcGIS Enterprise, the default Esri basemaps included in your portal are not enabled for offline use. You can take similar basemaps offline by adding an Esri basemap from ArcGIS Online to your web map or by authoring your own basemap and enabling offline use.
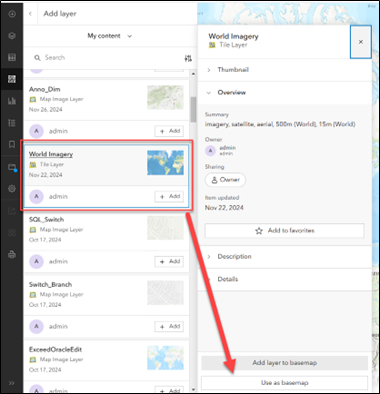
We will be using Esri’s World Imagery basemap which has been added to the basemap gallery in ArcGIS Enterprise: https://tiledbasemaps.arcgis.com/arcgis/rest/services/World_Imagery/MapServer
- Open Map Viewer and click Basemap on the Contents (dark) toolbar.
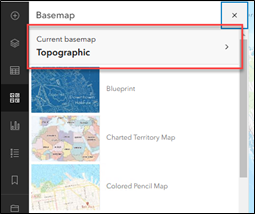
- At the top of the Basemap pane, click Current basemap and click Add.
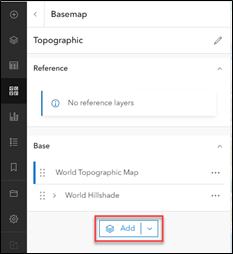
- Browse to and select your basemap. Click Use as basemap.
Add offline enabled layers to the web map
Once a layer has been added to a web map, the properties such as symbology, appearance, and visible range can be changed for the layer to meet your preferences.
1. Click Layers on the Contents (dark) toolbar.
2. Click Add and then browse to and select layers. Click Add to map.
Save the web map
After you create a map, you can save the map as an item on the My Content tab of the content page. When you initially save a map or save a copy of a map, a new map item appears on the My Content tab of the content page and is only available to you. Depending on your sharing privileges, you may be able to share your map with groups to which you belong, your organization, or everyone (public).
1. Click Save and open on the Contents (dark) toolbar and click Save as.
2. Type a title and select a destination folder for the new map and click Save. Optionally, set Tags and Summary.
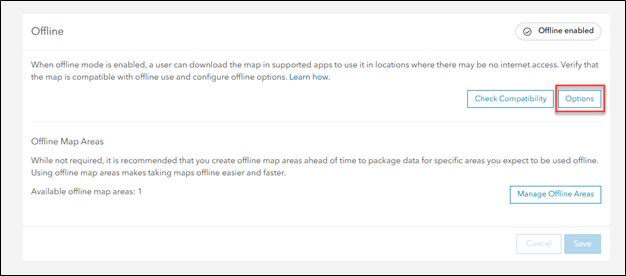
Configure offline options
Once a web map has been created and set up for offline use, additional options are available to control which data is delivered to the client, both on the initial download and when synchronizing or downloading.
1. To access these options, go to the web map’s item page and click the Settings tab.
2. On this page, in the Offline section, click Options to access the additional settings for features and attachments, as well as basemap and tile package.
3. Select the appropriate choices based on the offline usage requirements of users, taking into account considerations such as device storage constraints, cellular data usage, and the speed of downloads and synchronization, particularly in regions with limited connectivity.
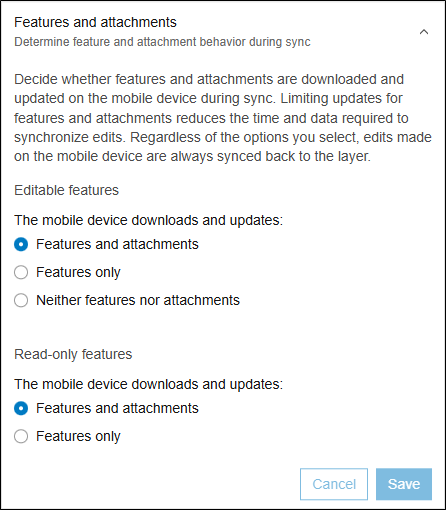
In the Features and attachments section, you can set how attachments and features are delivered to clients. These settings can be configured for editable and read-only features. They will be used when the offline map area is downloaded for the first time and for each time data updates are synchronized from the map in the organization.
The Features and attachments option will prepackage all the data and attachments within the extent of the map area. Features only will exclude attachments from being packaged. You can choose this option to provide only feature updates if offline users do not require access to attachments. To download a blank geodatabase with all the necessary fields for data collection, you can select Neither features nor attachments.
When your data is editable, all local edits are synced back to the layer, regardless of the options you select. However, for data that is only query and sync enabled, your local edits are never synced back to the layer.
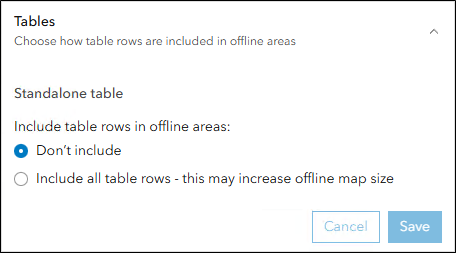
In the Tables section, you can determine how records within a standalone table are delivered to clients. The Don’t include option will exclude all current records and a blank table will be seen with the necessary fields to be used for data collection. Include all table rows will prepackage all the records within the standalone table. This option may increase the offline map size so choose the option that makes sense depending on what users need for offline use.
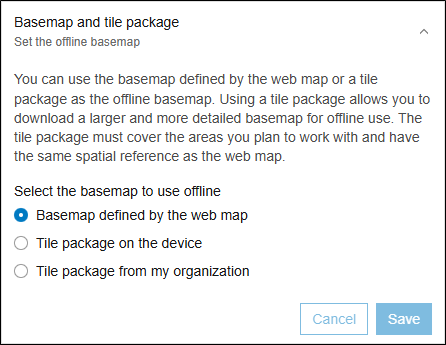
In the Basemap and tile package section, you have the option to choose between using the basemap defined by the web map or a tile package when an offline map area prepared ahead of time is taken offline. Tile packages allow you to use a larger file and can be useful if you have your own highly detailed or customized imagery and basemaps that you would prefer to use.
If using a tile package, there are two options to choose from. The Tile package on the device option allows the use of a tile package that has already been downloaded to the device. Upon selecting this option, a file name will need to be provided. Later, when the offline map area is downloaded, you will need to navigate to and select the tile package previously downloaded to the device.
The Tile package from my organization option allows the use of a tile package that has previously been published. Upon choosing this option, you will browse to and select a previously published tile package. When taking offline a map area prepared ahead of time, the tile package will appear alongside the downloaded mobile geodatabase in the project’s home folder by default. The download location can be specified using the ArcGIS Pro sharing and download options.
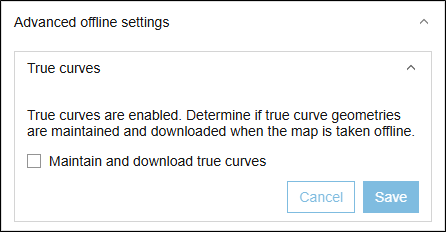
In the Advanced offline settings section, you can check the box to maintain and download true curves. By default, this option is not enabled, and when using offline map areas prepared ahead of time, true curve features are densified upon download. These features can still be edited, but behavior during sync will vary depending on how the web feature layer feature access properties are configured.
With the web map created and setup for offline use, you can continue on with the third blog article in this series — Offline map areas prepared ahead of time: Creation, configuration, and management
This article was originally published on September 6th, 2025, and was last updated on November 24th, 2025.
Article Discussion: