In the previous blog article for this series about offline map areas prepared ahead of time, you learned how to add the offline basemap and layers and configure the offline options associated with the web map. Now that you have created and configured the web map, you can created the offline map areas ahead of time for the extents where work needs to be completed. You will also set options for each map area, which will affect the size and data delivery.
Create offline map areas ahead of time
Complete the following steps to create the offline map areas:
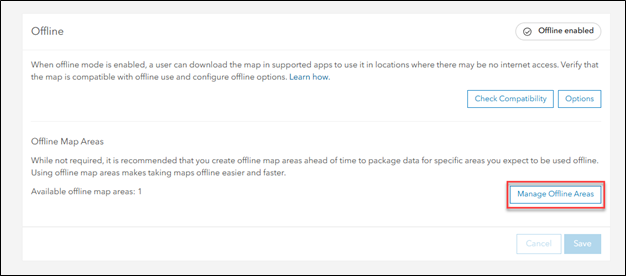
1. To begin creating map areas prepared ahead of time, go to the web map’s item page and click the Settings tab.
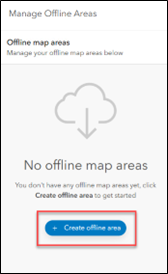
2. In the Offline section, click Manage Offline Areas and click Create offline area to begin creating the new map areas.
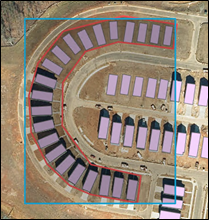
3. Navigate to a location for the new map area that you will create.
4. Use the Sketch rectangular map area button or the Sketch polygon map area button to create the boundary around the map area.
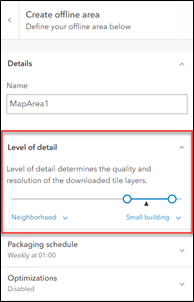
5. Provide a name for the new map area. You can create additional offline map areas based on your needs, but the total number of offline map areas associated with the web map is limited to 16.
Once the new map area’s boundary has been set, there are additional items to configure. Keep in mind that the following can be updated after the map areas have been created.
Configure offline map areas ahead of time
Configure offline map areas ahead of time using the following options:
Level of detail
The Level of detail slider allows you to control the quality and resolution of the downloaded tile layers. Select the highest and lowest level of detail to generate tiles for.
The black arrow represents the map’s current scale. The displayed scale range (right for more detail or to the left for less detail) indicates the expected level of detail that will be downloaded. Each increase in the level of detail increases the time to create the tile package and the size of the tile package.
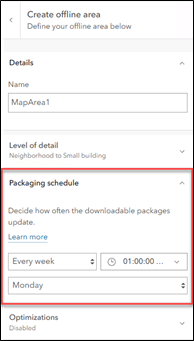
Packaging schedule
After a map area has been created, it is packaged and stored on the server. After this first package, edits may be made to the underlying data either directly to the service or through an offline map that has been synced to upload changes. Although these changes have been made, the previous package will still be used when users attempt to download the preplanned map area until a repackage occurs.
For offline mobile and ArcGIS Pro users, this schedule will not affect the accuracy of the data that is initially downloaded. This is because upon the first download, map areas are set to perform an initial sync to retrieve the most up-to-date data.
If a schedule is used, set it to a time after all data processes have been completed (such as during non-working hours) to ensure that the data includes the most recent updates. If the data in your maps isn’t updated often, you do not need to repackage frequently.
The schedule can be set to the intervals of monthly, weekly, daily, or never.
Optimization
For large deployments of offline map areas prepared ahead of time, it is important that they scale well when multiple users pull updates to mobile devices at the same time. To alleviate additional work on the server, a read-only optimization is used when the Enabled packaged updates option is turned on.
This option uses the packaging schedule to generate files that are stored on the server and can then be downloaded for updates. When an ArcGIS Pro user clicks Sync, these update files are downloaded and applied to the local geodatabase.

Save map areas
Once the map area boundary and configurations have been made, click Save to save map areas.
This begins to package the data using the OfflinePackaging service. The amount of time to complete this depends on the size of the data being packaged. Once complete, clicking the offline map area provides update details and the downloadable packages created. Feature layers are bundled into mobile geodatabase files (.geodatabase), tile layers into tile packages (.tpk or .tpkx), and vector tile layers into vector tile packages (.vtpk). If there are multiple services within the web map, additional geodatabase files will be generated.
By default, if the total size of packages will exceed 4 gigabytes, the web layer packaging will fail, and a warning will display in the map area manager. If this occurs, there are a few options you can try to get the size down:
1. Attempt to reduce the size of the sketched area such as using the Sketch polygon map area button earlier discussed.
2. Exclude attachments from the offline package if those are within the features but not necessary for the offline user. This is where the Features and attachments section of the offline options could come into play.
3. If you are using tile layers, adjust the level of detail that will be included in the offline package by updating the level of detail that was first set when creating the map area.
Click here to learn about updating size limits for offline map areas
ArcGIS Enterprise has a default limit for the size of offline map areas. Follow the below steps to adjust offline map areas size limits:
- Log in as an administrator to the Portal for ArcGIS machine.
- Browse to and open this file in a text editor.
C:\Program Files\ArcGIS\Portal\framework\webapps\arcgis#sharing\WEB-INF\classes\resources\gw-config.properties
- Adjust the following property value
content.file-download-max-filesize=<size_in_MB>
For example, to set it to 3 GB… content.file-download-max-filesize=3072
NOTE: 1024MB = 1GB. 1024 *3 = 3072
- Save the file.
- Restart Portal for ArcGIS from the Windows Services panel.
Manage offline map areas prepared ahead of time
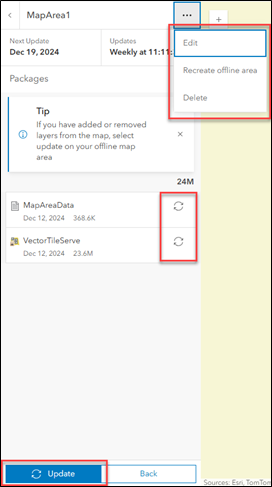
After you create the map areas, you can modify or update them.
1. Click the Edit option to change any of the previous items that were set during the initial creation.
You can rename the map area, change the boundary of the map area, or change the configuration of the map area (level of detail, packaging schedule, and optimizations). After you edit and save a web map, the map packages for this area are repackaged.
2. Recreate the existing preplanned map areas with the Recreate offline area option.
This option is to be used after adding or removing fields, creating or updating domains, or any modifications that have occurred in the underlying schema. When recreating the preplanned offline areas, all existing packages are deleted and new packages will be created. Any existing edits should first be synced with the service before the recreation of offline areas occur. Users must redownload the offline map areas to pick up the new packages.
3. If a preplanned map area is no longer needed, click the Delete option to remove the offline map area as well as any associated packages.
4. Refresh specific packages in a map area if the data has changed but you want the updates to be available for download before the next scheduled package update.
5. Click the Update option when changes to the web map have occurred.
If layers have been added or removed, data has been updated, or if the advanced offline settings have been changed, use Update to repackage these changes so they are available to download before the next scheduled package update.
This blog series has covered the process of creating a web map and setting up offline map areas. You can continue to the fourth blog in this series — Offline map areas prepared ahead of time: Download, access, and update changes
Article Discussion: