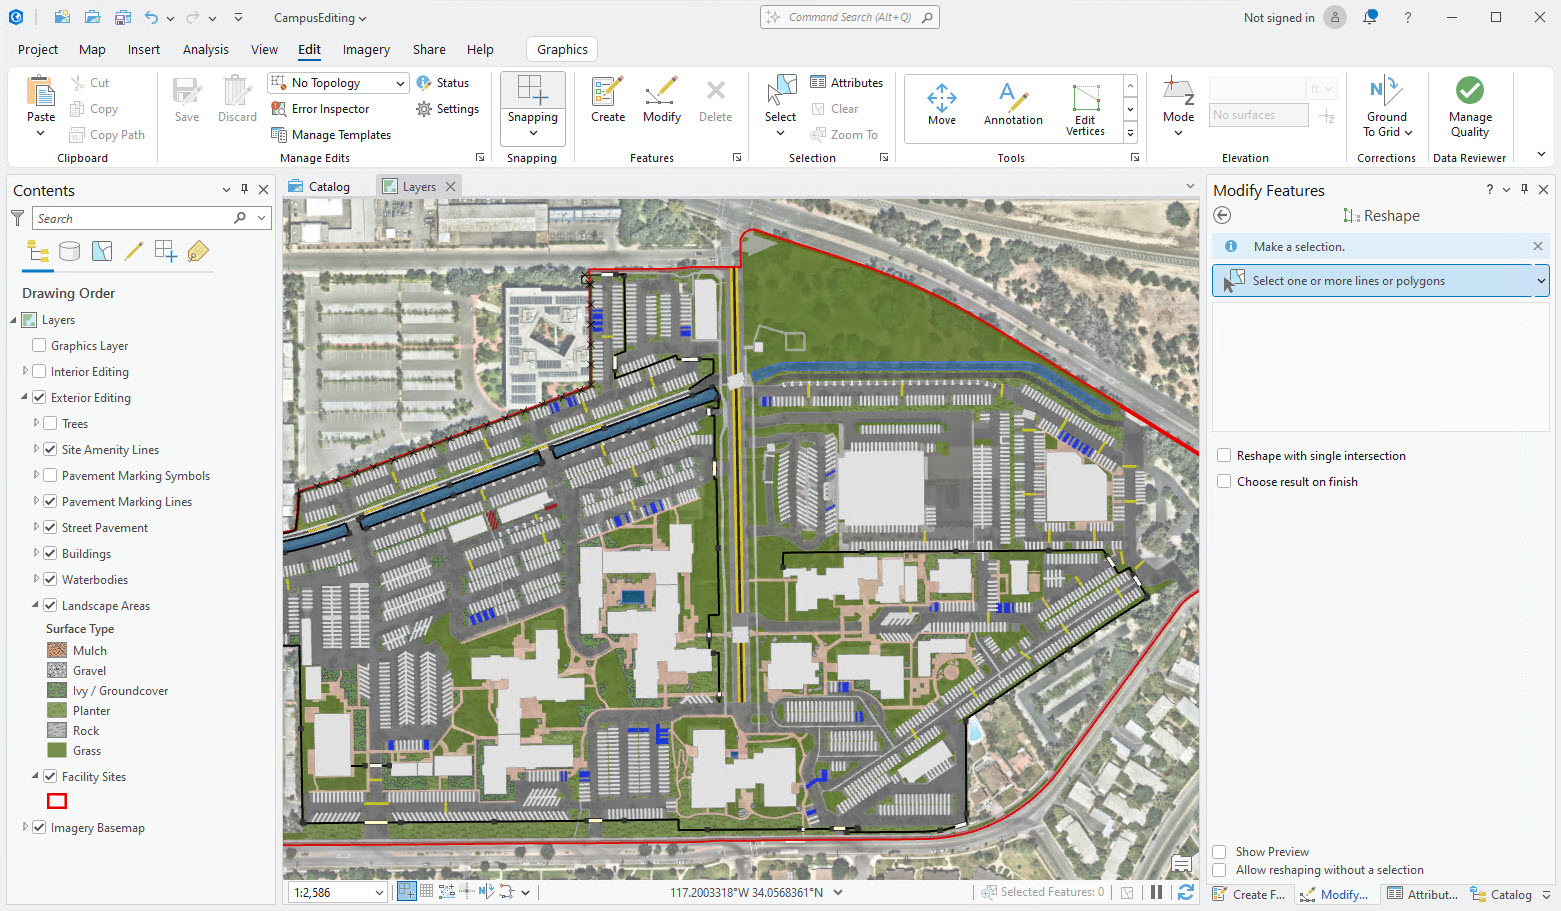
The Reshape editing tool has a variety of capabilities to support modifying one or more polylines or polygons. Reshape can modify one or more selected line and polygon features with a single edit operation, but it can also reshape features that aren’t selected. With a selection set, reshaping a line with a single intersection and choosing the reshape result for a single line or polygon are available. Along with previewing and other supporting editing capabilities, Reshape allows for efficient and accurate data editing. This blog article will provide an overview of these capabilities.
To show Reshape capabilities, examples make necessary data updates to the Esri campus map.
For all editing workflows, to prevent editing features in certain layers, set visibility, selectability, or editability in the Contents pane, and consider Single Workspace Editing. To learn more, refer to the Configure settings for editing help topic.
For Reshape help, refer to the Reshape a line or polygon feature help topic.
Selection sets
Reshape can modify selected or unselected, visible and editable features. Without a selection, the system uses the reshaping sketch to determine which features to update. Reshaping multiple features, selected or not, with one edit operation can increase productivity and improve data quality. Reshaping with and without selection sets is described below. There are different capabilities available for multiple selected features versus a single selected feature that are also described below.
Allow reshaping without a selection option
To reshape features without a selection, check the Allow reshaping without a selection option at the bottom of the pane and then start sketching in the map. When the edit operation is applied, the system will find and update features, ultimately flashing the reshaped features. (You can turn off animated flashing as described in the User Interface Backstage option help topic. This is a new ArcGIS Pro 3.5 option.) The tool will only update visible and editable features in the map’s editable data sources that intersect the reshaping sketch and return a valid result.
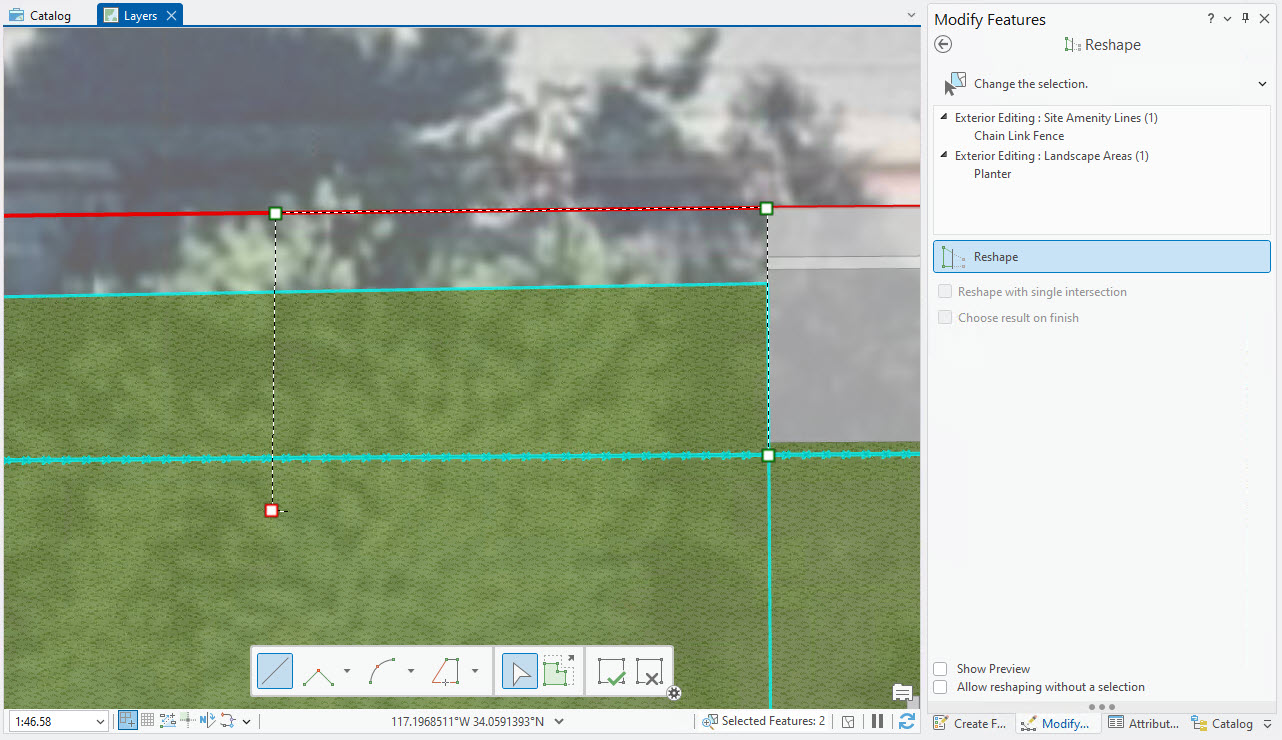
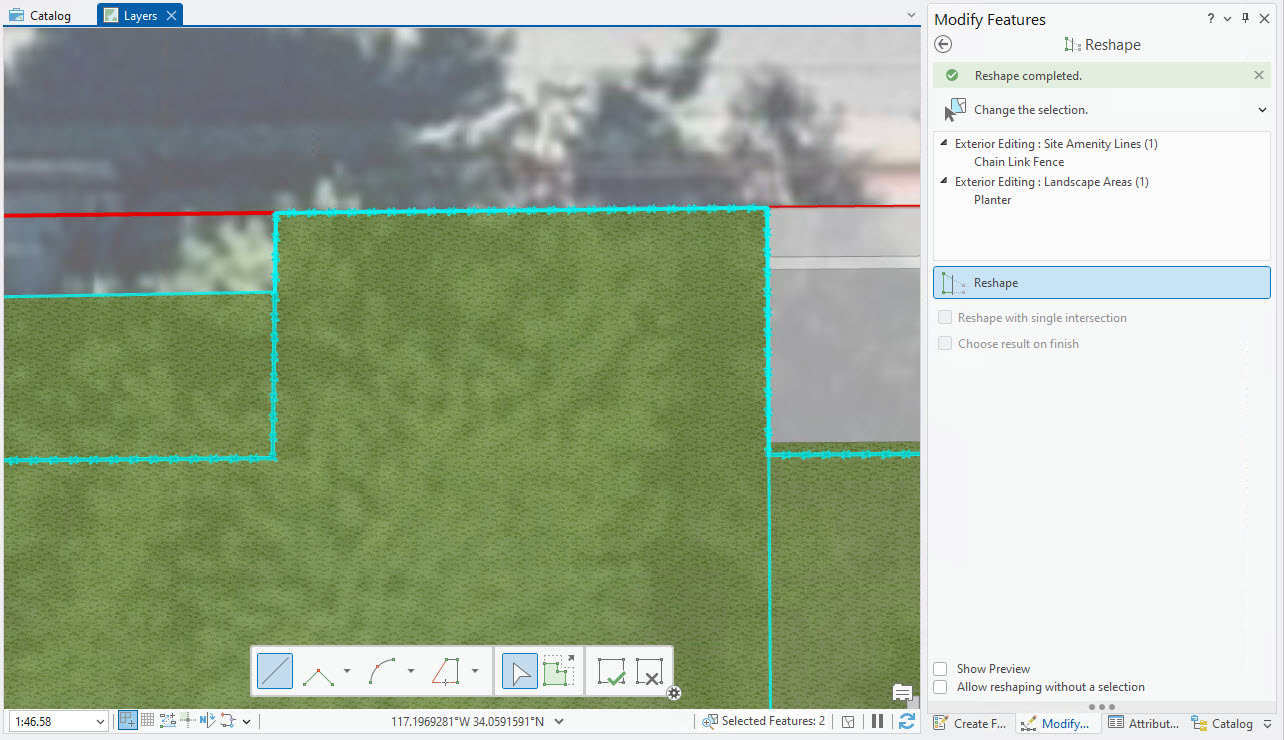
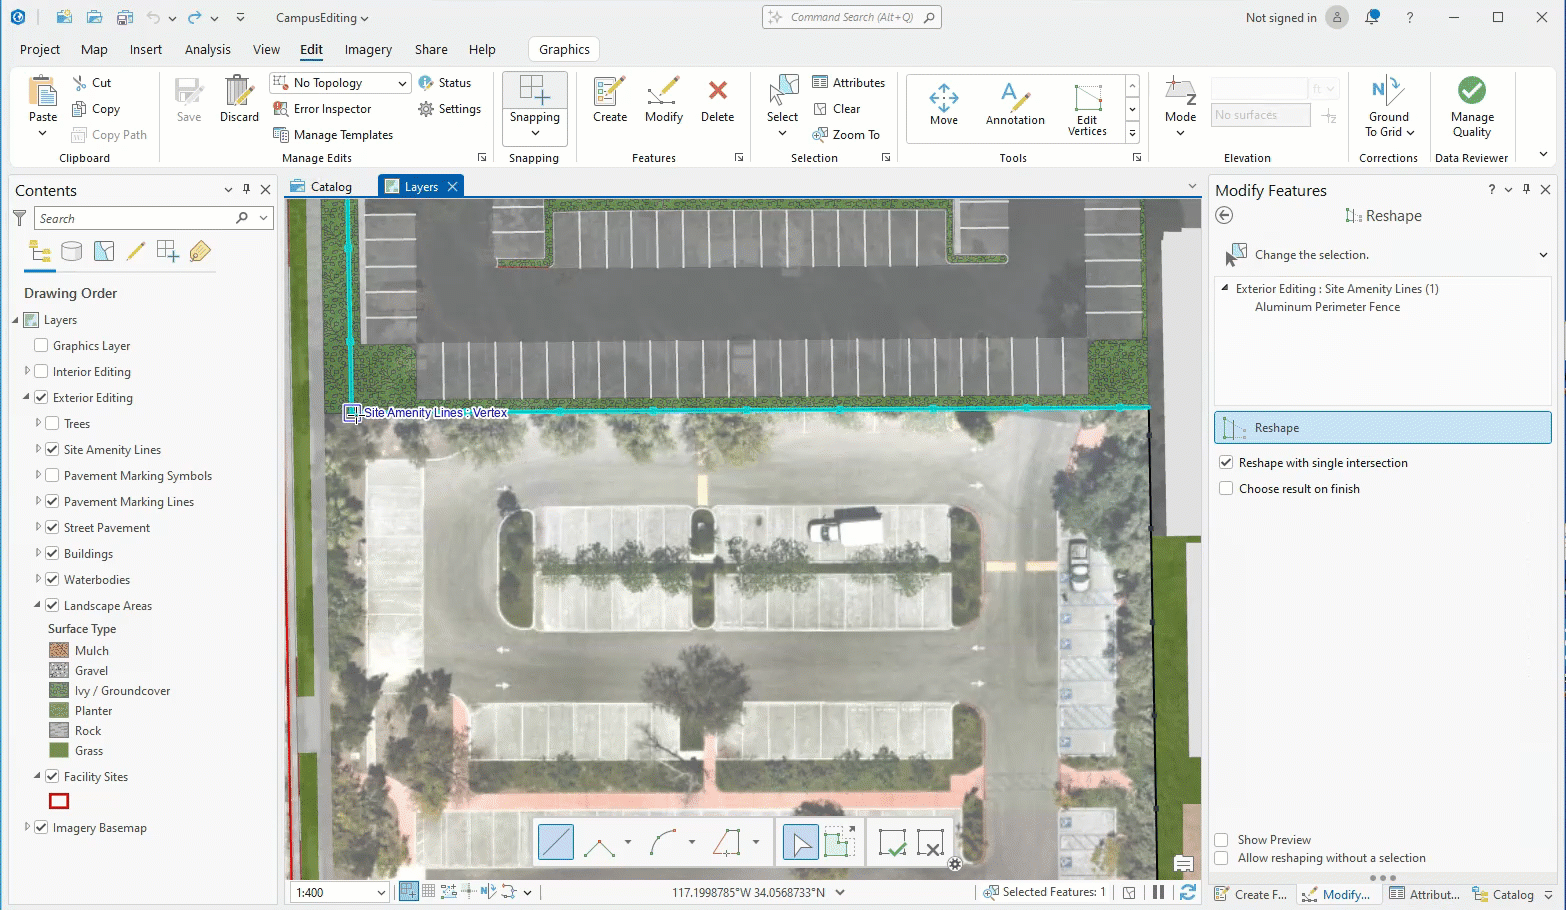
Reshape selected features
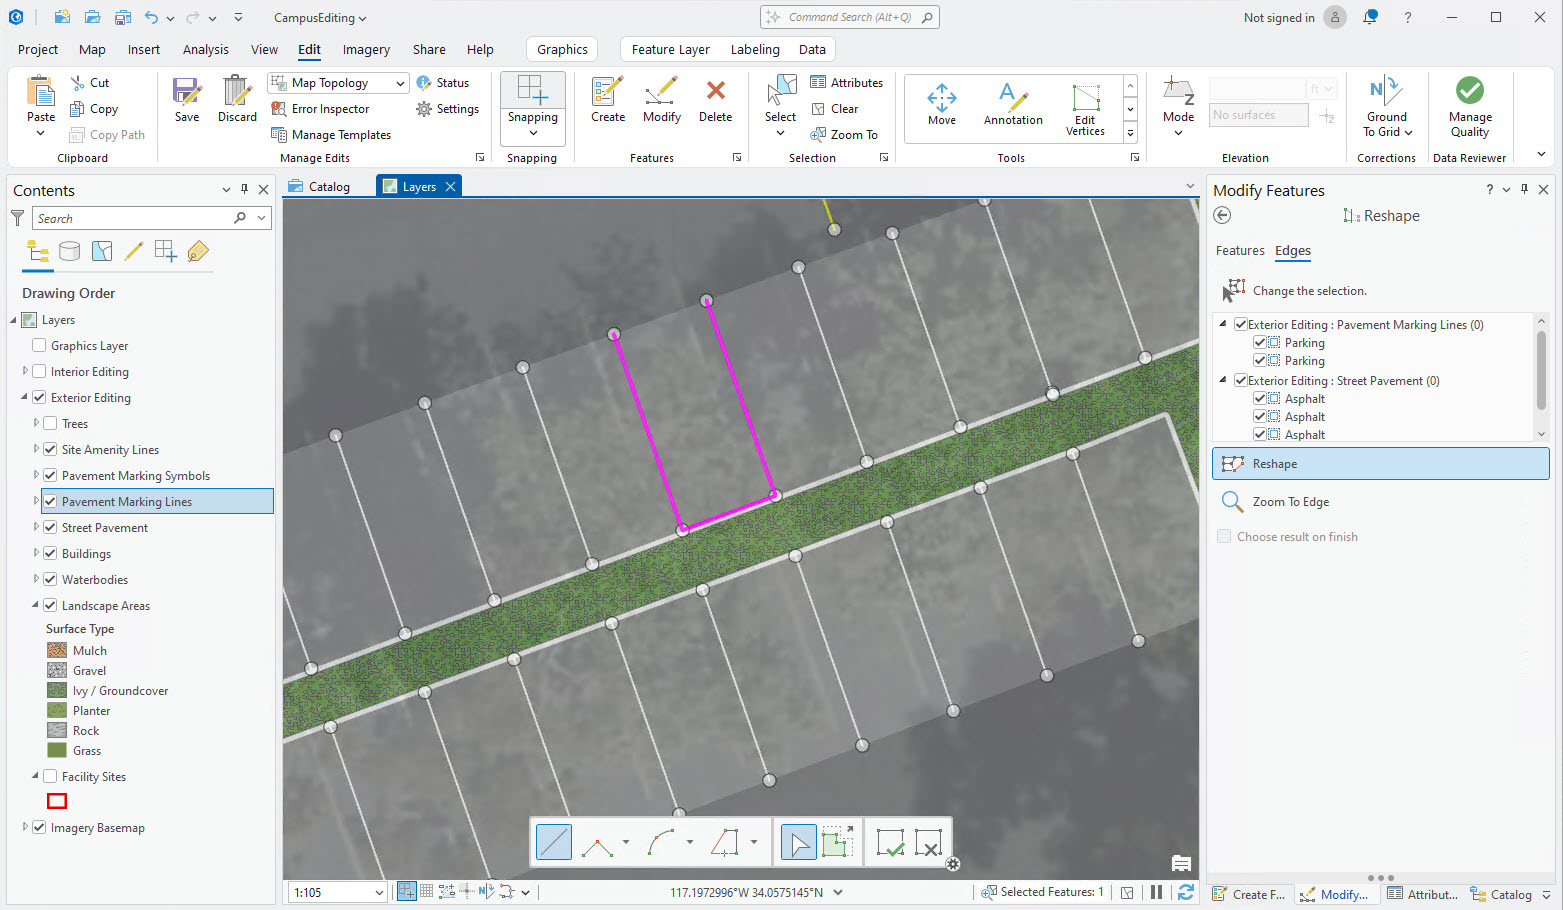
Reshape supports a single selected feature or selections across multiple layers and across geometry types, polygon and polyline. Requiring a selection ensures that only the intended features are modified (uncheck the Allow reshaping without a selection option).
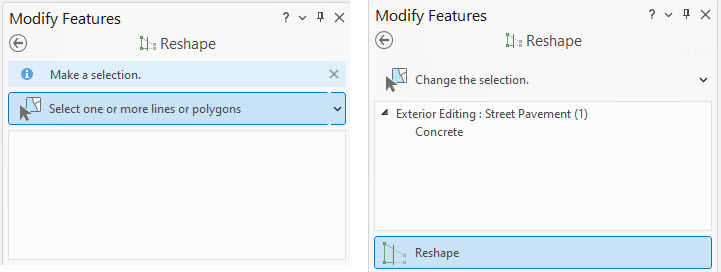
Select features for Reshape
Reshape includes an Active Select tool that facilitates the interactive selection of features that satisfy the tool’s input criteria. When the Reshape pane opens, if there is a valid selection, the Reshape tool will be active. But, if there is not a valid selection when the pane opens, the Active Select tool will be active. Select the features in the map with the Active Select tool to automatically activate the Reshape tool. Then, mid-sketch, switch to the Active Select tool to add more features to the selection set for reshape (if you switch to the core Selection tool on the ribbon tab, the reshaping sketch will be discarded).
For more information on the Selection Filtering experience, see How the Editing Tool’s Selection Filtering experience streamlines user workflows and refer to the Select features for editing help topic.
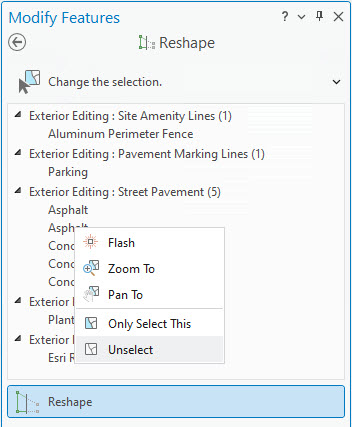
Add and remove from selection set
Before or during sketching, you can add or remove features from the selection set with the Reshape tool active. To add a feature, press Shift while clicking to add it to the selection. To remove a feature, press Ctrl while clicking or right-click the feature identifier in the tool pane and choose Unselect. The Shift and Ctrl keys act like temporary overrides and when released, the sketch is resumed. For more information on shortcuts specific to editing in ArcGIS Pro, see the Keyboard shortcuts for editing help topic.
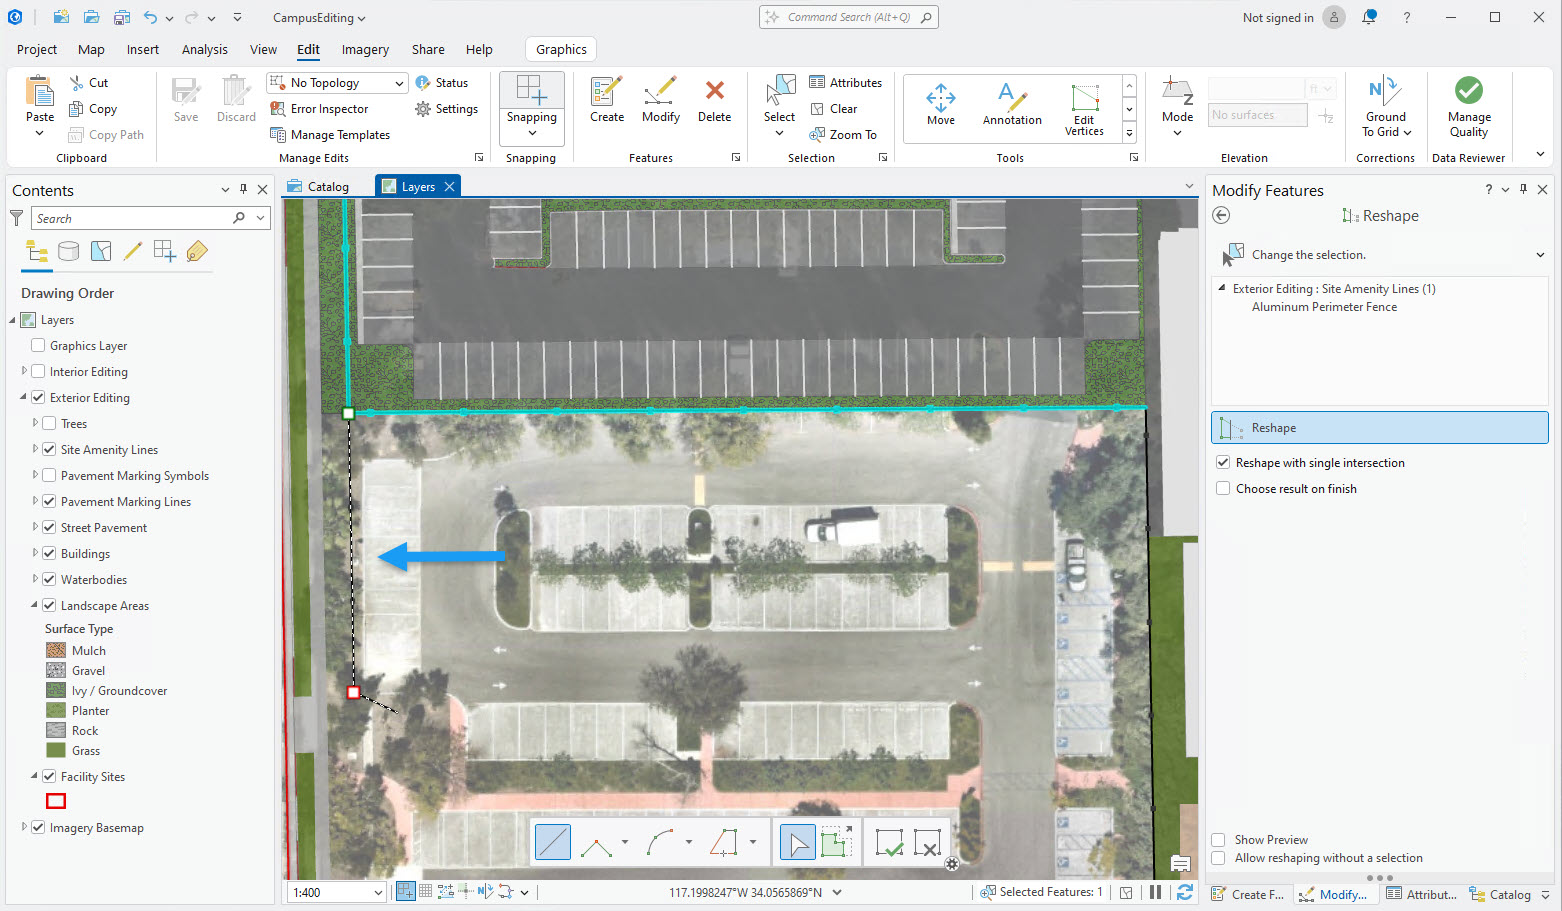
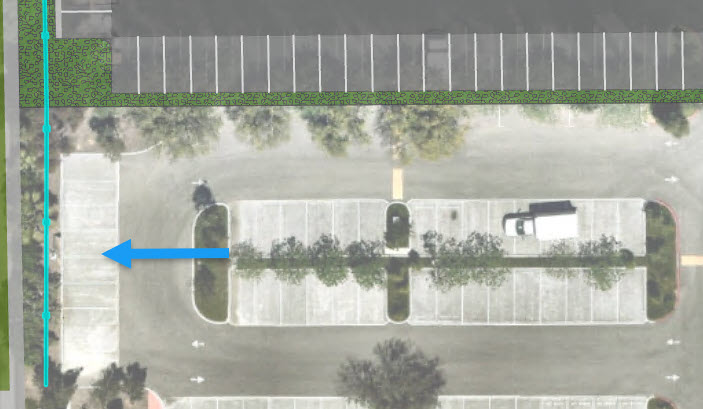
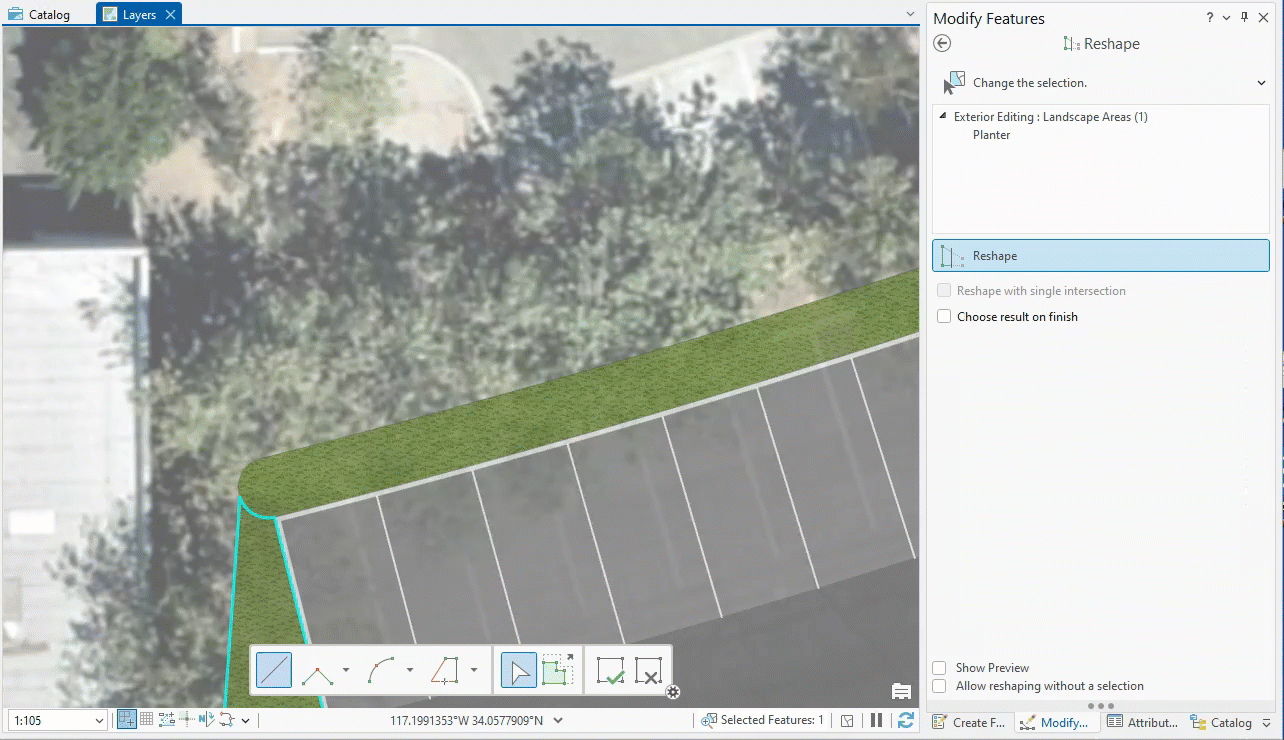
Reshape with single intersection option
When a single line is selected, you can choose the Reshape with single intersection option. This option allows an exception to the default requirement that the reshaping sketch intersects the selected feature at least twice.
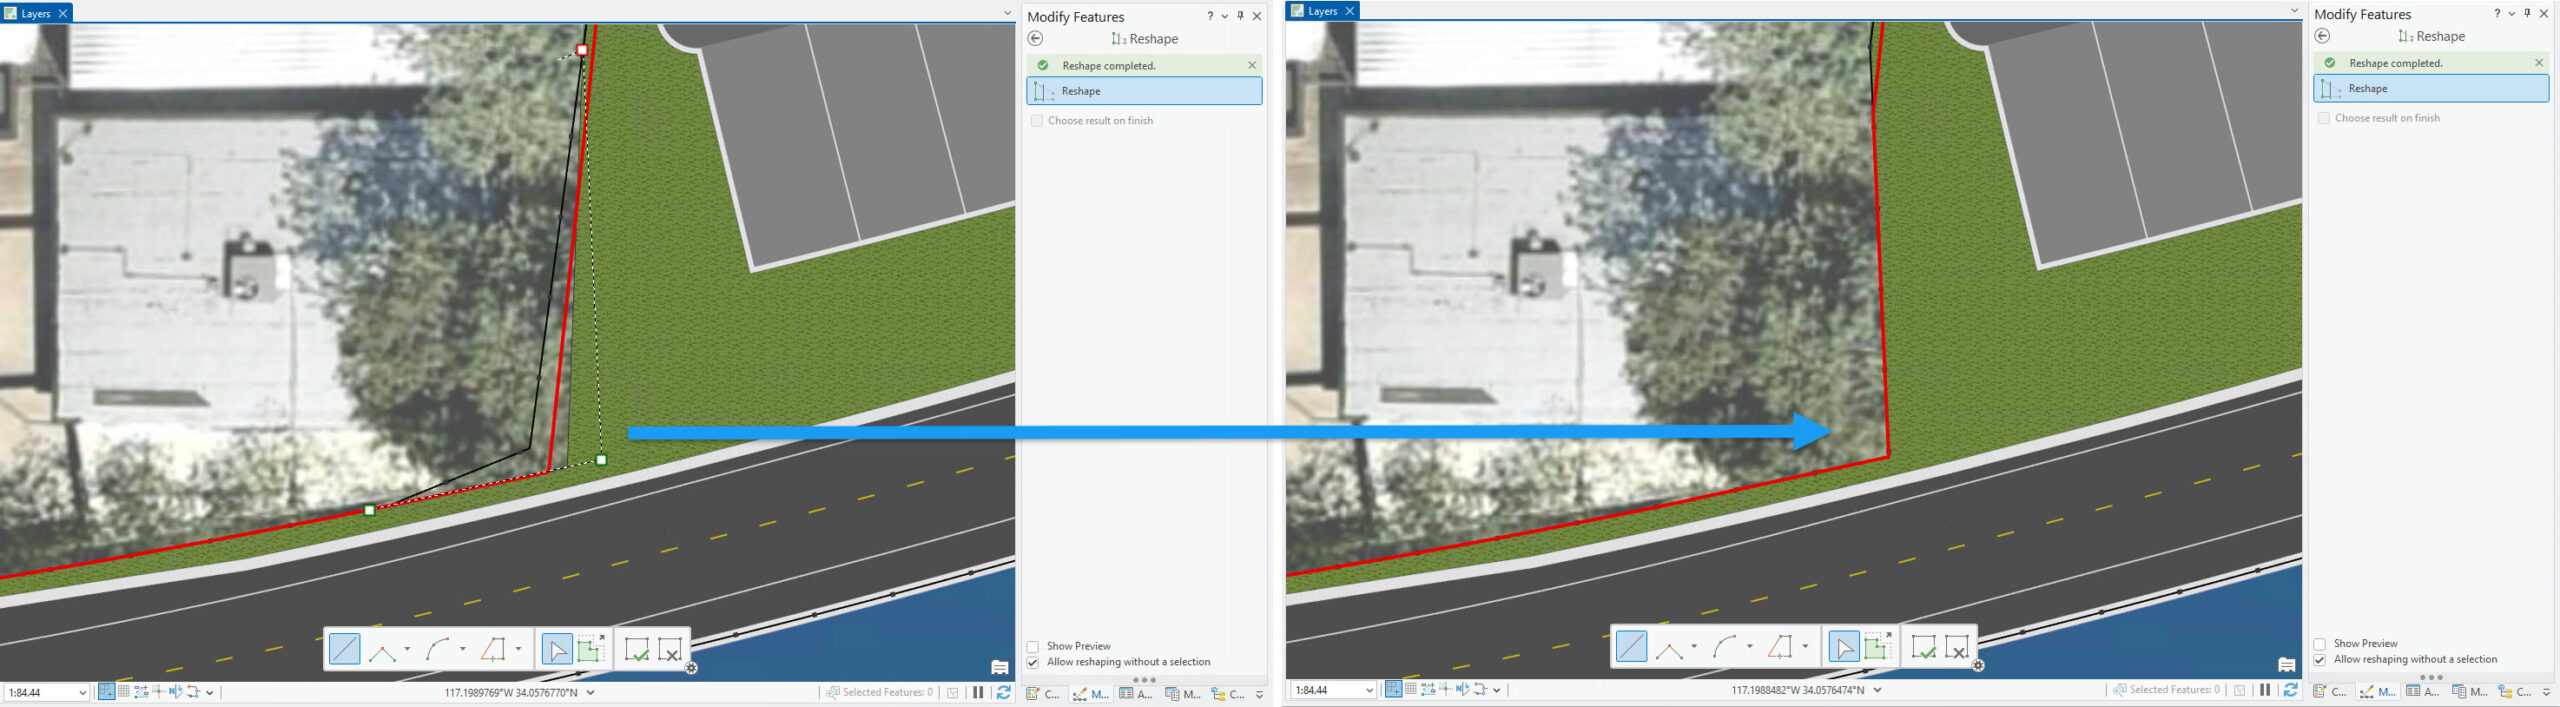
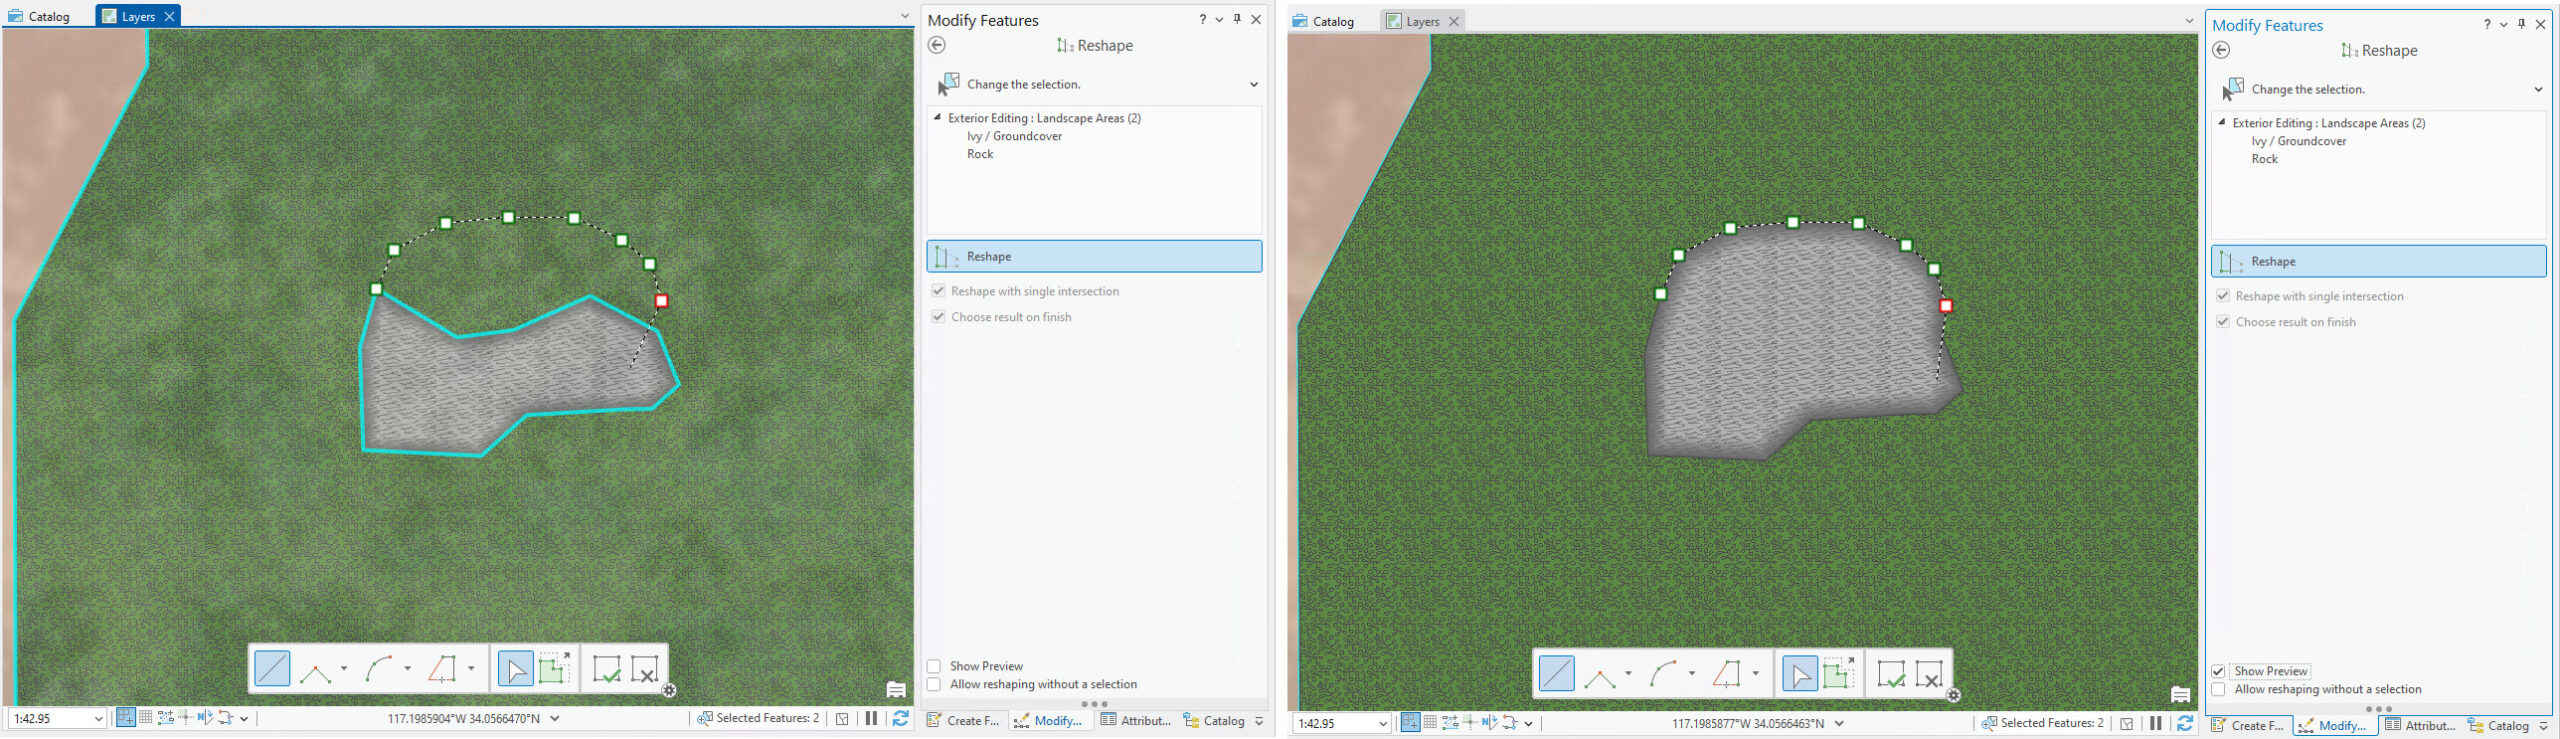
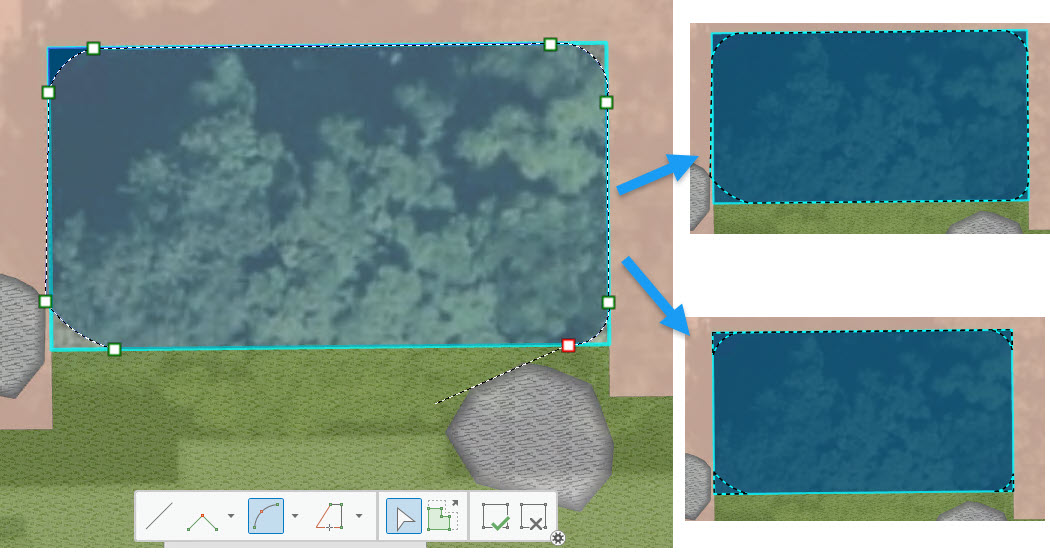
Choose result on finish option
When either a single line or polygon is selected, you can enable the Choose result on finish option. This option allows you to choose the correct reshape result after applying the sketch and before committing the edit. When the sketch is applied, the result options are shown with a black dashed boundary. Move the pointer between the possible results and click to pick the correct result and finish the edit.
Show preview option
The Show Preview option is new at ArcGIS Pro 3.5 and allows you to preview likely results by showing feature symbology on the reshaping sketch. Show Preview is available with or without a selection. Previewing the results can assist in making accurate, detailed edits. Be aware that it is a preview of the anticipated results based on the current state of the reshaping sketch and may not have all the reshape information. With Show Preview on, consider if the in-progress sketch is valid when making decisions. Sometimes moving the pointer across the features will provide enough information about the result without having to place a vertex, but the vertex will need to be placed before the edit can succeed.
The Show Preview option can be used in conjunction with the Choose result on finish and Reshape with single intersection options.
Show feature symbology editing option
The Show feature symbology application editing option may be needed to preview sketches that cross a feature multiple times. Without the Show feature symbology option enabled, only the first reshaping sketch segment may show a preview. With the option enabled, additional reshaping sketch segments may show feature symbology.
Reshape fails to update any features
If Reshape errors due to an invalid reshaping sketch, the reshaping sketch persists and a failure notification is shown in the pane. To resume the reshaping sketch, sketch in the map, making the necessary updates, for example: continue the sketch, reverse direction and continue, and move vertices. If the reshaping sketch is valid but the selected feature was incorrect, use the Active Select tool to change the selection and choose Finish on the Editing toolbar. Alternatively, choose Allow reshaping without a selection and choose Finish on the Editing Toolbar to let the system find the features to update. To discard the failed reshaping sketch, click Cancel on the Editing toolbar.
Reshape Edges tab
Reshape Edges tab is another option to maintain feature connectivity. Reshape Edges tab is available when Map Topology or Geodatabase Topology is enabled. To learn more, see the Topological editing enhancements in ArcGIS Pro blog article describing ArcGIS Pro 3.4 enhancements and refer to the Edit topological edges help topic.
Additional sketch functionality when using Reshape
The reshaping sketch has access to additional capabilities that help to improve data editing accuracy and efficiency. This additional functionality expands what you can accomplish when using Reshape tool. These include:
- Editing toolbar offers options to change the reshaping sketch constructor, turn on or off mid-sketch vertex editing, stretch the sketch proportionately, and Finish or Cancel the sketch.
- The sketch context menu commands can be accessed when you right-click anywhere on the map while sketching. For example, Replace Sketch updates your reshaping sketch with an existing geometry with a single click.
- Vertex editing context menu commands are available if Vertex Editing is enabled and you right-click on the sketch segment or a vertex.
- Drawing guides such as Snapping, Reference Grid, On-screen constraints, Inference, and Vertices and Nodes are located at the bottom left corner of the map. Introducing editing with Inference in ArcGIS Pro blog article goes into more details about Inference. The following example illustrates how combining Snapping, Reference Grid, and Inference can help you reshape your feature accurately.
Alternatives to the Reshape tool
Despite the range of capabilities provided by the Reshape tool, it is one of many tools in the editor tools gallery and may not be the best tool for the current edit. Other tools for reshaping features include: Replace Geometry, Continue Feature and Align Features. These tools have access to the same sketch functionality, such as context menus and drawing guides, as the Reshape tool as they involve sketching.
- Replace Geometry – Consider this tool when editing much of a single feature’s geometry and need to preserve the attribution of the existing feature. Replace Geometry can be used to update point features as well as lines and polygons.
- Continue Feature – With a single line or polygon feature selected, Continue Feature resumes feature sketching mode so you can add segments or access the context menu. This tool can be handy when creating multipart features (including doughnut) by completing parts using the F4 key or Finish Part context menu command and proceeding to create additional parts.
- Align Features – This tool can be used to reshape multiple polygon, polyline and point features by moving and aligning them to a defined sketched path within a set tolerance. Like Reshape, Align Features has an option to make edits without making a selection.
Summary
The Reshape tool offers advanced editing possibilities and can combine with other editing functionality to enhance editing accuracy and efficiency. Reshape supports editing with or without a selection set. With the Reshape with single intersection option checked, the reshaping sketch must intersect the polyline feature once. When reshaping a feature and choosing which part to preserve, ensure that Choose result on finish is checked; otherwise, the tool will automatically use the larger part to complete the reshape. A recent enhancement provides a preview of what the edited features will look like. Consider Replace Geometry, Continue Feature, or Align Features for other editing operations to complement or as alternatives to the Reshape tool.


Article Discussion: