A common problem users face when sharing packages is that their script tools have dependencies on packages that are not in the default ArcGIS Pro Python distribution (arcgispro-py3). As a result, the script tool may not work in the receiver’s Python environment, making it challenging to share the script tool with coworkers, clients, or the broader community. If you intend to share your script tool with others, you should consider if it will work in the receivers’ Python environment.
This blog series offers a solution: package the scripts and tools as a geoprocessing module, and distribute with Anaconda. Conda will solve the dependencies of the package when it is installed into a user’s environment.
This blog is part two of a two-part series. The first blog article Sharing is caring explains how to create a geoprocessing module and its advantages. In this blog article, you will learn how to use conda to distribute Python packages to the public.
Conda
Conda is a command-line program that comes pre-installed with ArcGIS Pro. Conda is a package and environment management system that can install Python packages into your Python environment. The packages are distributed through channels (a URL where the conda package is kept and downloaded from), usually hosted on Anaconda’s Cloud repository. Conda also checks package dependencies and verifies that all requirements of all installed packages are met.
Now, you will learn how to use conda to distribute the geoprocessing module parcel that you built in the Sharing is Caring blog article.

TUTORIAL 1: Set up the build environment
Estimated time to complete: 5 minutes
This part of the tutorial requires you to install the packages conda-build and anaconda-client.
? Note: The environment into which these packages are installed should be separate and can be re-used to build conda packages and distribute with Anaconda.
Complete the following steps to downloading conda-build and conda-client using a separate stand-alone environment:
1. Open the Python Command Prompt.
2. Create a stand-alone environment and place it in a well-known location with a short path, such as C:\envs\build-distribute using the following command:
? Note: Replace <X.Y.Z> with the version of Python used in the release of ArcGIS Pro targeted by the package (for example, 3.9.18 for ArcGIS Pro 3.2). You can find the Python version for recent releases of ArcGIS Pro in the Available Python libraries documentation. Use the Other versions drop-down menu to see the package set for other recent releases of ArcGIS Pro.
3. Run activate C:\envs\build-distribute to activate the environment.
4. Optionally, run conda update --all to make sure everything is up to date with the latest bug fixes and features.
The active environment build-distribute is now ready to be used to build packages. You can get back to this environment in the future by starting the Python Command Prompt from the ArcGIS Pro Windows program group and running activate C:\envs\build-distribute. Use this environment for the Distribute with conda section below.
5. Run the following and make sure they give a meaningful result from the command prompt:
a. Run conda-build -V. The result should look like this:
conda-build 3.27.0
b. Run anaconda -V. The result should look like this:
anaconda Command line client (version 1.12.0)
TUTORIAL 2: Prepare, build, host, and install
Estimated time to complete: 20 minutes
Distribute with conda
Before moving forward, complete Tutorial 1 above and ensure that all the packages you will need for building and distributing with conda are installed in the environment you will be using to build and upload packages.
Prepare the basic package for distributing with conda
Complete the following steps to prepare the package:
1. Recreate the basic folder structure as follows:
postoffice
├──mailbox
│   ├  setup.py
│   ├  readme.md
│   └──parcel
└──recipe
    └  meta.yaml
? Note: The mailbox directory containing the parcel geoprocessing module (Python package) was created in Part 1 of this blog series. In the steps below, you will create setup.py, readme.md, and meta.yaml files.
2. Create setup.py and readme.md and place these files in the mailbox folder:
? Note: It is good practice to use semantic versioning. In setup.py, change the value of the version key (version=<X.Y.Z>) with the version of your package. For example, 1.0.0 may be appropriate if this is going to be your first full release of the package. A lower version such as 0.1.0 may be appropriate if this is a pre-release version. Increment the release version if this is a major update or patch. Read more about semantic versioning at Semantic Versioning 2.0.0.
? Note: Replace python_requires <X.Y.Z> with the version of Python used in the release of ArcGIS Pro targeted by your package (for example, 3.9.18 for ArcGIS Pro 3.2).
The setup.py script sets several properties and directs the build utility to the package directory. The long description is stored in an accompanying readme.md file.
The setup.py and readme.md files should be located in the mailbox directory. For more information on using setup(), see Packaging and distributing projects.
3. Create the meta.yaml file and place it in the recipe folder.
The meta.yaml file contains all the metadata for the build recipe. If the geoprocessing module has dependencies for additional packages, you can specify them under the run: group on the meta.yaml. See the following example:
run:
  - python {{ python_requires }}
  - arcgispro >=3.0
  - scikit-learn
This is how you can ensure that the package will work in the receiver’s Python environment. When conda installs the package, it will check the list of dependencies you specified and solve for these dependencies in the receiver’s Python environment. For more information on meta.yaml properties, see Defining metadata (meta.yaml).
Build the package
Complete the following steps to build the package:
1. If it is not already open, open the Python Command Prompt and activate the build-distribute environment.
2. Change your directory to the postoffice directory:
cd <your/path/to/postoffice>
? Note: Replace with your actual path.
3. Run conda build recipe -c esri.
? Note: The arcgispro package dependency is only available on the esri channel. The esri channel needs to be specified because otherwise conda only checks the default channel. Type conda info to see a list of channel URLs.
? Note: Check the final output to make sure the build was successful.
4. Note down the path to the parcel-1.0-py39_0.tar.bz2 file.
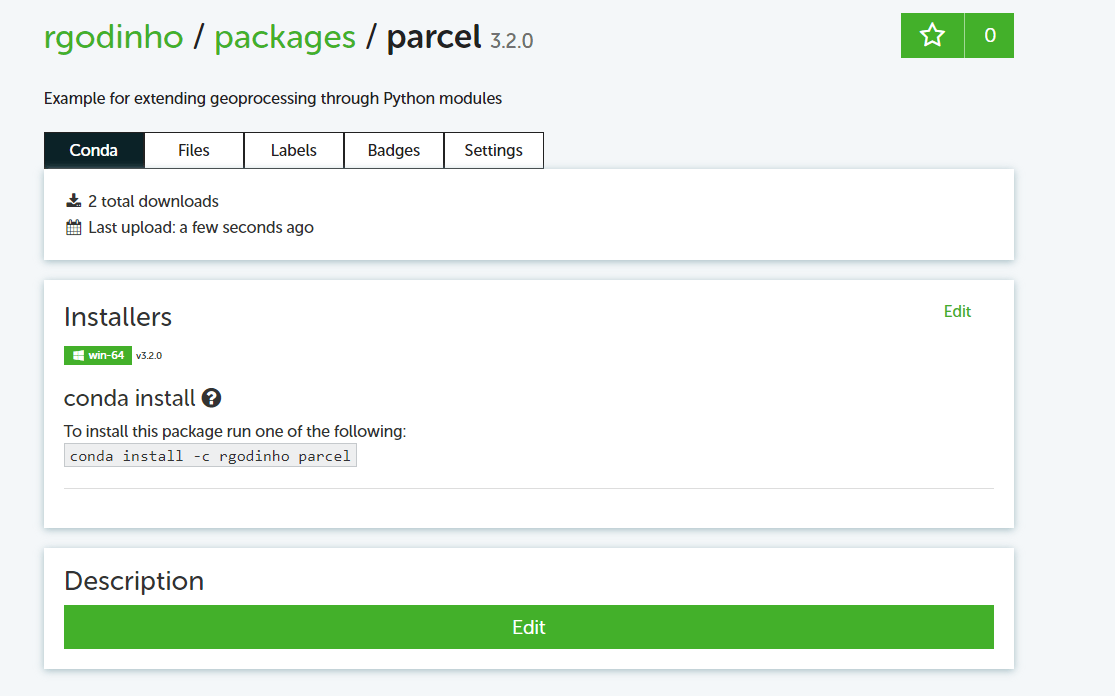
Host with Anaconda.org to share publicly
1. If you don’t have an Anaconda account, create an account with anaconda.org.
2. From the Anaconda Prompt, run anaconda login:
? Note: Log in using your anaconda.org credentials.
3. Run anaconda upload C:\{your\path\to\parcel}.tar.bz2.
? Note: Replace <your\path\to\parcel> with your own path noted from conda build.
? Note: Check the output to make sure upload was successful. The output contains the location of the package on Anaconda Cloud.
Install
Before starting the next sections, open a new Python Command Prompt and activate the environment you want to install the parcel package into. You cannot reuse the command prompt instance from the steps in the Distribute with conda section. That command prompt session should only be used to build and upload the distribution.
Install the hosted distribution from Anaconda using conda
Complete the following steps to install the hosted distribution:
1. Open the Python Command Prompt and make sure the conda environment that you want to install the site-package into is active.
Do not install packages into the default Python environment for ArcGIS Pro, called arcgisprop-py3. If you do not already have a clone of arcgispro-py3, you can create a clone and then activate the cloned environment using these commands on the Python Command Prompt:
conda create --clone arcgispro-py3 --name <new_environment_name> --pinned
conda activate <new_environment_name>
2. With a cloned environment active, run conda install parcel -c <your_channel>.
? Note: Replace <your_channel> with your channel name (in my case, it is rgodinho).
Now you have installed the parcel package into the currently activated conda environment. The package can now be managed using standard conda commands such as conda uninstall parcel or conda update parcel.
Use the installed custom package
To use the package in ArcGIS Pro, the Python environment where the custom package was installed must be activated in ArcGIS Pro. You can use the Python Command Prompt and run proswap <name_of_clone> to swap to your clone. proswap changes the environment of the command prompt and ArcGIS Pro (it will change next time you reopen ArcGIS Pro). Alternatively, you can change the active environment from the Package Manager in ArcGIS Pro.
Now that you have the parcel package installed and the environment is active, you can import the parcel package and run code from the envelope module. For example, try running parcel.envelope.letter() after importing parcel.
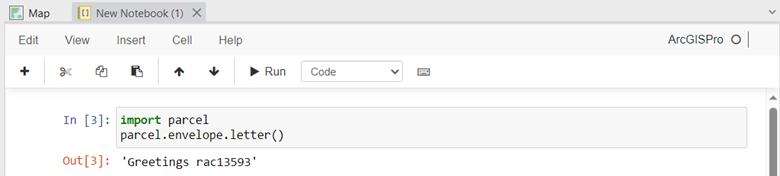
In ArcGIS Pro, the geoprocessing module’s toolboxes will behave like system toolboxes. You can now search for the Read Your Letter tool in the Geoprocessing pane, and see it on the Toolboxes tab.

 on Python window on ArcGIS Pro.")
Conclusion
In this blog, you learned to distribute geoprocessing modules using Anaconda. Because you have used conda, the dependencies of the package will be solved when it is installed into your colleagues’ or clients’ environments. This removes the need to provide coworkers and clients with complicated instructions for installing package dependencies into cloned environments. Instead, use conda install <your_geoprocessing_module > and conda will take care of the rest. Now you can share your hard work ? ?.
To learn more about building and distributing Python packages with conda, see the following additional resources:


I get this error when running:
Here is the shortened version. I created a github issue here.