Esri’s Sign Management solution provides capabilities for government and transportation agencies to modernize their traffic sign collection, streamline maintenance and inspection activities, and understand asset conditions over time. For many users, a big draw of this solution is the support for over 700 MUTCD sign codes. Of these 700 codes, over 150 have preconfigured symbology and default attributes, making data collection and management of signs even more streamlined. The symbols for these codes come from Esri’s Transportation Style, which contains a set of 2D symbols designed to work well for the transportation industry.
Users frequently request the ability to configure a set of additional common signs with unique symbols for either additional MUTCD or locally defined sign codes, such as a state’s own MUTCD or a supplement to the national MUTCD. This blog includes detailed steps for adding unique symbols that represent the additional signs your organization is responsible for maintaining.

Find icons for symbols
First, you will find icons for the symbols you want to create. Many common state and local roadway sign icons are available in Scalable Vector Graphics (SVG) format for free use on Wikimedia Commons. Some organizations might also develop SVG icons for their common signage in-house. Some organizations might also develop SVG icons in-house for their common signage. These SVG icons can be used as-is or further modified using a vector graphics editor application, such as Adobe Illustrator, Affinity Designer, or Inkscape.
For my customization, I downloaded the Colorado State Highway Router Marker SVG icon from Wikimedia Commons and used a free SVG editor website to remove the route number. This generalized version will be my starting point for creating a custom map symbol.

Create a new web style in ArcGIS Pro
Once you have icons for all the symbols you want to create, the next step is to import them into a style in ArcGIS Pro. You can choose to create a brand new style directly in ArcGIS Pro, but if you also want to incorporate the default SVG sign symbols used in the Sign Management web maps, you can download the Esri Transportation style and import it into ArcGIS Pro. You can then create new symbols within the style, using the SVG icons to generate a vector symbol.
I imported the Esri Transportation style into the Sign Data Management Pro Project, and added a new symbol for the Colorado State Highway route marker using the SVG icon as the source file.

Share as a web style
After you’ve created all the symbols within the style in ArcGIS Pro, you can share the style to your ArcGIS Online or ArcGIS Enterprise portal. To publish a web style from an ArcGIS Pro style file, right-click the style and click on Share As Web Style.

In the Share pane, add your title, summary, and tags for the web style, and make sure the style type is set to 2D. Then, update Share with to share the style with the group that will make the web style available for use in Map Viewer and other applications.
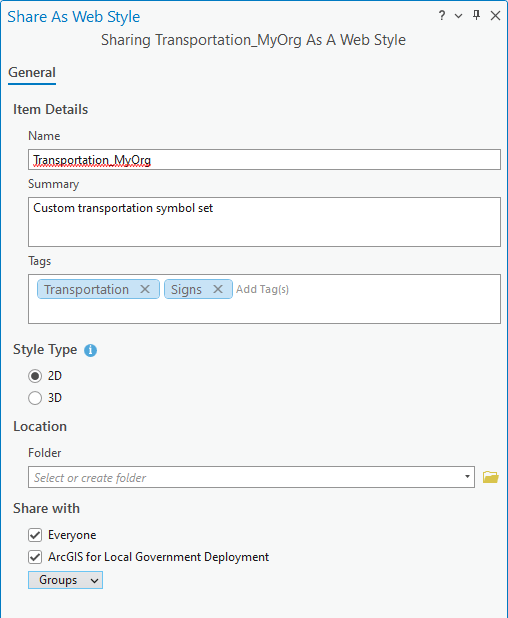
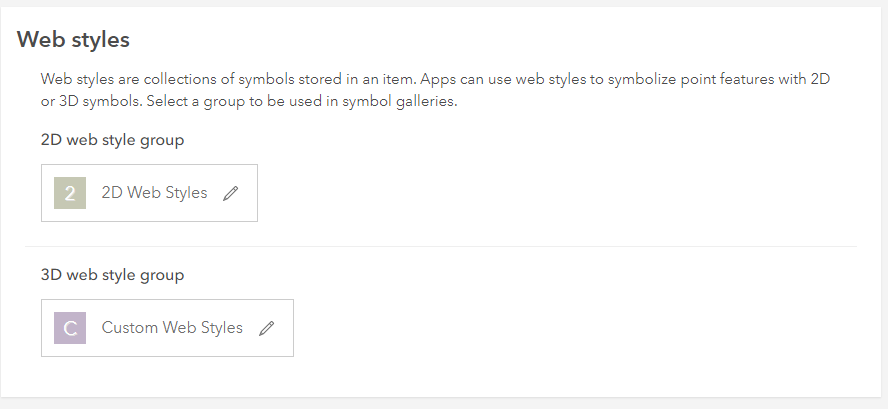
If a group hasn’t been configured, an organization’s administrator will need to create it and designate it as the organization’s 2D web style group in the map settings.
Before sharing the web style to your portal, be sure to analyze the style in ArcGIS Pro and review any warnings or errors. Once the web style is published and shared to the group configured to store 2D web styles, Map Viewer will show them as options when point layers are being styled.
Update feature templates
Now that the web style is published, you can switch to your ArcGIS Online or ArcGIS Enterprise portal to configure the maps used in the Sign Management solution. The solution uses feature templates and unique symbology to simplify the collection and visualization of commonly used signs. Your organization may want to configure its set of common signs by adding additional feature templates and updating unique symbols for either additional MUTCD or organization-specific sign codes.
Feature templates are used to define and simplify data collection for common signs by preconfiguring attributes. These templates are stored in the TrafficControlDevices feature layer and managed in Field Maps Designer. Open the Sign Editor map in Field Maps Designer. Click Forms to access the Signs layer, then click Templates.

A list of sign feature templates appears. You can reorder the template’s position in the list, set the template’s properties, or remove the template. By default, each sign feature type in the Sign Management solution has one template that predefines the sign’s attributes. When accessing the templates, you might see a message that says “We accidentally left some of your fields behind”. This message appears when fields have not been given a default value. To continue setting default values on templates, click Add fields.
To create a new feature template, hover over the All Other Signs template and click Duplicate. A new feature template called Copy of All Other Signs is created. Click it and the template’s Properties panel appears on the right. For the Display name and Description properties, type the name of the sign type and its MUTCD Code. In the Default Values section, you can set predefined sign attributes for the template, such as type, MUTCD code, color, and dimensions. Optionally, drag the template to a new location to reorder the list of templates. Repeat these steps for each new sign template, and click Save once all templates have been created.

The feature templates will now be available to simplify data collection in apps such as the Sign Editor Field Map.
Update 2D symbology
Next, you will add the newly created symbols from the web style that you published to the web maps used in the Sign Management solution. Start by opening the TrafficControlDevices feature layer in Map Viewer. Select the Signs layer to open its properties. On the Settings (light) toolbar, click Styles. In the Pick a style section, select Style options. In the Style panel, scroll down to the Sign layer’s Other section. At the bottom of the Other section, a note indicates that there are more than 200 unique values and that values not listed still display on the map in this category. To ensure that the sign you want to symbolize is visible in the Other section, first use the sign in a record in the Signs feature layer.
For the sign code you want to uniquely symbolize, click the checkbox and select Move to group. Click Untitled Group and the value will be moved into the group and given a basic default symbol. From here, you can update the symbol using the new web style you published in the previous steps. The web style will be available to use in Map Viewer when setting the symbol style for a particular sign.
For my map, I’ve browsed to the web style I published to my portal earlier and selected the Colorado route marker symbol I created from the source SVG file, as shown in the following graphic:

Once you’ve set the symbol styles for all the new signs, click the overflow button for the Signs layer in the Map Viewer, and click Save.

Update 3D Symbology
The Sign Management solution uses an ArcGIS CityEngine rule package (*.rpk) to visualize signs in 3D. The rule package is configured with the same predefined set of common signs symbols as the 2D symbology. You can add signs to the 3D symbology by updating the rule package with PNG icons representing the additional signs.
First, download and unzip the Sign Data Management desktop application template folder, if necessary, and then browse to the Signs\assets\textures\signs folder. Add PNG icons for the additional signs in the folder, making sure the name of the PNG file matches the MUTCD code the new sign is associated with. For my project, I’ve added a PNG image for the Colorado Route Marker (M1-5a) to the signs folder on my local drive.

Next, open ArcGIS CityEngine and, from the File menu, click Import/Link Project Folder into Workspace. In the dialog box, select the Signs folder and click Finish.
In the Navigator window, expand the Signs/rules folder. If you’ve added any signs that aren’t rectangular in shape, double-click the Signs.cga rule to open the editor and scroll to the very end of the code that appears. Add additional cases for each sign under the constant sign_shape. The geometry for a sign’s shape is defined by a COLLADA (.dae) file and standard sign shape files are available in the Signs\assets\geometry folder. You can add custom shapes by placing the COLLADA files in this folder.
After you’ve made the necessary changes to the Signs.cga rule, right-click it in the Navigator window and select Share As. Select Save package to file, browse to the Signs folder, name the output Signs.rpk, and click Save. Check Include CGA source code and click Share.

When the packaging finishes, you can browse to the Sign Rule Package item in your ArcGIS organization and use the Signs.rpk file created in ArcGIS CityEngine to update the item.
Publish a 3D sign layer
The final step is to create or update the 3D scene layer from your Signs layer. The solution includes the 3D Sign Notebook that can be used to create and update a scene layer used to visualize traffic signs in 3D.
The first time the notebook runs, it publishes a new scene layer and updates the Sign Viewer (3D) web scene to point to the new scene layer. This scene layer represents a static snapshot of the assets stored in the TrafficControlDevices feature layer. As new signs are added, updated, or removed from the TrafficControlDevices feature layer, you will need to re-run the notebook to refresh scene layer.
Subsequent runs of the notebook will publish a temporary scene layer using the latest features in the TrafficControlDevices feature layer, update the source of the original scene layer to point to the new scene layer, and clean up the temporary scene layer.
To complete the following workflow, you must be assigned a role of Administrator or a custom role that includes the privilege to create, edit, and schedule ArcGIS Notebooks.
First, browse to the 3D Sign Notebook item and click Open Notebook. From the Kernel menu, click Restart & Run All, and then click Restart and Run All Cells.
As the notebook runs, messages beneath each cell indicate the run’s progress. When the run finishes, a message states that the scene layer update is complete. As new signs are collected over time, the notebook can also be scheduled to run at a regular interval to update the scene layer and reflect the latest changes.
To view the signs in 2D and 3D, open the Sign Viewer app. Sign Viewer is a configuration of ArcGIS Experience Builder used by internal staff to view and understand the sign collection. Users can switch between 2D and 3D views of the sign collection with a single click.

You’ve now created custom sign symbology in both 2D and 3D. For more detailed information on this entire workflow, please check out the following resources:
- ArcGIS Solutions help: Configure Sign Management
- Video tutorial: Creating Custom Map Symbols for ArcGIS Pro
- ArcGIS Blog: Use Published 2D Symbols in ArcGIS Online
- ArcGIS Pro help:
For more information about the Sign Management solution, check out the following resources:
- Learn how to deploy, configure, and use the solution.
- View a demo video.
- Learn more about ArcGIS Solutions.

Article Discussion: