In agriculture, crop scouting is the basic action of traveling through a crop field while making frequent stops for observations. This enables precise assessment of pest pressure and crop performance, ultimately allowing for the potential evaluation of economic risk from infestations and disease. Crop scouting enables pest and or disease control as a means of determining the right course of action.
Viticulture like other agriculture endeavors also requires careful monitoring, controlling pests and diseases, canopy management and monitoring fruit development. The ArcGIS suite of mobile technology provides various applications that use location to enable all phases of field work. Let’s look at how ArcGIS QuickCapture coupled with Survey123 can be used to scout grape vines in a vineyard.
To get started, first Download and install Survey123 Connect for ArcGIS. This desktop application is used to author and publish a survey form for vine scouting. Launch Survey123 Connect once installation is complete and Sign in using your ArcGIS Online or your ArcGIS Enterprise portal credentials.
Launching Survey123 connect will present you with options to begin the process of creating a new survey or editing existing ones. Chose to start a ‘New Survey’ form then select ‘Community’ in order to gain access to the host of sample community surveys . In the search window, type vineyard or scroll down till you find the ‘Vineyard Scouting’ form.
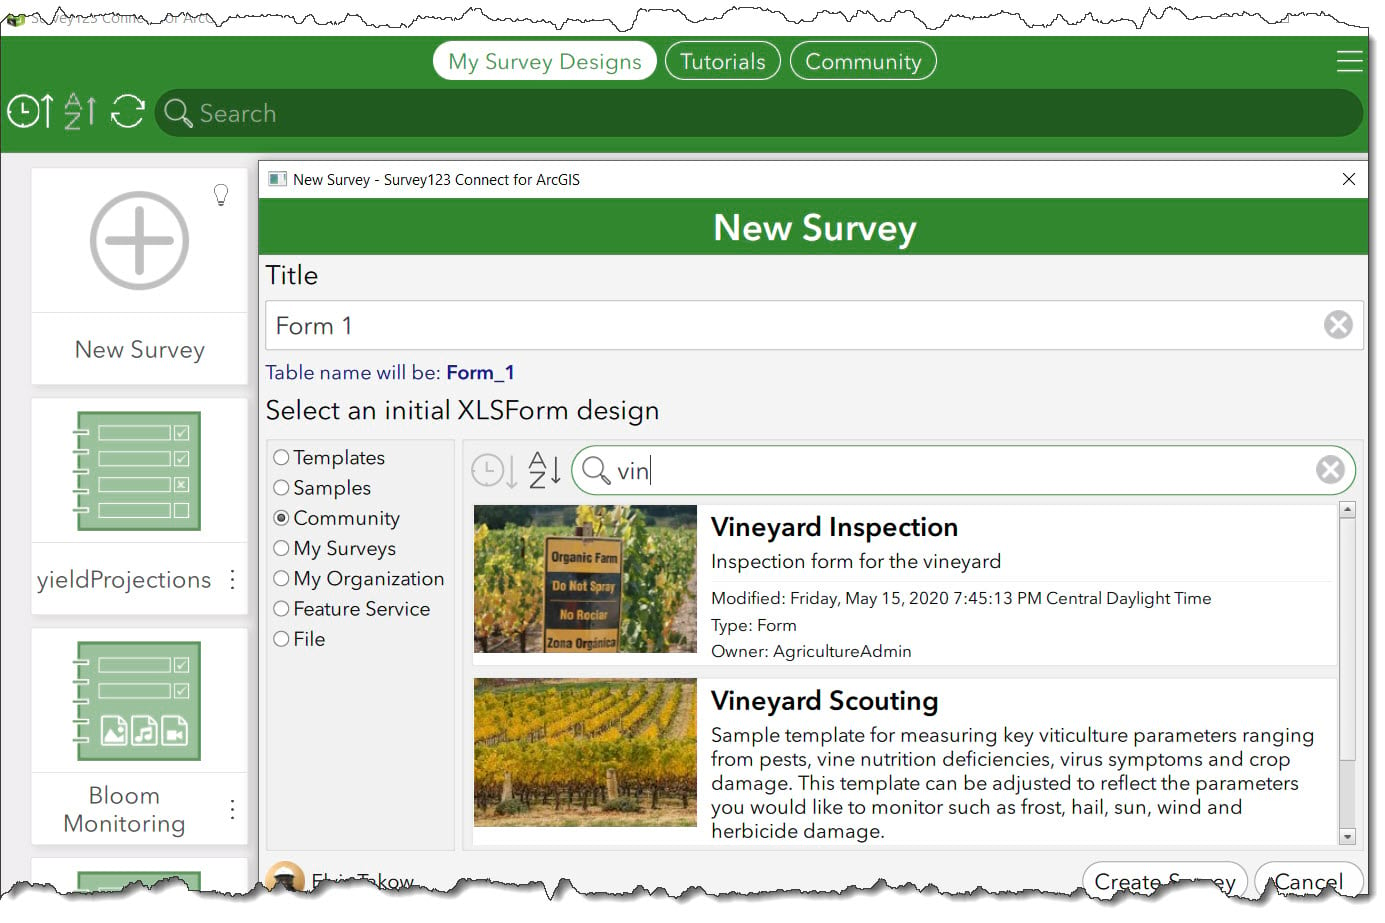
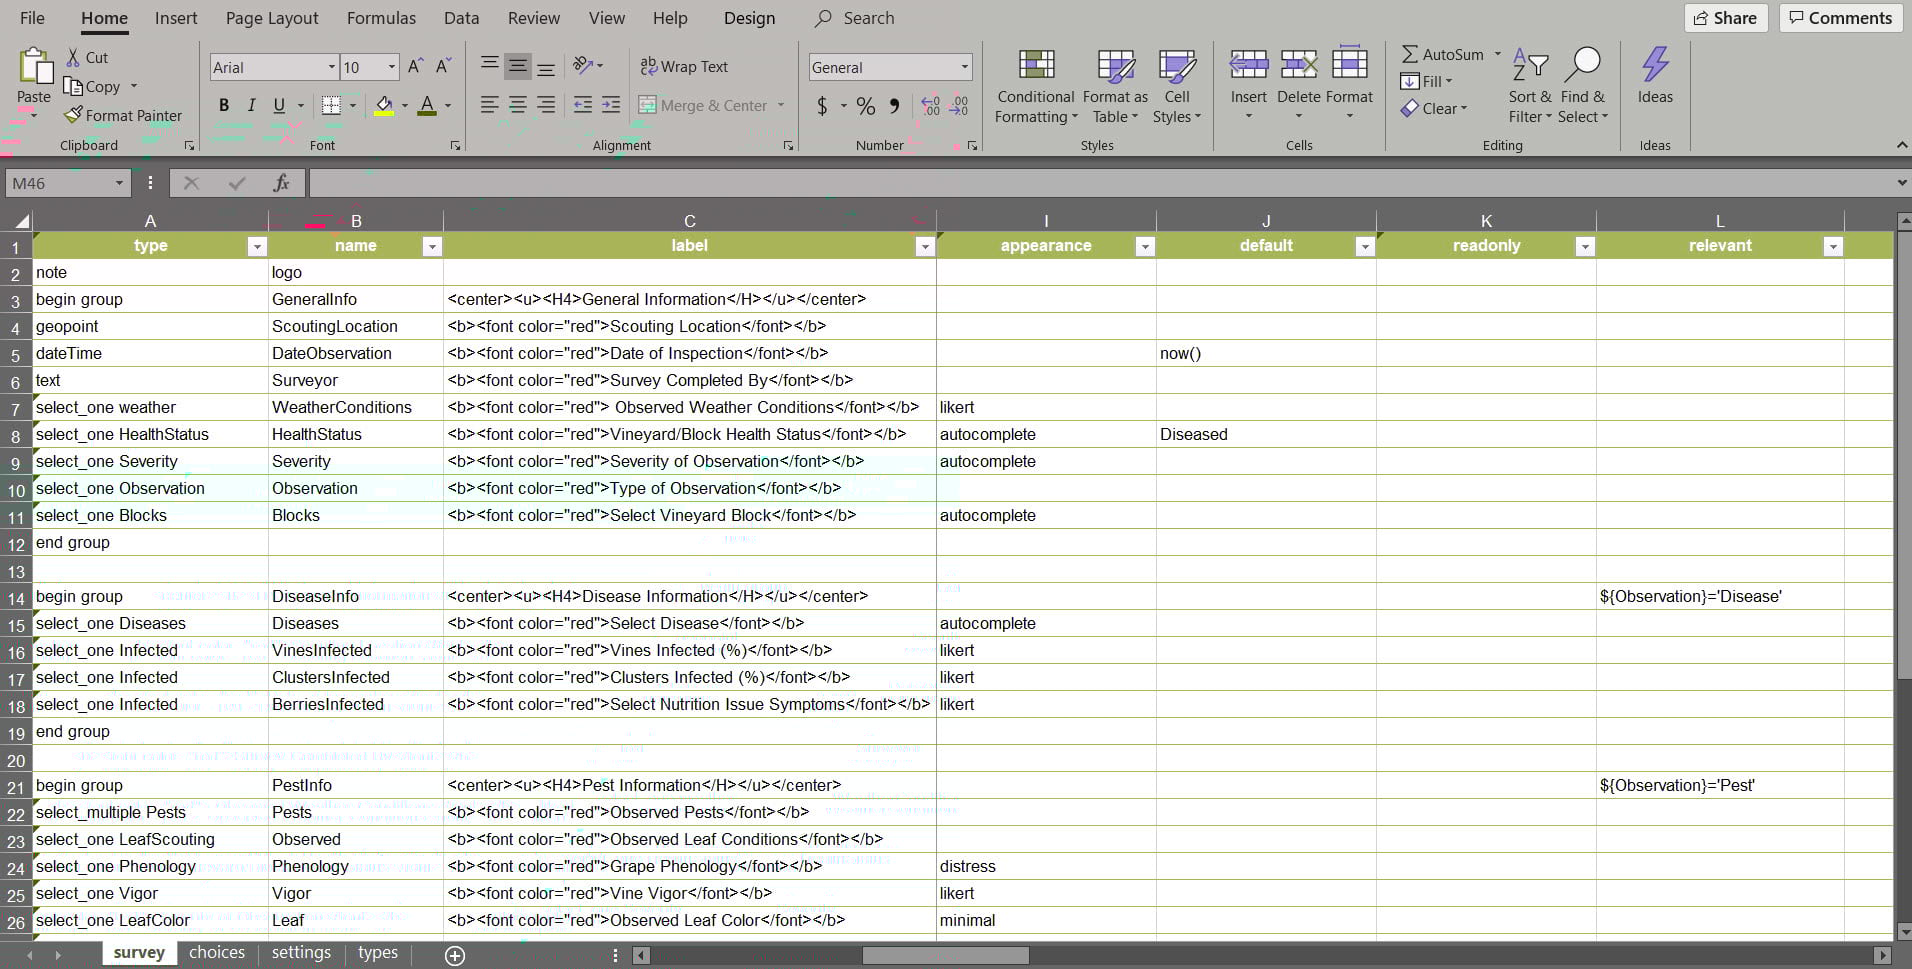
Select the ‘Vineyard Scouting’ form then specify a title and select the option to ‘Create Survey’. A new survey form is created locally and you now have access to the XLSForm. The form is already configured with questions that correspond to the fields in the newly created hosted feature layer.
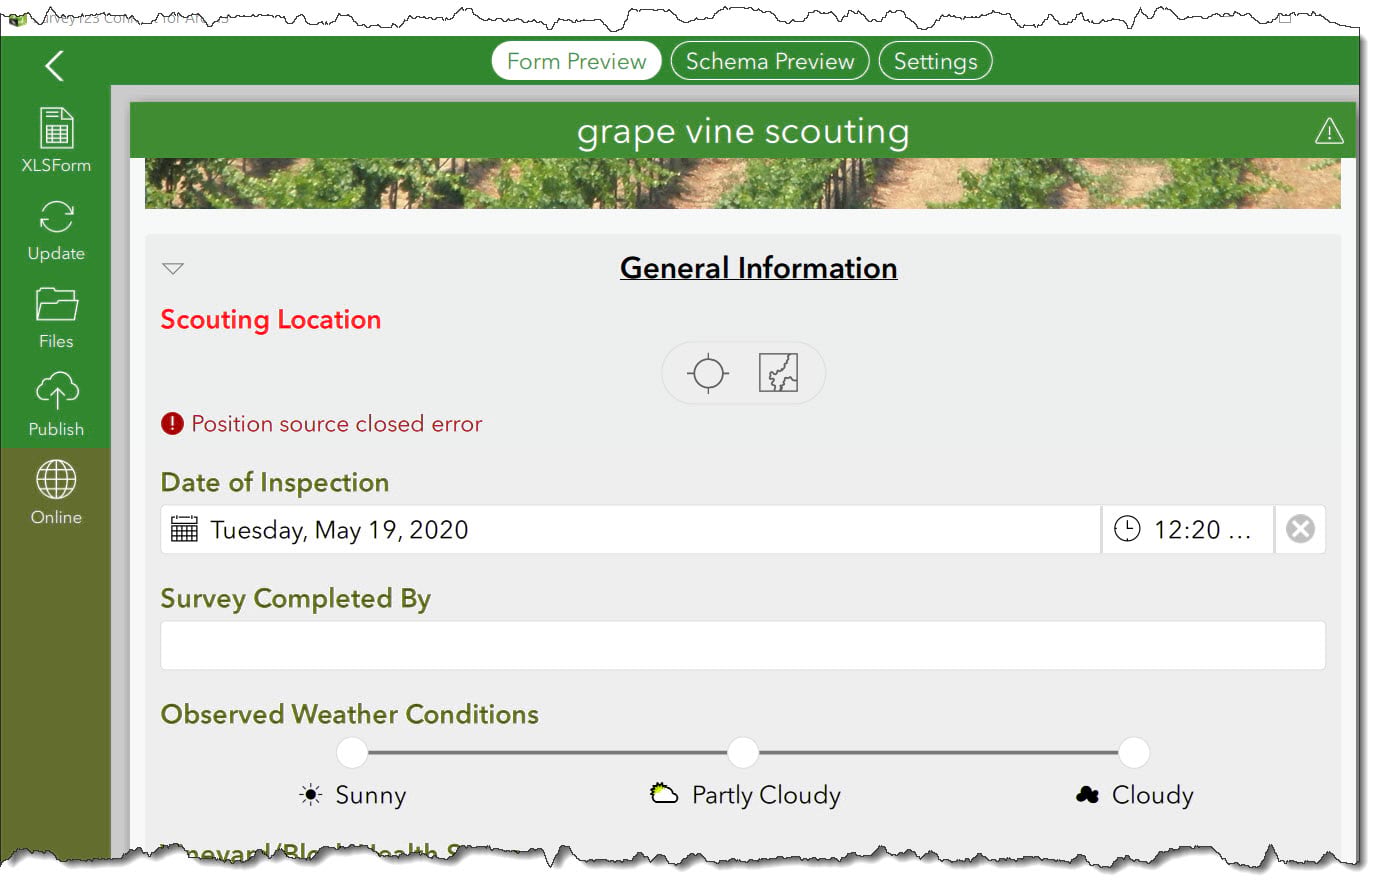
Additional settings can be configured to refine the appearance of the form while incorporating logic based on responses to questions. To learn more about authoring forms using Connect, see the following resource, Create Surveys.
Once the survey has been adjusted to your specifications and published, the new survey form item and hosted feature layer will be stored in a folder under your Content tab in either ArcGIS Online or your ArcGIS Enterprise portal. The folder will be named ‘Survey-the title of your survey’.
Now that we have our vine scouting form created the next steps involve creating a feature layer for use with ArcGIS QuickCapture. This is a ‘Big Button’ data collection application that enables the rapid collection of geo-referenced data with minimal user interaction.
The premise for vine scouting and the use of both ArcGIS QuickCapture and Survey123 is grounded in 3 fundamental tenets of mobile workflows in Agriculture. These include but are not limited to increasing efficiency, capturing data where it’s created and ultimately minimizing the use of paper based workflows. As such a vineyard manger tasked with assessing vine health can use QuickCapture to determine health status thereby facilitating the subsequent survey of diseased vines as established by the QuickCapture to the precise location of the vine in a vineyard block.
To get started we must first create a hosted feature layer view from the feature layer created in Survey123 Connect. This can be accomplished by undertaking the following steps:
Create a hosted feature layer view
- Sign into your organization (ArcGIS Online or ArcGIS Enterprise portal).
You must have privileges to create content, and you must be the owner of the hosted feature layer from which you want to create the view.
- Open Content >My Content and open the item details page for the hosted feature layer you created with Survey123 Connect. This will be used as the source for the view.
- Click Create View Layer on the Overview tab of the items details page .
- Type a unique title for the hosted feature layer view.
- Type tag terms separated by commas.
Tags are words or short phrases that describe your item and help people find your item when searching. Include QuickCapture as a tag for this view along with the term ‘vine scouting’
- Type a summary that describes the use and content of the view.
- If your organization has set up content categories, click Assign Category and select up to 20 categories to help people find your item. You can also use the Filter categories box to narrow down the list of categories.
- Choose the folder where the hosted feature layer view will be stored.
- Certain apps, such as Esri solutions layer templates, require specific layer IDs. If you need to use the view in one of those apps, preserve the layer IDs.
- Click OK to create the view.
- The hosted feature layer view’s item details page appears when the view is created. Now you can set the view definition and alter layer settings.
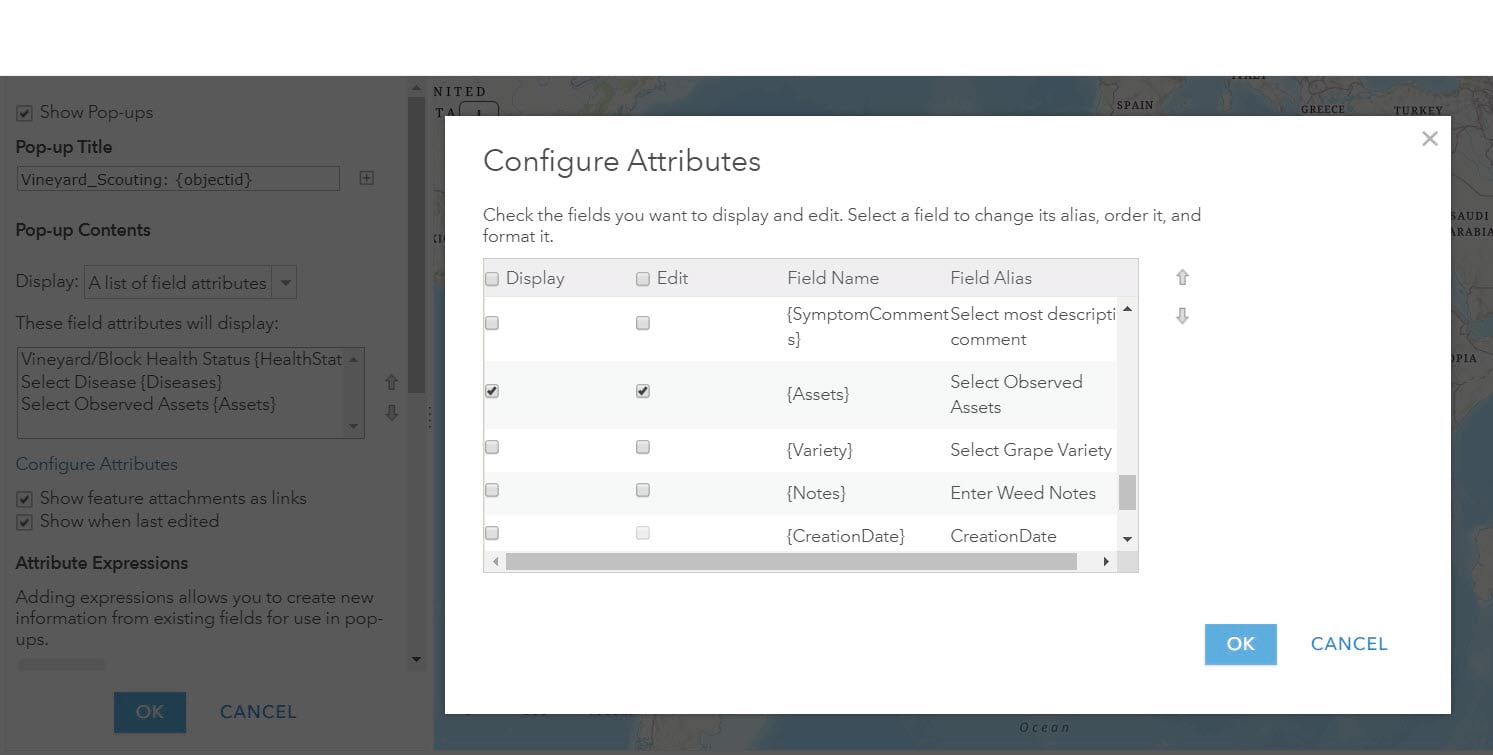
- From the item details page of the hosted feature layer view, click the ‘Visualization’ tab then choose the configure pop-up icon in the table of contents on the left.
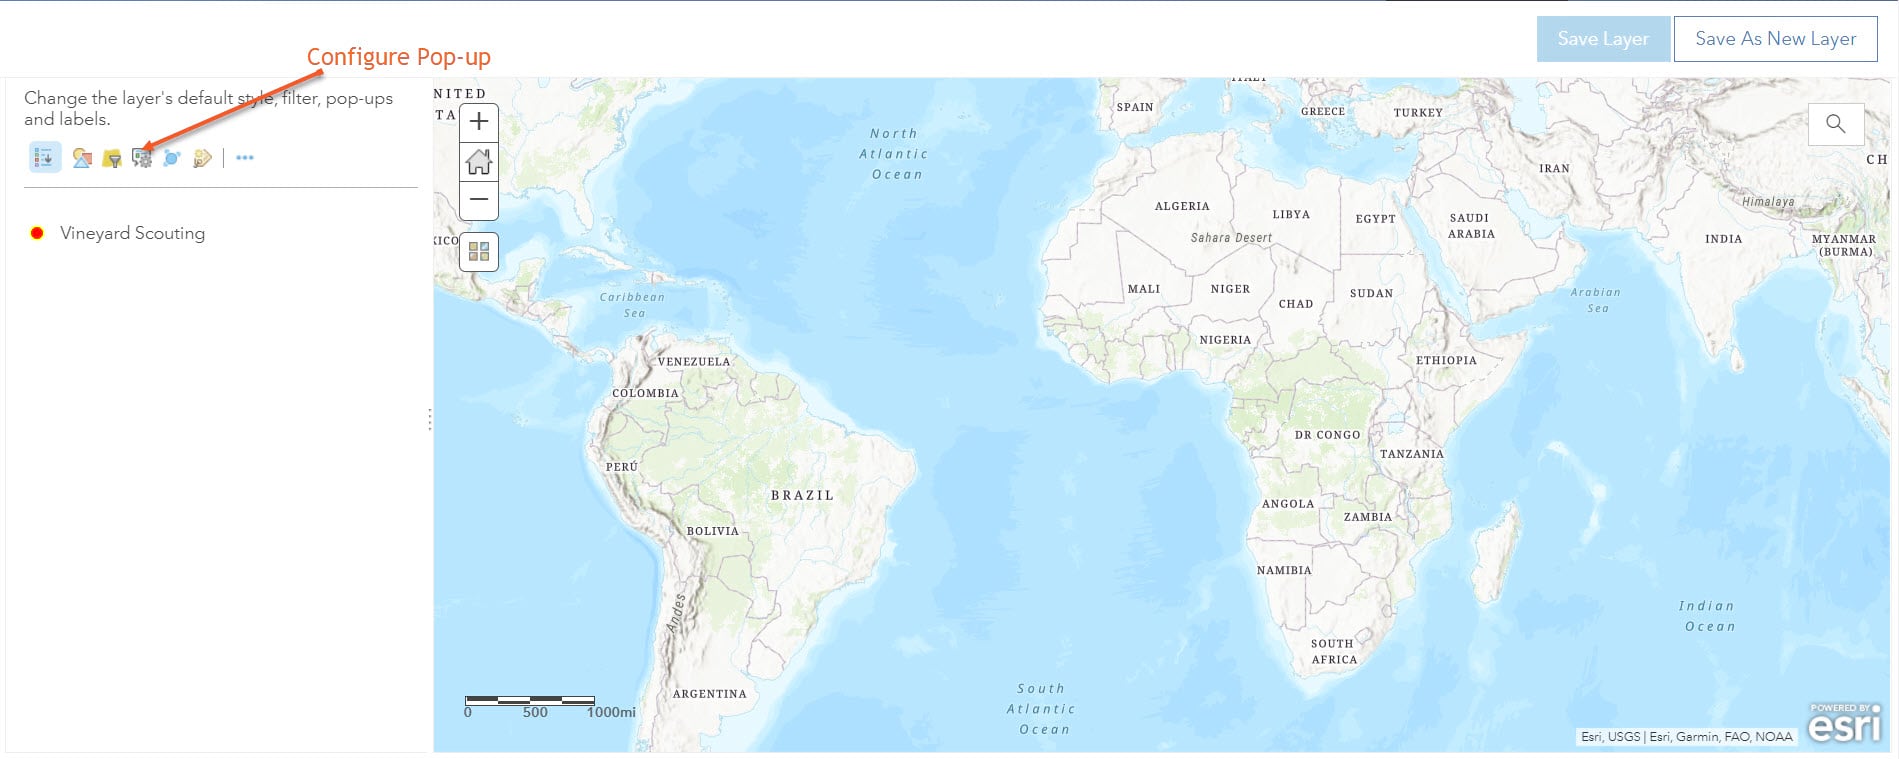
13. Select the option to Configure Attributes then proceed to turn on Display and Edit options for the following fields: HealthStatus, Diseases, and Assets. Check the fields you want to display and edit. Select a field to change its alias, order it, and format it.
The hosted feature layer view is now ready for use in the QuickCapture designer to create a vine scouting form.
Create a vine scouting QuickCapture project
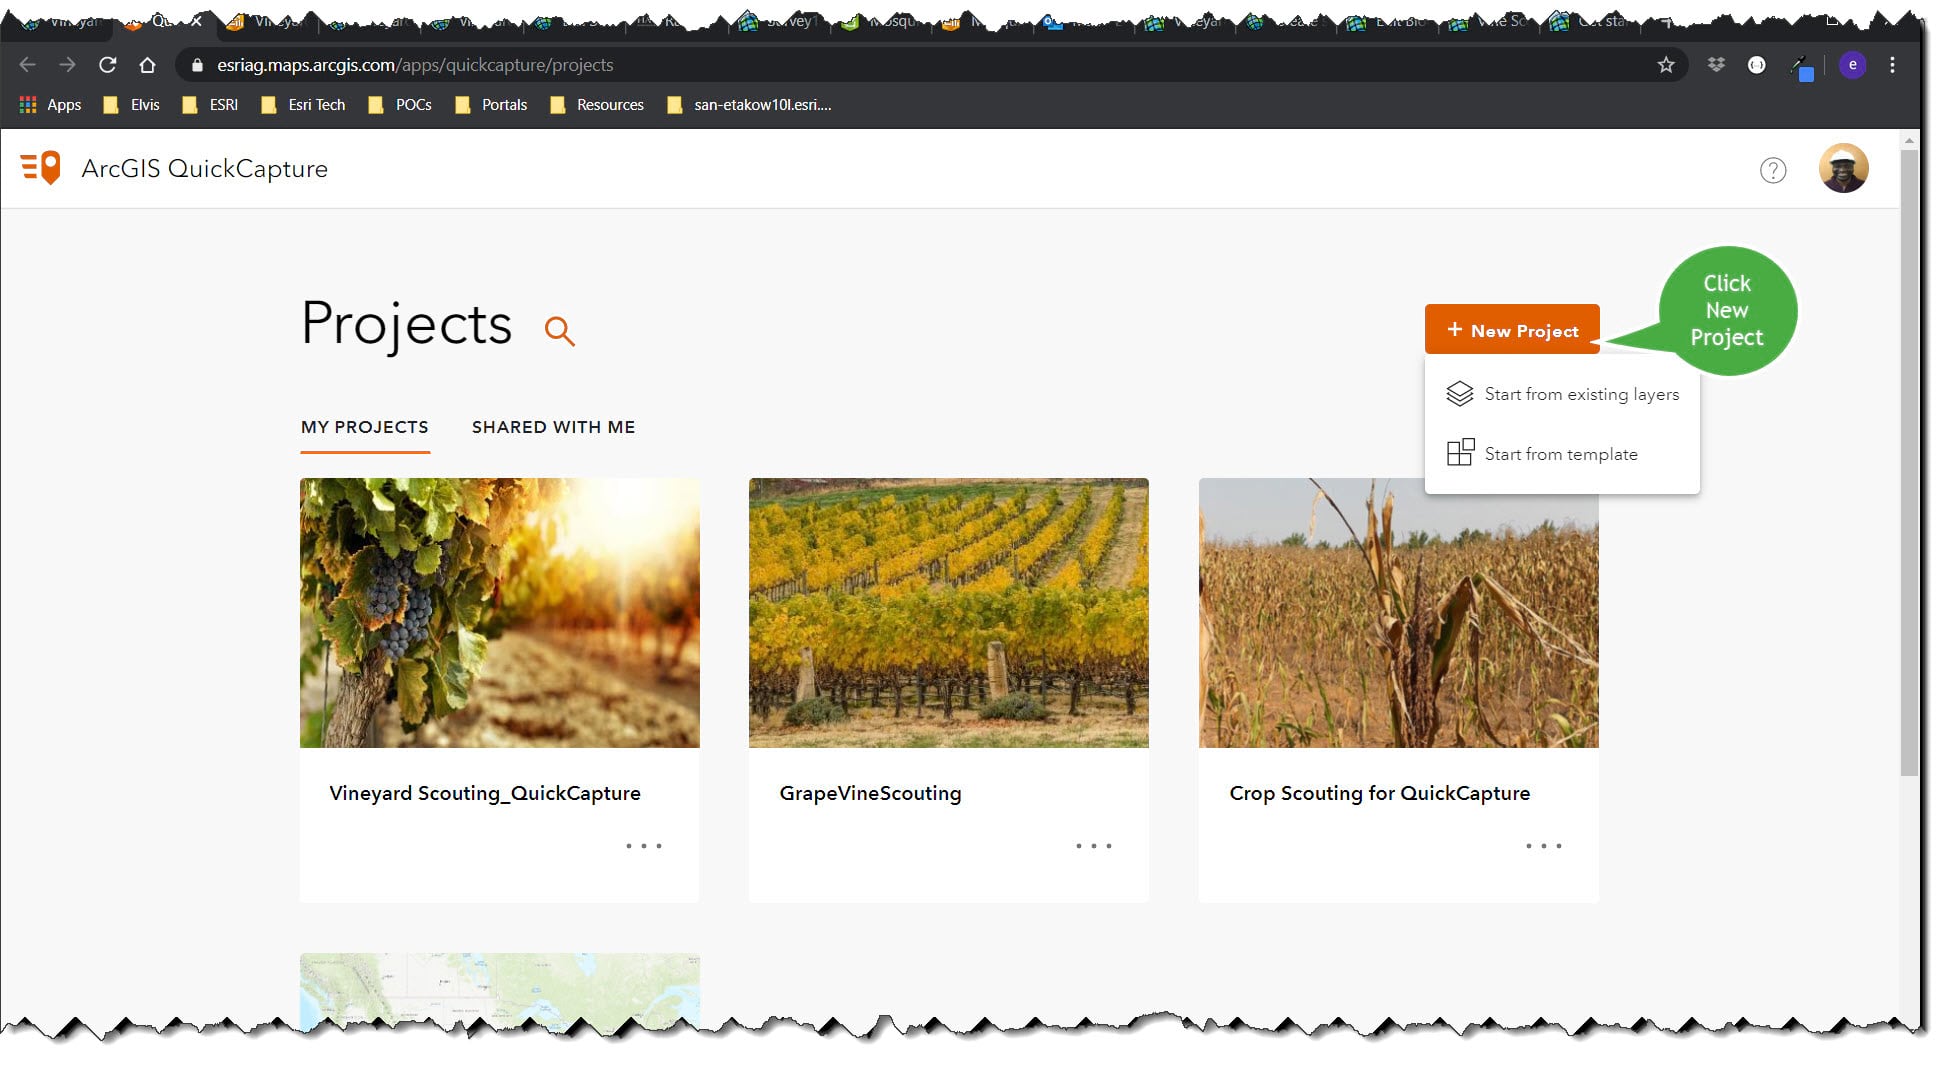
In ArcGIS Online or your ArcGIS Enterprise portal, open the QuickCapture designer from the App Launcher, which is found next to the user profile.
Click ‘New Project’ and select ‘Start from existing layers’ then navigate to the hosted feature layer view created in the previous section.
Click ‘Next’ to create a new and confirm the project information such as ‘Title’, ‘Data recovery email’ and ‘Save in folder’. Finally, click ‘Create’.
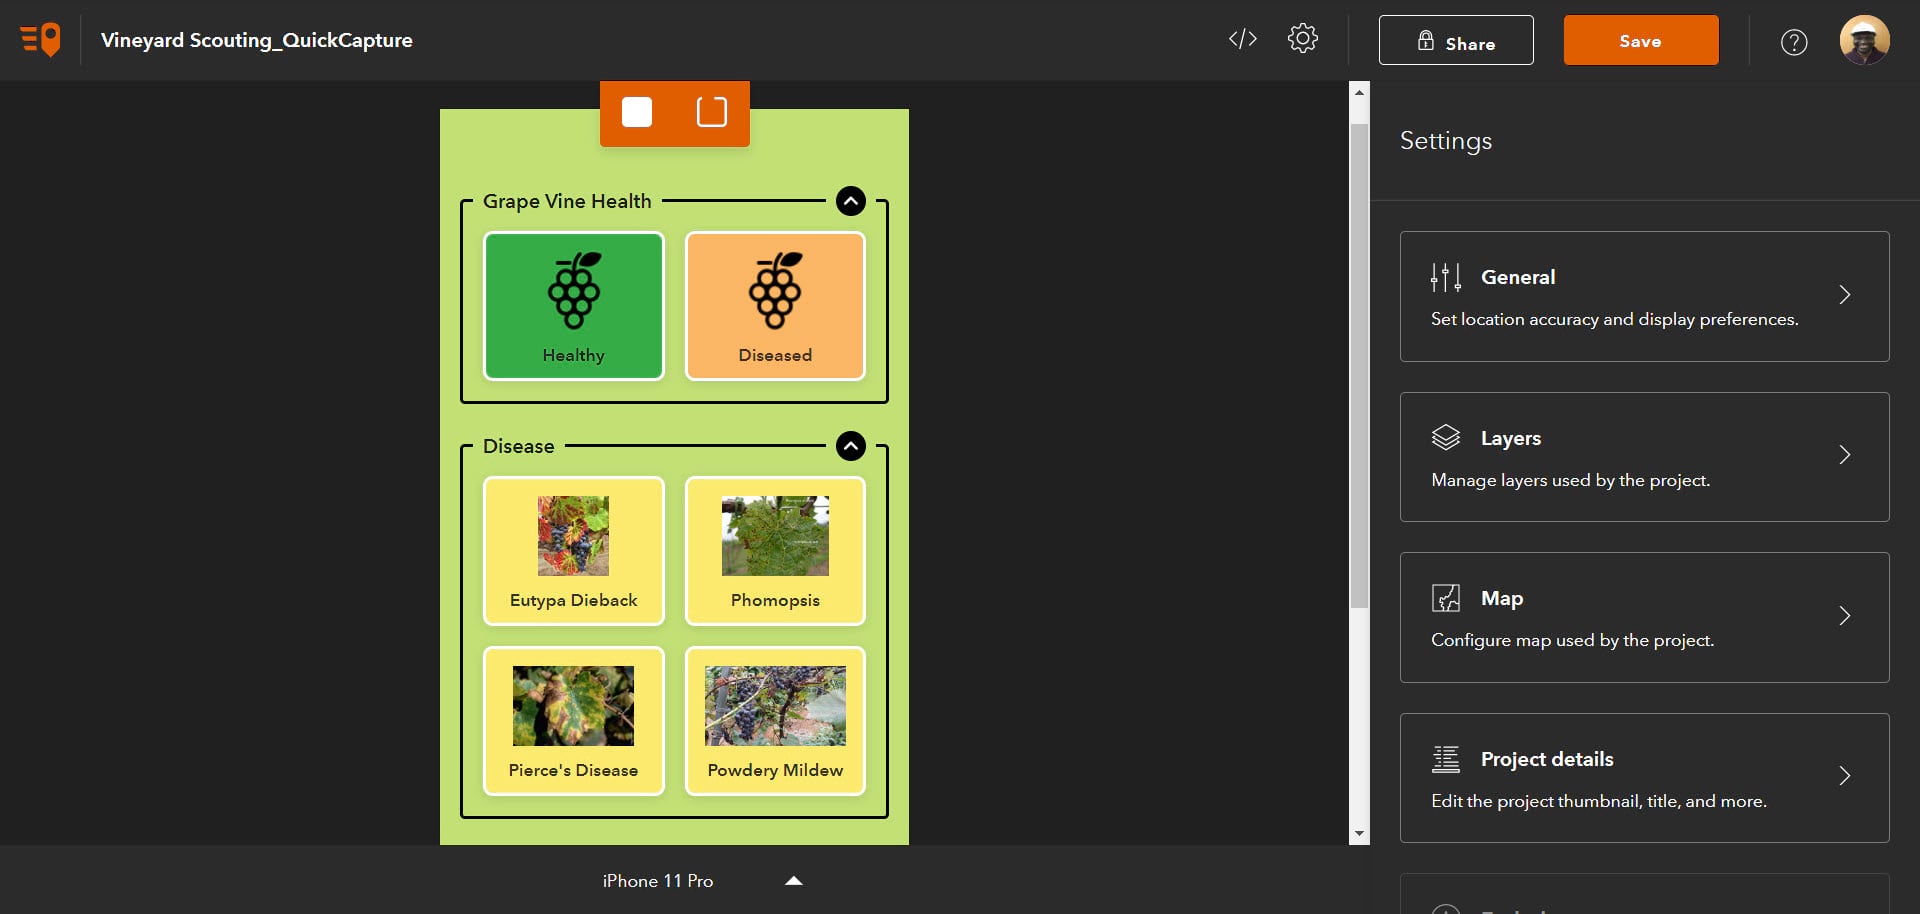
The QuickCapture designer will be launched. This is used to modify the look and feel of the app. You can change properties for an entire group, or for individual buttons.
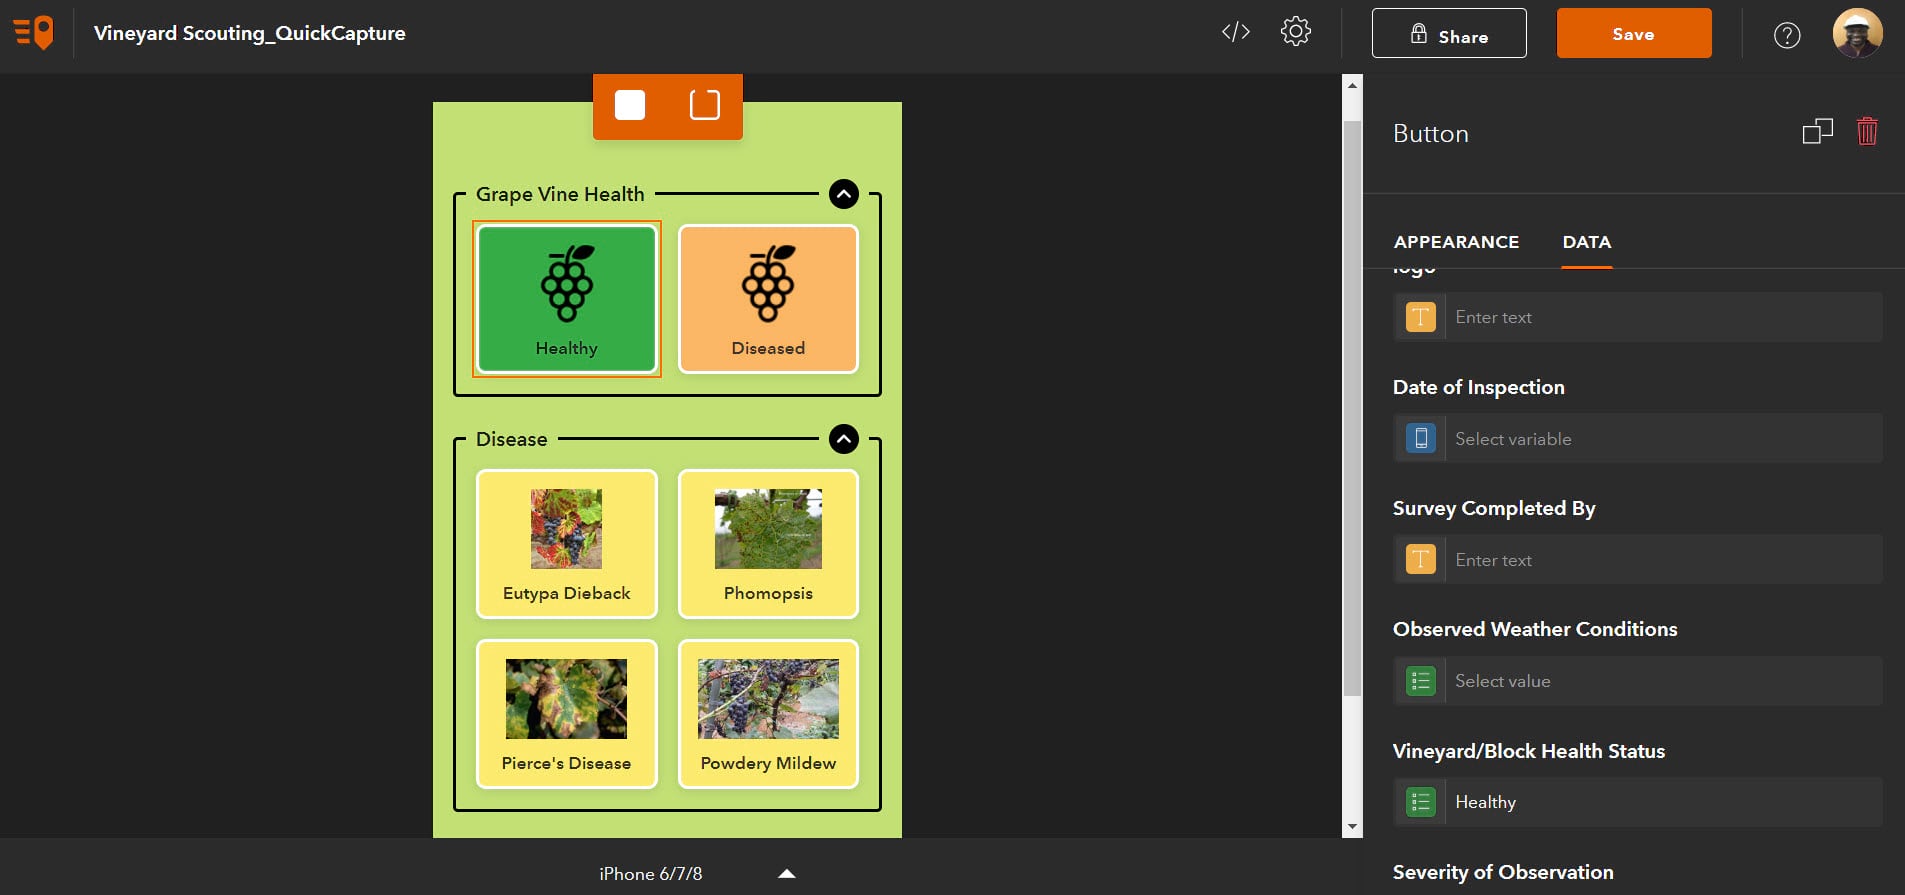
The designer is also used for a variety of other settings and options around the type of data captured, user inputs and basemaps. Additionally, users can also adjust the general look and feel of QuickCapture as well defined more advanced setting like Webhooks.
Here are a few general steps for setting up a feature layer for use with ArcGIS QuickCapture:
- Click the group label to apply changes to the entire button group. When selected, the group will be outlined in orange.
- In the group properties, alter the number of columns to your desired preference. This will set the properties for the buttons.
- Press the <shift> key and click to select all of the buttons. Selected buttons will be outlined in orange. With all buttons selected for a Group, open the Appearance tab and choose the large button size.
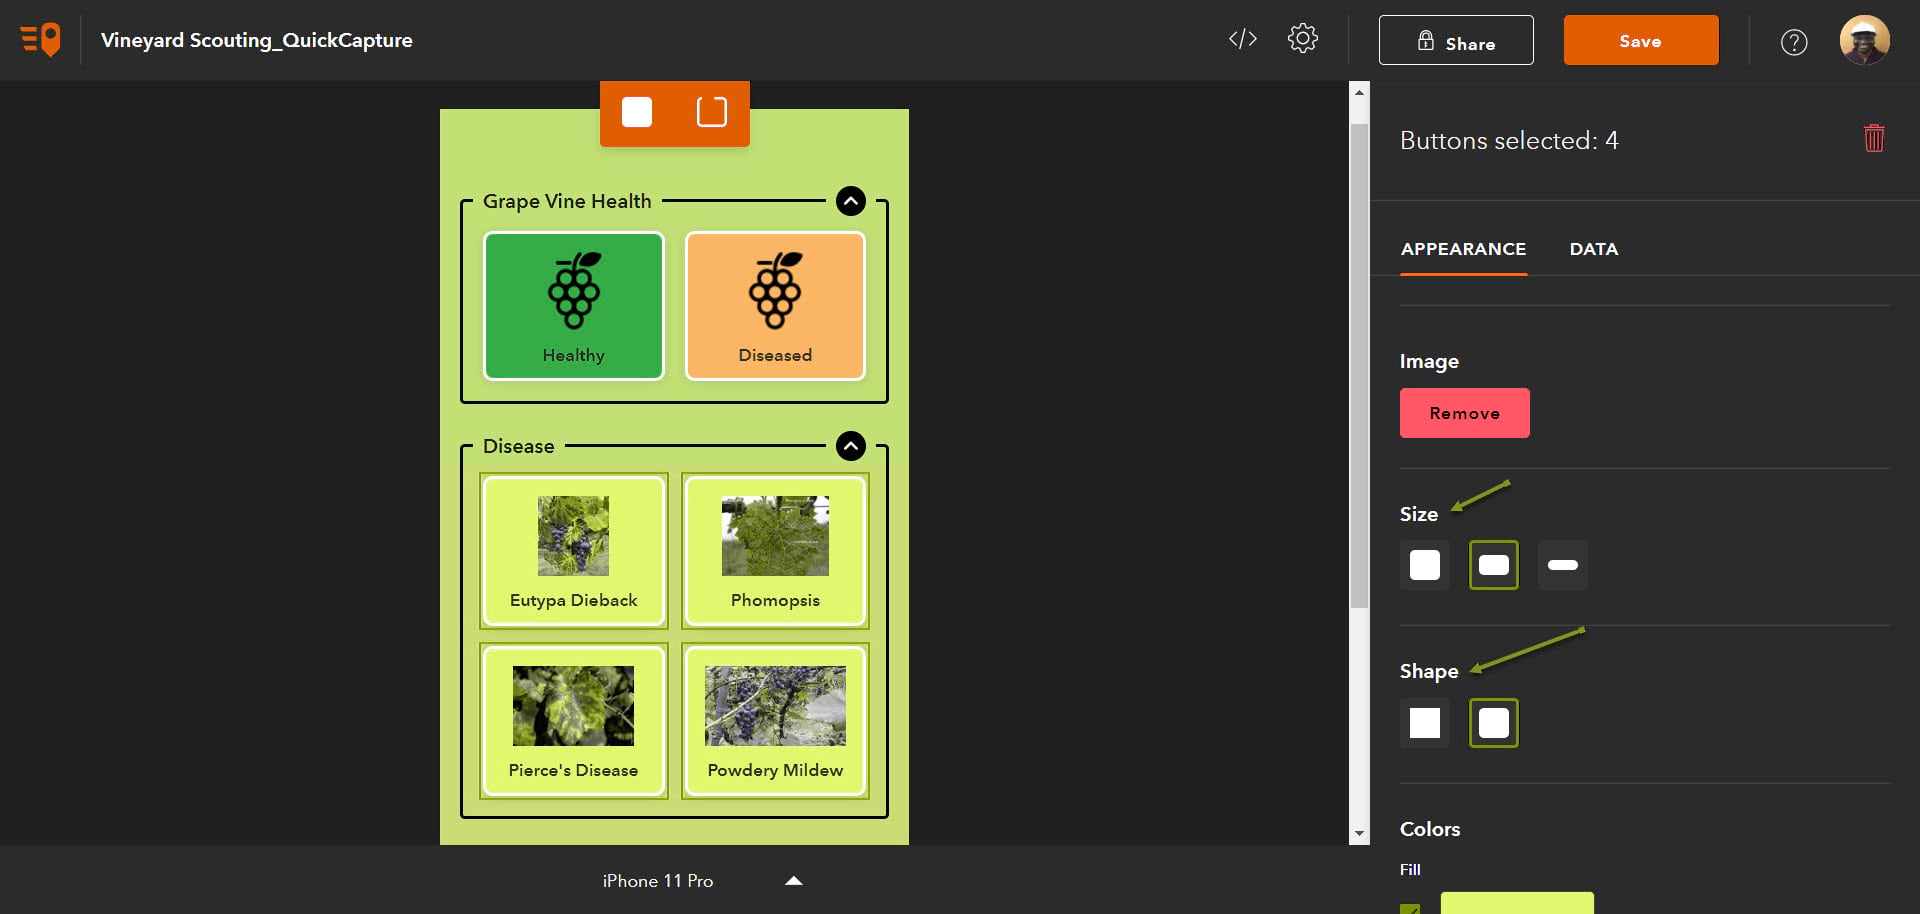
4. Open the Data tab to enable photos for all or just some of the buttons; you can also designated photos as required or take photos with or without a preview. Save and share the project.
5. Click Save when finished, then click Share to make the project available to all members of your organization, or to a specific group with members.
Tip: When you click Save a dialog appears from which a QR Code to open the project can be captured. QR codes can also be obtained from the Sharing dialog, which also includes a link to the project. The QR code is handy if you have the device in hand, or the link can be emailed to members to open the project.
6. Now that your project has been designed, proceed to install the QuickCapture mobile app from the Apple or Google Play app store onto your device.
7. Open the QuickCapture mobile app and sign in. Alternatively, you can open the aforementioned link or QR code (from above) to present the sign in page immediately.
8. If prompted, choose to allow QuickCapture to access your location. This enables the device location to be captured in the feature layer. Open the project.
9. Tap Get Projects to view available projects. The project created above will be displayed (along with any others that are available).
10. Download and open the project by clicking on the project icon once downloaded.
When collecting data, simply click the appropriate button to capture a feature. Where enabled, the camera will open to capture a photo. The location and photo will be stored in the feature layer, along with the date and account name of the QuickCapture user.
With your Survey123 hosted feature layer configured and the hosted feature layer view designed to your specifications, vine scouting can now be carried out.
ArcGIS QuickCapture will be used to establish the health status of vines using the hosted feature layer view while Survey123 will be used for a more detailed assessment of the vines. For details on how to use a custom basemap with Survey123 see the documentation on Prepare basemaps for offline Use.
Both the vine scouting and the vineyard survey results can be visualized in an ArcGIS Dashboard. The results can be monitored by the entire organization or shared specifically with the relevant stakeholders for appropriate decision making. The following dashboards illustrate the results of both the vine scouting and vineyard survey results as captured with ArcGIS QuickCapture and Survey123 respectively. For details on how to get started with created an ArcGIS Dashboard, take a look at the blog Create your first dashboard using ArcGIS Dashboards.
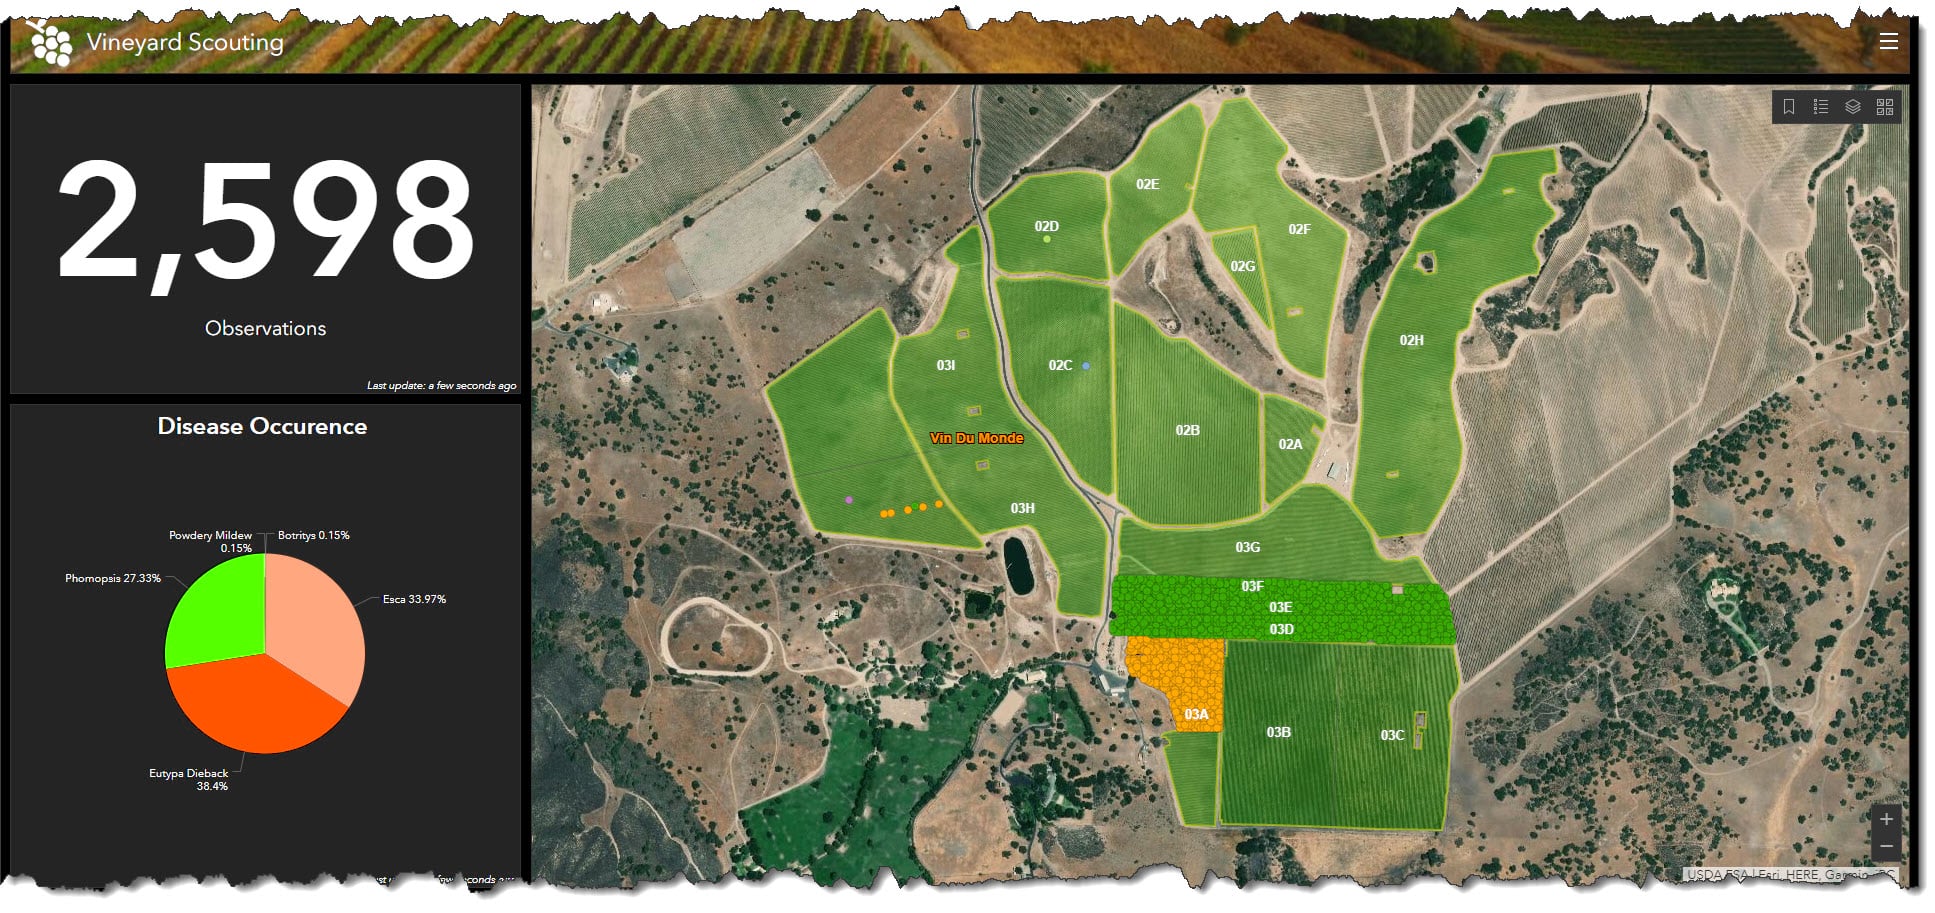

We have outlined a use case for incorporating the use of ArcGIS QuickCapture to verify the location and health status of vines thus enabling the survey of diseased vineyard blocks and vines. With an ArcGIS Dashboard the results can be visualized and shared with decision makers who will ultimately determine the proper course of action.

Article Discussion: