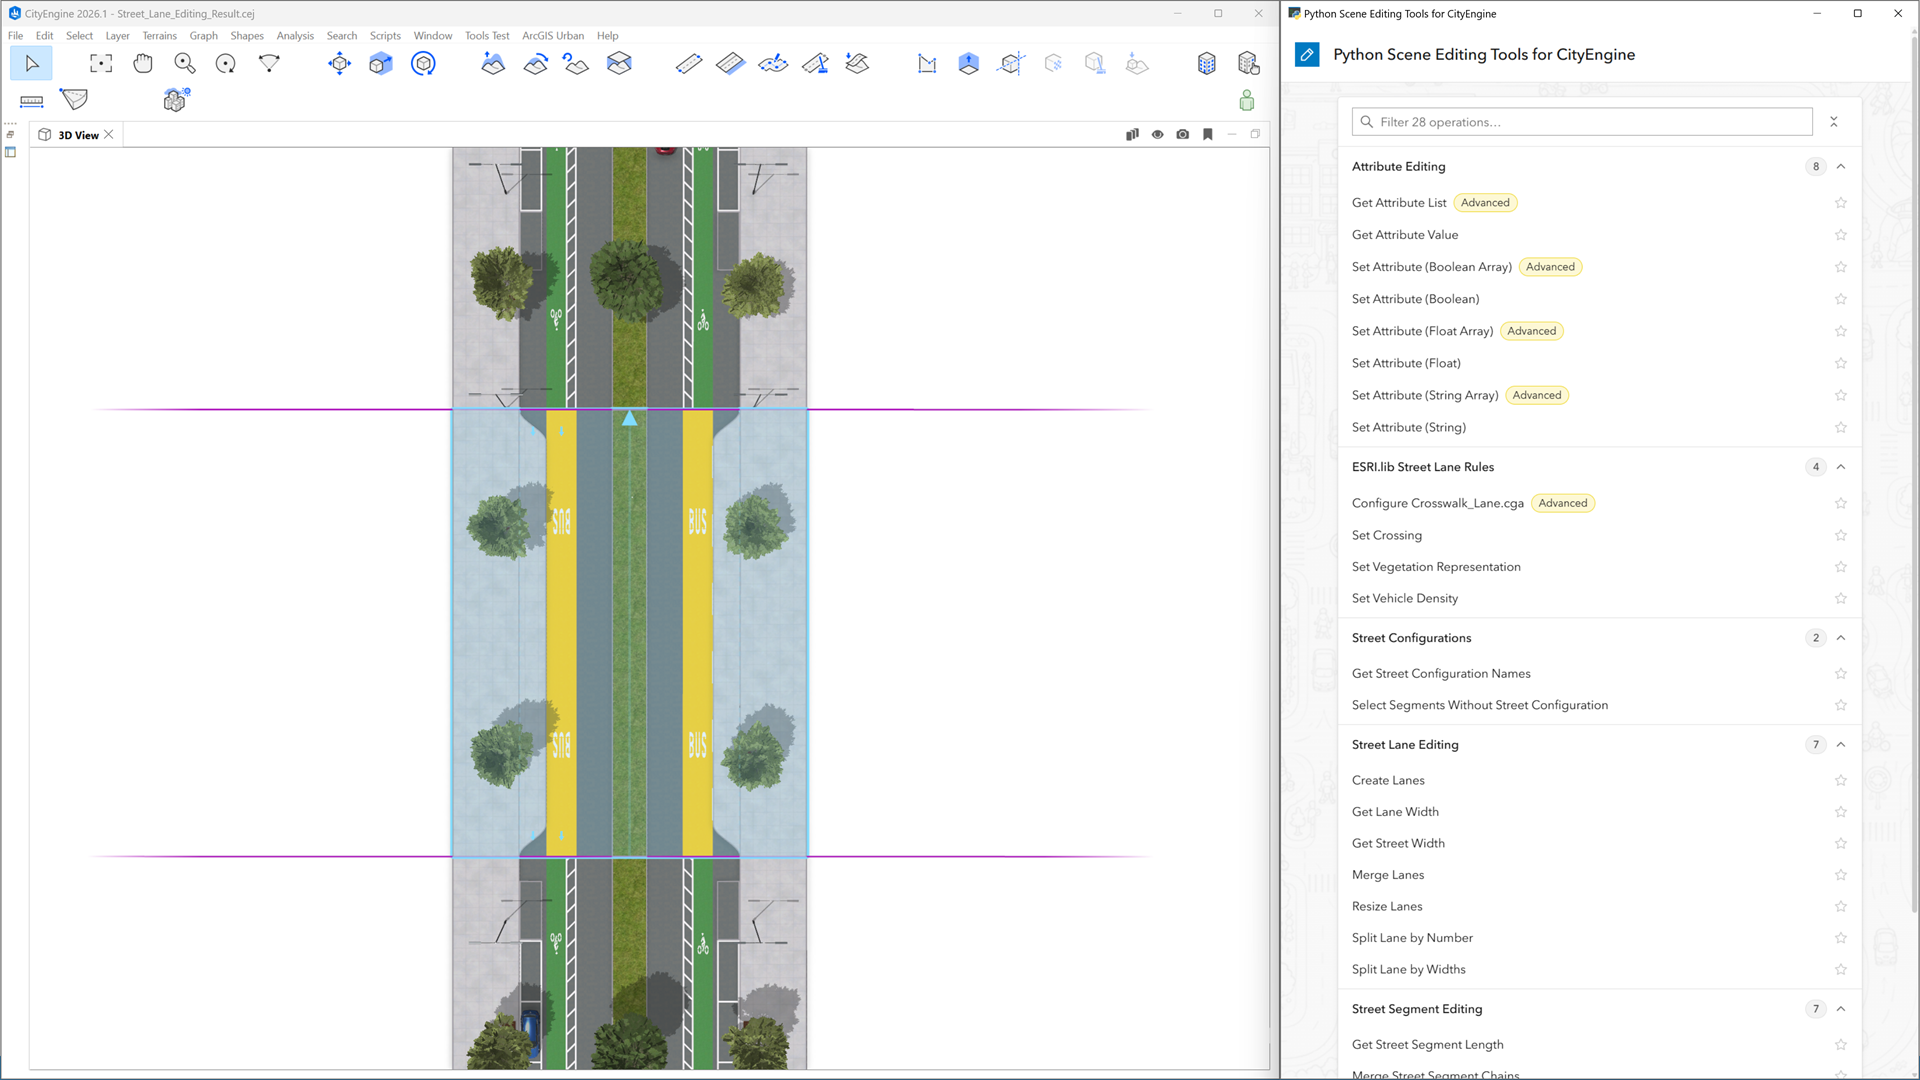
When working with ArcGIS CityEngine scenes, most editing tasks are simple, but some can become tedious when repeated across many shapes or street segments. Typical examples include changing attributes across shapes with different rule files, reorganizing street lanes or cleaning up street networks.
We created the Python Scene Editing Tools to simplify such time-consuming and repetitive edits. Using these tools, power users can edit scenes more efficiently.
But there is more to the tools than solving these particular editing problems. They also show how CityEngine can be extended with custom editing capabilities built on its Python 3 API and modern web technologies.
In this blog post, we cover the key features of the tools, how to get started and a few step-by-step examples.
Tools
The tools are grouped into five categories, each focused on common editing tasks.
- Attribute Editing: Set attributes on all selected shapes regardless of their rule files, list all attributes, read attribute values
- ESRI.lib Street Lane Rules: Configure crossings, vehicles and vegetation
- Street Configurations: Detect segments with no configuration assigned, list configuration names
- Street Lane Editing: Split, merge and resize lanes, create multiple lanes by numbers, get street and lane widths
- Street Segment Editing: Merge segments, detect and merge consecutive segments, straighten consecutive segments, get and set segment lengths
Getting started
The tools are installed and launched entirely from within CityEngine. Before you start, make sure CityEngine 2026.1 is open.
- Install: Download the example project through
Help → Download Tutorials and Examples → Example Python 04 Scene Editing Tools 2026.1. - Run: In the CityEngine Navigator, open
/Example_Python_04_Scene_Editing_Tools__2026_1/scripts/main.pyand run it withF9orPython → Run Script. - Use: The tools open in a new window with a web-based interface and in-app documentation for each tool. We recommend placing the window with the tools next to CityEngine. The tools apply to the scene that is currently open in CityEngine.
Examples
The following examples show how you can use the tools for various editing tasks.
Example 1: Attribute Editing
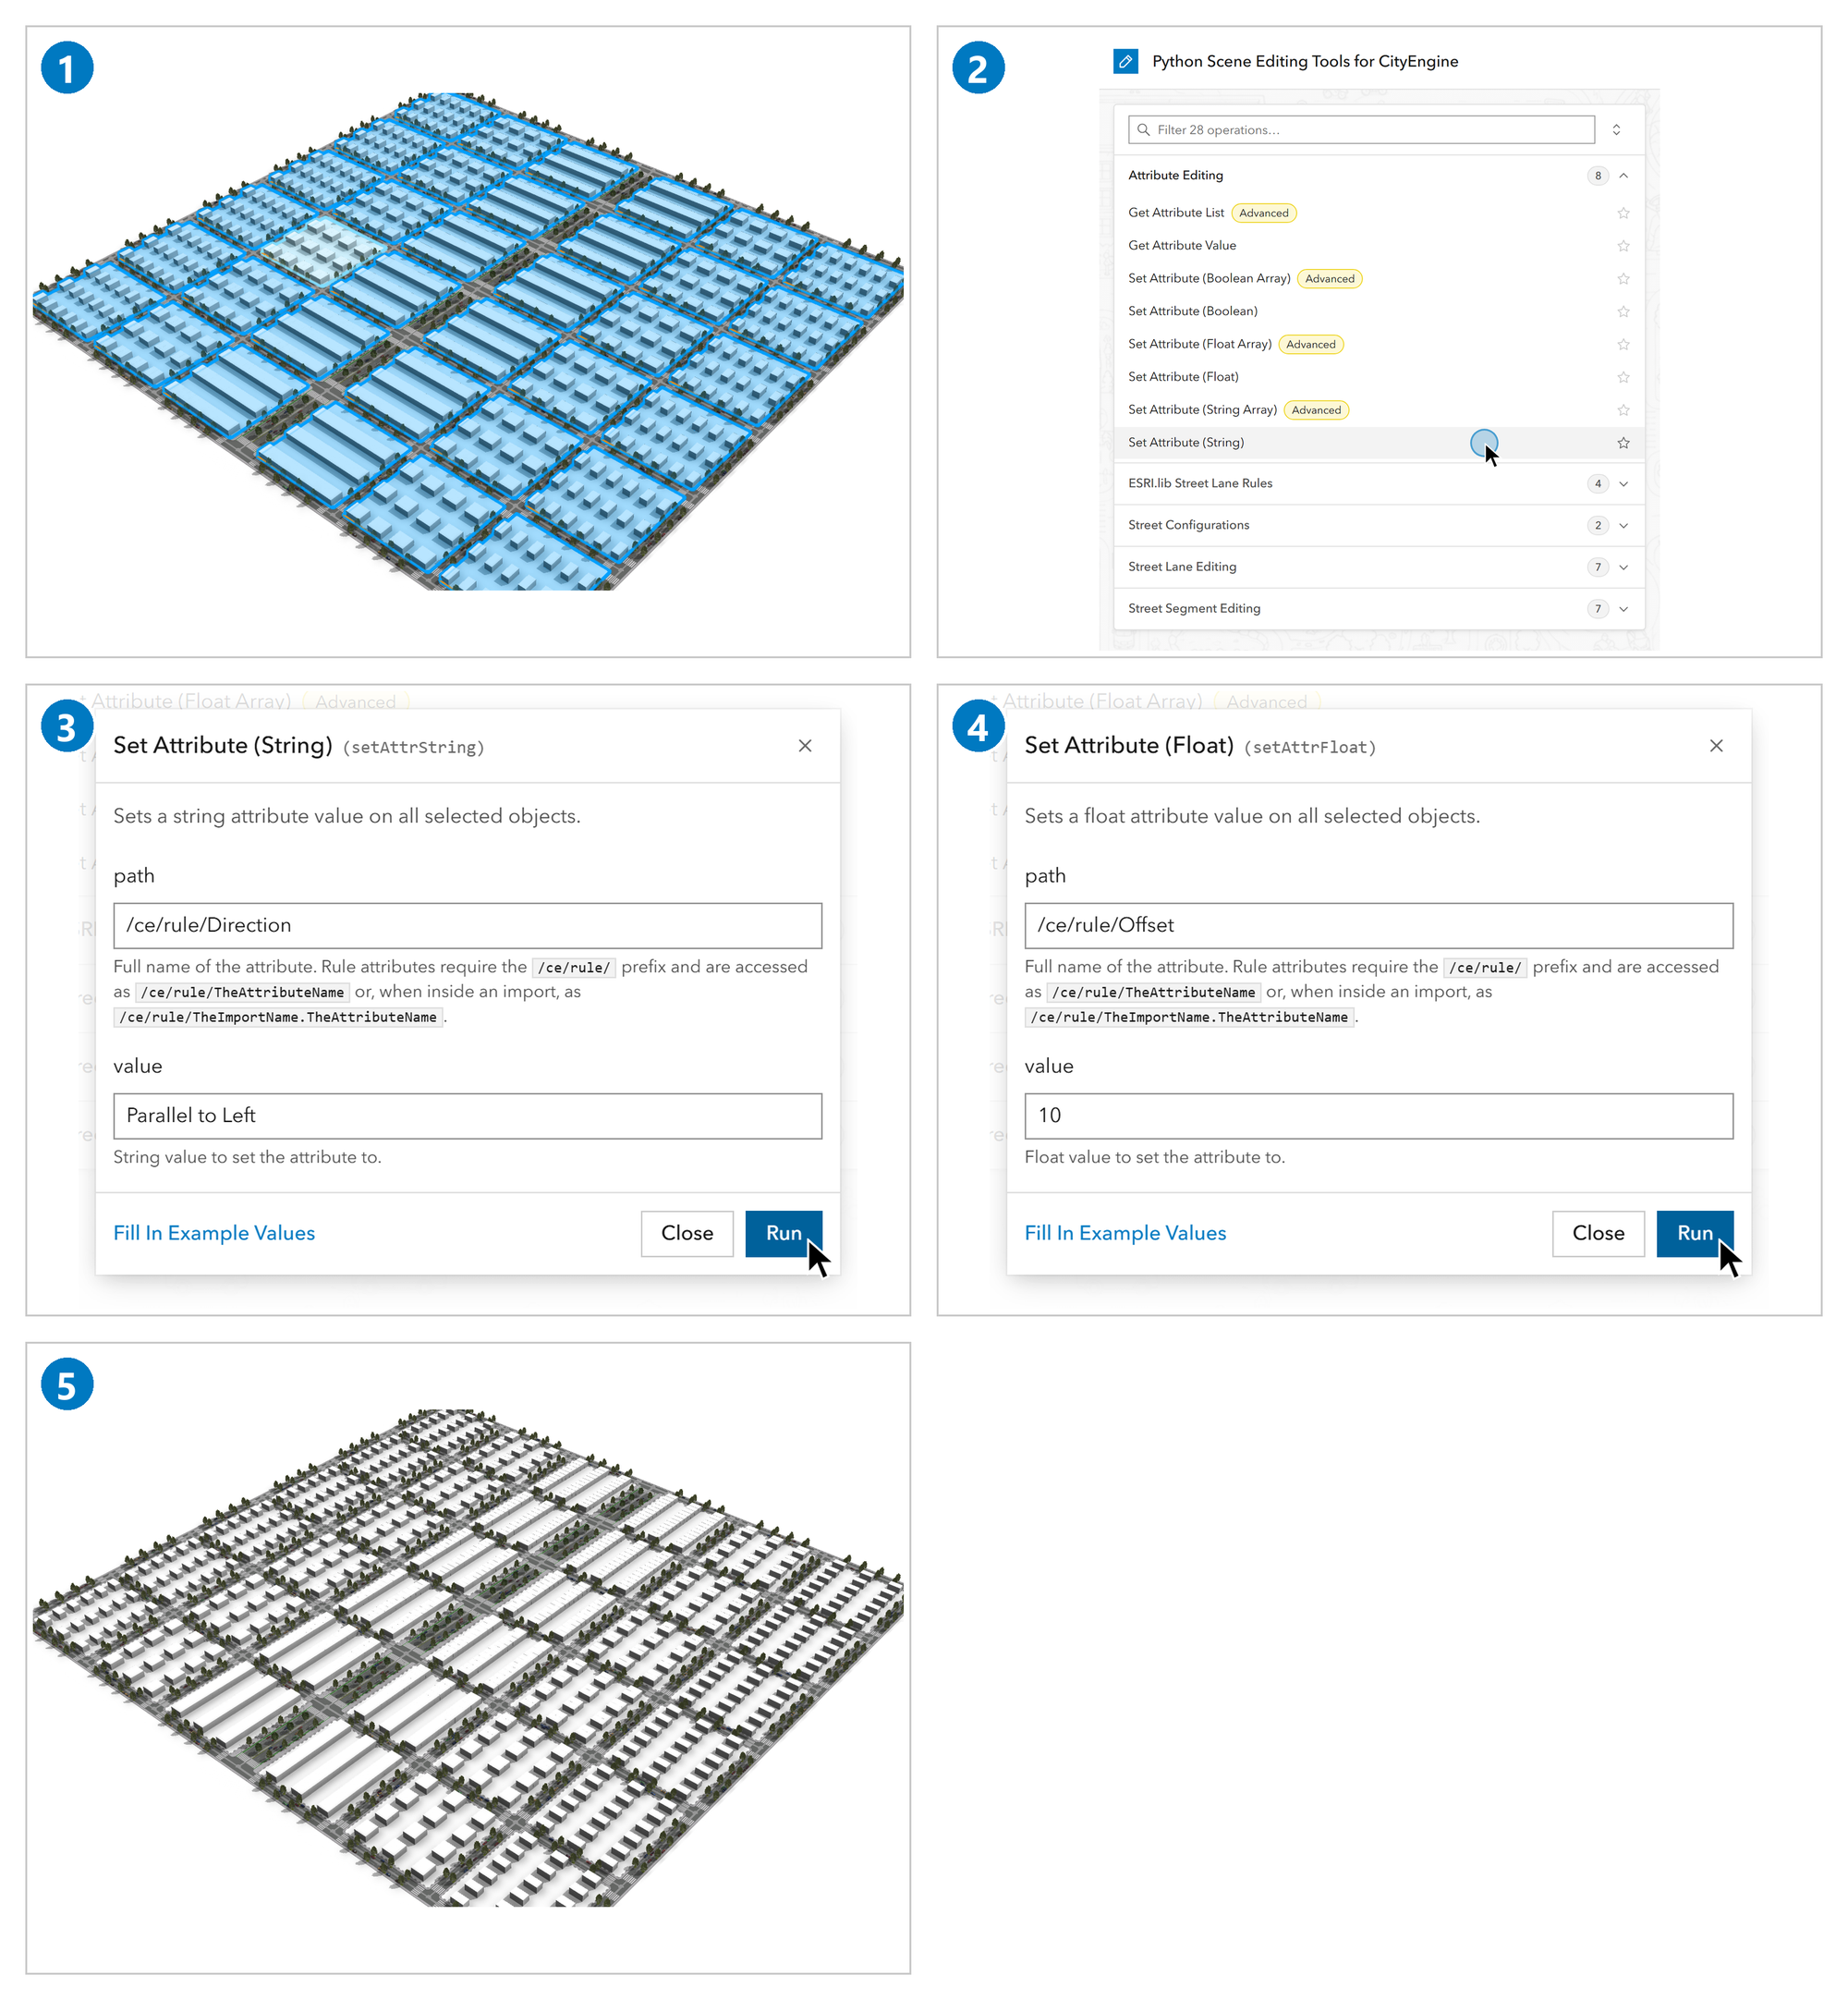
The CityEngine Inspector lets you edit rule attributes of several shapes at once only if they share the same rule file. The Set Attribute tools let you set a value on all selected shapes, regardless of their rule file.
Open /Example_Python_04_Scene_Editing_Tools__2026_1/scenes/Set_Attribute.cej in the Navigator. Our goal is to adjust the orientation and position of residential houses generated from different rule files.
- Select all shapes in the
Blockslayer. - In the tools window, expand
Attribute Editingand openSet Attribute (String). - Enter
/ce/rule/DirectionaspathandParallel to Leftasvalue, then clickRun. - Open
Set Attribute (Float). Enter/ce/rule/Offsetaspathand10asvalue, then clickRun. - All blocks now use the new direction and offset.
Example 2: ESRI.lib Street Lane Rules
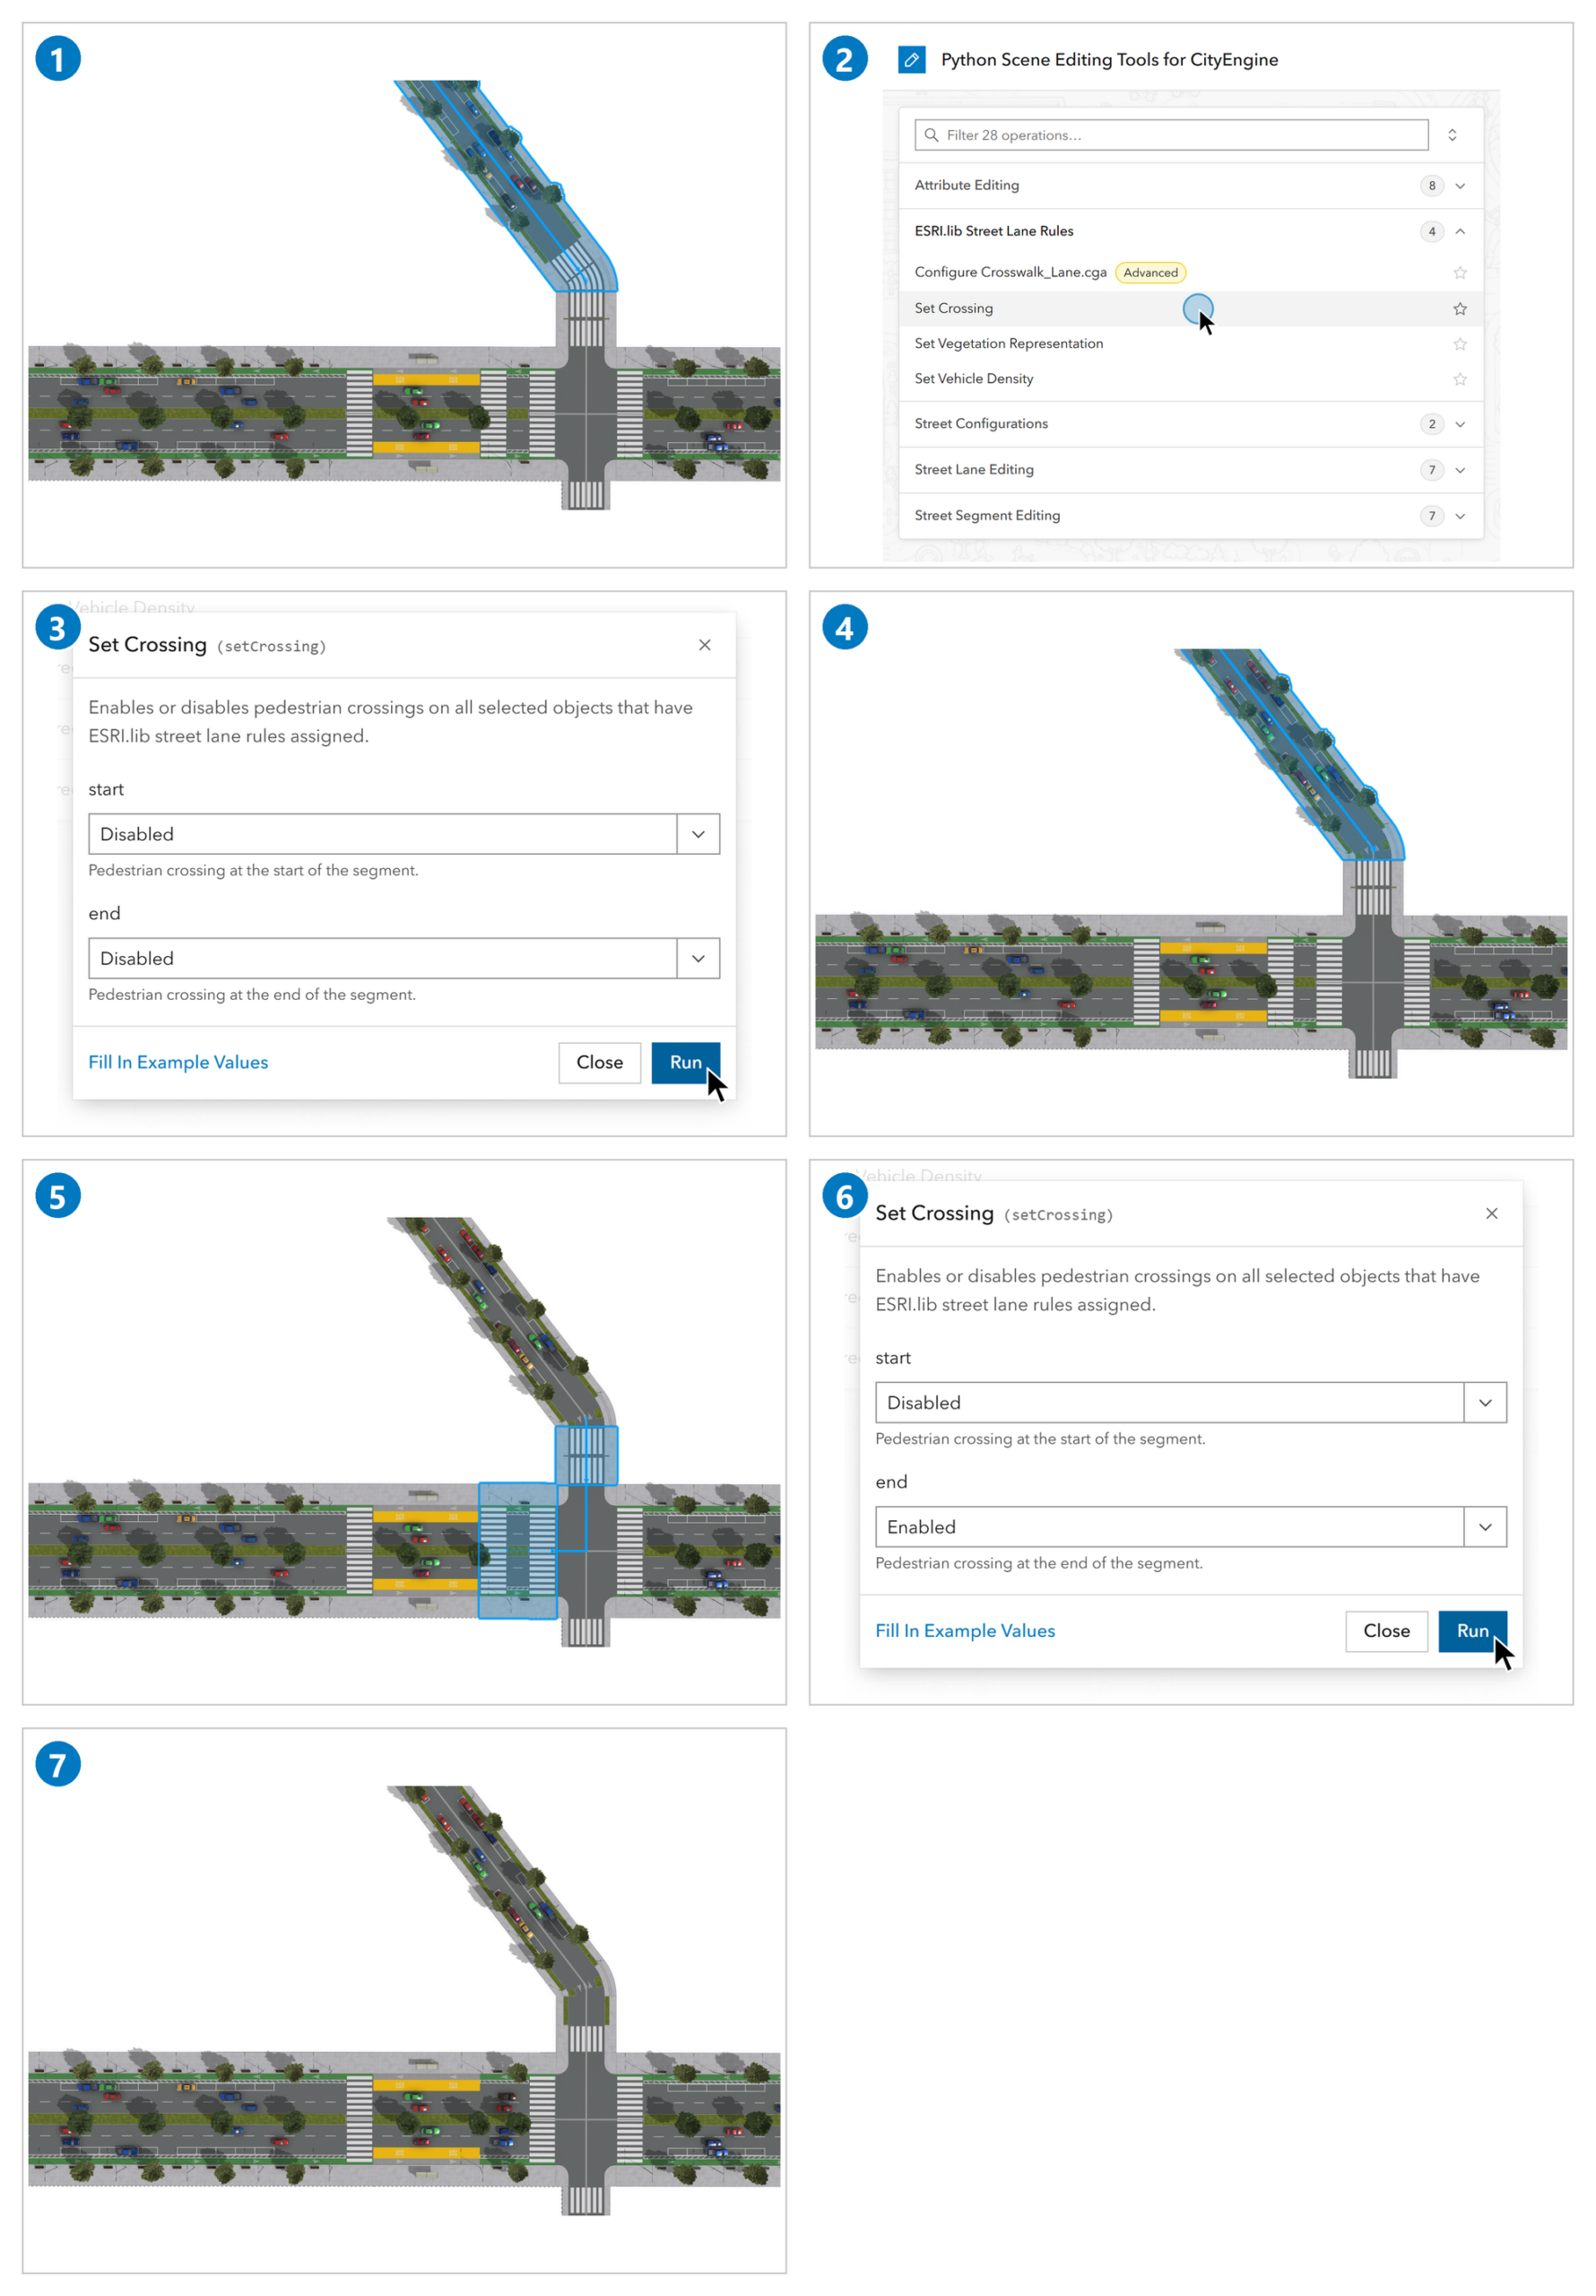
In the CityEngine Inspector, crossings must be configured manually lane by lane. The Set Crossing tool lets you switch crossings on or off for all selected segments and nodes at once.
Open /Example_Python_04_Scene_Editing_Tools__2026_1/scenes/Set_Crossing.cej in the Navigator. Our goal is to remove the crossings in the bend of the side street and the double crossing at the bus stop.
- Select the diagonal segment of the side street and the node where it bends.
- In the tools window, expand
ESRI.lib Street Lane Rulesand openSet Crossing. - Set
startandendtoDisabled, then clickRun. - The crossings at the bend are gone.
- Select the short segment of the side street and the main street segment left of the intersection.
- Open
Set Crossingagain. SetstarttoDisabledandendtoEnabled, then clickRun. - The crossings in the bend and the double crossing at the bus stop are gone.
Example 3: Street Lane Editing
The Street Lane Editing tools let you create, resize, split and merge the lanes of a street configuration efficiently.
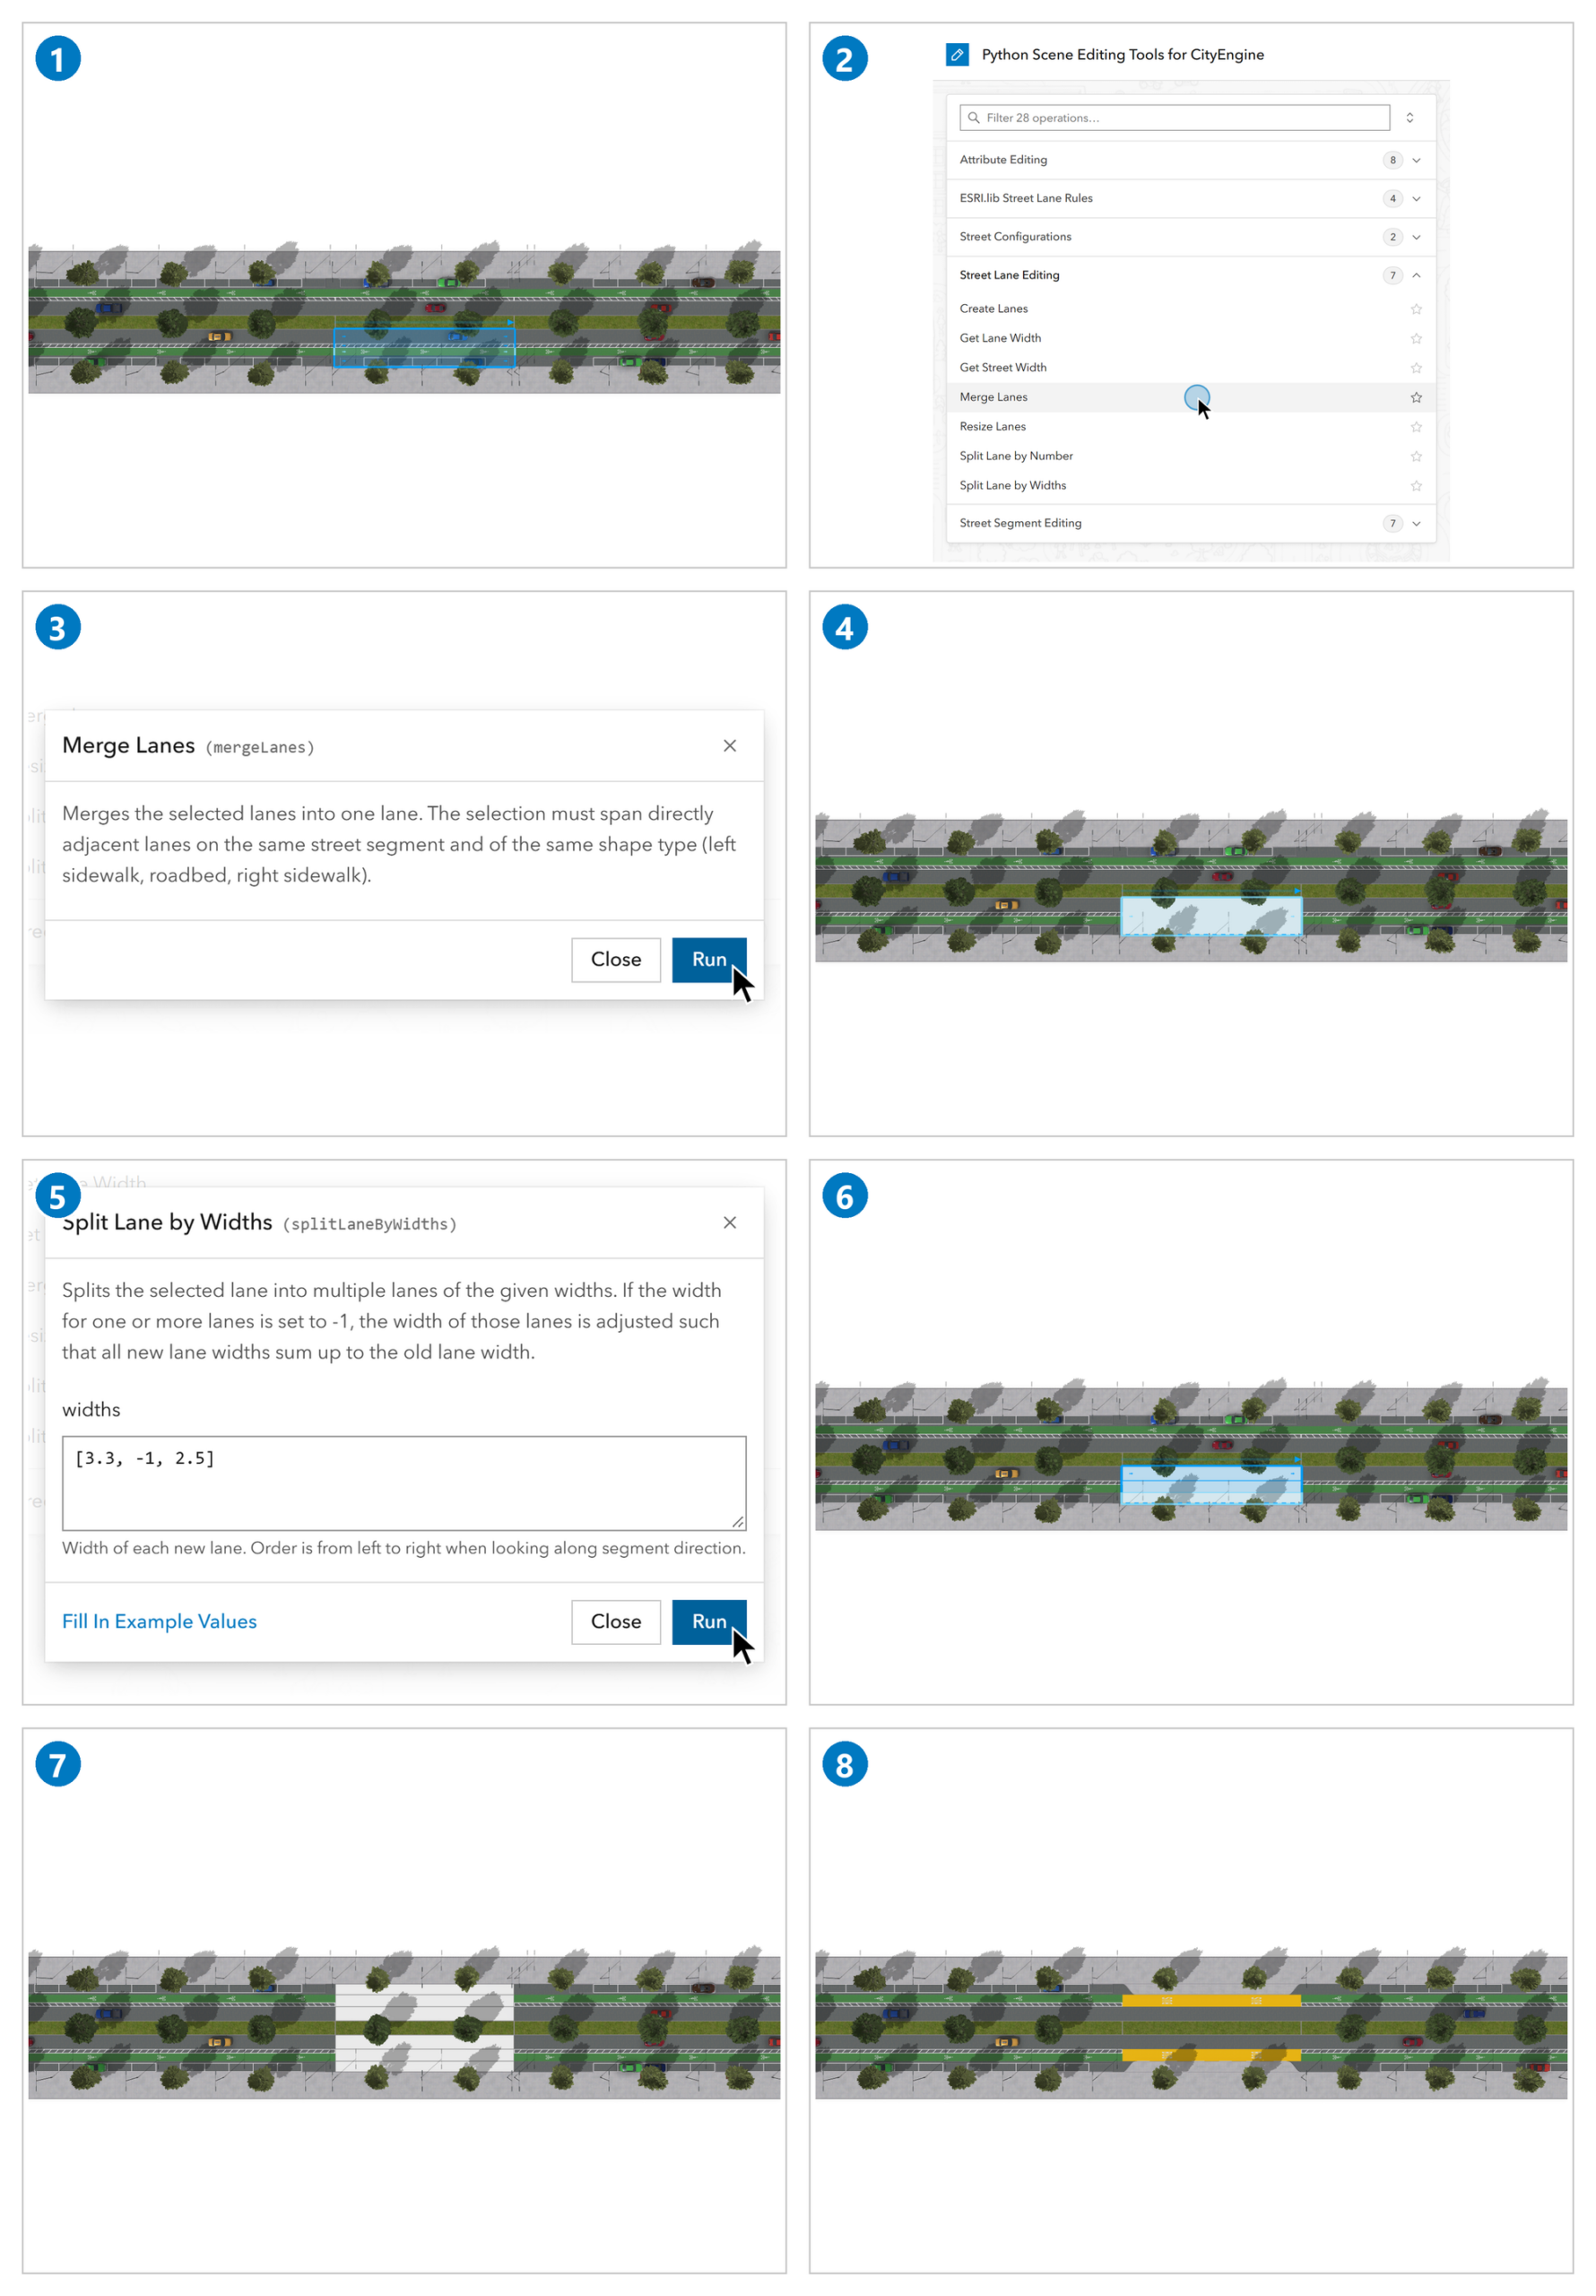
Open /Example_Python_04_Scene_Editing_Tools__2026_1/scenes/Street_Lane_Editing.cej in the Navigator. Our goal is to redesign a short street segment to accommodate a bus stop. This involves extensive rearrangement of the lanes.
- In the middle segment, select the four roadbed lanes south of the median.
- In the tools window, expand
Street Lane Editingand openMerge Lanes. - In
Merge Lanes, clickRun. - The four lanes are now a single 8.6 m lane.
- Open
Split Lane by Widths, enter[3.3, -1, 2.5]aswidths(-1takes the remaining width), then clickRun. - The segment now has lanes of 3.3 m, 2.8 m and 2.5 m.
- Repeat steps 1–5 for the lanes north of the median, using
[2.5, -1, 3.3]aswidths. - Assign and configure ESRI.lib lane rules on the new lanes. Here, we use
Bus_Lane.cgawith yellow asphalt andBulb_Lane.cga.
Example 4: Street Segment Editing
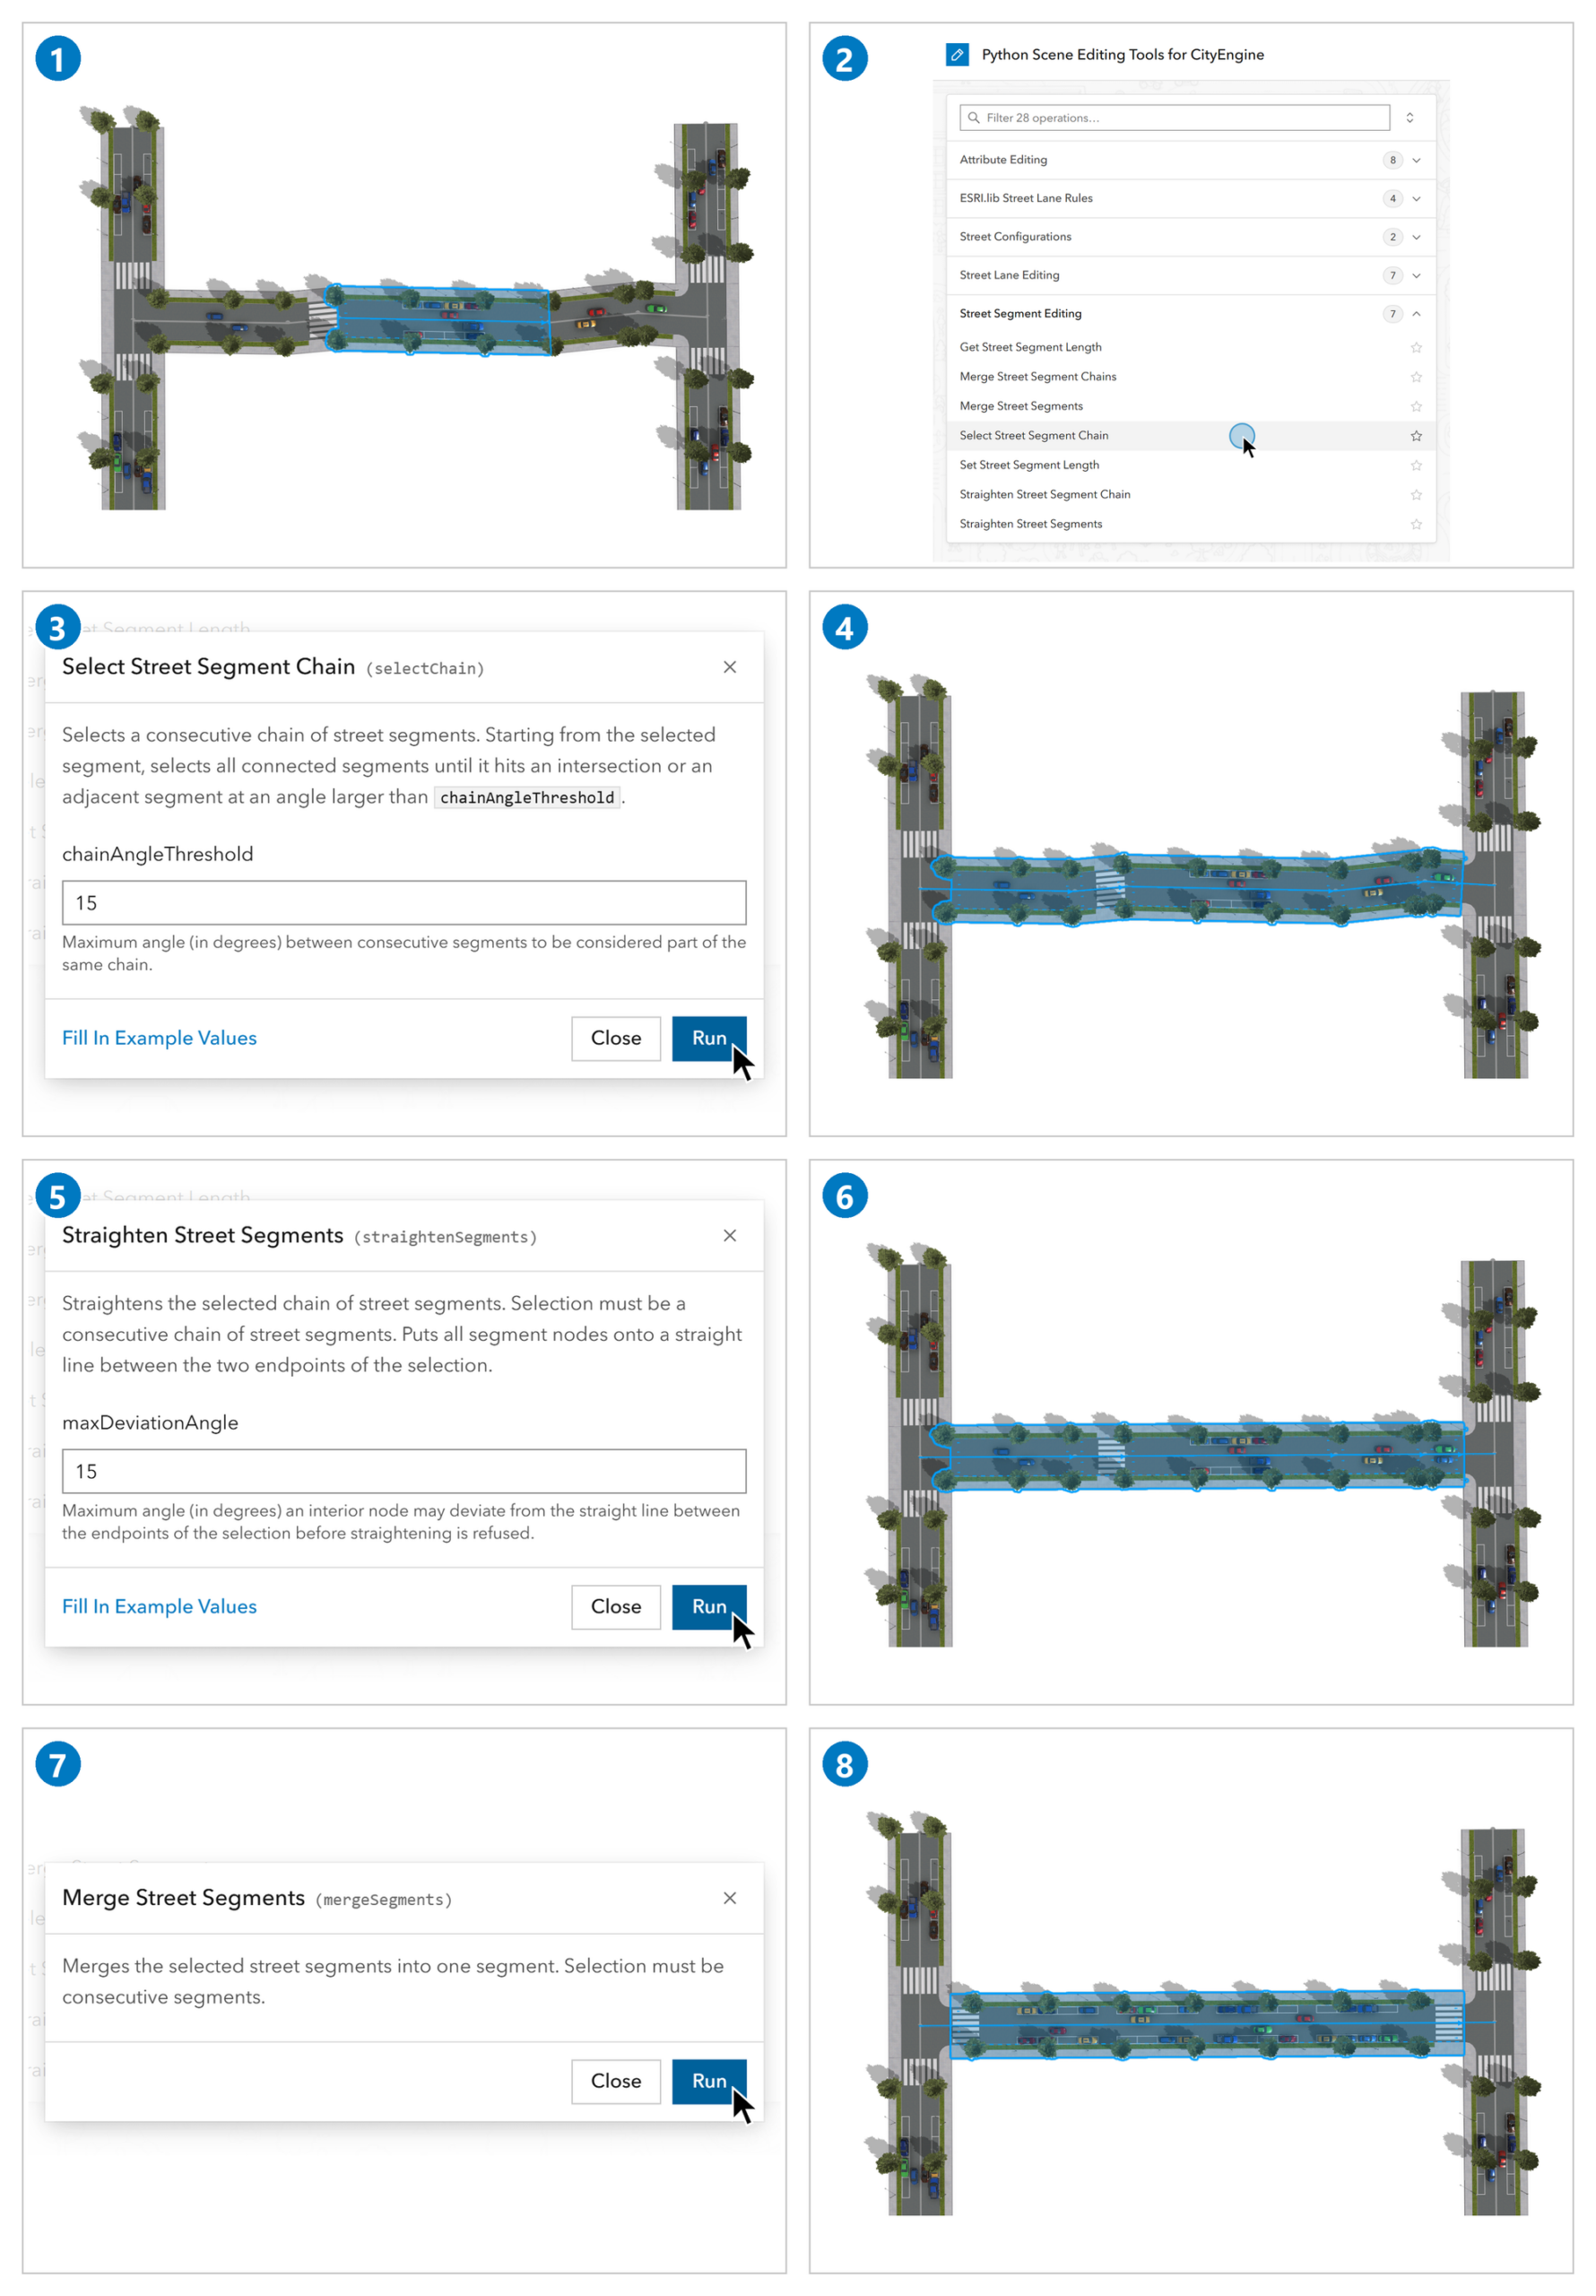
The Street Segment Editing tools let you select, straighten and merge chains of consecutive street segments efficiently.
Open /Example_Python_04_Scene_Editing_Tools__2026_1/scenes/Street_Segment_Editing.cej in the Navigator. Our goal is to clean up the messy segments in the middle of the street.
- Select the middle segment of the street.
- In the tools window, expand
Street Segment Editingand openSelect Street Segment Chain. - In
Select Street Segment Chain, clickRun. - The tool selects all five segments between the intersections.
- Open
Straighten Street Segments, then clickRun. - All nodes now lie on a straight line.
- Open
Merge Street Segments, then clickRun. - The street is now one segment from intersection to intersection.
Conclusion and next steps
In this blog post, we introduced the Python Scene Editing Tools for CityEngine and showed how they speed up tedious and repetitive scene editing tasks. To try them yourself, follow the installation steps in the Getting started section above. You can also use the CityEngine Python 3 API and web technologies to create your own custom tools.

Article Discussion: