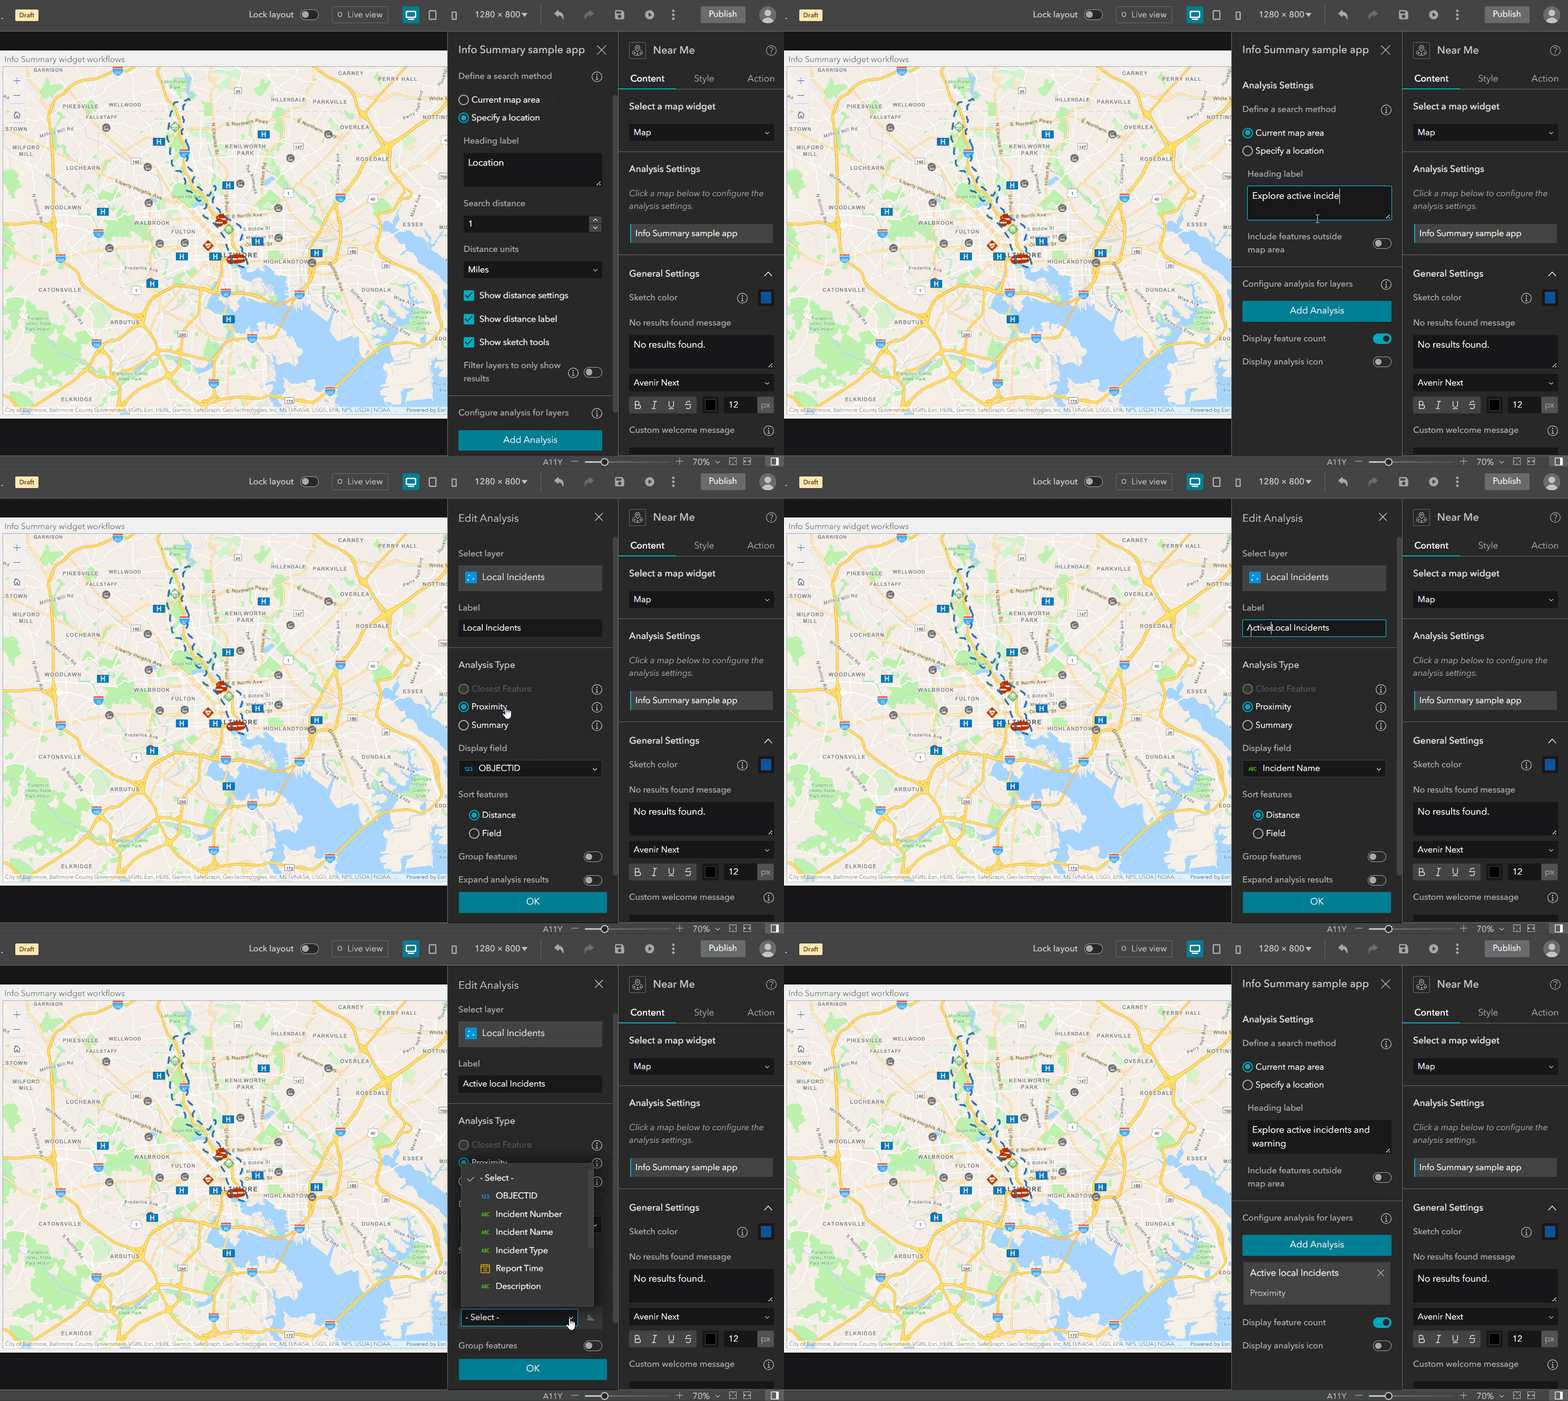
With the February 2023 update of ArcGIS Online, we have added some great enhancements in Near Me. The enhancements include some functional parities with Info Summary, Near Me, Situation Awareness and Screening Web AppBuilder widgets. We have implemented list virtualization to improve performance, added map symbol support and many more. We also organized the configuration experience for greater usability and better user experience. Please visit this community post if you want to learn more about what is new in Near Me in February 2024 ArcGIS Online update. As you migrate to Experience Builder, you can leverage these new functionalities for your Info Summary workflows in Experience Builder.
Let us assume you have a Web Appbuilder App that is used by public to explore current roadway conditions, restrictions, closures, and other alerts to help plan a safer trip. You want to migrate this app to Experience Builder. Here’s how to do it:
Create an app
First, you’ll create an app in Experience Builder:
- Sign into your ArcGIS account.
- From the Content page, click Create app and click Experience Builder.
- Click Create New.
- Choose a mapcentric template and click Create. See an example of an application using the Blank fullscreen template.
- In your app, add a Map widget. Near Me is mapcentric widget, so you need to add at least one map with a feature layer. For my app, I chose a map that has local incidents, road closures and weather data.
- In the Map widget content tab Options section, check Show pop-up upon feature selection to turn on pop-up visibility when selecting a feature from the Near Me widget.
- Add the Near Me widget to your app and connect it to the Map widget.
Configure Near Me widget
Now that you’ve created your app, you’ll configure the Near Me widget by configuring the map, search, and analysis settings.
In my application, I want the users to find out information about
- Local incidents.
- Road closures, Roadblocks and Detours, nearby Shelters.
- Weather warnings for extreme, severe and moderate events.
Configure map settings
- Click the Near Me .
- In the Content panel, under Analysis Settings, select your map.
- Click the map to configure its settings
Define a search method
- Select Current map area.
- Change the Heading label.
I entered Explore active incidents and warning
Configure analysis for layers
Setting up analyses is the key step when configuring the Near Me widget; the widget will not work until at least one analysis is configured. To configure the analysis settings, follow these steps:
- Click on Add Analysis button.
- Select the layer. I chose Local Incidents layer.
- Set a Label. In my application, I labeled it Active local incidents.
- From the Analysis Types, choose Proximity.
- Select Display field and I choose Incident Name field for list title.
- Select Sort features by Field and choose Incident Name field to sort features.
- Enable Expand on open and check Expand feature details.
- Click OK button and close Edit Analysis panel to go back to main Analysis panel.

Configure result parameters
You can configure your layers to show feature count, analysis type icon (this feature is helpful when you use same layer for different analysis) and map symbols.
- Click to check Map symbols parameter
Enabling this parameter will show the map symbols in Near Me widget panel, that way you can relate the features visually with the map. If you are using attribute values (unique symbols) to symbolize group of features, as for example, I have a layer called Road Closures and used the field “Direction” to symbolize Road Closures based on their direction, then this field will show up as default field when you turn on Group features and group symbols will show up in the widget panel.
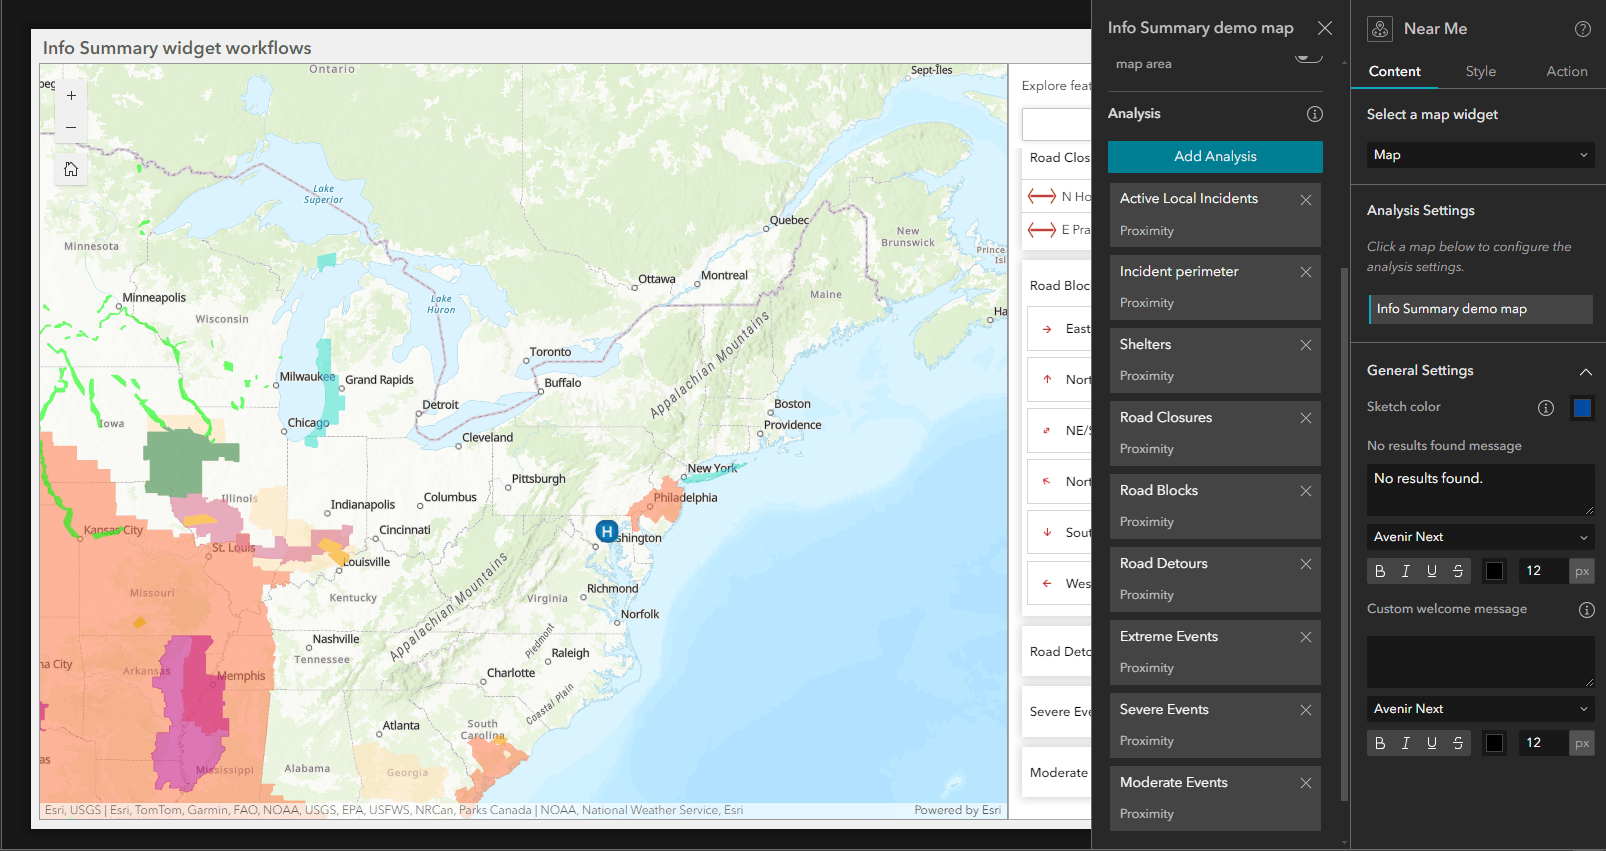
Similar way I configured proximity analysis for Incident perimeter, Road Closure, Road Blocks, Road detours, Shelters and Weather warnings layer in my application. After configuring all the analyses, my application’s configuration panel looks like following screenshot.

Configure message action
In October 2023 update we added support for Near Me to emit message action to communicate with other widgets. In your app, you can set up message action so when user clicks on a single feature from the result list in Near Me, the map will pan and flash to that feature.
- Click on the Action tab in Near Me widget
- Make sure Message action tab is selected.
- Click on Add a trigger
- Select Record selection changes
- From Widgets list, select Map.
- Select Pan to as an action
- Make sure that your layer is listed in the Trigger data section, optionally set custom zoom scale. Close Action Settings tab.
- Click again on + Add action button again and add flash action. Make sure to select your layer for Trigger data and Action data.
- Save app.
Set up automatic results update based on map area extent
In November update of ArcGIS Online 2024, we added support for automatic update of the results based on map extent change, which was a default behavior of Info Summary in Web AppBuilder. You can set Extent change message action to achieve this.
- Click on the map widget in the configuration.
- Click on the Action tab.
- In the Message action tab, click on Add a trigger.
- Select Extent changes.
- Select Framework as a target.
- Select Filter data records as action.
- Click on the Select data button, select all the layers that you want to be updated when extent changes.
- Save and Publish the application
Explore active incidents and warning
Finally, you’ll verify that the Near Me widget works as expected.
- Launch the application.
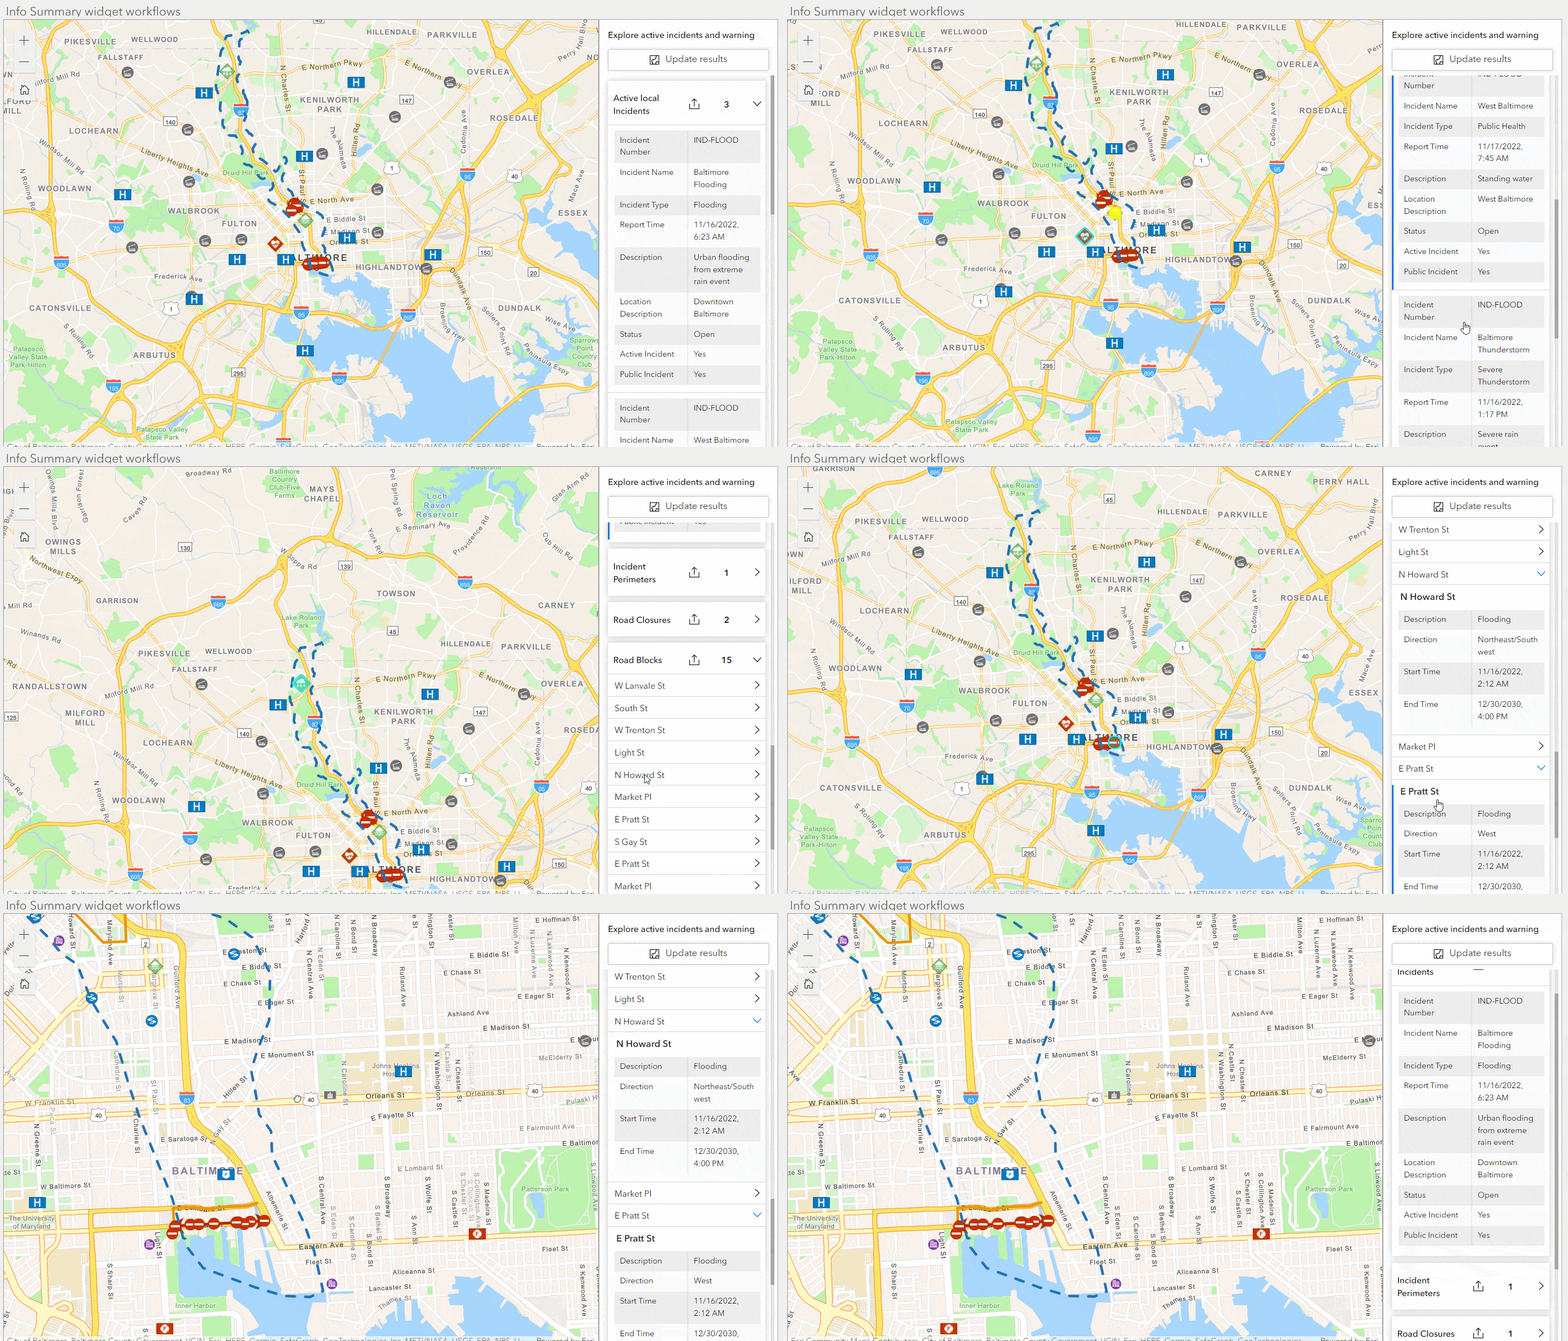
- After the application loads, widget will show all the configured layer’s feature within current map extent.
In my application, the widget will show all the Local Incidents, Road Closures, roadblocks, detours and Active weather warning within the current map area, if you your layer has more than 20 results, it will show a button “Show more” and once clicked it will load 20 more features. - With each map extent change, clicking Update results will refresh the app with current map extent features.

Related resources
- Documentation: ArcGIS Experience Builder Help: Near Me
- Documentation: ArcGIS Experience Builder Help: What’s new
- Blog article: Recreating Near Me workflows in Experience Builder
- Blog article: Recreating Situation Awareness workflows in Experience Builder
- Blog article: Creating a custom print service with reporting capability
- Blog article: Recreating environmental impact analysis workflow of Web AppBuilder Screening widget in Experience Builder
I chose Proximity analysis type for my layers to search, but cannot figure out how to get directions to the locations. The only option I have is to select the location, which highlights it only.
It would be great if you update the article with sample data and maybe convert this article into a tutorial.
It does not look like this Near Me widget or the List widget in ExB is going to replicate the heavily used Info Summary widget in WAB very well. Unfortunate because that Info Summary widget was the perfect, simple method for allowing users to navigate a list of features, including the grouping, symbology, count etc. in one easy to configure app. Now it’s going to be more complicated to configure and less functionality/usefulness. Not sure why the dev team decided to stuff this function into the Near Me tool rather than simply replicate the Info Summary tool as it was,… Read more »