With the February 2024 update of ArcGIS Online, the Near Me widget added some great enhancements. We added some functionality that used to be in Web AppBuilder Near Me, Info Summary, Situation Awareness and Screening widgets. We have implemented list virtualization to improve performance, added map symbol support to show map symbol in the widget panel and many other enhancements. Please visit this community post if you want to learn more about what is new in Near Me in February 2024 ArcGIS Online update. As you migrate to Experience Builder, you can leverage these new functionalities for your Near Me workflows in Experience Builder.
Let us assume you have a Web AppBuilder app that is used by the public to locate nearby parks and obtain information about the available recreational activities in each park. You want to migrate this app to Experience Builder. Here’s how to do it in four steps:
Create a new app
First, you’ll create an app in Experience Builder:
- Sign into your ArcGIS account.
- From the Content page, click Create app and click Experience Builder.
- Click Create New.
- Choose a mapcentric template and click Create.
See an example of an application using the Blank fullscreen template.
- In your app, add a Map widget. Near Me is mapcentric widget, so you need to add at least one map with a feature layer.
For my app, I chose a map that has park and recreational activity features.
- Add the Near Me widget to your app and connect it to the map.
Add and configure the Search widget
You want to provide the option for users to set an address or a location and find which parks are nearby, or for them to search a park and obtain information about different activities available.
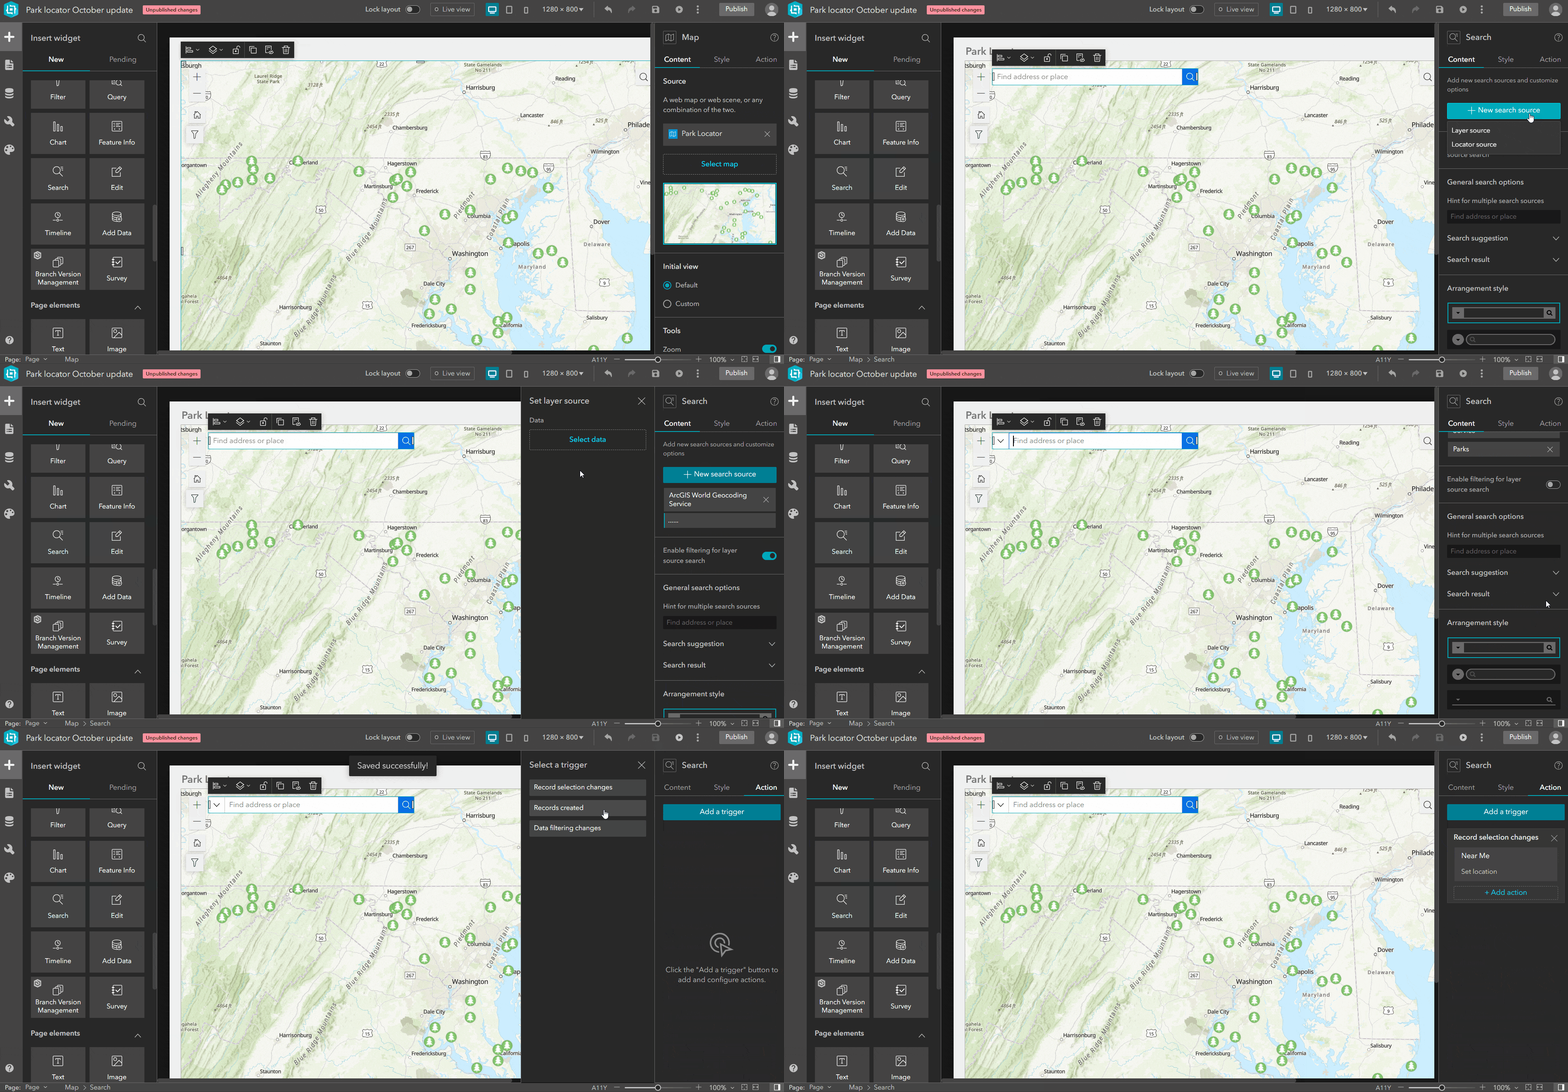
- Add the Search widget into the map.
- Click New search source
- Click on Locator source, then click on Select utility and select a geocode locator. In the sample application I used ArcGIS World Geocoding service.
- Click New search source again and configure a Layer source. I used Parks feature layer.
- Make sure that Enable filtering for layer source search is turned off if you configure a feature layer.
- Expand Search result and check Auto select the first result.
- On the Action tab, click Add a trigger.
- Select Record selection changes as a trigger.
- Select Near Me as a target from the Widgets list and Set location as an action to use the searched location as an input location in the Near Me widget.

Add and configure the Filter widget
Next, you’ll add a way for users to filter your map for specific criteria,
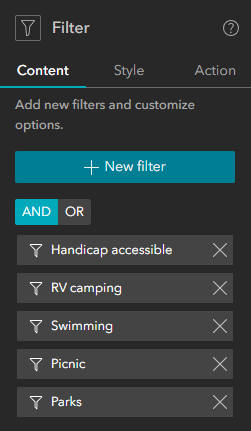
- Add a filter for each criterion. In my sample application, I included filters for accessibility, RV camping, swimming, picnic, and fishing facilities.
- Make sure AND is selected to specify that all filter criteria must be true.

3. Select arrangement style Icon and activation style Toggle switch from the content tab of the widget.
Configure the Near Me widget
Now that you’ve created your app, you’ll configure the Near Me widget by configuring the map, search, and analysis settings.
Configure Analysis Settings
- Click the Near Me widget.
- In the Content panel, under Analysis Settings, select your map.
- Click the map to configure its settings.
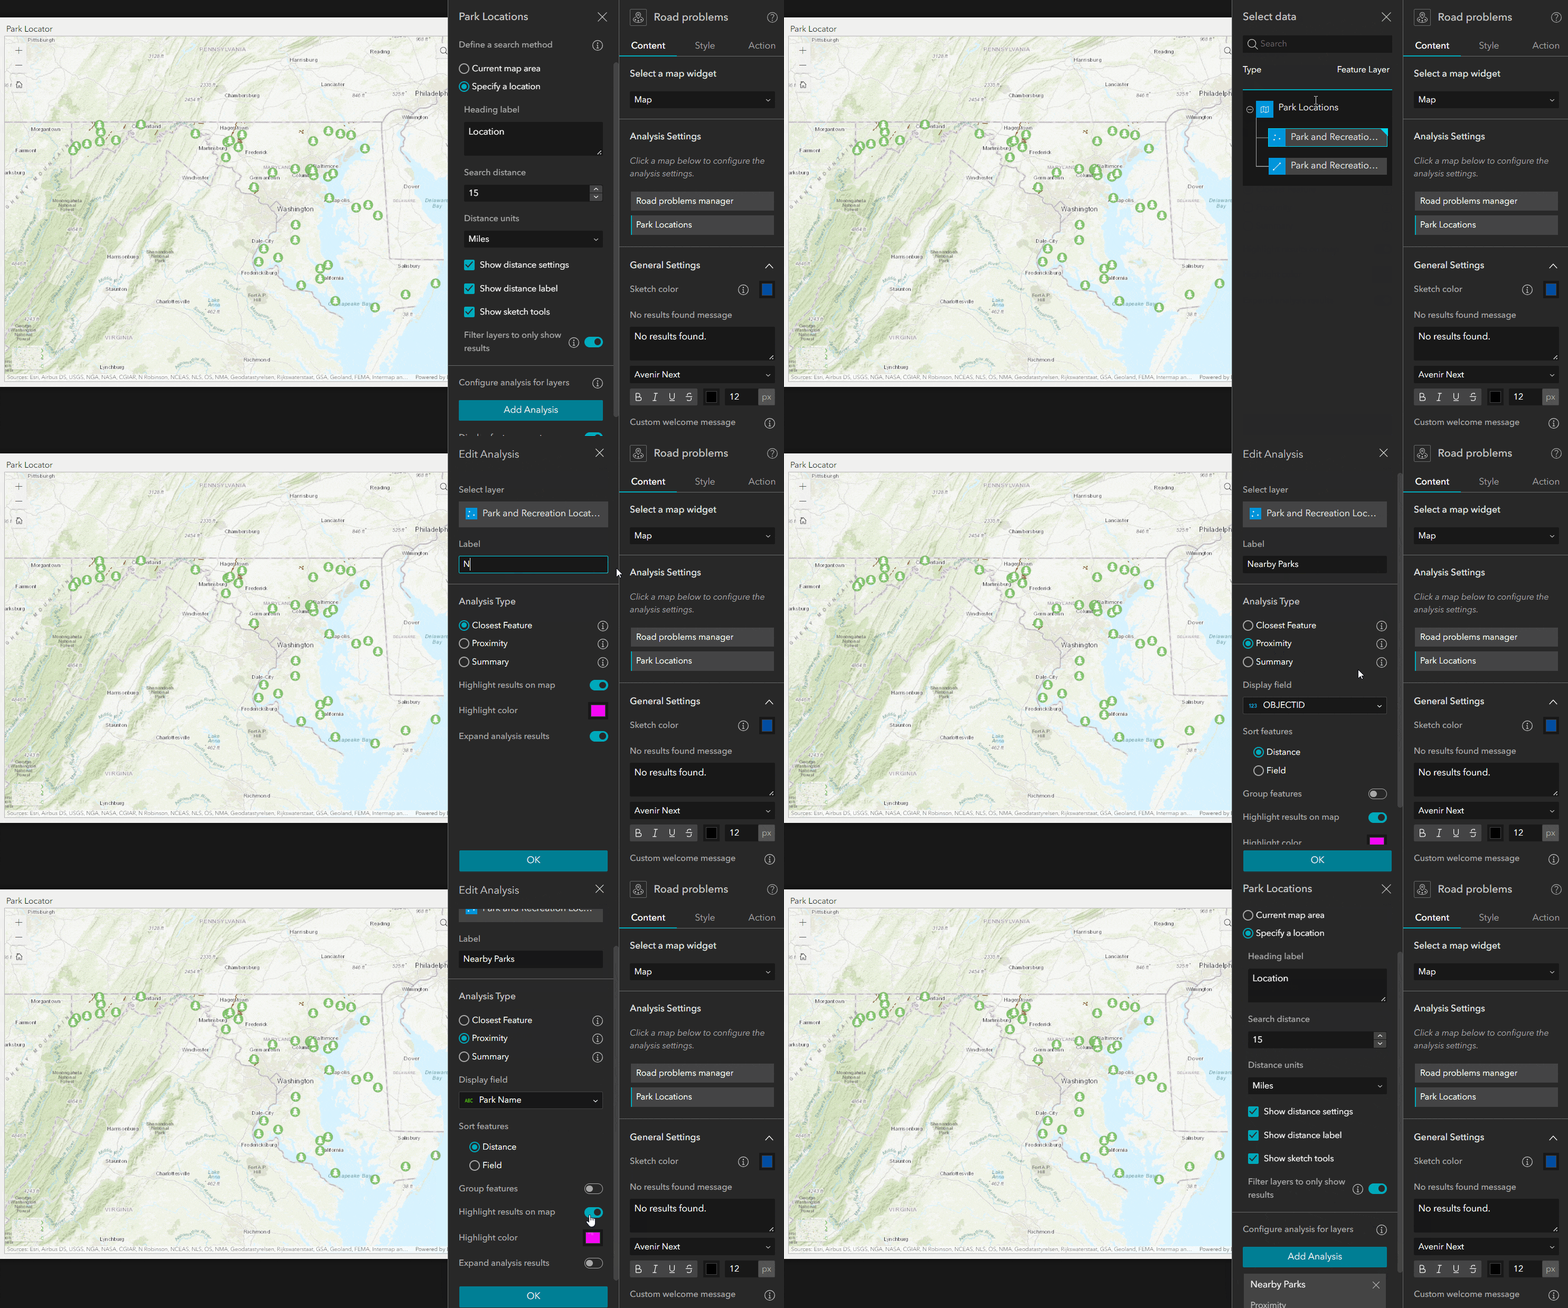
Define a search method
- Make sure Specify a location is selected.
- Set the default Search distance and Distance units. Because users want nearby results, I set my default distance to 15 miles.
- Turn on Filter layers to only show results to filter out features that are not included in the analysis results.
Configure Analysis for layers
Setting up analysis is the key step when configuring the Near Me widget, the widget will not work until at least one analysis is configured. To configure the analysis settings for layers, follow these steps:
- Click Add Analysis
- Select the layer
- Change the Label. I changed my label to Nearby parks.
- From the Analysis Types , choose Proximity.
- From the Display field dropdown, choose a field to use as feature title, In the sample app I chose Facility Name.
- Optionally choose to turn off Highlight result on map, or if you want to keep this option on, you can optionally change default Highlight color. I turned it off in the sample application.
- Enable Expand analysis results to expand the list.
- Save the app.

Configure message action
In October update we added support for Near Me to emit message action to communicate with other widgets. In your app, you can set up message action so when user clicks on a single feature from the result list in Near Me, the map will zoom and flash to that feature.
- Click on the Action tab in Near Me widget
- Make sure Message action tab is selected.
- Click on Add a trigger
- Select Record selection changes
- From Widgets list, select Map.
- Select Zoom to as an action
- Make sure that your layer is listed in the Trigger data section, optionally set custom zoom scale. Close Action Settings tab.
- Click again on + Add action button again and add flash action. Make sure to select your layer for Trigger data and Action data.
- Save app.
Find nearby parks
Finally, you’ll verify that the Near Me widget works as expected.
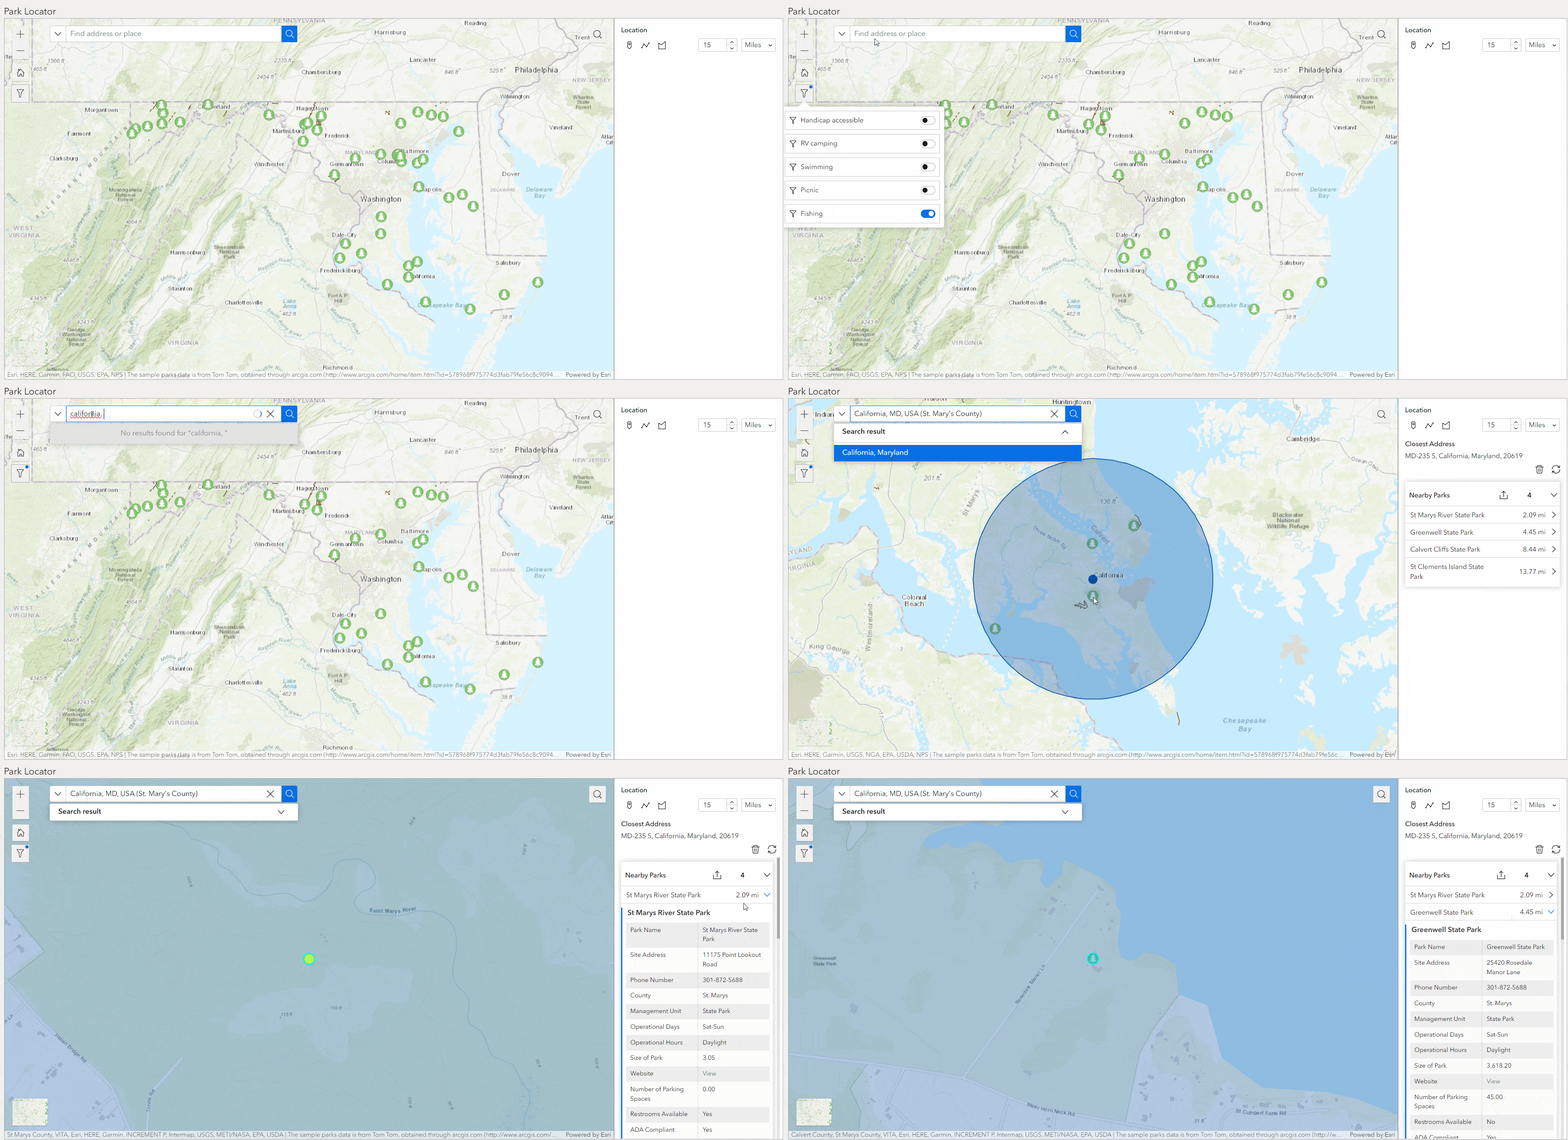
- Launch the app.
- Click the Filter widget and turn on a filter.
If your map filters to show only facilities that meet your search terms, great! I chose to filter for fishing facilities. After filtering, only the parks that have fishing available are shown on the map. You can search a location using search widget to use the location as an input in the Near Me (Beta) widget. As an alternative, a user can drop a point to find nearby parks within the search distance and obtain detailed information about those parks.

Article Discussion: