Effective task management often goes beyond assigning and completing work. Understanding how tasks progress throughout their lifecycle can provide valuable operational insight. By incorporating activity logging techniques into your task workflow, you can gain visibility into your team’s processes, making it easier to identify and address chokepoints.
In this blog, you’ll learn how to use activity logging strategies and custom task statuses in ArcGIS Field Maps to capture meaningful task metrics automatically. Follow along for tips on how to take advantage of Field Maps’ flexible task configurations and create workflows that better support your team’s needs.
Basic Time Stamping
Tasks make it easy to time stamp actions. It may be valuable to know when assignments are started and completed as well as how long they take to complete. The following tutorial will walk you through how to configure a time stamping mechanism to document your tasks’ start times, end times, and duration.
Setup
To get started, you will need to create three new fields for your task-enabled layer. You can do this by opening your tasks map in ArcGIS Field Maps Designer, navigating to the Form tab, selecting your task layer, and dragging and dropping Form elements from the Form builder. For this example, add two new Date and time fields. Name one “start time” and the other “end time”.
Add a third field for the task duration. This could be a text field or a numeric data type depending on how you want to store the task duration value. Note that numeric data types can be further formatted for display on pop-ups or dashboards. For this example, use a double.
Configuration
To accomplish start time, end time, and task duration time stamps, we’ll configure automatic updates attached to Edit Actions using arcade. The following steps assume the default task configuration. The default Edit Actions are Pick up, Start, and Finish. Learn more about standard task configurations here.
- In ArcGIS Field Maps Designer, navigate to the layer’s Tasks tab. Select the Assigned layout and click the Start action.
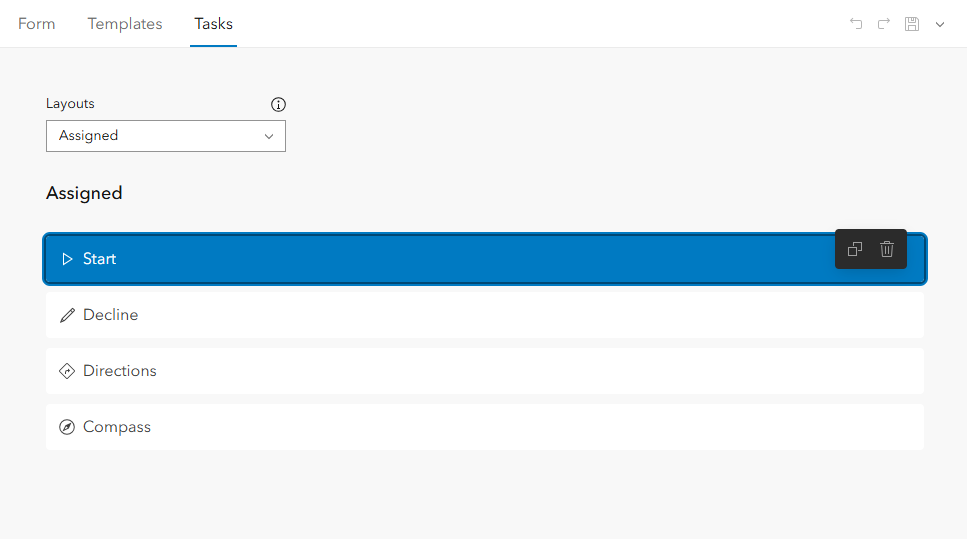
- In the Properties pane to the right, add an automatic update. Select your start time field. Next, click the gear to calculate an expression.
Tip: This Start action already has an automatic update to change the status to In progress when using the default task configuration. You can add multiple automatic updates to a single action to add or change values for multiple fields with a single button press.
- Create a new expression called “Current Time”. For the arcade, simply type “return Now();”.
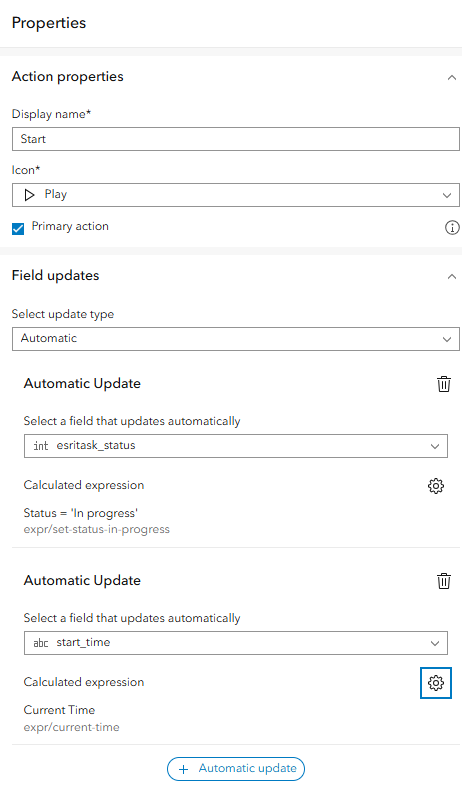
- Click Done, then click Save. This will write the current time into the
start_timefield at the moment that the Start action is tapped on the Field Maps mobile app. - We will follow a similar process to populate your end time field. Navigate to the In progress layout in the Tasks tab. Select the Finish action.
- Add an automatic update to the end time field. You can select the same “Current Time” expression you just created as the calculated expression.
- To populate the task duration field, add another automatic update to the Finish action. Select the task duration field and calculate a new expression. There are many different formats this field could take. The following implementation assumes that the
end_timeandstart_timefields are of data type “date”. Type the following expression into the Arcade editor.DateDiff($feature.end_time, $feature.start_time, "minutes")This expression returns the task duration as a double representing the total number of minutes. There are different ways to call the DateDiff function depending on the data type of the fields being passed as parameters.Tip: You can use an Arcade expression in an activity log, pop-up, or dashboard to format this value in many different ways. Arcade gives extensive flexibility to customize the format of your displays. Consider using the built-in ArcGIS Arcade Assistant (beta) to find a format that best suits your needs. - Be sure to save your changes. You’ve now successfully set up time stamping and duration calculating for the start time and end time of your tasks.
Advanced Time Stamping
Time stamping can be applied in a similar manner to other task actions. You may want to add a time stamp for when a task is picked up or calculate how long an assignee held onto a task before beginning. More impactful time stamping configurations become available when looking beyond the default task configuration. You may choose to add flexibility to your workflow by adding a custom task status.
In some cases, you may want to allow assignees to decline a task. You can do this by adding a custom Declined status. Similarly, you can allow assignees to pause and resume work by adding a custom Paused status. When paired with timestamp fields, this status can record when a task is paused and resumed, calculate the total pause duration, and adjust the overall task duration by excluding time spent in the paused state.
These are just a few examples of what you can accomplish with custom task statuses and activity logging. By following a similar workflow of adding fields, configuring automatic updates, and using Arcade expressions, you can capture timestamps and calculate metrics for virtually any stage of your task lifecycle. Consider what information would provide the most value to your organization and configure your workflow to capture it automatically.
Activity Logging Summary
You may want to take activity logging even further by creating a summary field for your task layer. You can use Arcade to configure your layer so that actions associated with a task are added to its log field in real time. This allows you to collect timestamped task actions all in one place. The output should be chronological and easy to read. Follow along to create an example of an activity logging summary field using the default task configuration.
Creating a log summary field
- Add a new string field to your task layer. Give it a relevant name and increase the Length. For this example, name the field
activity_log, and increase the length to 4000 characters. - Navigate to the layer’s Tasks tab in Field Maps Designer. Choose the Unassigned layout and click the Pick up action button to open its Properties pane. Add an automatic update to the
activity_logfield. Click the gear next to Calculated Expression and create a new expression. Give the expression a relevant name, such as “Log activity”. - In the Arcade editor, you will assign corresponding task properties to variables and dynamically display them in a return statement. For this example, type the following text into the Arcade editor. Make sure field names match exactly.
// Get the existing activity log from the original feature.
// If the log is empty, this will simply return an empty dictionary.
var events = Dictionary($originalFeature.activity_log);

var startStatus = $originalFeature.esritask_status;

// Convert the original task status into an activity label.
var activity = When(startStatus == 0, 'Picked Up',
                    startStatus == 1, 'Started',
                    startStatus == 2, 'Completed',
                    '');

var assignee = DomainName($feature, 'esritask_assignee');
var nowFormat = Text(Now(), 'MM/DD/YYYY HH:mm:ss');

var event = activity + " by " + assignee;

// Add the new activity to the existing log.
events[nowFormat] = event;

return Text(events);
- Next, navigate to the Assigned layout and select the Start action. Create a new Automatic update to the activity log field in the Properties pane. Click the gear to calculate an expression. You can reuse the “Log activity” expression that you created in the previous step.
- Repeat this process for the Finished action in In progress layout.
- Be sure to save your changes.
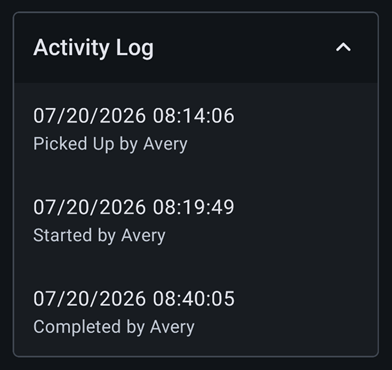
To make the activity log more readable , you may want to add a pop-up element, formatted as a fields list. One advantage to this approach is it will be supported across the Esri ecosystem. Follow the following steps to configure your pop-up as seen below.
- Open Map Viewer and select your task-enabled layer.
- Open the Pop-ups panel from the Settings toolbar on the right-hand side of the screen.
- Click Add content and choose Arcade.
- Give the expression a relevant name. The expression will use the values stored in the
activity_logfield as key-value pairs and format them to be displayed as fields, with the timestamp as the field name and the activity as the field value. Type the following into the Arcade editor.// Convert the activity log to a dictionary with // timestamps as the keys and activities as the values. var activityLog = Dictionary($feature.activity_log); // Create an empty array for activity timestamps as text element field names // and an array containing the timestamps. var dateFields = []; var timestamps = GetKeys(activityLog); // Iterate through the array of timestamps and add them to the field names. for (var t of timestamps) Push(dateFields, { "fieldName": t }); // Return the text element configuration. return { type: 'fields', title: 'Activity Log', //description: '', fieldInfos: dateFields, attributes: activityLog }
An activity logging summary can also be applied to advanced task configurations involving Declined and Paused statuses. Consider displaying this field in an ArcGIS Dashboard, Storymap, or Experience.
Conclusion
Activity logging can help task records become a valuable source of insight. By automatically capturing timestamps, durations, and task events, you can reduce manual documentation while gaining a clearer understanding of how work is completed. I hope you are inspired by these techniques, and I encourage you to explore their flexibility and customize them to fit the unique needs of your organization.

Article Discussion: