When work is planned in a neighborhood, residents and businesses need timely notice. Clear communication helps residents stay informed, traffic flow more smoothly, and businesses adjust with fewer disruptions. The Public Notification Instant App makes this outreach effortless with a simple, map-driven workflow — ensuring the right message reaches the right audience at the right time.
Transition from Web AppBuilder
For years, the Public Notification Web AppBuilder widget supported mailing list creation and notification workflows. With Web AppBuilder retiring, organizations should now use the Public Notification Instant App, the next generation of this capability. It carries forward the same familiar functionality while introducing a modern interface within the Instant App and a simplified setup that make the process faster, more transparent, and easier for both technical and non-technical users.
Putting Public Notification into Action
In this hypothetical example, a planned utility project near the intersection of Tulip Ln and Sandalwood Dr is used to illustrate how the app guides the notification process. The goal is to identify all nearby properties so residents and property owners can be notified in advance.
To begin, let’s look at a few key configuration settings that shape how the Public Notification Instant App works.
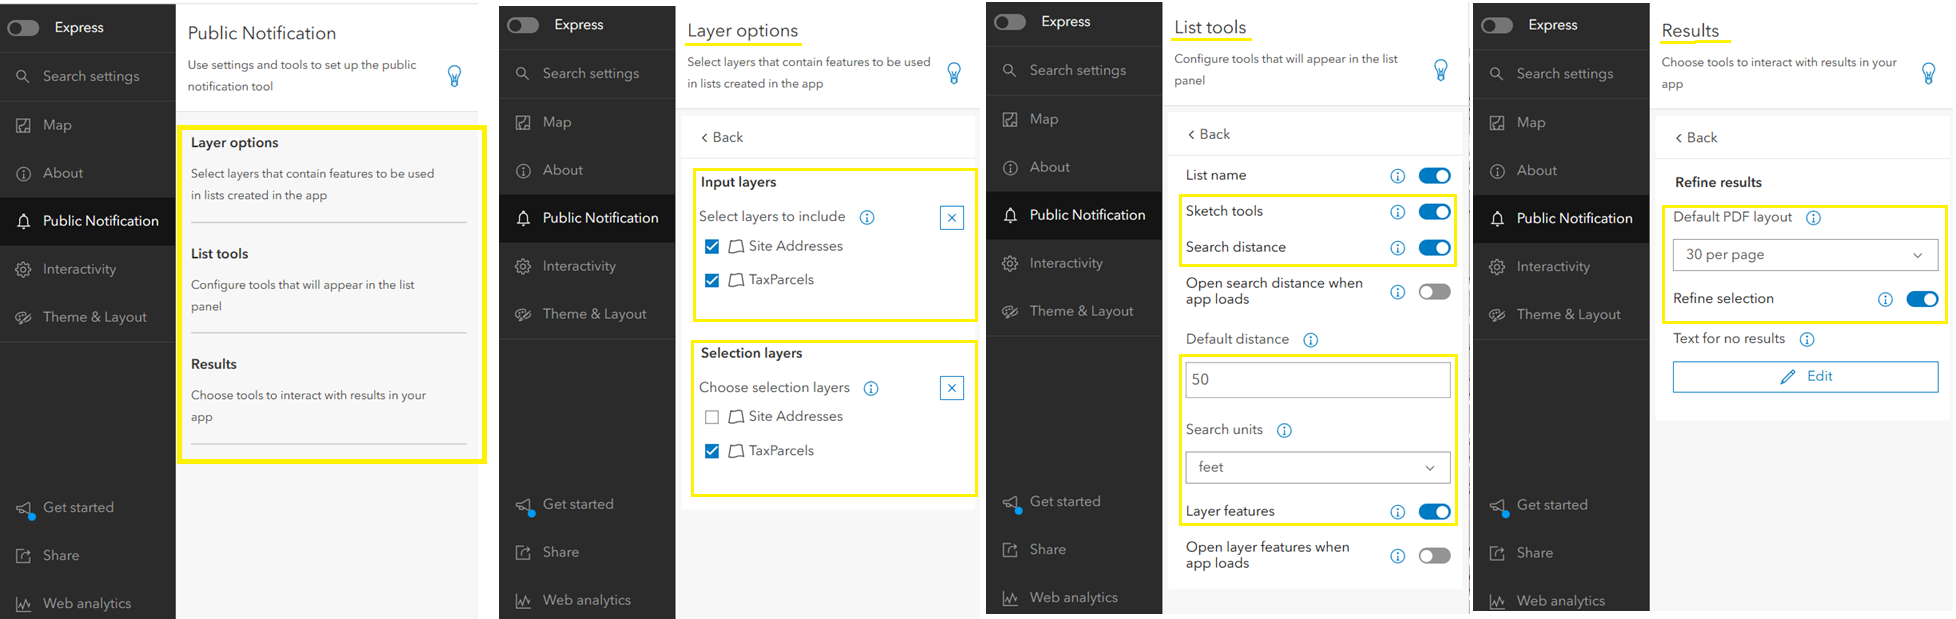
Configuration Settings
In the config panel, the Public Notification tab is organized into three main sections:
Layer options
- Input layers – Determines which layers are available for identifying the features to notify.
- Selection layers – Specifies which layers can be used to define the area of interest. All layers from the web map appear here, and the app author decides which are available in each list.
List tools
- Search distance – Enabled by default, allows the app author to define a starting buffer distance and unit. In this example, the default is 50 feet, which can be adjusted dynamically while building the selection.
- Layer features – When enabled, allows the use of an existing layer and sketch widget to define a boundary. All features from the input layer that intersect the selected boundary are included in the results.
Results
- Refine selection – Toggle option that, when enabled, opens a panel to manage and adjust the total features across all lists.
- Page layout – Defines how many records appear on each page of the exported PDF and controls the layout of mailing labels and lists.
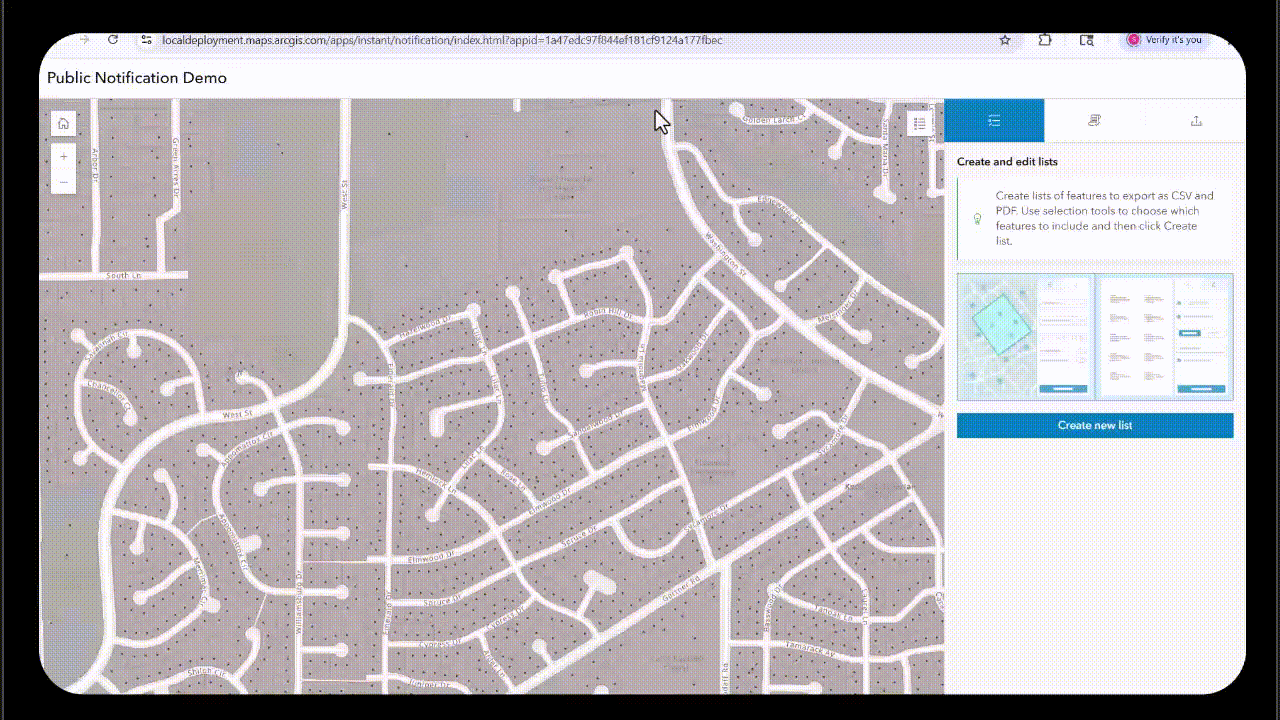
Create and Edit Lists
Let’s start by creating a list in the Create and edit lists tab, where the workflow takes shape. Clicking Create new list opens a panel with options such as the input layer. In this example, the input layer is Site Addresses—a point layer from the web map that has been configured for use in the app.
The location of interest can be defined in two ways:
- Search bar – Type an address into the search bar to drop a point on the map. This uses either the ArcGIS World Geocoding Service or a custom locator set by the app author.
- Sketch widget – Draw directly on the map.
In this scenario, a point is placed near the intersection of Tulip Ln and Sandalwood Dr, where the project is set to begin.
Initially, the Selected features label displays “0.”
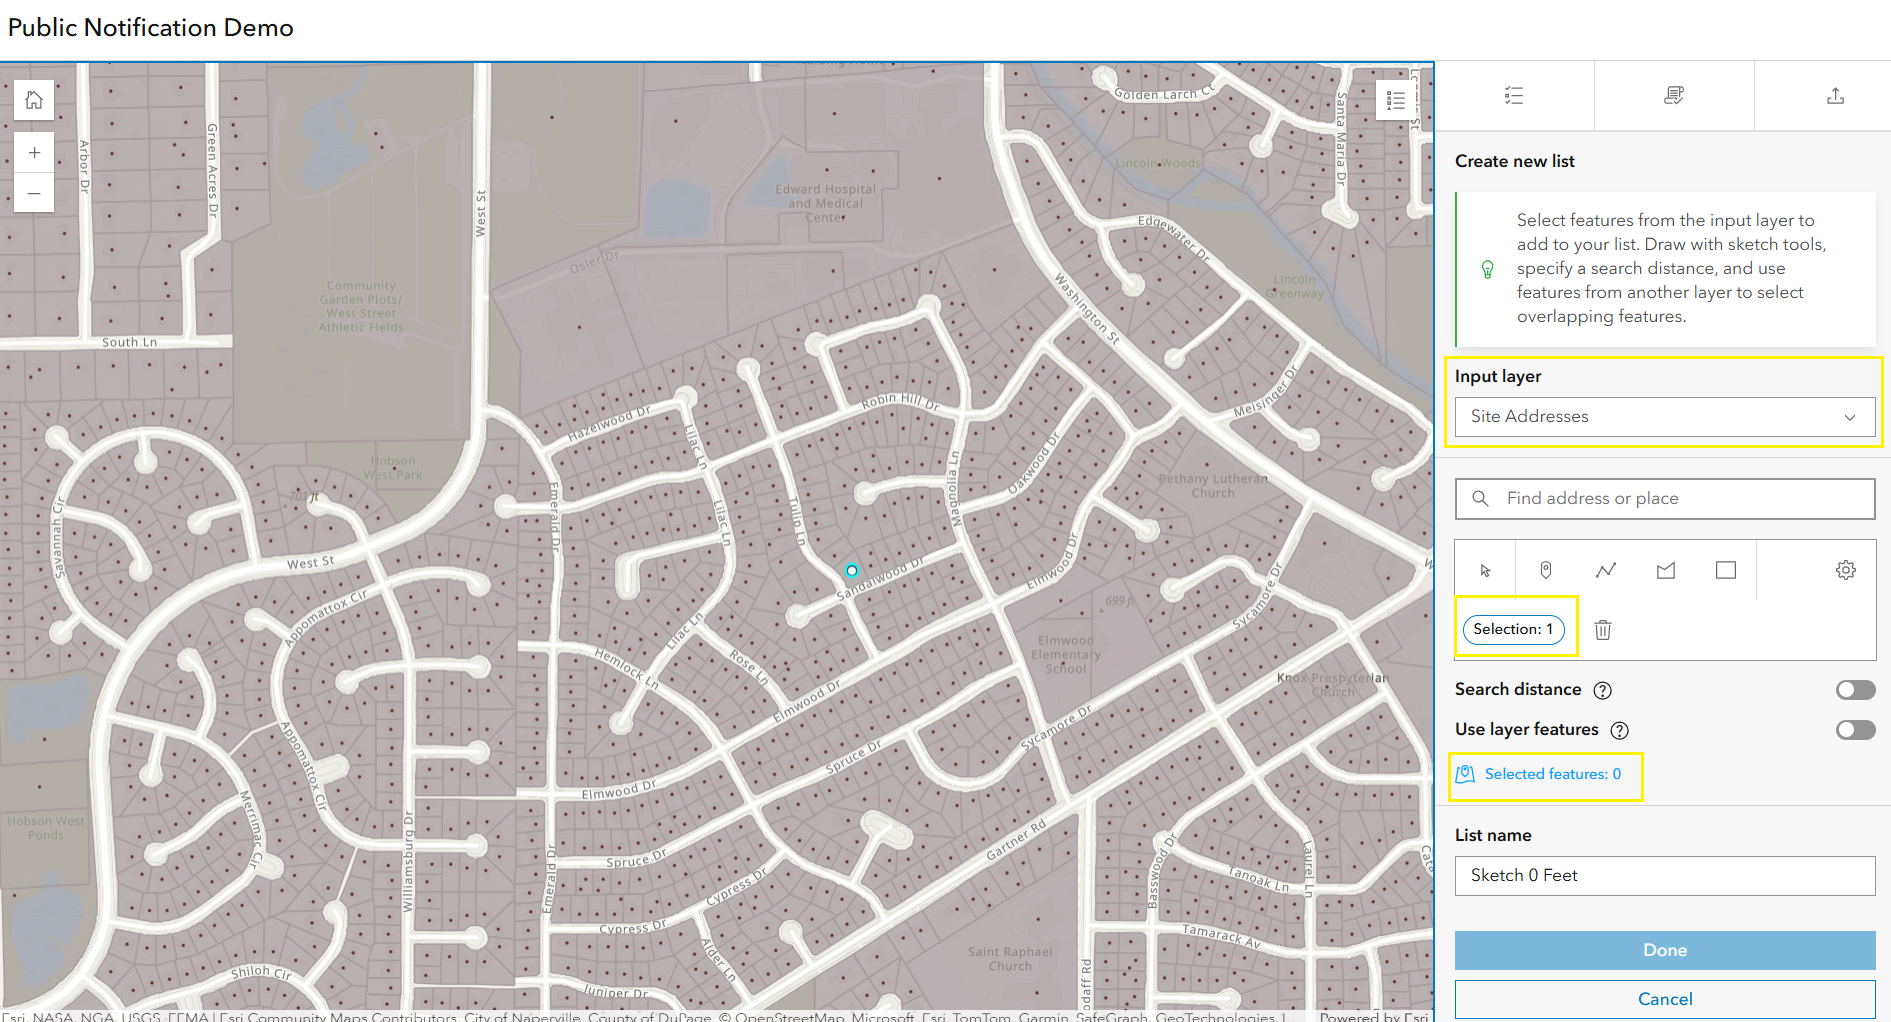
Enabling the Search distance option (on by default in the app’s configuration) applies a 50-foot buffer around the point.
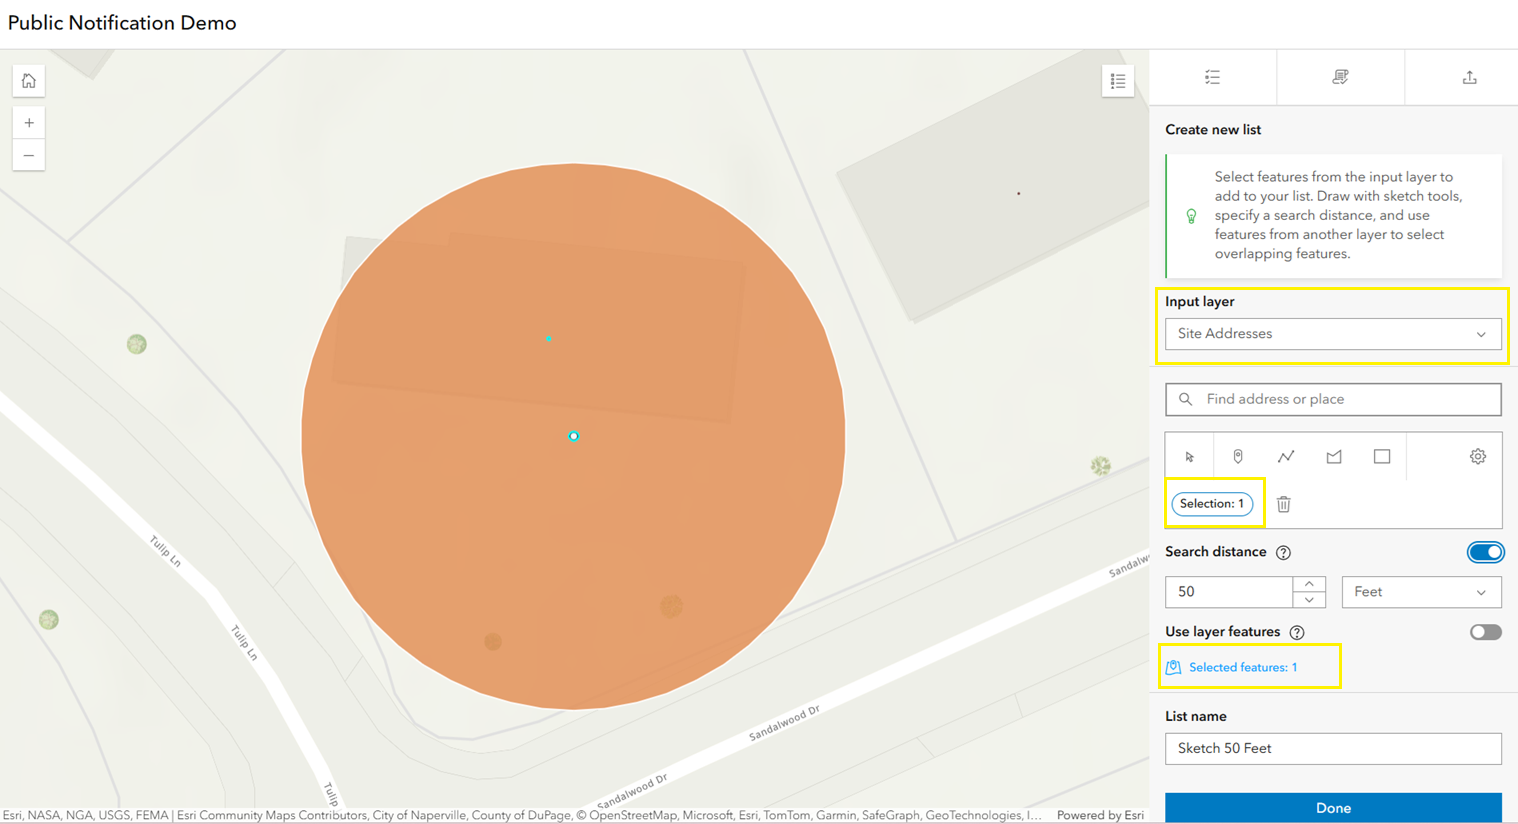
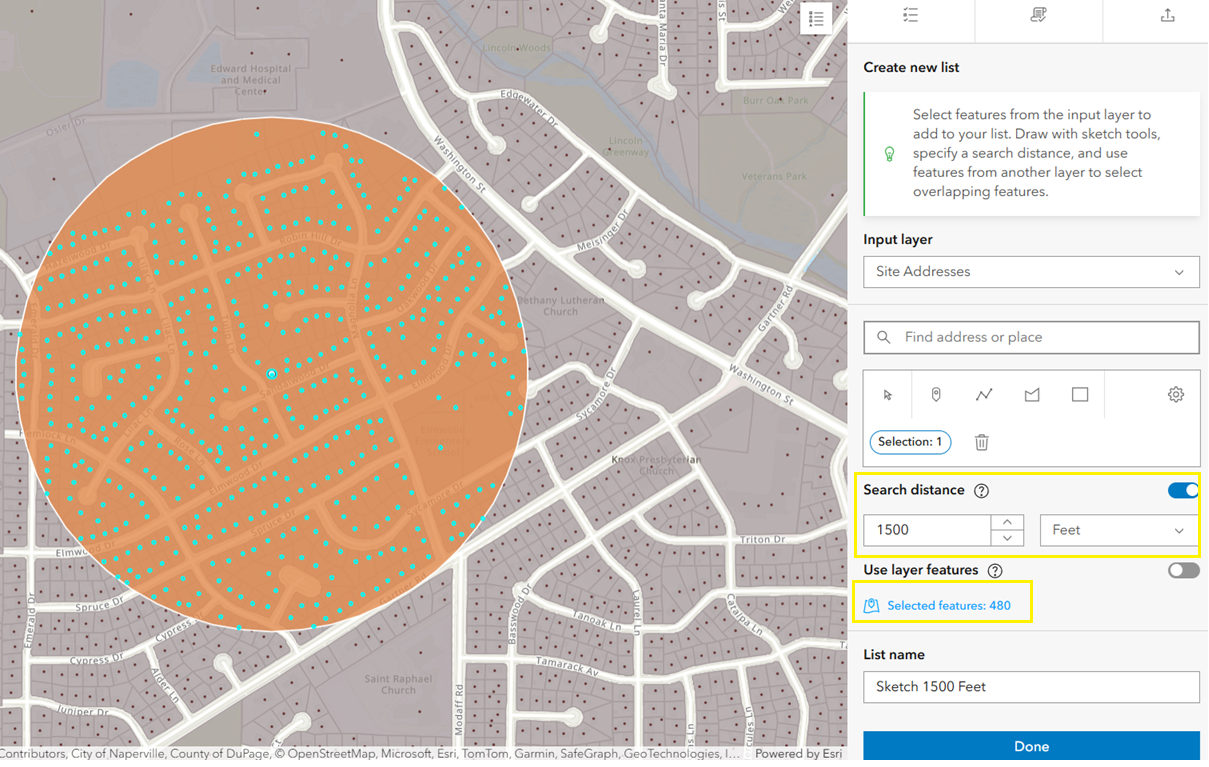
Because no addresses fall within this range, the buffer is increased to 1,500 feet. The expanded buffer captures additional addresses, updates the count dynamically, and displays the selected features on the map.
For cases where selections must align with parcel boundaries rather than a circular buffer, the Layer features option provides another approach. When enabled in the app configuration, it allows users to choose a layer such as tax parcels. Those features act as boundaries, and all intersecting addresses from the input layer are included in the results.
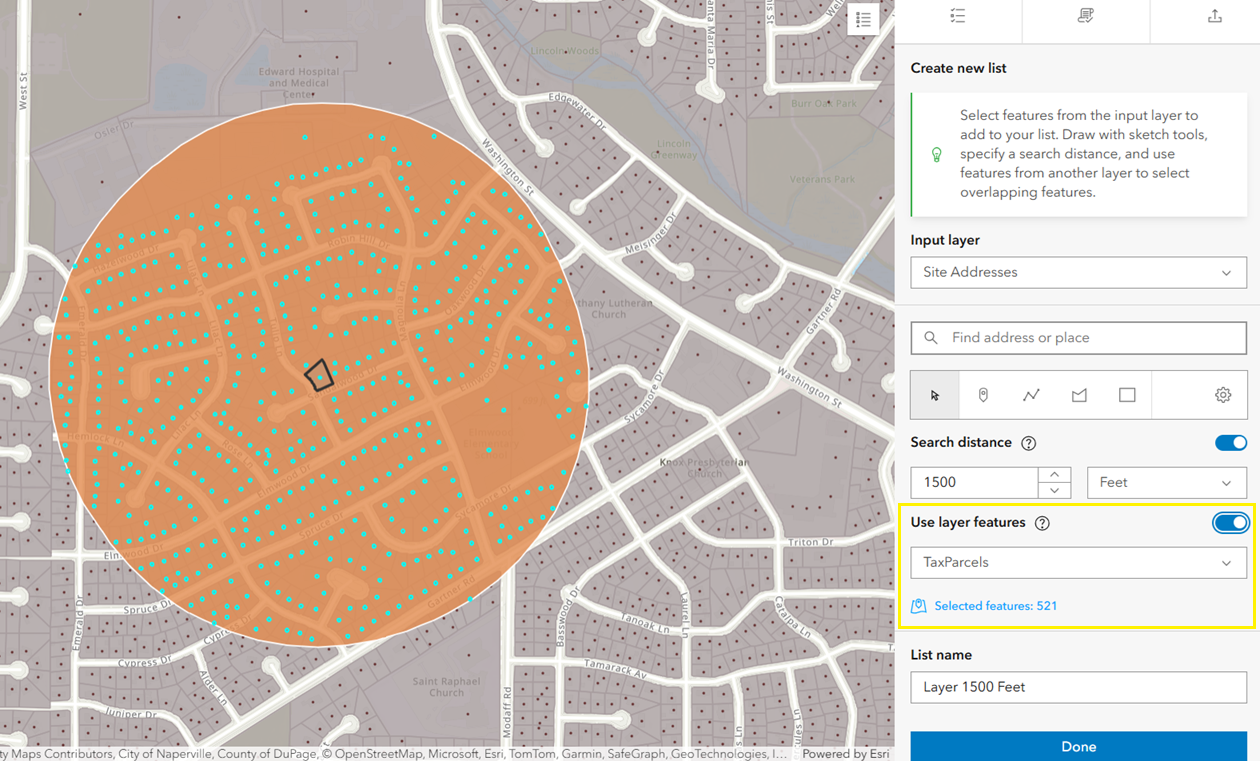
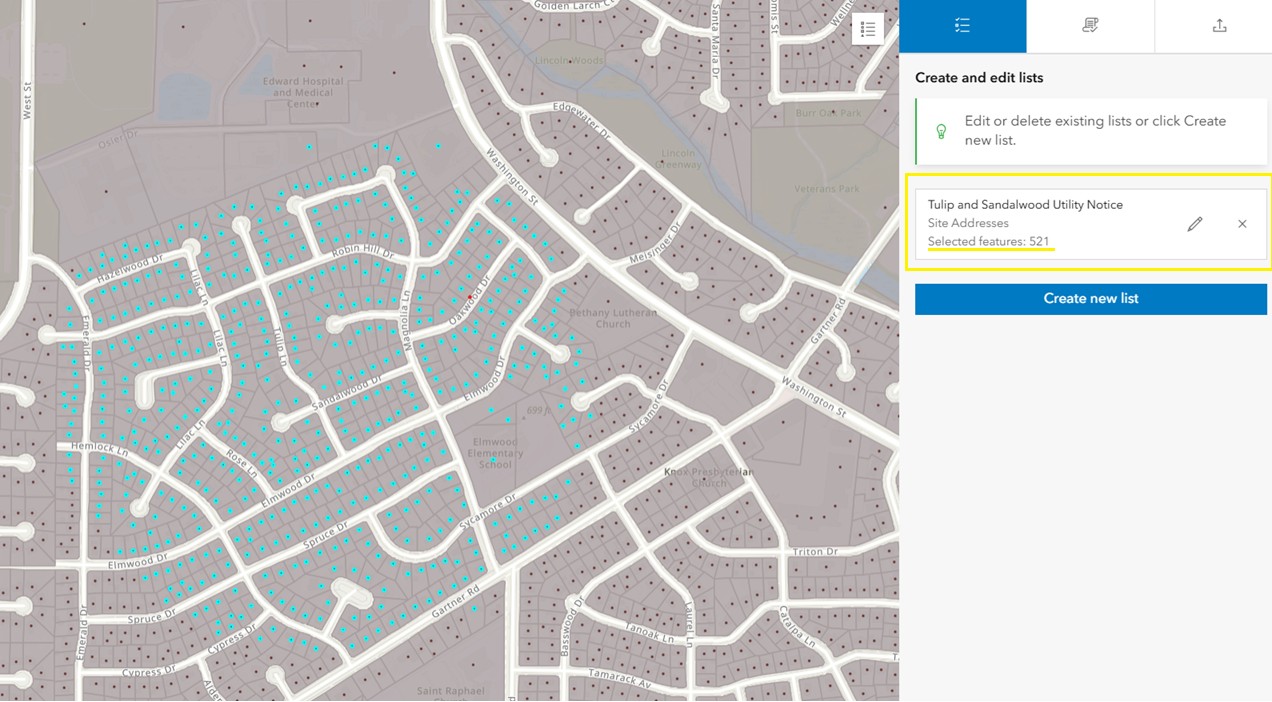
Once the selection is finalized, a default name appears in the List name field. Users can replace it with a descriptive name—for example, Tulip and Sandalwood Utility Notice. Clicking Done saves the list, which then appears in the Create and edit lists panel with buttons to edit or delete.
Refine Selection
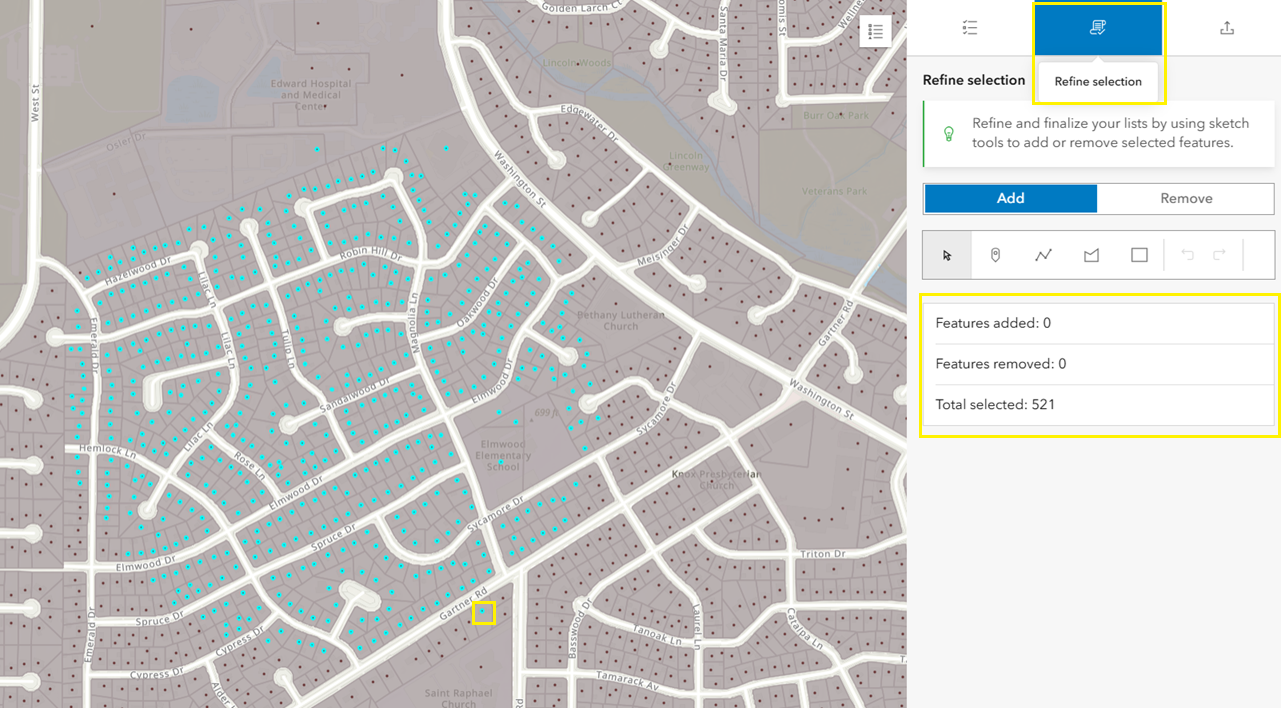
The Refine selection tab, when enabled in the app settings, allows users to fine-tune the features chosen in the earlier step. This tab is not visible if it is not enabled. The option is especially useful in workflows that require selecting non-contiguous features, which are single features made up of multiple, physically separated parts, such as a lake with several islands.
The panel includes tools to refine the list. Add and Remove buttons adjust the selection, supported by the sketch widget for drawing shapes on the map to carry out these actions. The summary displays the number of features added, removed, and the total, updating dynamically as changes are made. Undo and Redo options provide quick corrections if needed.
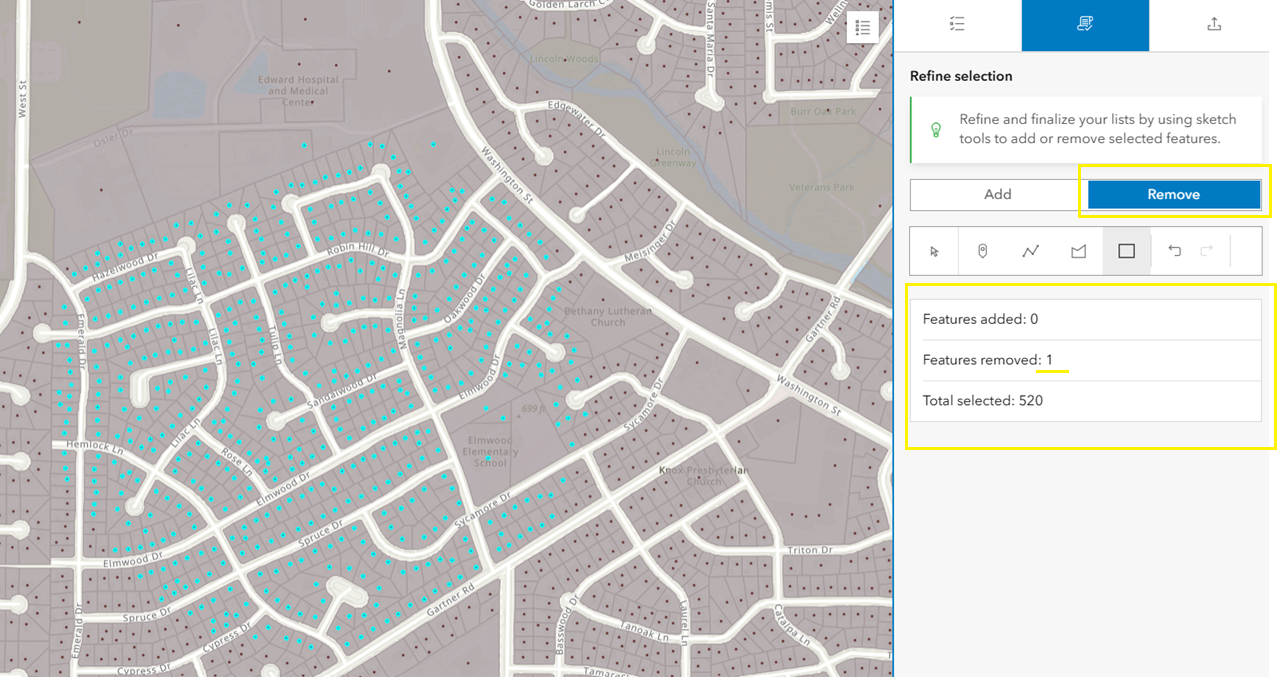
In this example, a feature below Gartner Rd is removed by clicking the Remove tab and drawing a rectangle around the point. The feature is immediately removed, and the summary updates to display Features removed: 1 and Total features: 520.
After refinement, the Create and edit lists tab updates to display a panel with the refined feature list and the revised feature count.
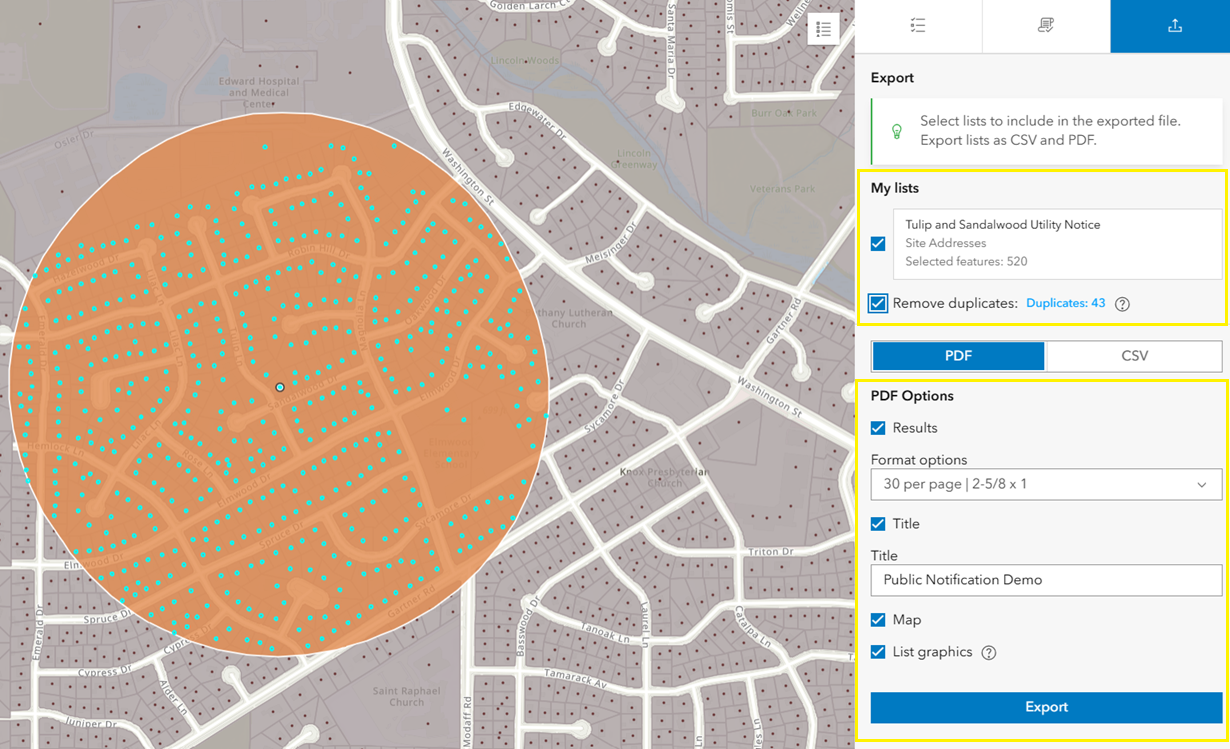
Export
With the list complete and refined, it’s time to notify the community. The Export tab transforms the selection into mailing labels, PDFs, or CSV files so notices reach the right people quickly and efficiently.
Under My lists, all lists created during the workflow are displayed. Every list is selected by default, but any can be unchecked if they are not needed. A Remove duplicates option shows the count of duplicate records and, when enabled, excludes them from the export.
Two export formats are available:
- PDF – Ideal for printed notices or mailing labels.
- Results – Choose the display format (for example, 30 per page | 2 × 5.8 × 1) using the dropdown before exporting.
- Title – Add the app’s title to the exported file. The title is included by default but can be edited if needed.
- Map – Insert the map with selected features on the first page. The List graphics option can also be checked to display buffers or graphics created during the workflow.
- CSV – Perfect for digital workflows. Exports the results as a CSV file that can be downloaded, saved locally, or shared with other systems for further processing.
Both formats generate outputs ready for printing, archiving, or distribution, ensuring the notification effort reaches the right audience in the right format.
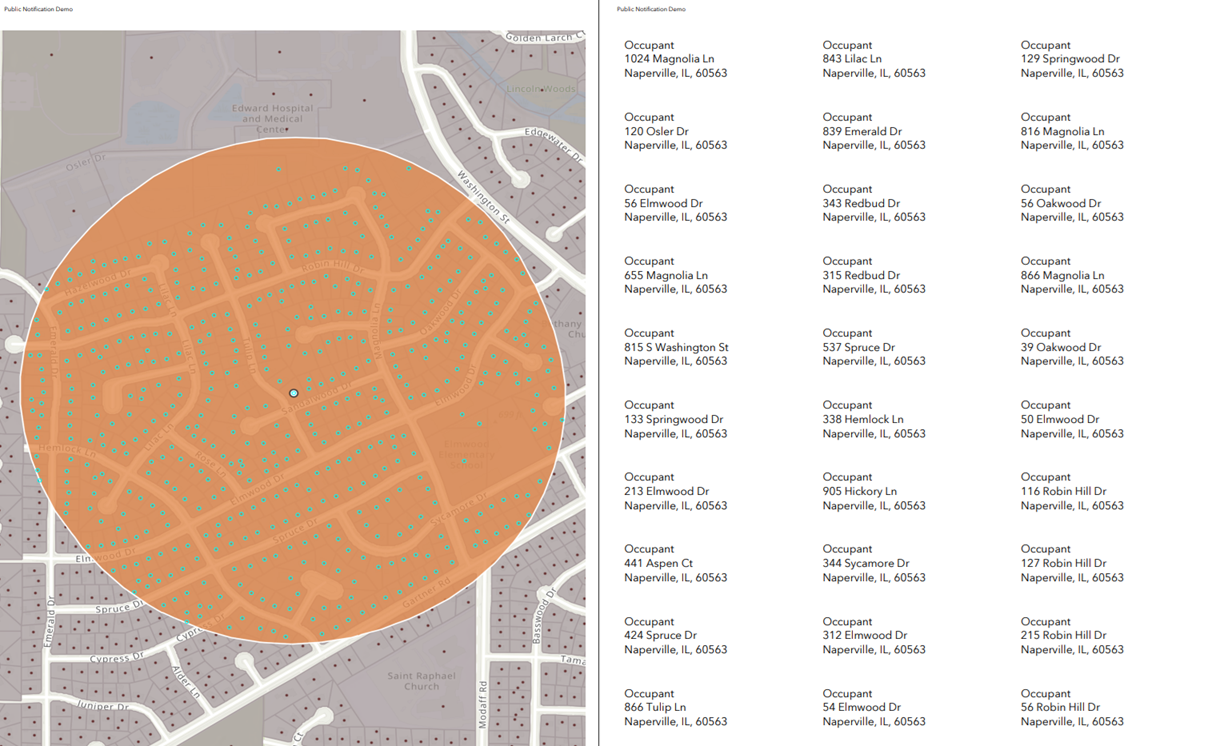
The image below shows an exported PDF that includes the map with graphics as well as the resident details.
The animation below illustrates the complete workflow discussed above.
To help organizations get started quickly, the Public Notification Instant App is also available as part of an ArcGIS Solution: Public Notification. The solution includes preconfigured maps and apps so teams can jump-start their implementation without building from scratch.
Explore the Public Notification Instant App to see how easy it is to notify the right people at the right time—and simplify how your organization manages public notices.

Article Discussion: