
A few weeks ago, I came across publicly available data of Malbork Castle, a medieval stronghold in northern Poland. I had visited the castle a couple of times before, and seeing the model brought back memories. It sparked the idea for a simple cultural heritage app: an immersive 3D experience that would let people explore Malbork Castle virtually and discover the stories connected to it.
I wanted the app to feel designed around the castle, with styling, navigation, and interactions that worked together as one experience. That need for creative control made the ArcGIS Maps SDK for JavaScript the right choice.
At the same time, as a GIS professional rather than a software developer, I have limited experience building full web applications. For me, creating a custom web app would normally mean either involving software developers or investing significant time in learning development skills myself. Instead, I used this project to explore whether AI could help turn the idea into a working prototype.
What you’ll find in this article
In this blog post, I share how I built the Malbork Castle Explorer with agentic AI and the ArcGIS Maps SDK for JavaScript. This is not a step-by-step tutorial for building the same application, but a practical walkthrough of the process: how I planned the app, gave AI useful context, reviewed its output, recovered from mistakes, and eventually shared the app. Along the way, I also highlight practical approaches and reusable patterns that can be applied to other projects.
If you are a GIS professional curious about building your own app with AI, this post is for you!
What I built
Discover the Malbork Castle Explorer
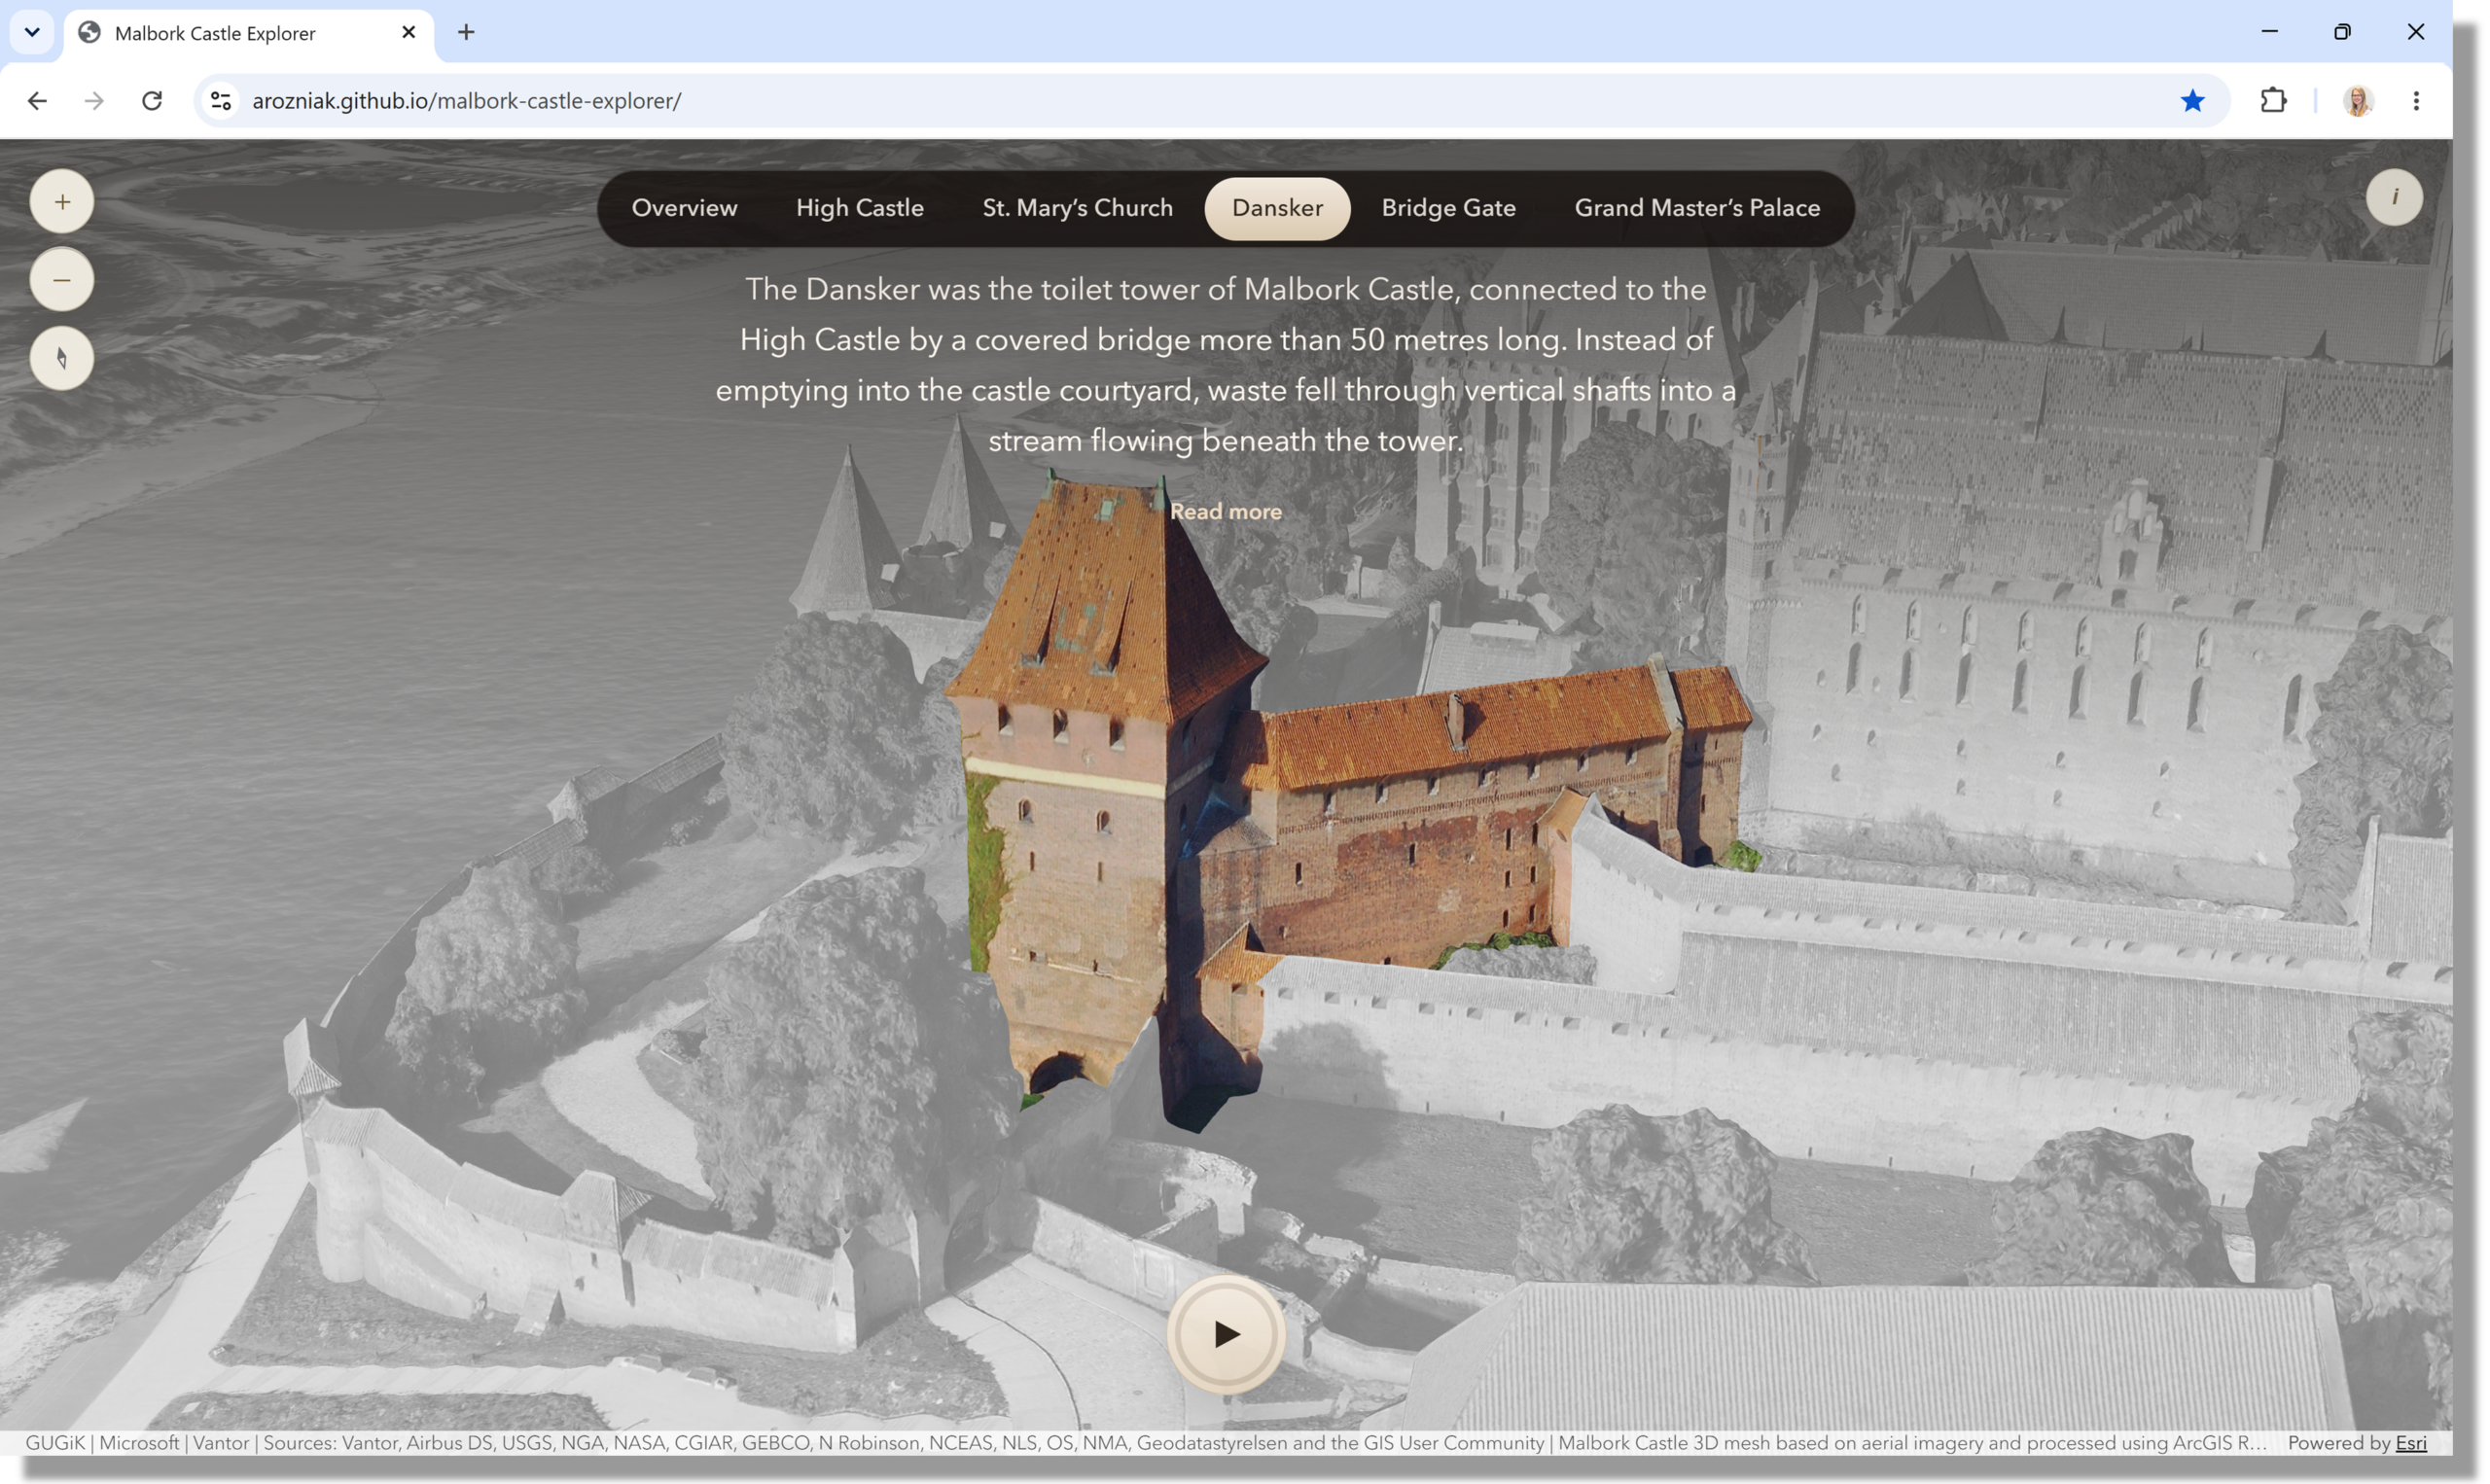
The final application is a lightweight 3D explorer for Malbork Castle. It opens with a full-screen web scene and a small set of navigation tabs for key areas of the castle. Each tab moves the camera to a predefined viewpoint and shows a short description based on the scene content.
The app also includes a guided tour mode. When started, the tour moves calmly between selected viewpoints, allowing users to experience the castle as a sequence of places rather than as a static 3D model. The interaction is intentionally simple: users can explore manually, read more when they want additional context, or let the guided tour move them through the experience.
My workflow at a glance
- Planning
- Setting up
- Giving AI context: Using official tools and references, Keeping things simple, Documenting decisions
- Building the app: Initial version of the app, Iterating on the AI outcome, When things go south, Review and fix
- Deploying
1. Planning
Before working with the AI agent, I spent some time thinking about the data and user experience. You might be surprised how much smoother the process becomes when you take some time to plan first! In that sense, working with AI is not so different from working with developers: the clearer the requirements, the better the result.
I started by preparing the data as a web scene, combining the Malbork Castle mesh layer with a basemap. I then selected a few locations to highlight and prepared the related story content.
Next, I thought about the application itself: what functionality it should provide, how users would interact with it, and what kind of experience I wanted to create. To organize these ideas, I sketched a few rough concepts on paper and later used AI to turn them into more polished illustrations.
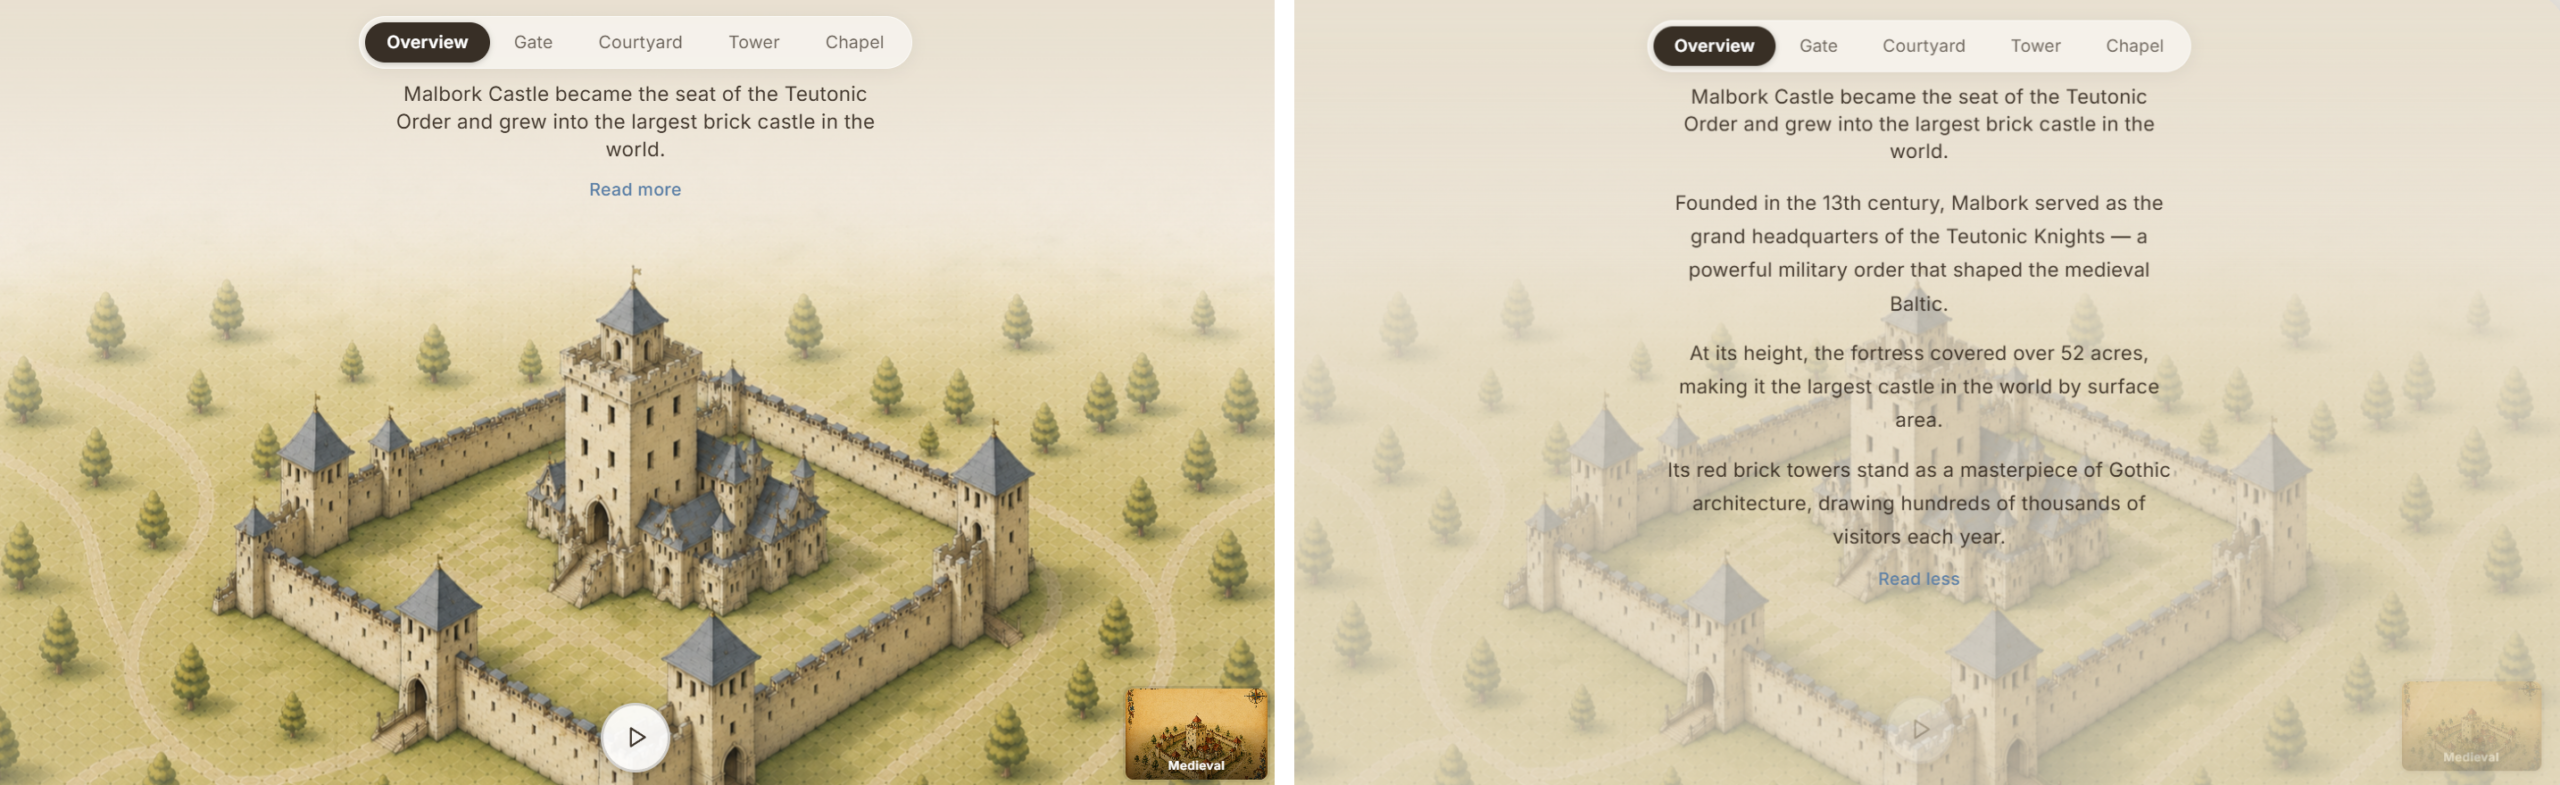
I invested quite a bit of time in the UX design for this project, but that’s largely because I enjoy that part of the process. In practice, AI can work just as well from a simple description, sketch, or wireframe. The important thing is communicating the idea clearly.
2. Setting up
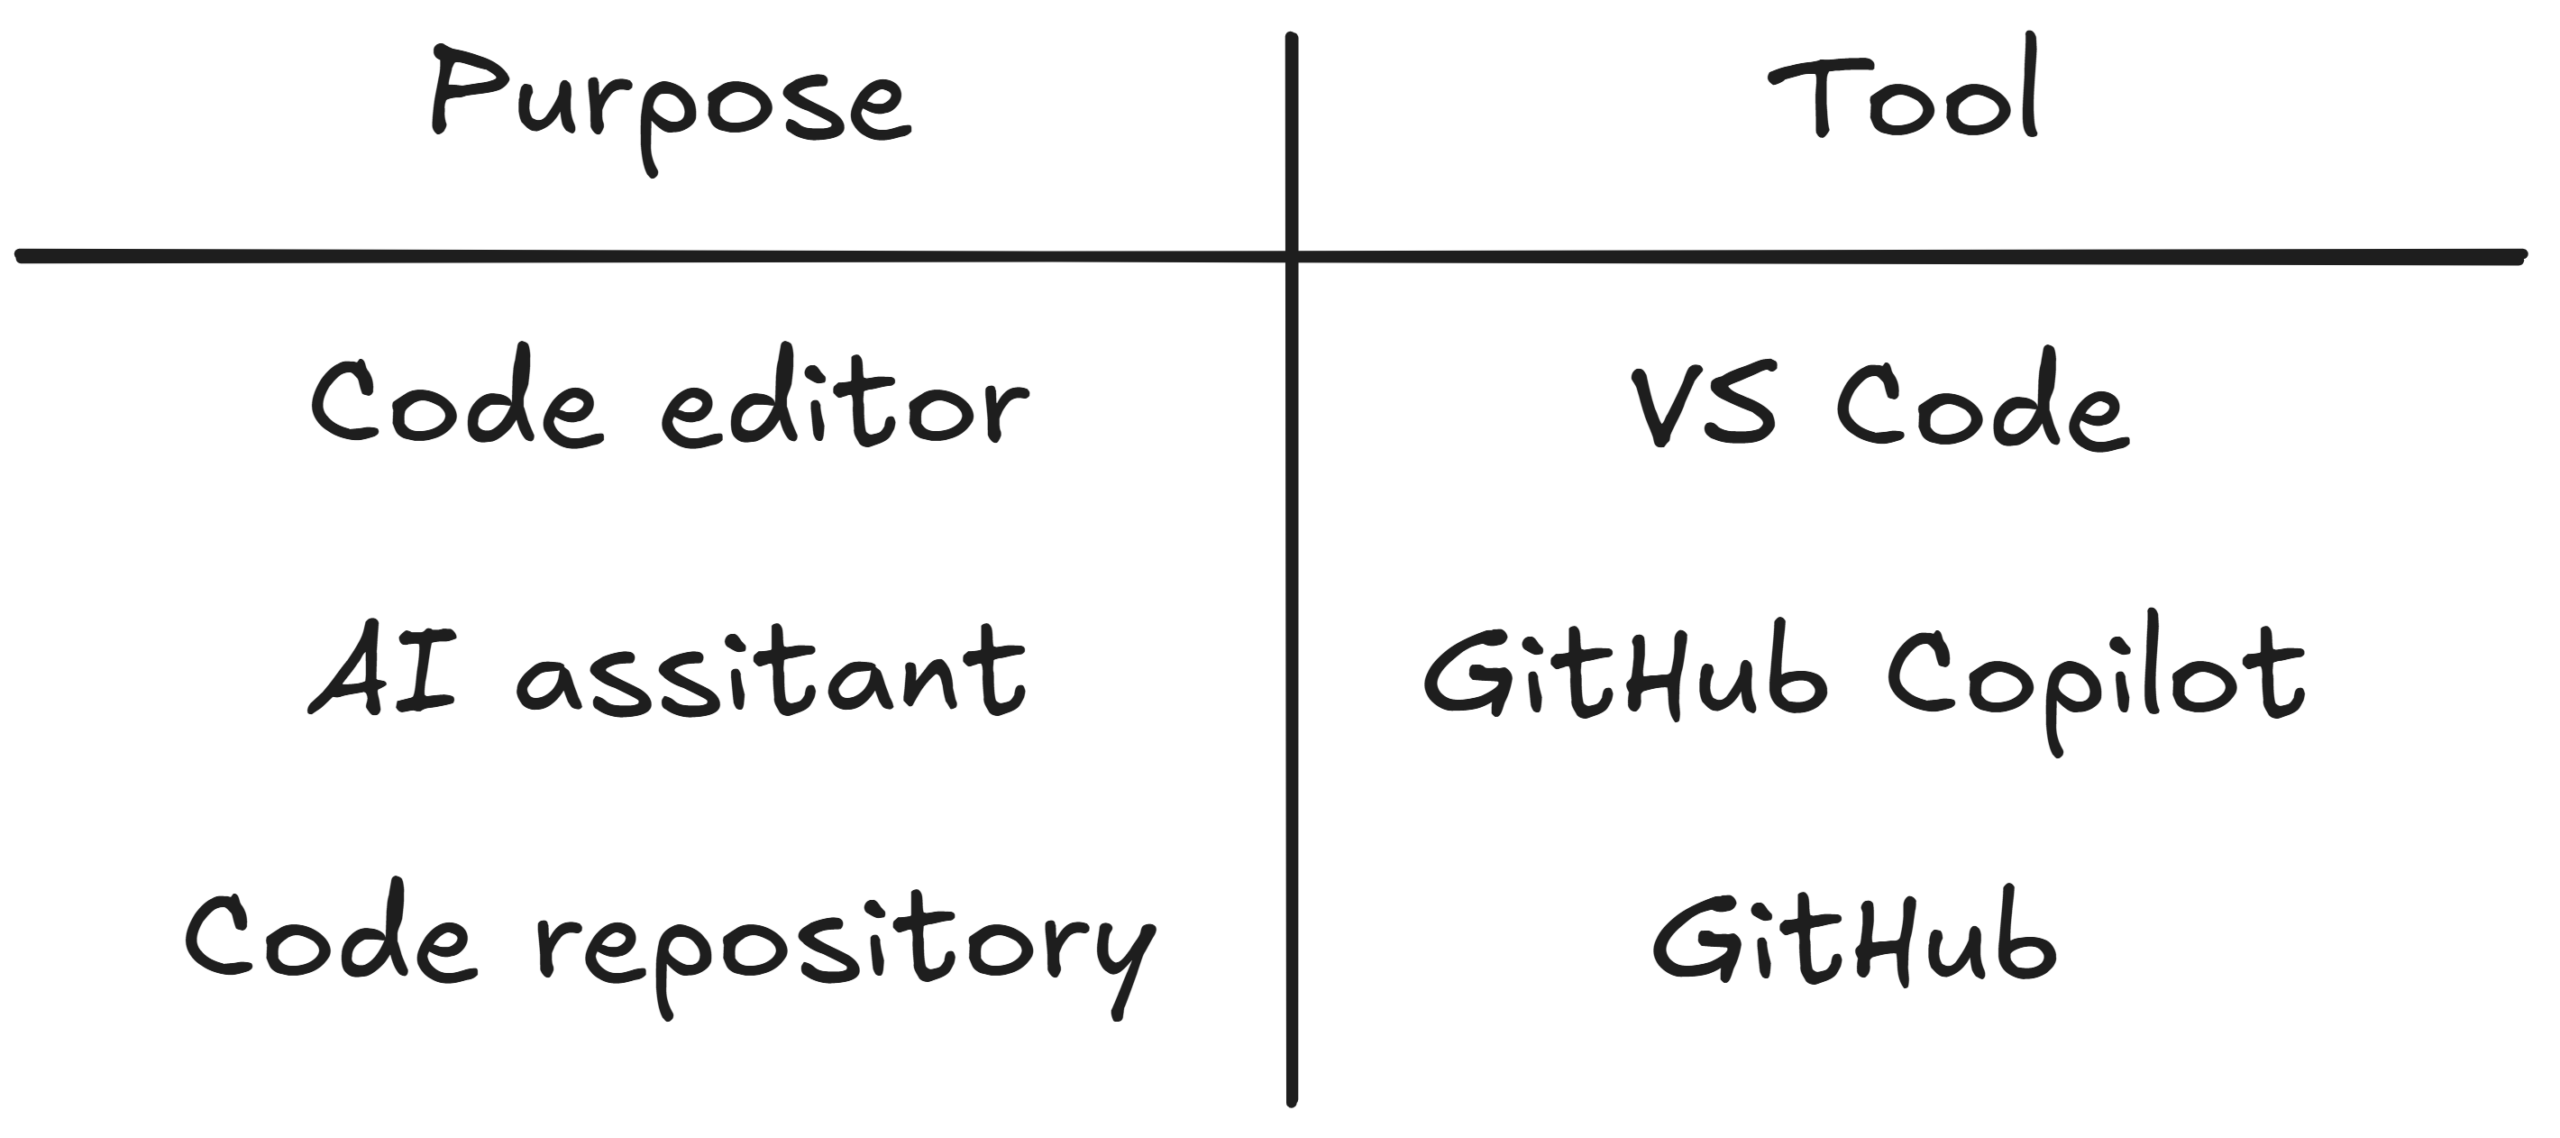
For this project, I kept the toolset simple: VS Code, GitHub Copilot (using GPT-5.4 model), and GitHub. GitHub handled both version control and deployment for the finished application.
Similar alternatives can be used for each part of the setup, but I chose to stick with tools I already knew and had available.
If you’re interested in the tools I used, setup instructions are available in the official documentation:
3. Giving AI context
With the basic setup in place, I was ready to start engaging with AI. Before asking AI to write any code, I shared the project context it would need to make good decisions. That included:
- how the project should be initialized,
- which technologies and components to use,
- references to official documentation and examples,
- implementation guidelines,
- expectations for how the AI should interact with me.
Let me highlight a few decisions that shaped the project.
Using official tools and references
Instead of reinventing the wheel, I wanted to make sure AI uses established patterns.
First, I asked it to initialize the project using the official @arcgis/create CLI tool. It creates a new project from a predefined template, giving AI a solid starting point.
I also provided links to the official documentation, sample code, and showcases. I specified that the latest version of the Maps SDK for JavaScript should be used and that Map Components should be preferred where possible, with @arcgis/core used only when needed.
In my initial prompt, I also asked AI to use Calcite components. Calcite provides ready-made, purpose-built web components for web applications, so it was a sensible starting point. However, I later realized that custom components were a better fit because they gave me more control over layout, behavior, and visual style.
Keeping things simple
I decided not to implement authentication, as all data used in the application is public and the app is intended for a public audience. Adding sign-in functionality would only introduce unnecessary complexity.
I also asked AI to leave the @arcgis/create template unchanged at first. My goal was to get the basic setup working first and add functionality incrementally from there.
Documenting decisions
Finally, I asked AI to create and maintain project documentation. This includes technical constraints, project decisions, and a list of all prompts used. Having that documentation made it easier to work across multiple sessions and keep the implementation aligned with the original goals.
Looking back, giving AI context was one of the most important parts of the workflow. The most helpful prompt was not simply "build an app." It was the information around the app: what I wanted to create, which technologies to use, what to avoid, where the data came from, and how I wanted AI to collaborate with me.
4. Building the app
From there, the project evolved through cycles of building, testing, and refining the app. The next sections highlight a few examples from that process.
Initial version of the app
First, I tailored the template to the project, replacing the default 2D map with a full-screen 3D scene and removing unnecessary functionality.
Next, I provided AI with the materials needed for the implementation: the web scene, the UX description, and the UI mockups. I asked AI to propose an implementation plan before making any changes. This gave me a chance to review the approach and make adjustments before any code was generated.
See the initial app idea prompt
The implementation plan consisted of three phases. Phase 1 connected the app to the public ArcGIS web scene and used its slides as the source of truth for locations, viewpoints, and descriptions. Phase 2 implemented the main user experience with minimal tab-based navigation and expandable descriptions. Phase 3 added the guided tour, including play/pause controls, camera animation, and automatic transitions between locations.
Iterating on the AI outcome
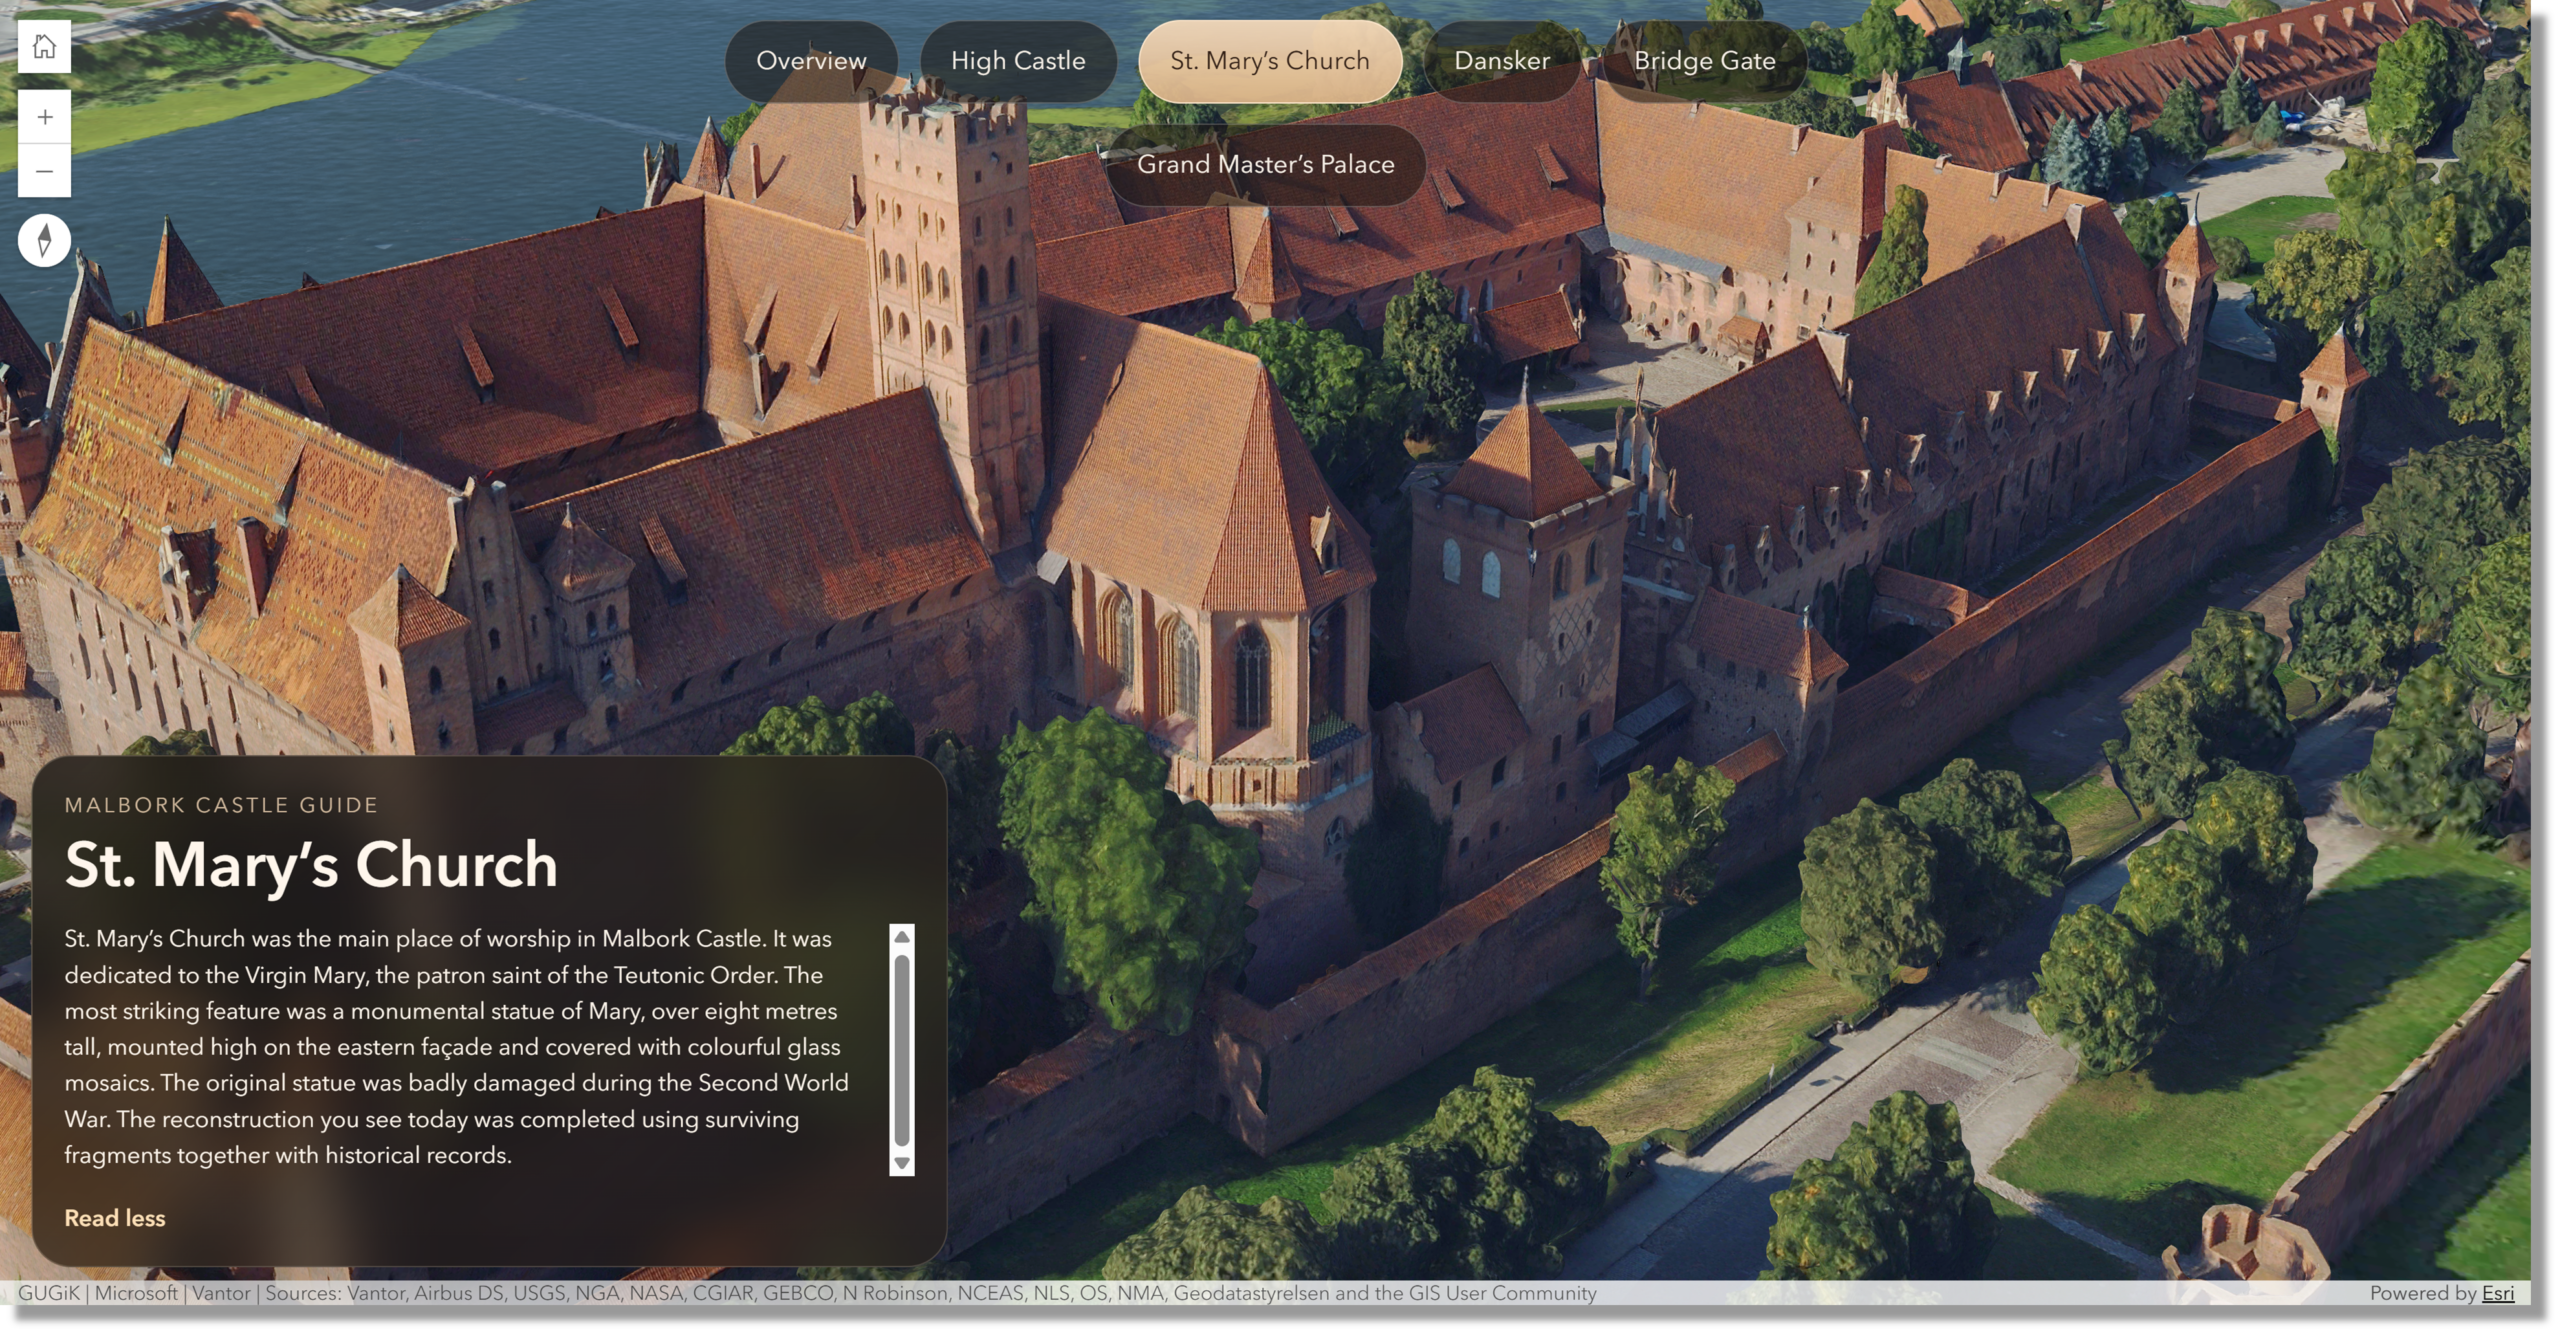
This was the result after the first implementation of Phase 2. While it captured much of the intended experience, some details differed from the original design. For example, the descriptive text was placed in a different location and included too many UI elements, while the navigation tabs were split across multiple lines. I worked through these differences one by one until the implementation better matched the design I had in mind. The complete phase 2 feedback prompts are available in the project repository.
When things go south
Not every AI-generated change was an improvement. Sometimes the implementation didn’t work or didn’t follow the design or my intentions. Often, the simplest solution was to undo the changes, adjust the prompt, and try again.

When an issue appeared to stem from a misunderstanding, I would often ask AI to review the original prompts and identify potential ambiguities. This often helped me spot gaps in my thinking and rephrase the requests more clearly.
Regular commits to GitHub provided an additional safety net and made it easy to return to earlier versions when needed.
Review and fix
Once the application was working and looking as intended, I moved on to testing and refinement. I started with manual testing to identify bugs and usability issues. After fixing these, I used AI for additional rounds of review.
For example, I asked AI to compare the implementation against the project’s original technical constraints and point out anything that didn’t match the documented approach.
See the technical constraints review prompt
I also asked AI to review the code as a senior software developer would, focusing on technical risks or performance concerns.
See the technical review prompt
In both cases, AI produced reports that were saved alongside the rest of the project documentation: technical constraints compliance report and engineering review report. I reviewed the recommendations and used AI to help plan the changes I decided to implement.
5. Deploying and sharing the application
As a final step, I deployed the application with GitHub Pages. I asked AI to prepare the relevant deployment files and configuration in the repository, so the app could be built and published from GitHub. After that, the actual publishing step was straightforward: I enabled GitHub Pages in the repository settings, and a few seconds later the custom app was online and ready to share.
What I learned
The biggest lesson from this project was that AI worked best when I treated it as a collaborator, not as an autopilot. It could generate code, suggest implementation plans, and help debug issues, but I still needed to define the goal, test the result, and decide which recommendations to accept.
I also found that asking AI to propose a plan before changing code helped me stay in control of the implementation. When something went wrong, the most effective approach was often to undo the change, clarify the request, and try again.
For future projects, I would commit early and often, keep the project documentation up to date, and explicitly ask AI to review accessibility, performance, maintainability, and technical constraints before considering the prototype complete.
Conclusion
As GIS professionals, we can solve many problems using existing ArcGIS solutions. But sometimes we have a specific vision or workflow that calls for a custom application. For many of us, that usually means relying on software developers or spending significant time learning new development skills. Agentic AI is beginning to lower that barrier.
My goal with the Malbork Castle Explorer was to see whether agentic AI could help turn an idea, available data, and an initial UX concept into a functional prototype. In my experience, the answer is yes.
AI can accelerate the journey from idea to app, but clear thinking, careful review, and human judgment still matter. I hope this encourages you to experiment and try bringing your own ideas to life.

Article Discussion: