Did you happen to catch the interactive GIS “Treasure Hunt” we put together to celebrate GIS Day 2022? If you didn’t, you should check it out—it’s pretty neat! Users answer a sequence of geography-related questions by zooming to the right answer on a map, while hints and even the final answer can be revealed if you’re stumped.
If you are familiar with that Treasure Hunt and are now wondering how you can replicate that experience, perhaps for a classroom, or maybe just to get one over on your know-it-all in-laws, you’ve come to the right place. We’ve been fine-tuning the Treasure Hunt workflow for a few years now, and we’re happy to share the steps we used to put it together.
What you need to know
The good news is, building a Treasure Hunt doesn’t require much in the way of specific GIS expertise. You really just need:
- Access to an ArcGIS Online organizational account
- Familiarity with ArcGIS Online and ArcGIS Survey123
- A fun idea for a geography-oriented quiz!
Each Treasure Hunt is fed by an ArcGIS hosted feature layer. This feature layer must adhere to a specific schema of particular field names and types. The easiest way to create a Treasure Hunt-compliant feature layer is to use an ArcGIS Survey123 form that we’ve already designed for you.
The Treasure Hunt workflow follows three broad steps:
- Create the survey
- Build out your Treasure Hunt data using the published survey (this is the most time-consuming part)
- Provide your Treasure Hunt data to the Treasure Hunt application
We’ll walk through each of those parts in detail below.
Building the Treasure Hunt
Part one: Create the survey
Copy the survey from the Treasure Hunt author template
This process is relatively quick, requiring a sequence of five clicks (demonstrated in the embedded video below):
- Go to your ArcGIS Survey123 page
- Click the “New Survey” button
- Choose the “Template Survey” option
- At the top of the page, select the “Community” tab
- Click on the Treasure Hunt Author card.
- You’ll be presented with a preview of the template. Click the “Use this template” button.
Now you have your own copy of the survey form that is used to build a Treasure Hunt. (In creating this copy, Survey123 has also created the accompanying feature layer.)
Publish the survey
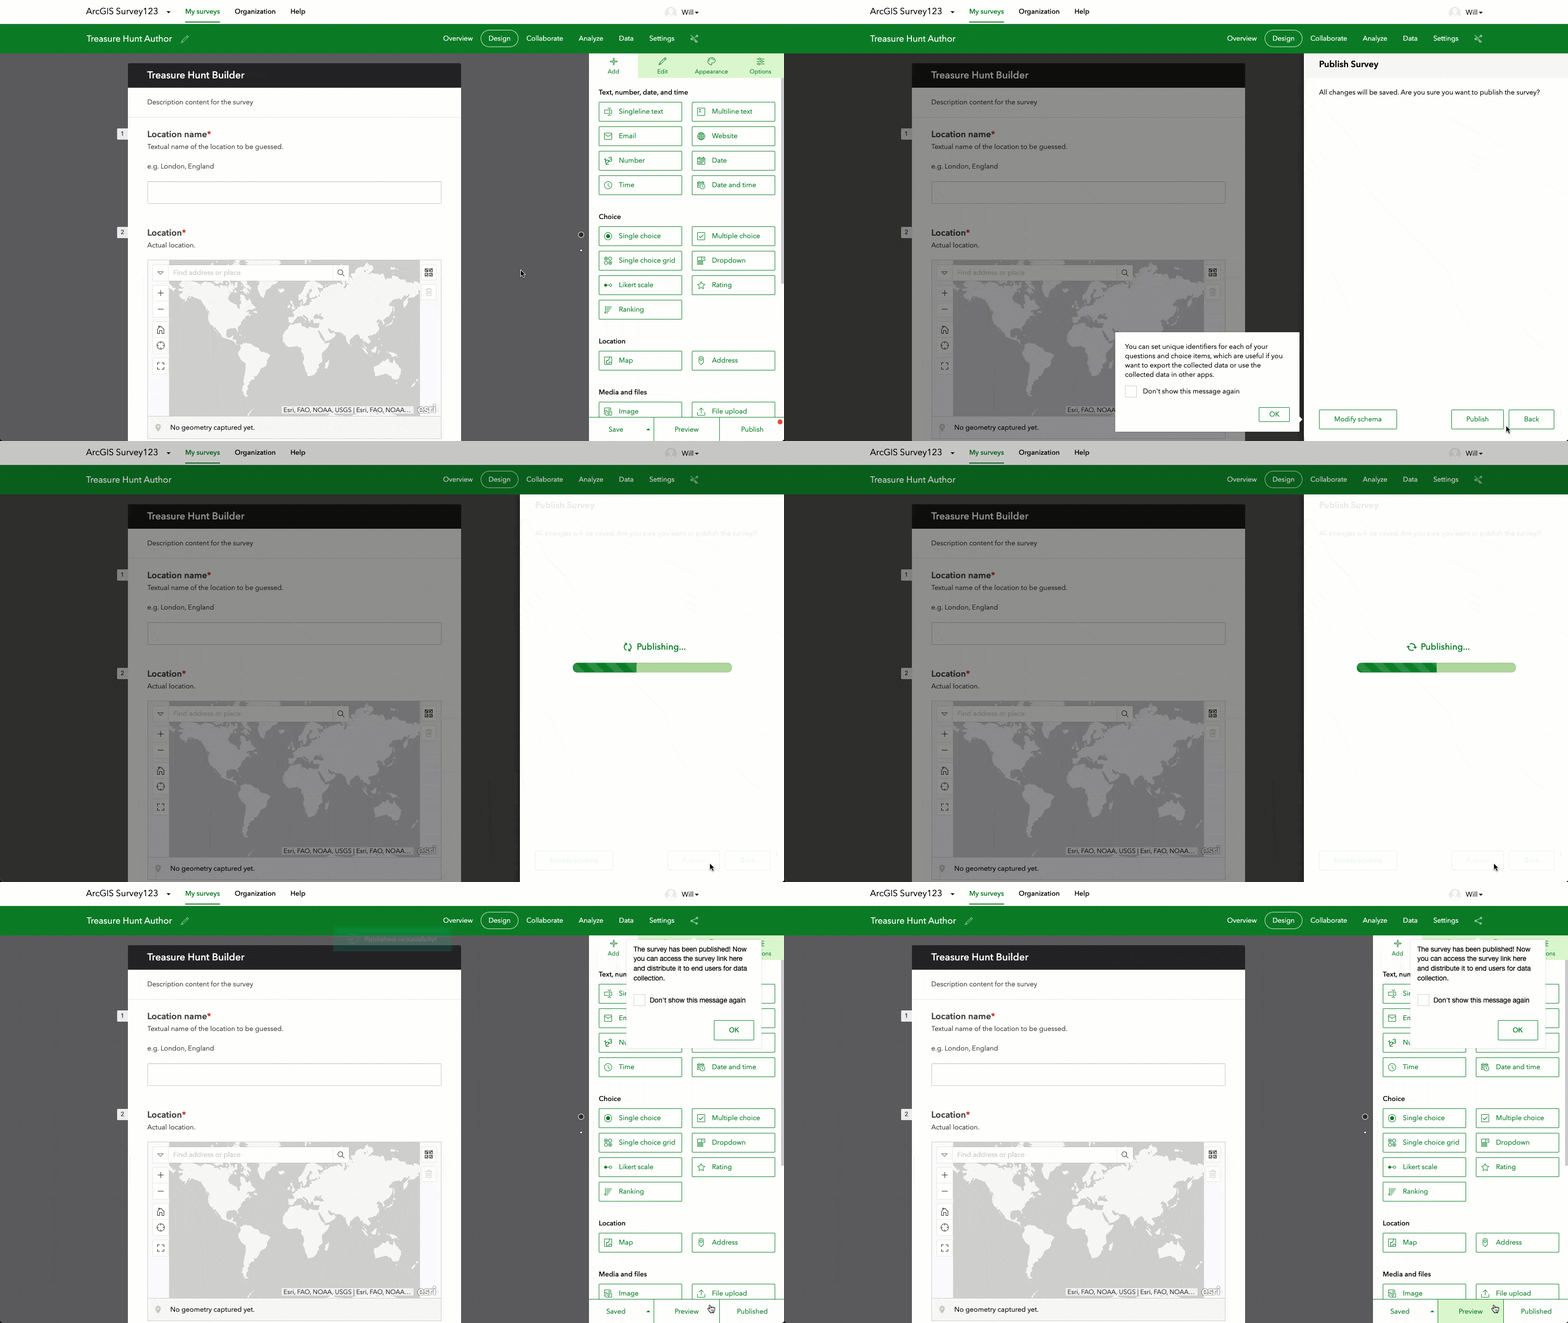
After you’ve created a copy of the survey, your browser will be redirected to the design tab of that duplicated survey. In our case, that’s a little deceptive, since you don’t need to modify the design—the form is ready to use as-is. All you need to do here is:
- Click the publish button in the lower right-hand corner of the page…
- …and then confirm the publish in the second menu that appears.

Okay! Now we’re ready to get to work adding content through the survey you just copied.
Part two: Build out your Treasure Hunt content using the published survey
Launch the live input form
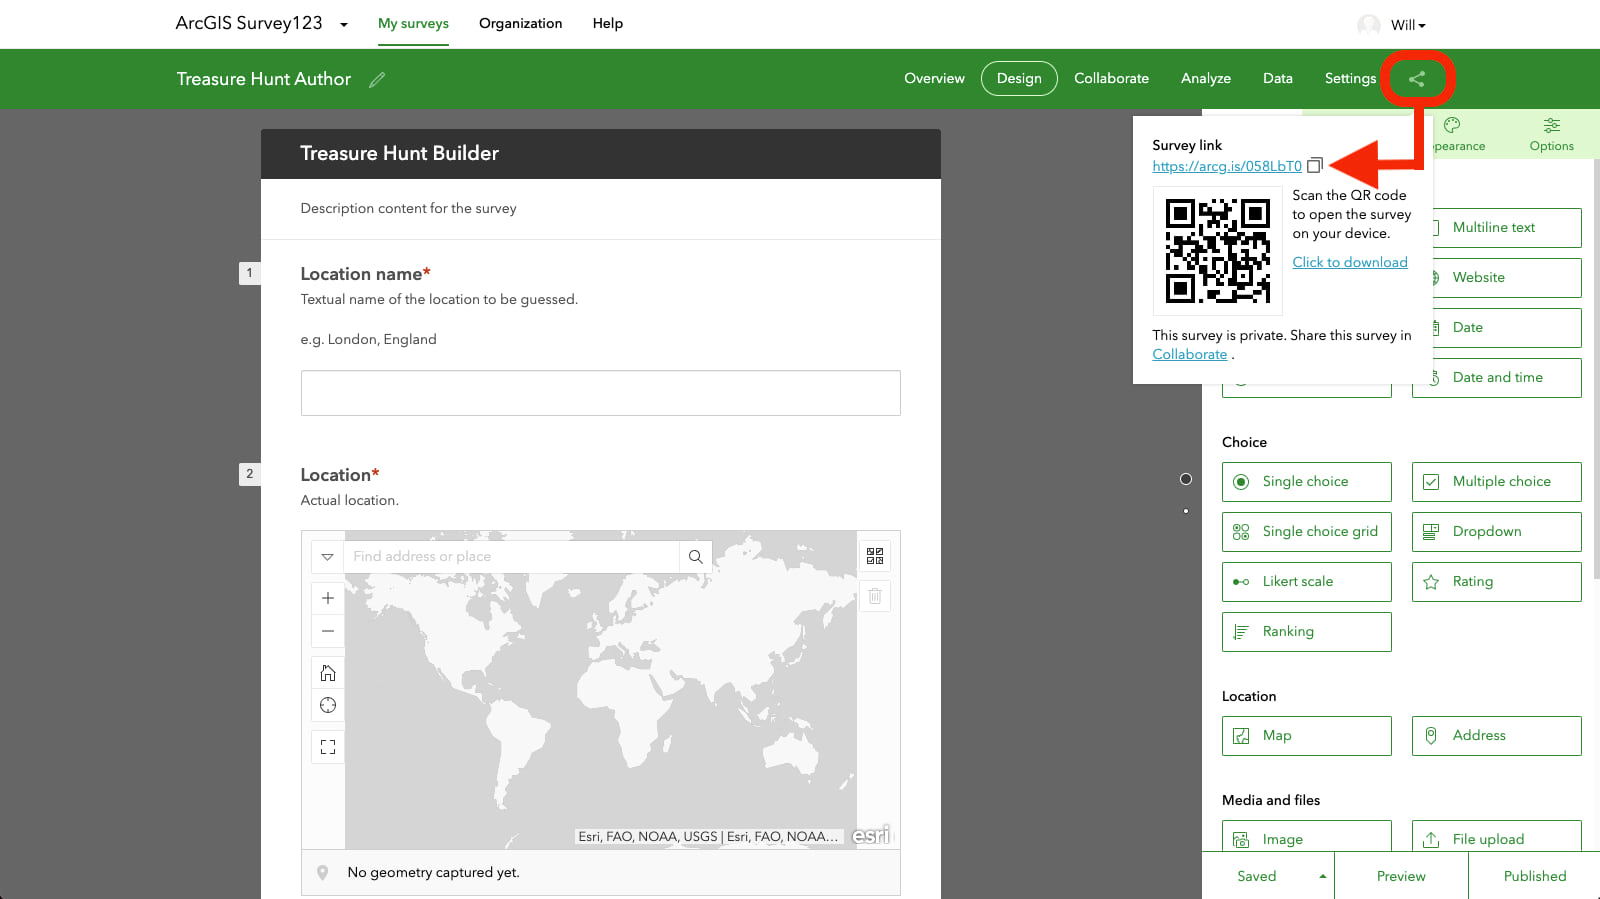
- In the survey editor for the Treasure Hunt survey, you’ll notice that there’s an active Share button in the upper right now that your survey has been published. Click on that Share button to access the survey link.
- Click on the survey link to launch the live survey input form.

Use the live input form to contribute your content
The live survey form is where you’ll spend most of your time when building a Treasure Hunt. Each time you complete and submit the form, it will constitute one question/answer in the Treasure Hunt. You can re-launch the survey form as many times as needed to fully populate your Treasure Hunt.
Part three: Supply your Treasure Hunt data to the Treasure Hunt application
Share your Treasure Hunt data
When your content is complete (or if you just want to review it), you’ll need to make the resulting data available so that the public (and the Treasure Hunt application) can see it.
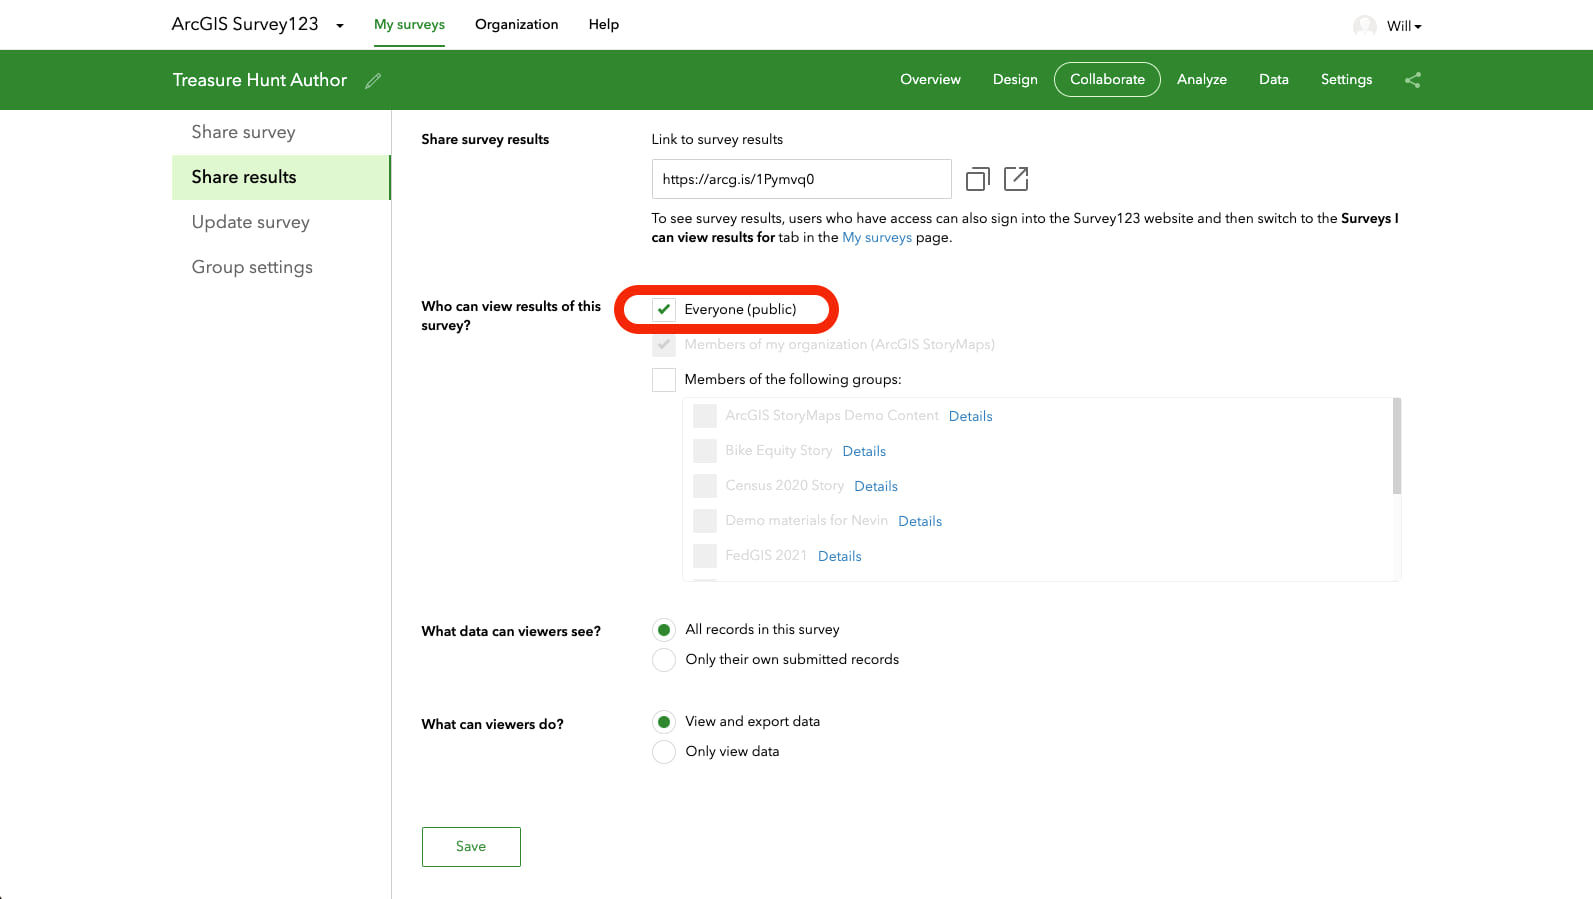
- To do that, first enter the Collaborate tab in the survey editor.
- In the menu that appears on the right-hand side of the window, select Share results.
- In the “Who can view results of this survey?” section, check the box next to “Everyone (public).”
- Save those settings.

Create your custom treasure hunt URL
This is the general base URL for the Treasure Hunt application:
https://esri.github.io/treasure-hunt-app/
That URL on its own defaults to a Treasure Hunt populated with data about World Heritage Sites. However, by appending arguments to the base URL, we can instruct the Treasure Hunt application to run using other data sources, instead.
In order to run a Treasure Hunt based on the data content you created in the previous steps, you’ll need to add a URL argument called itemID. That itemID is the unique identifier for your survey, so the URL will look something like this:
https://esri.github.io/treasure-hunt-app/?itemid=YOUR_UNIQUE_IDENTIFIER
So, how do you get the unique identifier? It’s available right in the browser address of your survey—it’s that long string of characters and numbers, circled in the image below.

To create your Treasure Hunt’s URL, simply copy that string and tack it onto the end of the base URL with the itemID argument, as such:
https://esri.github.io/treasure-hunt-app/?itemid=17fe4d1f9e3c44788776ebe6a499fee9
(Make sure you don’t forget the “?” character! That’s a required separator that tells the app that what comes after should be interpreted as an argument.)
Register your Treasure Hunt survey with the application (optional)
This step isn’t required, but you can register your survey’s itemID with the hosted application by filling out this form. By performing this extra step, you create a record in our database that contains some additional information about your Treasure Hunt. Using the Treasure Hunt registry offers a couple of benefits:
- Your URL will be a bit friendlier; instead of using the itemID parameter in the URL, you’ll use the edition parameter, which is a string that you’ll specify upon registration. Then your URL will look something like this: https://esri.github.io/treasure-hunt-app/?edition=famous-romances
- You’ll have more control over the behavior of your Treasure Hunt—for instance, the initial zoom level, the intro image, etc.
Finally, if you want to make customizations to the Treasure Hunt application and host your own instance of the application, you can find the source code here:
https://github.com/Esri/treasure-hunt-app
Happy hunting!
__________________________________
Banner image credit: Nadjib BR, via Unsplash.

Article Discussion: