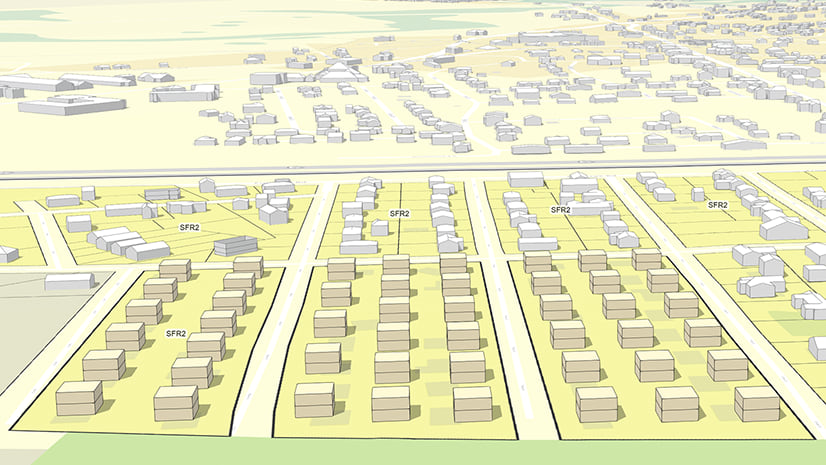
Urban planners are facing a common challenge: supporting growth without further driving urban sprawl. Infill development or densification—adding density within existing urban areas—has therefore become a key strategy to make better use of existing infrastructure and improve housing availability. To successfully pursue this approach, it is essential to analyze and understand existing conditions, as they form the foundation for a realistic and effective densification workflow.
In this blog post, you’ll learn how to model existing conditions in ArcGIS Urban by working with existing building spaces and parcel parameters. You’ll see how these approaches help establish a reliable baseline for densification workflows and support informed decision‑making when exploring future development scenarios directly in Urban.
Existing building spaces
As an urban planner, you might be tasked with transforming an urban area. Before you can start exploring different strategies, you need to know what’s already there, both visually and quantitatively. Working with existing spaces in Urban allows you to get an overview of the current urban fabric to base your development on.
As an example, we focus on MFO-West in Zürich, Switzerland, a former industrial site transitioning into a mixed‑use urban quarter. In the following paragraphs you learn how to create and edit existing spaces as well as how to use them for different densification strategies in Urban based on this example project.
Represent existing buildings as spaces
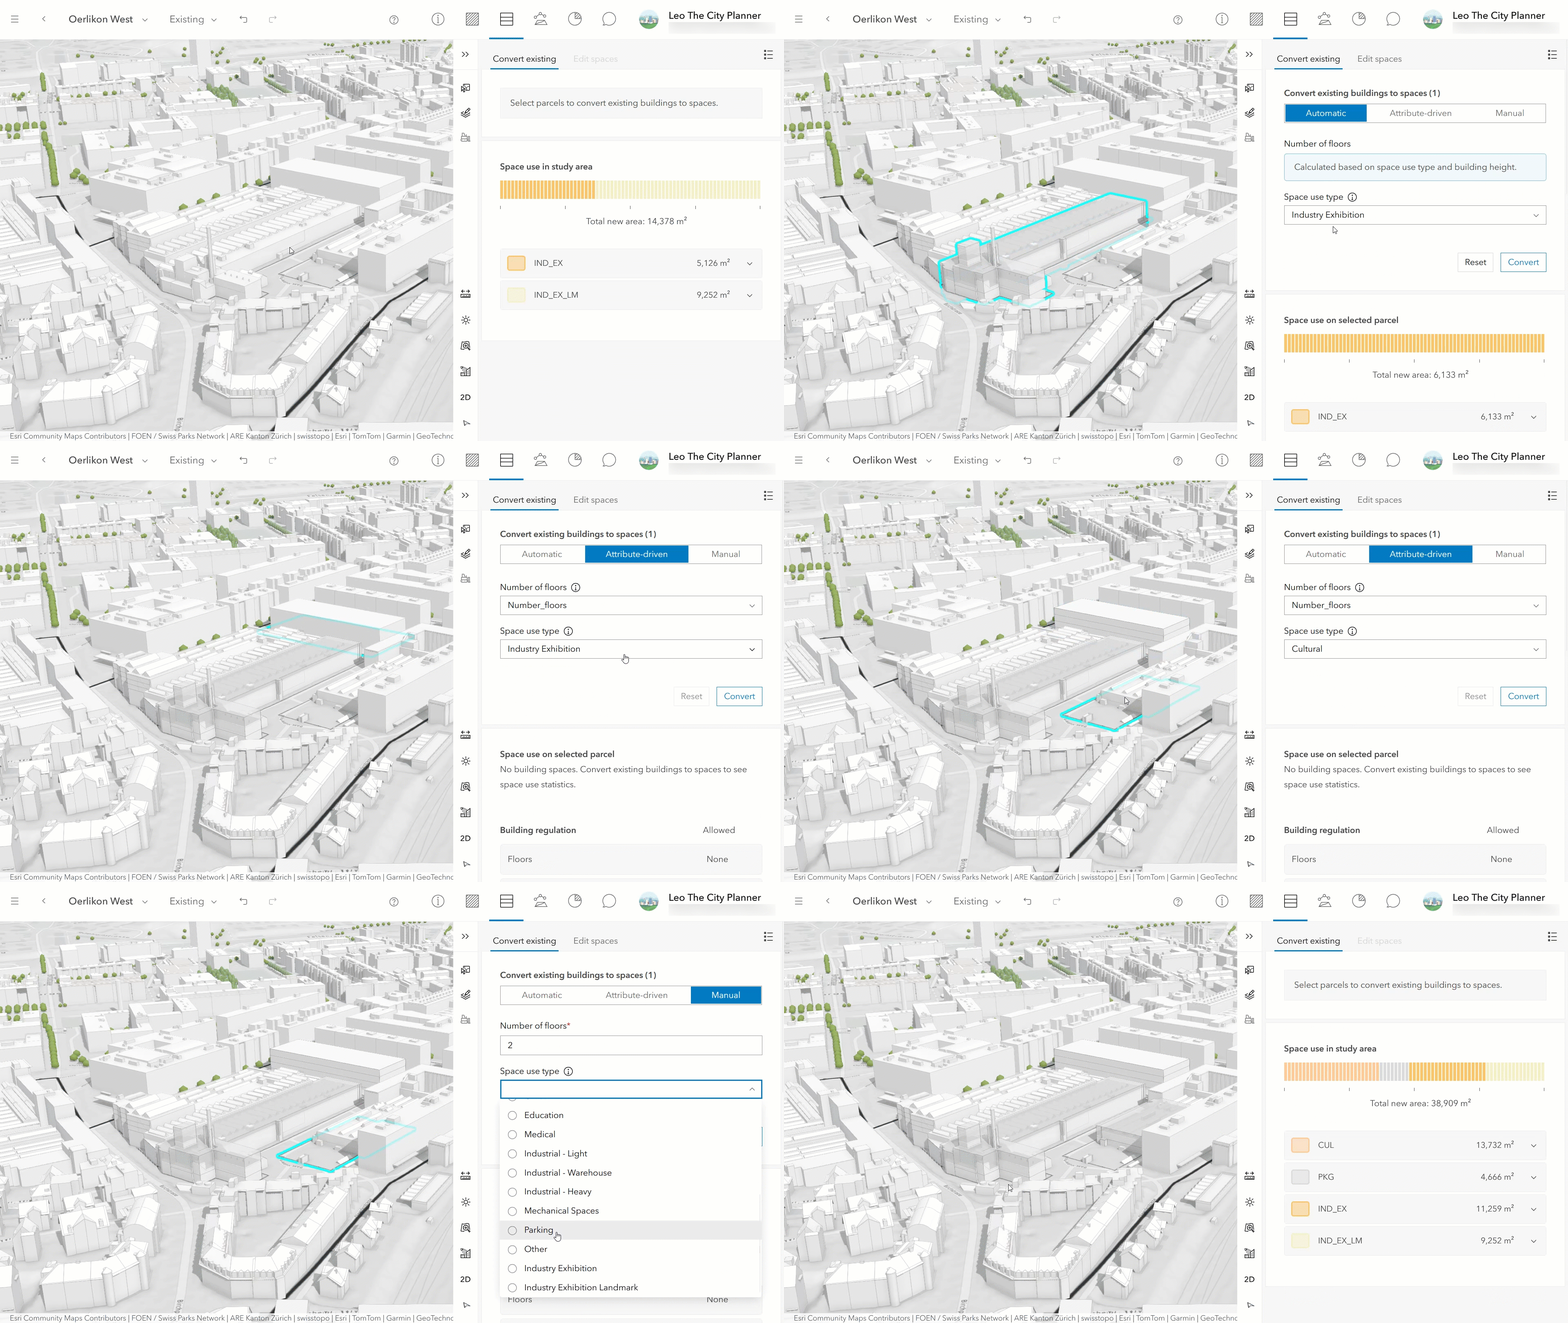
To model existing conditions, start by splitting existing buildings into floors directly within your plan. Urban now provides a dedicated building conversion workflow that automatically generates building spaces from schematic buildings in the existing scenario. Select one or multiple parcels and initiate the conversion from the “Convert existing” tab. The system detects buildings on the selected parcels and creates corresponding building spaces.
Depending on your data, you can choose between three different conversion modes:
- Automatic: Automatically estimates the number of floors based on the space-use type and building height.
- Attribute-driven: Use existing building attributes to define number of floors.
- Manual: Define the number of floors manually.
In each conversion mode, you manually define the space-use type for the generated spaces. All spaces created during the conversion are assigned the same space-use type.
The spaces have the development status “Unchanged” assigned, meaning these spaces are existing spaces. The development status will become important when exploring different densification strategies later. Continue converting spaces for all the buildings you want to include in your existing conditions.
Review and refine generated spaces
After the conversion, review the generated building spaces and adjust them where necessary. You can refine geometries, correct floor numbers, or update space-use types to better reflect local conditions. To adjust, select the parcel where you want to refine spaces and enter the “Edit spaces” mode.

Where to find the conversion tool
The building conversion workflow is available in the development side panel under the “Convert existing” tab when working in the existing scenario. The conversion section appears at the top of the panel, guiding you through the process.
Validate existing buildings against zoning regulations
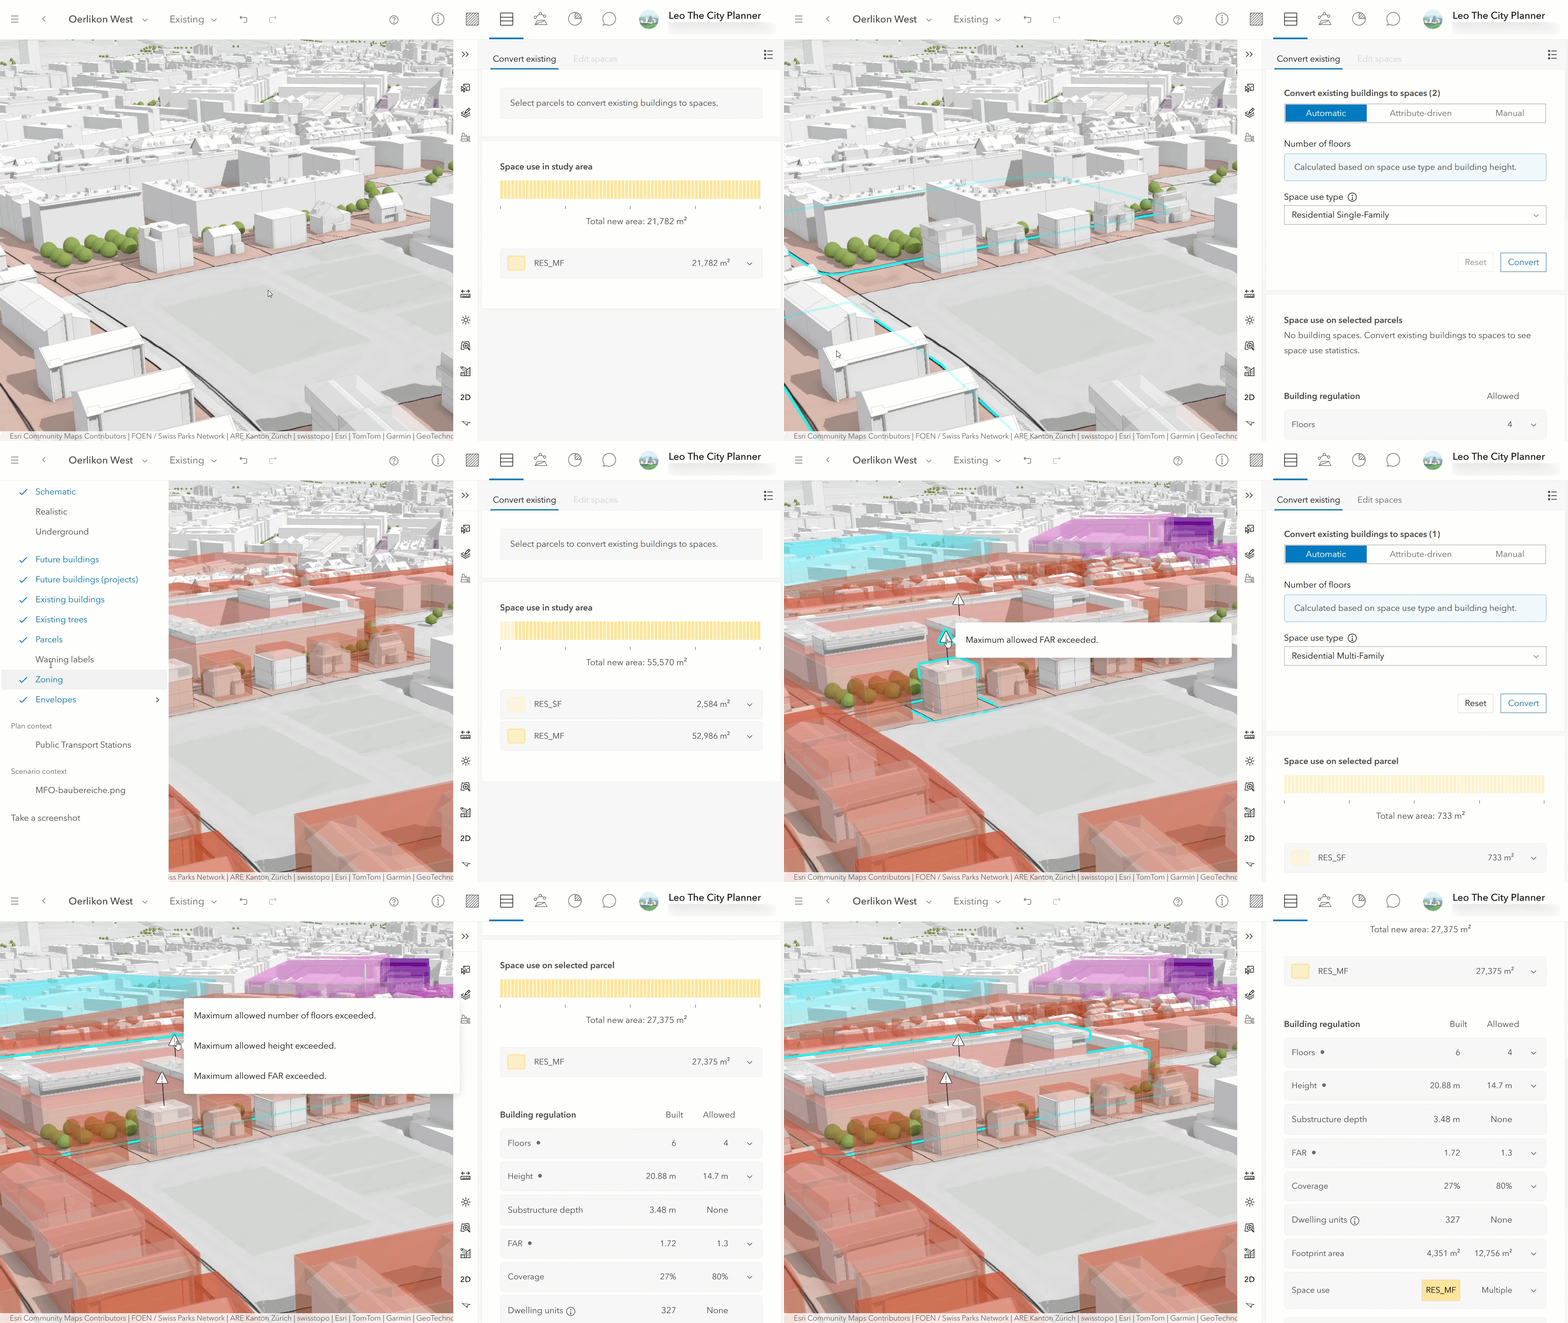
Understanding existing conditions also means knowing how current buildings relate to zoning regulations. After converting buildings into spaces in the existing scenario, you can visualize zoning envelopes and highlight non‑conforming conditions directly in Urban. By comparing generated building values such as floor area ratio, height, and setbacks with the underlying regulations, you can quickly identify where existing buildings exceed or fall short of what is allowed. This workflow provides valuable context for planning decisions, helping you distinguish between compliant structures and areas with regulatory constraints, and identifying remaining potential of existing regulations.
In the following example, we validate buildings surrounding a public school to better understand how existing development relates to zoning constraints in a sensitive context.
We now return to our MFO‑West study area to continue exploring how existing conditions can inform densification strategies.
Copy building spaces to design scenarios
Once existing buildings have been converted into spaces, you can copy the parcels into a design scenario to start transforming the area. Alternatively, you can also create a new scenario based on the existing scenario. With the existing spaces copied into the design scenario, we can now start to explore different densification strategies.

Strategy 1: Repurpose building spaces
A common example for repurposing existing spaces is an office space that is no longer required due to evolving work‑from‑home policies. To reactivate these valuable spaces, we can repurpose them to apartments.
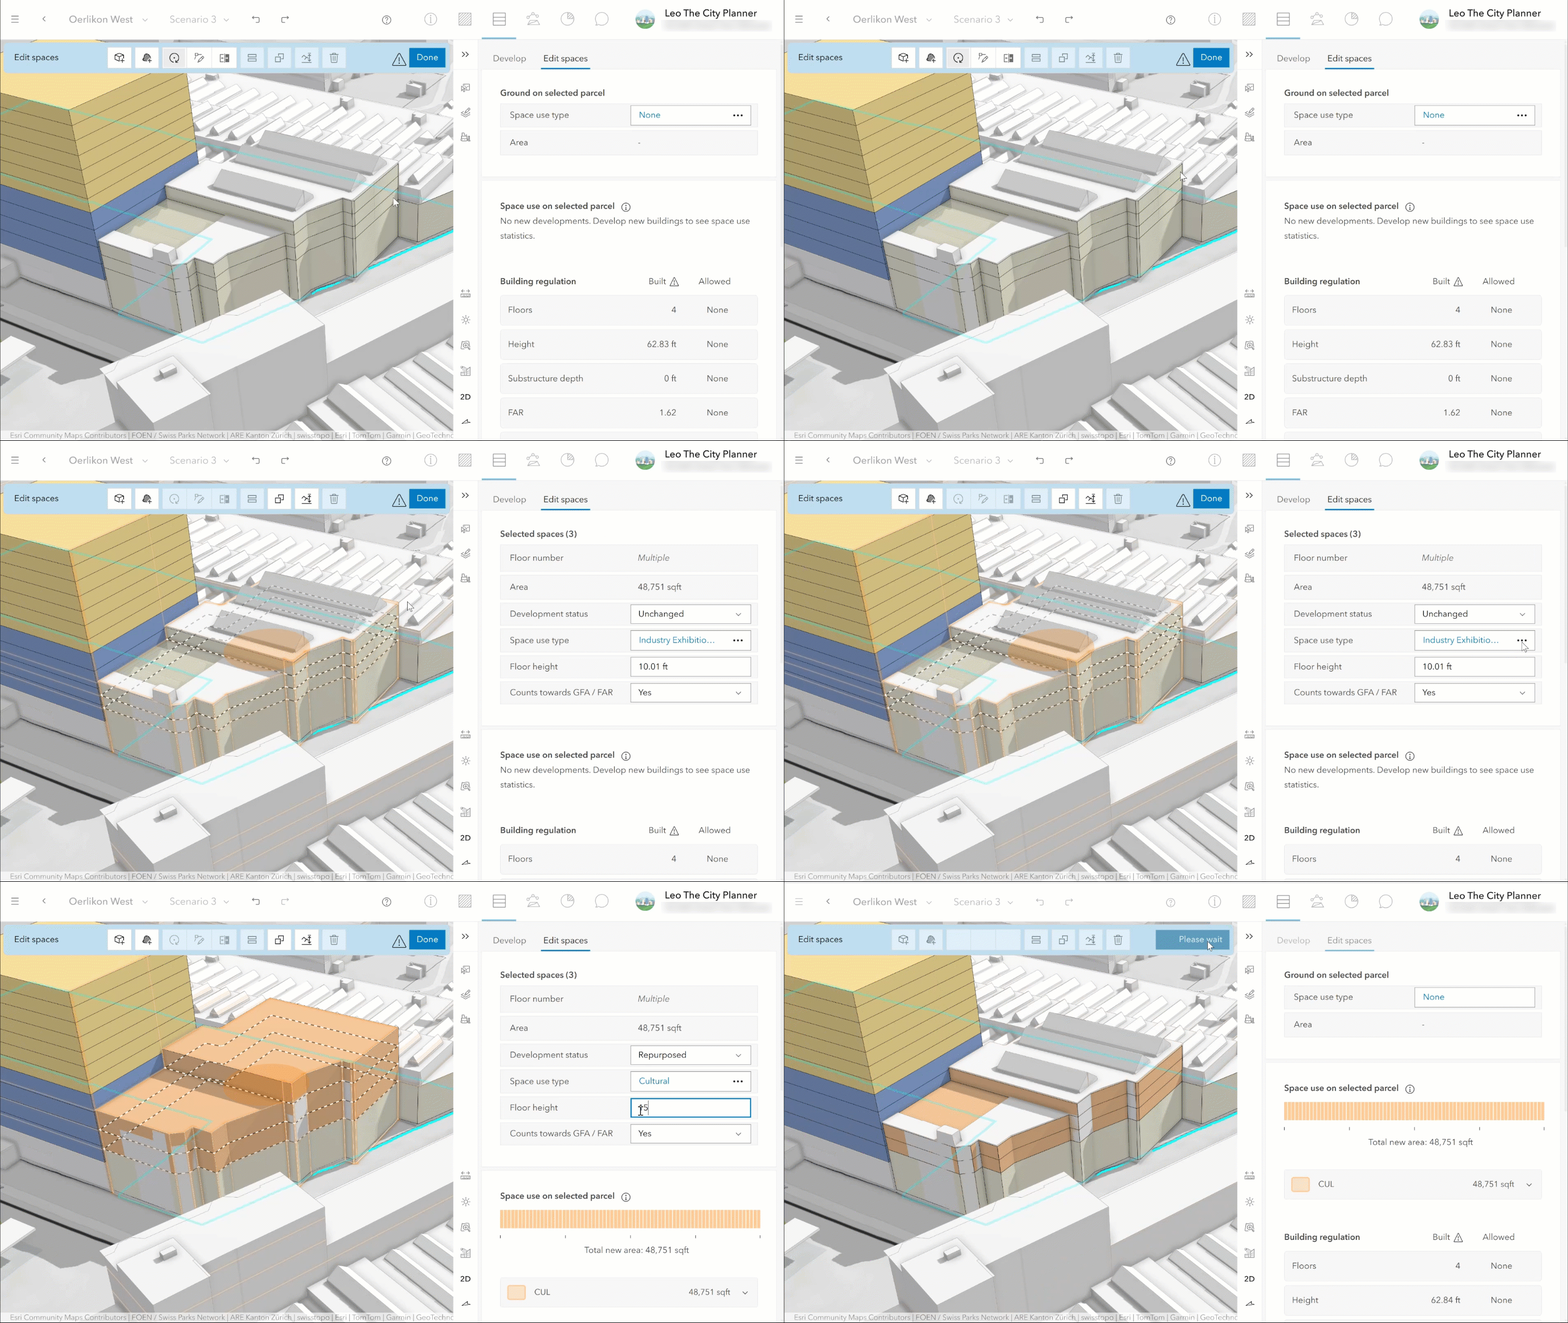
In our MFO-West example, we reuse the upper floors of an existing industrial hall as cultural space, hosting art galleries, youth programs, and other social projects. In ArcGIS Urban, repurposing a space is done in a design scenario by changing its space‑use type. The development status automatically updates to “Repurposed”, indicating that the space already exists but is assigned a new use.
Strategy 2: Extend and retrofit existing buildings
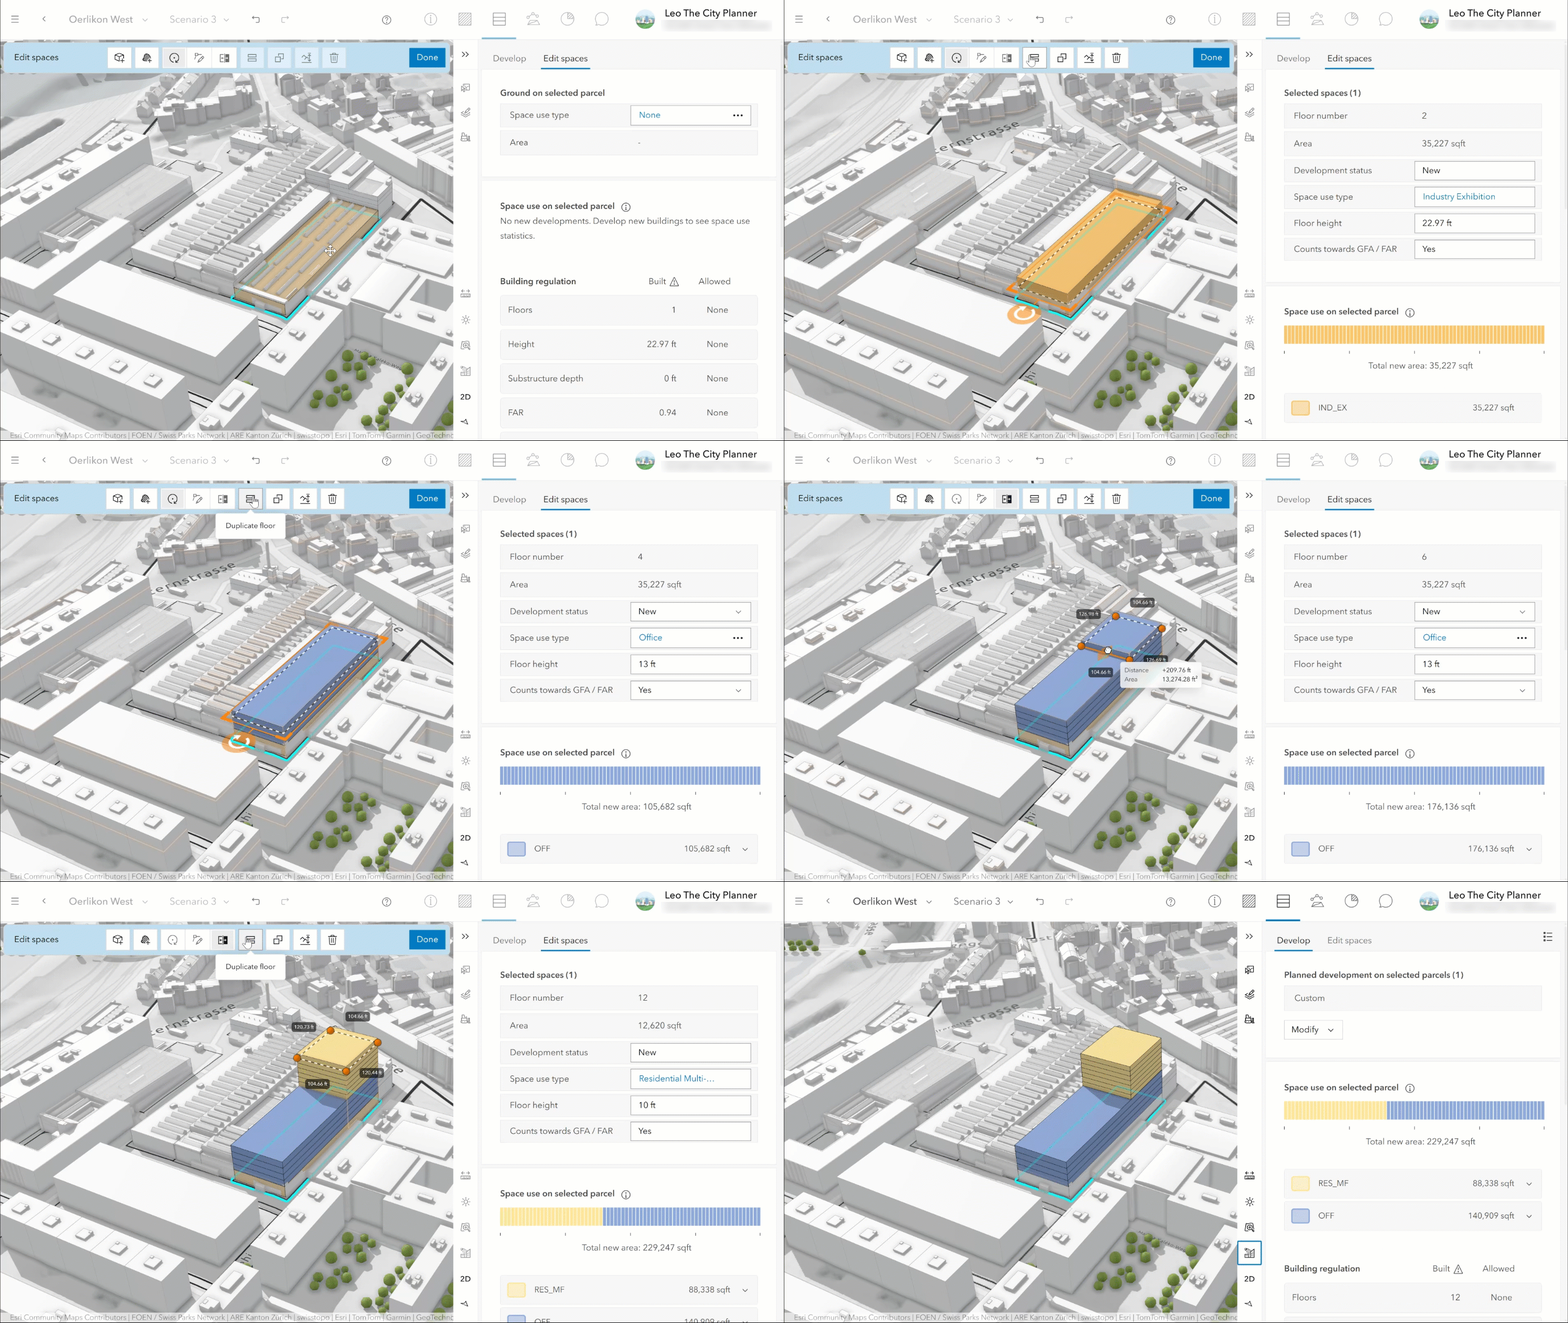
Another approach is to add new floors on top of existing structures. In our example, we build up the existing industrial hall, used for exhibitions, with office and residential space. This strategy increases usable floor area without expanding the building footprint, allowing you to densify the site while preserving the existing structure.
This strategy can also be used to evaluate the impact of retrofitting. Older buildings can be extended with new materials or additional structures to make them more energy efficient or improve their climate resilience.
Prepare filtered metrics
Before analyzing results in the dashboard, you can define filtered metrics in the metrics graph within the plan configuration. With the Filter Metrics capability, you can filter values by development status—for example, isolating “Unchanged”, “Repurposed”, or “New” spaces. This allows you to prepare metrics that reflect specific aspects of your development strategy and tailor your analysis to the questions you want to answer.
In our example we create filters for energy use per development status.

Use the dashboard to see the impact
Switch to the dashboard to make the impact of densification visible and measurable as existing spaces and future changes coexist within a scenario. We can compare existing conditions with transformation scenarios side by side and track changes such as floor area, housing units, energy use or space use distribution.
Add the filtered metrics you defined to the dashboard to break down results by development status. This allows you to evaluate how “Unchanged”, “Repurposed”, and “New” spaces each contribute to the overall outcome. We can use our previously created “Energy use” filter metrics to separate the energy use per development status in the dashboard.

Parcel parameters
In addition to existing building spaces, parcel parameters provide another way to represent existing conditions in Urban. When added to the existing scenario, they allow you to capture parcel‑level characteristics that help complete the picture of the current condition. We can use parcel parameters to store parcel‑specific values such as tax rate, land value, or other relevant attributes.
Add parcel parameters to your plan
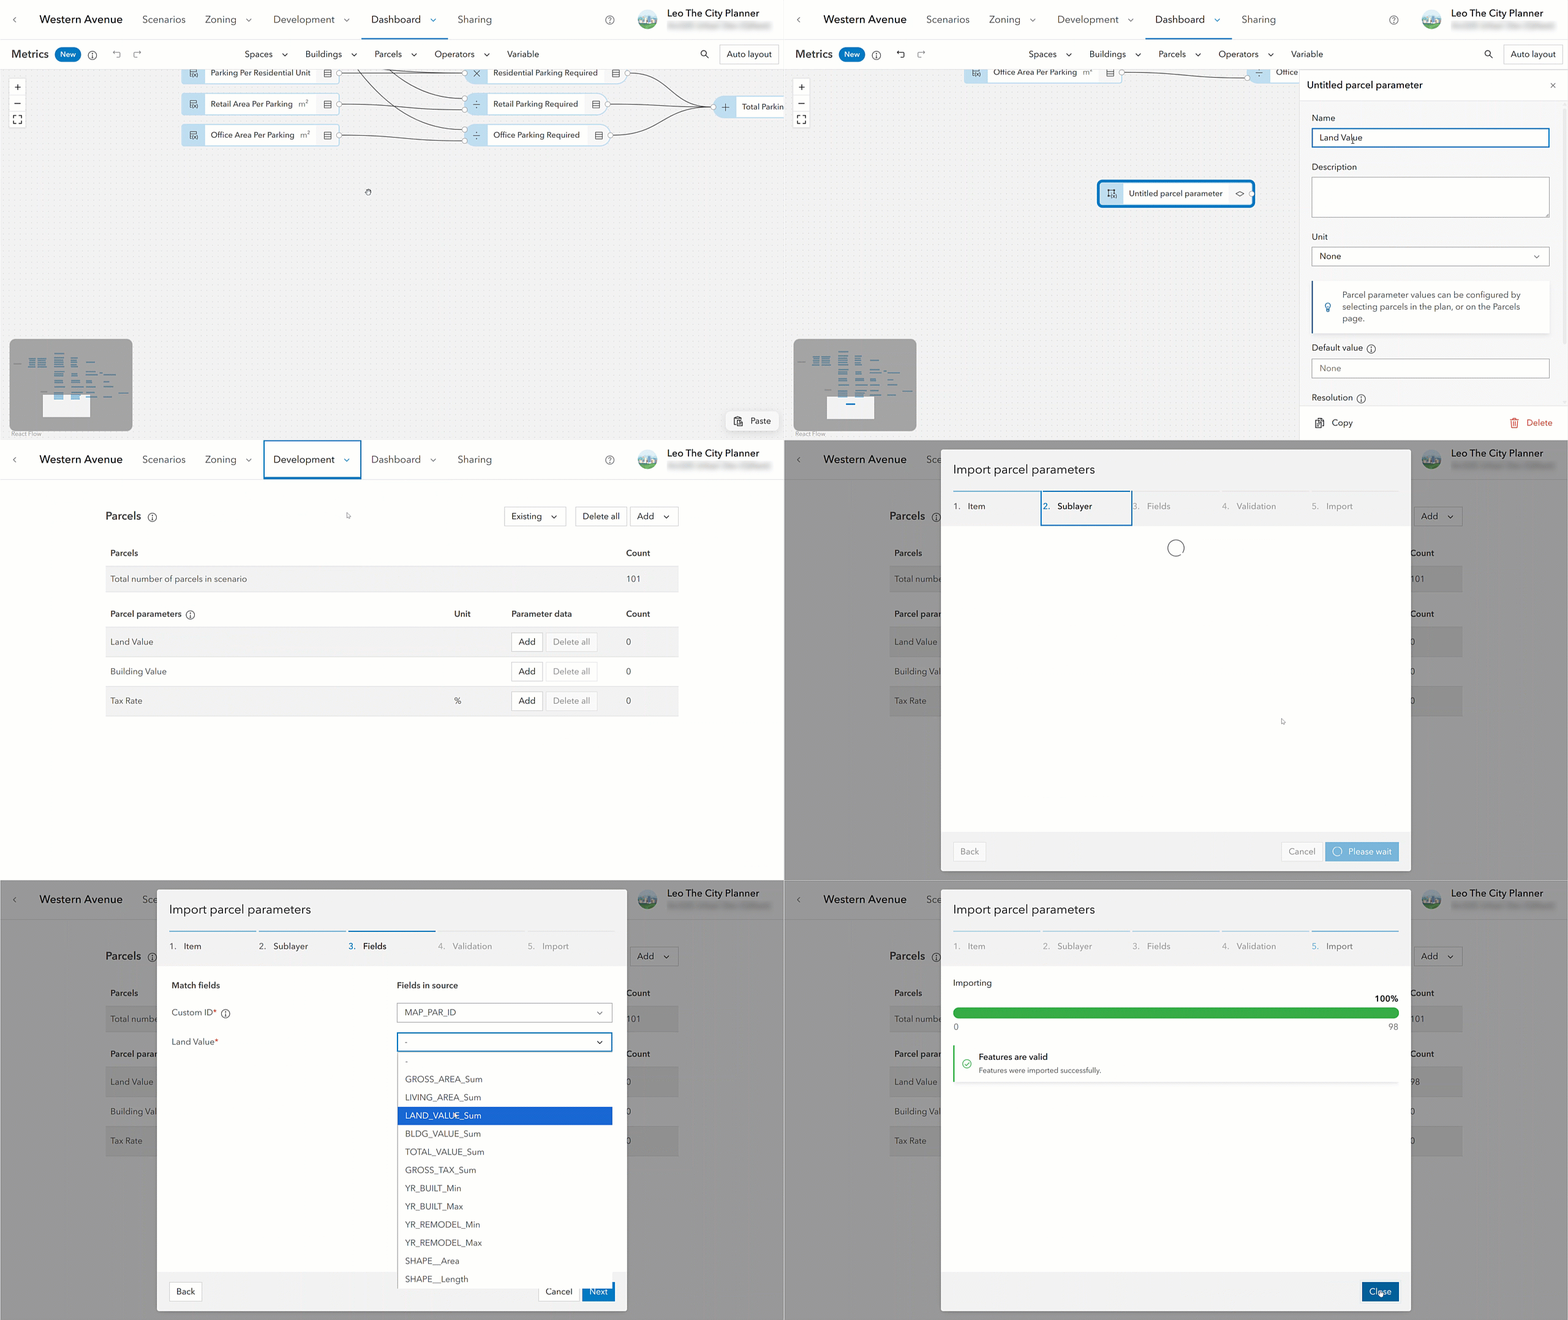
We want to know the current land value of each parcel in our transformation area. Let’s add a parcel parameter metric to our metrics graph in the configuration of our plan and call it “Land Value”. In the next step, we can import the data from a feature layer. Our parcel parameter is now ready to be used in further metrics calculations.
Use parcel parameters in metric calculations
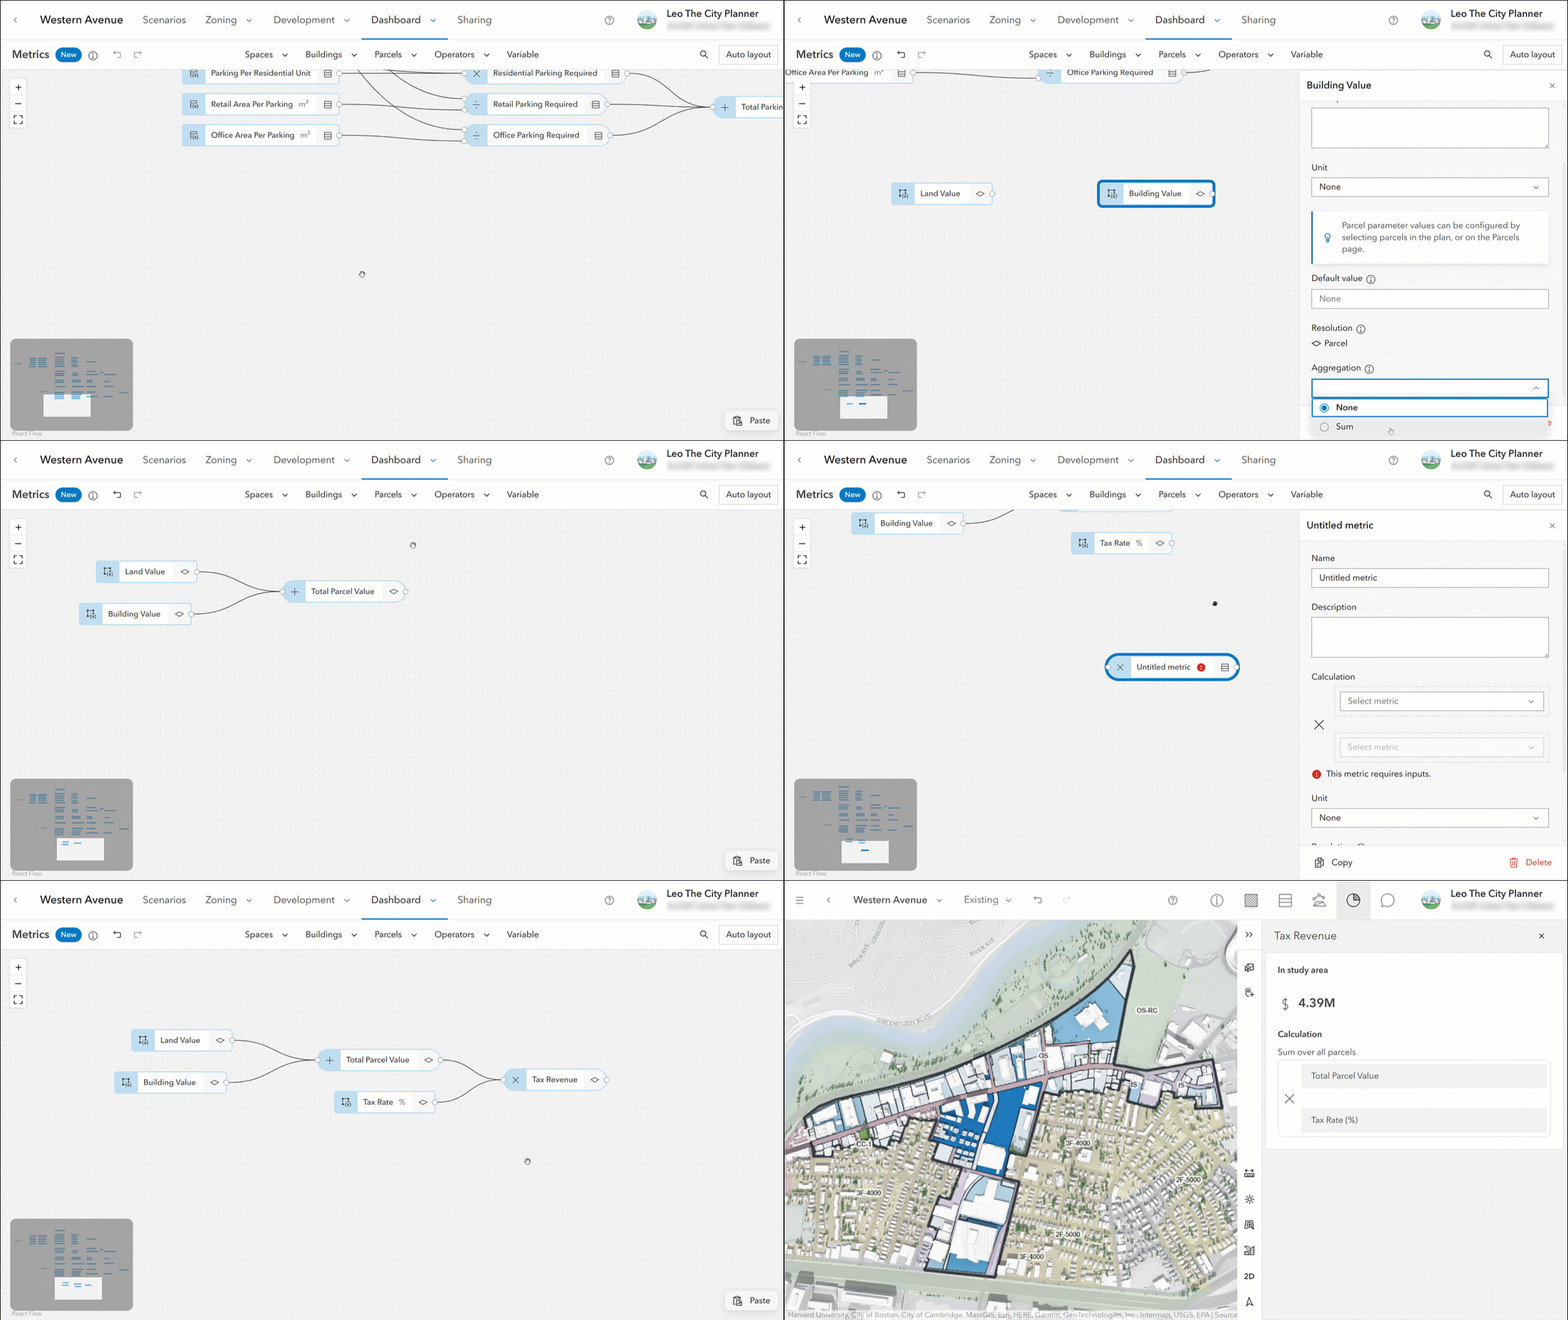
Using the land value and combining it with the building value and tax rate, we can calculate the tax revenue per parcel. This makes it possible to translate existing parcel‑level conditions into measurable indicators and compare how different densification scenarios affect fiscal outcomes across the study area.
Key take aways
Modeling existing conditions is a critical first step for successful densification workflows. With the automated building-to-space conversion in ArcGIS Urban, you can now generate existing building spaces quickly and consistently. In combination with “Filter Metrics” you can explore strategies such as repurposing or building up qualitatively and quantitively within a realistic context.
Parcel parameters complement this approach by representing existing conditions at the parcel level, allowing you to incorporate parcel‑specific constraints and values directly into your analysis. Together, these tools help establish a reliable baseline, support transparent impact evaluation, and enable informed decision‑making when exploring infill and densification scenarios in ArcGIS Urban.


Commenting is not enabled for this article.