Introduction
Update: ArcGIS Pro 3.5 added new tools to bulk apply error resolutions to topology errors. The concepts outlined in this series of articles are important to understand when choosing which actions to use when resolving your errors. Learn more about how to use these new tools by reading the Analyzing topology errors and Resolving topology errors articles.
In the years since we’ve released the ArcGIS Utility Network, we’ve discovered that a handful of different topology errors account for the majority of errors that our users experience on a daily basis. We’ve greatly expanded our online documentation on this topic to include all of the errors along with the approaches for resolving them. However, because these errors and their resolutions are specific to different industries, we’ve decided to develop this blog that provides examples and screenshots for all of these major issues and their corresponding solutions.
By reading this article you will be better equipped to understand how to interpret these errors and what techniques you can apply to the decision-making process for resolving them. We continue to improve the error management and quality assurance experience and hope that this series of content will go a long way to improving your daily experience.
There is a disclaimer with the content you will find in these articles:
- Resolutions that require adding or removing rules will require users to disconnect from the system while the admin disables and enabled the topology to make the change. Changing your rules can also introduce new errors if existing features were relying on those rules, so it’s recommended you test out these changes in a staging environment or file geodatabase first.
- The examples provided in this, and other articles made use of the latest data models and software at the time of publication. There may be slight changes made to user interfaces or data models over time.
- The errors and proposed solutions were all manufactured for demonstration purposes only and resolutions for the same error will vary due to differences in business requirements, data model, and drawing standards at every utility.
- The validation framework is only able to validate features that have valid geometries and are connected. If your data is not well snapped or has invalid geometries the framework will not be able to perform additional validation.
Examples
Check out one of the following articles for examples of how to identify and resolve specific types of errors.
If you haven’t already, you should read the Dirty area management with the utility network article to learn how the Utility Network uses dirty areas to track and validate edits to the network topology.
Cheat Sheet
Below you can find a table that can be used as a quick reference for the most common types of topology errors customers encounter with their data. You can download a printer-friendly version of this table from the Utility Network Community on the Esri Community page. Feel free to save a copy of it and refer back to it often!
| Error Type | Error Description | Resolutions |
| Junction-Edge Errors | 8: Invalid connectivity – No junction edge rule |
|
| Ambiguous Connectivity | 9: Invalid connectivity – More than one junction edge rule applicable |
|
| Edge-Edge Errors | 10: Invalid connectivity – The edges are different subtypes and cannot connect |
|
| Stacked Points | 25: Stacked point features |
|
| Invalid Terminal Connection | 36: The line feature has an invalid terminal |
|
| Midspan Terminal Device | 38: Devices with multiple terminals cannot be midspan |
|
Viewing Rules
Some of the errors require that you know what network rules are configured in your database and there are several ways you can do this. For instructions on how to review all the rules in a network read the view network rules page in the online help for instructions on how to do this.
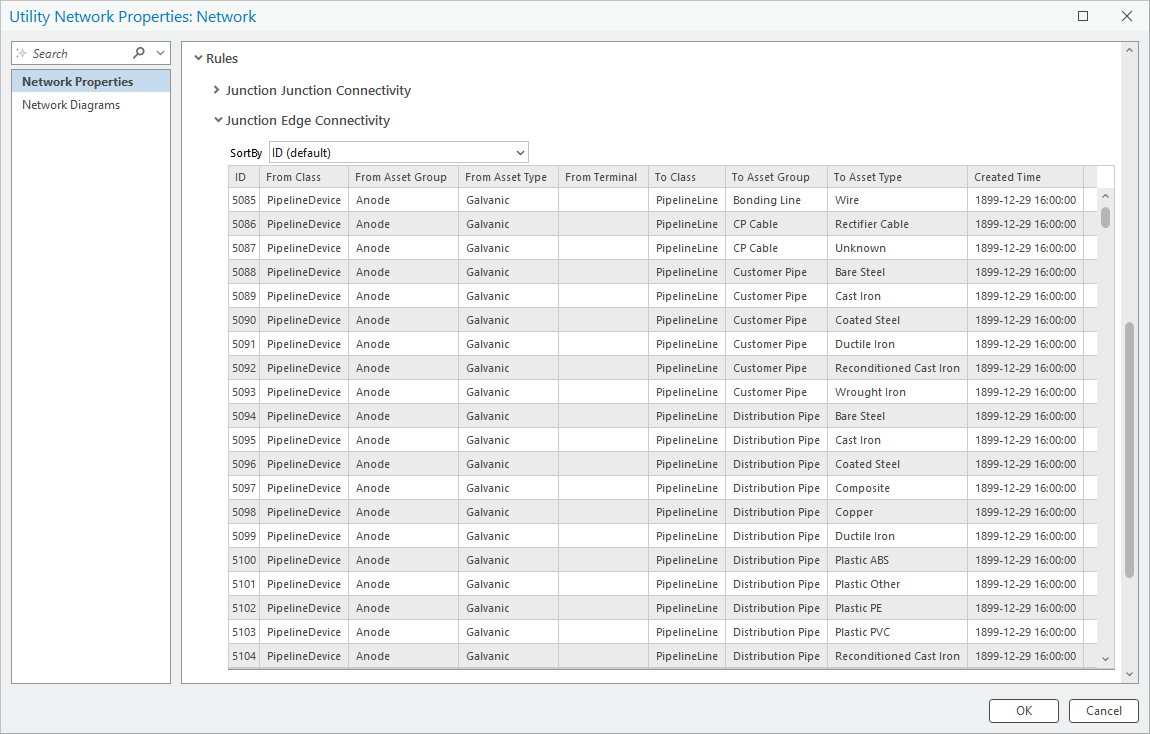
There is also a toolbox provided by ArcGIS Solutions that allows you to see all the rules configured for a given feature, which is convenient for troubleshooting purposes. You can access this tool and learn more about some of the other tools provided by the ArcGIS Solutions team by reading the Utility Data Management Support blog. I have provided an abbreviated version of the instructions for using the “Configure UN Layers” tool here, for reference purposes.
Once you have downloaded the tools and added the toolbox to your project, open the “Configure UN Layers tool”

Check the box next to “Rule Popup”. By default the tool will only modify your active map in your current project, on your active map so you can leave these parameters alone if this is what you want. It is recommended you pause your map before running this tool, since the map will refresh every time a layer is updated.

Once the tool finishes running you will find the list of rules for a feature at the bottom of your popup. Feel free to modify its location or style using the configure pop-up tool.

Conclusion
Now that you’ve read this article you should have a good understanding of the terminology and concepts behind topology errors. For a full list of all the possible network errors, refer to the Errors page in the online help. You should also familiarize yourself with the content in the Feature restrictions and rules page to learn the difference between a network rule and a feature restriction, along with the constraints for what types of features can be connected or associated.
Look at the related articles below for a collection of articles showing industry specific examples of topology errors and how to resolve them.
You should also visit the Getting started with ArcGIS Utility Network learning series for a curated collection of the most important videos, tutorials, and articles designed to help you learn the utility network.


Commenting is not enabled for this article.