
Your ArcGIS Online user profile is how your colleagues and peers in other organizations learn about you. Also, it’s a yardstick for measuring the value and veracity of your shared items and groups. Whether you’re making maps and apps for others in your GIS department, for users throughout your organization, or for the general public, it’s a good idea and a best practice to write and display a complete profile, especially if you want others to consider your content seriously.
Why compose and post a detailed profile of yourself? Which profile below inspires the most confidence? Whose maps, apps, and layers will you most likely use or trust?
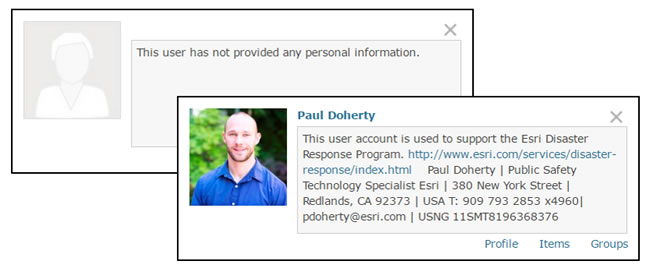
Be Somebody
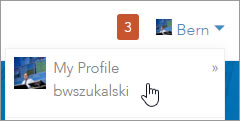
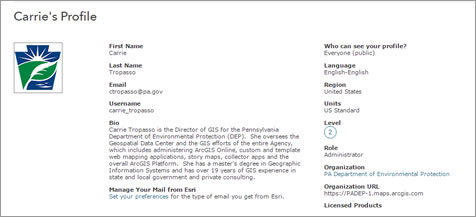
After you get your account and sign in, click your user name in the organization. On the drop-down menu, click My Profile. Create a profile that includes your name, your role in your organization, your duties, and contact information. While completing your profile when you first sign on is recommended, you can change it anytime.
Make Sure Your Profile Is Visible
When you edit your profile, ensure that it will be visible to others. Look under the question, Who can see your profile? and click Everyone to ensure that no matter how you share your items, others will know who you are and what organization you represent.
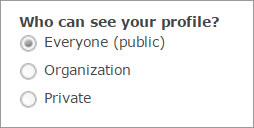
Note: Your administrator may disable the ability for you to control these settings. See the ArcGIS Online Help page Configure security settings for more information.
Format Your Profile
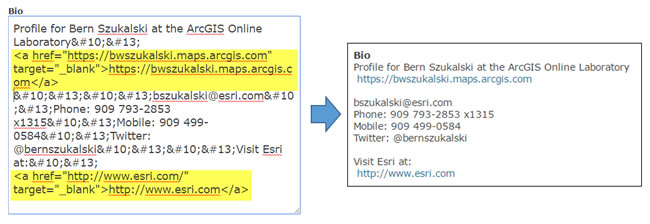
You can format your profile for easier reading by inserting carriage returns. While the profile editor does not currently support what you see is what you get (WYSIWIG) editing or HTML, you can add carriage returns and special characters by using HTML character codes. In the example below, carriage returns and line feeds (highlighted in yellow) were added to improve profile formatting.
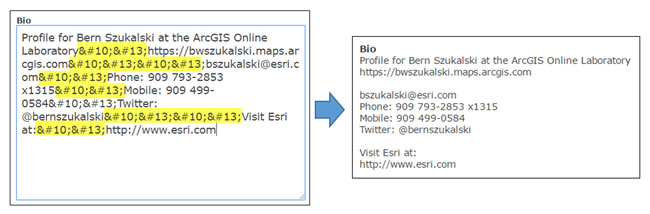
You can also add hyperlinks to your profile by using the <a> tag as you would in any HTML document. The example below is the same formatted profile shown above but with hyperlinks added (highlighted in yellow):
Include Pertinent Information
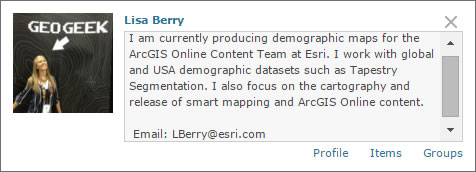
An informative profile will include pertinent details (about you or the group or organization you represent. Things to consider for including in your profile are a good thumbnail, some information about yourself such as your roles and responsibilities (if appropriate), and contact information such as your email address. Here’s an example from a colleague:
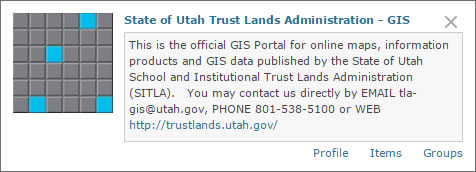
Include your organization logo with your profile if you officially represent the organization.
When you share items on behalf of an organization, you may want it to be the recognized source of the information, rather than yourself or another person. In that case, create an account that represents the organization, and the administrator can transfer ownership of items, as needed, to that account. Note that Esri terms of use prohibit the sharing of account logins, so this must be an account separate from your own.
An example from the State of Utah Trust Lands Administration illustrates this. Note the official logo, contact information, and link to the organization’s website.
You can edit and update your profile at any time, so it’s never too late to put your best profile forward. By doing so, you’re letting others know who you are or what organization you represent, offering context and instilling confidence in others who may want to use your shared items.
For more information, see the ArcGIS Online Help page Manage profile.