 The Magazine for
Esri Software Users
|
|
|
Use Raster to Grid Utility to Model SDTS Format DEM Data
By Mike Price, Esri
 Editor's Note: One of the many new enhancements available in ArcView GIS 3.2 is the SDTS Raster to Grid conversion utility. This stand-alone utility converts Spatial Data Transfer Standard (SDTS) format digital elevation model (DEM) data directly to the Esri GRID format for use with ArcView Spatial Analyst or ArcView 3D Analyst. This article describes how to use the utility to convert free SDTS DEM data from the USGS EROS Web site. Visit the "Terrain Modeling with ArcView GIS" page at the ArcUser Online Web site (www.esri.com/arcuser/) to read previous articles that describe how to download, convert, and model other types of data such as Digital Line Graph optional (DLG-O) format vector data and Geographic Names Information System (GNIS) label point data.
The SDTS DEM Raster to Grid conversion utility will be used to convert 1:24,000 scale data that references the Moab and adjoining Rill Creek areas of Utah. The Moab area was modeled in the July-September 1999 issue of ArcUser magazine. The same procedure used to convert the Moab files for that exercise will be used to download and unzip the files for this model. Though a quick review of this procedure will be provided here, visit the ArcUser Online Web site for a detailed description. As before, this model is built in a Universal Transverse Mercator (UTM) North American Datum of 1927 (NAD27), Zone 12 projection. Grid cell elevations are presented in meters.
Quick Review: Downloading and Unzipping DEM Data
Before downloading any files, use Windows Explorer or another file management program to create a directory and subdirectories to hold and process files. Create a directory called Ut at or near the root of the drive used for modeling. Under \Ut, create a subdirectory called MoabProj. Under \MoabProj, create three subdirectories named Demfiles, Grdfiles, and Shpfiles. This very traditional method of creating and naming directories and files avoids problems that could occur when using grid files. Grid folder names cannot contain spaces or periods. Stay with the traditional DOS file naming convention of using eight characters for directory names and eight characters with a three-character extension for file names (8.3) to avoid problems with path names to grid data.
Visit the "Terrain Modeling with ArcView GIS" pages at the ArcUser Online Web site or use the keywords "USGS DLG" on any Internet search engine to locate the USGS EROS Web site. Once at the site, navigate to the 7.5-Minute Digital Elevation Model (DEM)-SDTS Format Only section of the GeoData page. This DEM data is indexed by the USGS quadrangle name. Choose FTP By State > Utah > Moab to access the Moab DEM.
Download the compressed Tape Archive (TAR) file that contains the SDTS DEM files to the \Ut\MoabProj\Demfiles\Moab subdirectory. Depending on the Web browser used, the file may be renamed and possibly truncated. If Windows long file name rules are used, the file might be named 30_2_1_1006298_TAR.GZ. Windows replaces all decimals (dots) in the file name with underscores except for the last one. To use the files, the GZ file must be unzipped and the multiple files extracted from the TAR. Use the WinZip utility as it handles both GZ and TAR formats very effectively. Remember to rename the file so that the extension--the string to the right of the dot--includes both TAR and GZ.
After downloading and extracting the Moab DEM, return to the EROS site and download the Rill Creek quadrangle DEM and place it in \Ut\MoabProj\Demfiles\Rillcree subdirectory. Use the procedure above to unzip and extract the Rill Creek files. Verify that all 20 files were extracted by using Windows Explorer. Note that most of these files have a .DDF extension.
Using the Conversion Utility
Keep Windows Explorer available. Choose Start > Programs > Esri > ArcView GIS 3.2 to bring up the program group. Select the SDTS Raster to Grid utility from the program group. Double-clicking on the utility's icon brings up the SDTS Raster to Grid parameter input dialog box. The information needed for the conversion utility can be supplied using Windows Explorer.
Switch to Windows Explorer by clicking on the minimized program icon or by using Alt+Tab. Navigate to the \Ut\MoabProj directory and explore the Moab and Rillcree subdirectories. Note all the files in Moab begin with 1158 and all the Rillcree files start with 1157. These four characters, called the transfer prefix, together with the directory path describing their location, comprise the input for Input prefix, the first text box. Enter the complete path name to the Moab DEM.  Add a backslash (\) and type the four character transfer prefix (1158 in this example). Select the entire path and copy it to the Windows clipboard using Control + C. Paste the path in the Output Grid text box using Control + V. Change the Dem in DemFiles to Grd, so that the conversion utility will create the Moab grid in the GrdFiles subdirectory. For this conversion, it is not necessary to provide a Raster Object record number so leave that text box blank. Under the Data Dictionary Modules section click the radio button to choose Keep DD. In the Void and Fill section be sure that the Convert Null Values button is selected. Add a backslash (\) and type the four character transfer prefix (1158 in this example). Select the entire path and copy it to the Windows clipboard using Control + C. Paste the path in the Output Grid text box using Control + V. Change the Dem in DemFiles to Grd, so that the conversion utility will create the Moab grid in the GrdFiles subdirectory. For this conversion, it is not necessary to provide a Raster Object record number so leave that text box blank. Under the Data Dictionary Modules section click the radio button to choose Keep DD. In the Void and Fill section be sure that the Convert Null Values button is selected.
With the information just supplied, the conversion utility will go to the project area, find the Moab SDTS DEM files, and recognize that they start with 1158. It will then create an Esri GRID file named Moab and place that file in the GrdFiles subdirectory. The data dictionary will be retained and any missing data in the grid will be given a null or No Data value. Click the OK button and the utility will run in a separate window.
Use Windows Explorer to make sure the conversion was successful. Hit F5 to refresh the file directory window. The GrdFiles subdirectory should contain two additional subdirectories named Info and Moab. The Moab folder should contain data files with the .ADF extensions. ADF stands for arc data files. Restart the SDTS Raster to Grid utility from the program group. Note that the transfer prefix number for Rill Creek is 1157. Use the same procedure to convert the Rill Creek DEM and store it in the GrdFiles\ Rillcree subdirectory. Verify that the Rill Creek data was converted successfully.
With both DEMs converted, they can be loaded in ArcView GIS using either the ArcView Spatial Analyst extension or the ArcView 3D Analyst extension.
- Start ArcView GIS. Choose File > Extensions to load either extension into ArcView GIS.
- Open a new project and a new view.
- 3. Choose Files > Set Working Directory and path to \Ut\MoabProj\GrdFiles. When working with grid data, both ArcView Spatial Analyst and ArcView 3D Analyst generate many grids, both temporary and permanent, that will need to share an Info directory. Specifying a directory dedicated to grid data by setting the Working Directory means all the grids will be stored in one location. This avoids confusion caused by storing grid data in the same directory that contains shapefiles, images, or triangulated irregular network (TIN) data.
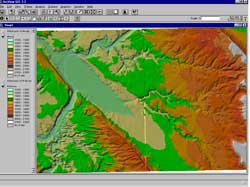
- 4. Add a new theme by choosing View > Add a Theme or pressing the Add Theme button. Under Data Source Types specify Grid Data Source. Navigate to the Ut\MoabProj\GrdFiles directory and select the Moab and Rillcree grids from their respective subdirectories.
- 5. After loading the grids, inspect them. Note the elevation ranges for each theme and look for the closeness of fit along the common boundary.
- 6. After studying the elevation ranges, reclassify the elevation data in both legends with values that include maximum and minimum values for both grids. Apply the same color ramp to both themes.
- 7. Create and apply hillshades for each grid by choosing Surface > Compute Hillshade.
- 8. Save your project, step back, and admire your work!
 Summary
The Raster to Grid conversion utility that comes with ArcView GIS 3.2 will convert USGS 7.5-minute SDTS DEM data directly into an Esri GRID format file that can be loaded into ArcView Spatial Analyst or ArcView 3D Analyst and used to create very striking digital terrain models. Additional information on using these two extensions as well as ArcView Network Analyst can be found in Extending ArcView GIS, published by Esri Press and available from the GIS Store at the Esri Web site.
| |
