ArcUser Online
Summer 2011 Edition
How to Set Up an Esri Geoportal Server
Aggregate geospatial resources using open source products
By Richard Kachelriess and Christine White, Esri
This article as a PDF.
Esri Geoportal Server is a suite of software modules that provides seamless communication with data services that use a wide range of communication protocols and supports searching, publishing, and managing standards-based resources. One of these components is a geoportal, which is a gateway that provides access to geospatial resources such as metadata records and catalogs, web services, Wikipedia articles, Flickr content, YouTube videos, SharePoint documents, RSS feeds, KML documents, and REST URLs.
The Esri Geoportal Server is an open source product that is free and does not require ArcGIS Desktop or ArcGIS Server licensing. The State of Montana, National Oceanic and Atmospheric Administration (NOAA) National Climatic Data Center, Norwegian Mapping Agency, and other organizations use Esri's geoportal technology to manage and publish the metadata for their geospatial resources so users can discover and connect to those resources.
About This Tutorial
This tutorial steps through implementing a geoportal on an intranet and uses base software that is also open source. This geoportal will be accessible only on your local machine or your organization's intranet. This implementation uses the PostgreSQL database and the Apache Tomcat servlet. To use a different database or servlet, please read the Geoportal wiki and installation guides online at www.esriurl.com/geoportalserver.
This tutorial assumes you can
- Navigate the computer's file system with Windows Explorer.
- Create and name new folders.
- Copy and move files between folders.
- Extract a ZIP file.
- Open a web browser and enter a URL.
What You Will Need
- Windows XP/Vista/7
- Administrator privileges
- An Internet connection to download the required software
- PDFs, downloaded from esri.com/arcuser, containing links to software locations and configuration information
What You Will Do
- Download programs and files.
- Perform preinstallation computer preparation.
- Install PostgreSQL database.
- Install Java Developer Kit and Runtime Environment.
- Install Apache Tomcat.
- Install Esri Geoportal Server.
- Set up the user and schema for the geoportal in PostgreSQL.
- Deploy the geoportal app.
- Modify the gpt.xml file.
- Modify Java Database Connectivity (JDBC) .jar file.
- Log in to the geoportal.
- Register ArcGIS Server with the geoportal.
1. Download Programs and Files
At minimum, the Esri Geoportal Server requires the Java Development Kit and Runtime Environment, a relational database management system (RDBMS), and a servlet container. Although the Esri Geoportal Server supports several different options for the RDBMS and web servlet, this tutorial uses the PostgreSQL RDBMS and the Apache Tomcat servlet. Download the programs and files listed in Table 1 either by searching online for the specific versions listed or by using the links provided with the documents downloaded from the ArcUser website.
| Component | Function | Version |
|---|---|---|
| Esri Geoportal Server | Geoportal software | 1.1 |
| PostgreSQL | RDBMS | 8.4.7 |
| Apache Tomcat | Web servlet | 6.0.32 |
| Java Development Kit with Runtime Environment | Java controller | SE 6 Update 24 JDK |
| JDBC Configuration File | Connects Tomcat to Postgres | Postgresql-8.4.701-jdbc4.jar |
2. Perform Preinstallation Computer Setup
Prior to installing the Esri Geoportal Server and its components, you need to create some folders and find out some basic information about your computer. Note: The C:\ drive is used in this tutorial for simplicity; any drive on the host computer can be used to install the software for the geoportal server—just make sure to adjust any path statements appropriately. Please create the following new folders on your computer:
C:\geoportal

C:\lucene

C:\lucene\assertion
Although the geoportal will not be available on the Internet, you need to know the IP address of your computer. The simplest way to find this information is by typing ipconfig in the command prompt.
- Open the Command Prompt window (Start > Programs > Accessories > Command Prompt).
- Type ipconfig.
- Write down the IP address. ________________________________
Run create_schema_pg from the command line to generate tables for the geoportal in the PostgreSQL database.
3. Install PostgreSQL 8.4.7
The PostgreSQL RDBMS will store the geoportal user, resource metadata, and harvesting scheduling information for the geoportal.
- Run the Windows installer for PostgreSQL version 8.4.7. Accept all defaults.
- When asked to create a password for the postgres user, enter postgres. (Note: If your network has a password policy that enforces strong passwords, choose a stronger password.)
- Verify that the PostgreSQL port number is 5432.
Configure PostgreSQL Database
You need to streamline your computer's access to the PostgreSQL database to simplify the geoportal's installation and operation.
- Navigate to C:\Program Files\PostgreSQL\8.4\data.
- Open pg_hba.conf in Notepad (right-click and choose Edit). Go to (Ctrl+G) line 70. This line is below the one that starts with # IPv4. Change md5 to trust.
- At the end of the file, add the following two lines, substituting your IP address (which you wrote down earlier) for
:
# My computer's connection:
host all all/32 trust - Save and close the file.
These changes open up the Postgres database to connections from your computer only. It does not open up the database to external computers. The change to line 70 simplifies connections through localhost, and the new lines allow your computer to connect to the database via a TCP/IP connection.
For the database commands that will configure the Postgres database for the geoportal to run correctly, you need to update your computer's Environmental Variables.
- Right-click My Computer and select Properties.
- On the Advanced tab, click Environmental Variables.
- In the System variables section of the new window, select the PATH entry and click Edit.
- Go to the end of the text in the Variable Value box.
- Do not delete or overwrite any existing text! Add
;C:\Program Files\PostgreSQL\8.4\binto the end of the text.
Ensure that there isn't a space between the semicolon (;) that starts this line and C:\. - Click OK three times to save the changes.
- Restart your computer for the changes to take effect.
4. Install the Java Developer Kit and Runtime Environment
Run the installer and accept all the defaults.
5. Install Apache Tomcat 6
Apache Tomcat 6 is web servlet software that manages web applications. You will need web servlet software to deploy the geoportal web application. Run the installer and accept all defaults. Verify that the Tomcat port number is 8080. Don't enter an administrator user name or password.
Configure Apache Tomcat 6 Service
- Right-click My Computer and select Manage.
- Expand Services and Applications and select Services.
- Find Apache Tomcat 6 in the Services list and ensure that the Service Status is Started. (If not, right-click it and choose Start.)
- Right-click the services and select Properties.
- Change Startup type to Automatic.
- Click OK to save the change and close.
- Verify the installation by opening a web browser and going to http://localhost:8080. A default Tomcat page should appear.
6. Install the Esri Geoportal Server
Extract the contents of geoportal-1.0.zip, the geoportal ZIP file, into the C:\geoportal folder.
7. Set up Geoportal User and Schema in PostgreSQL
Geoportal User Setup
- Reopen the Windows Command Prompt.
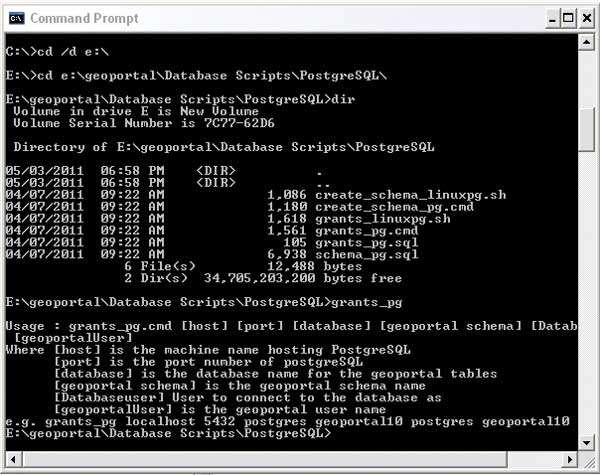
- Type cd C:\geoportal\Database Scripts\PostgreSQL to change to this directory. (Hint: If the geoportal folder is not on C:\, type cd /d another drive letter>:\ to change from the default C:\ prompt.) Type dir to see the contents of this directory.
- Type grants_pg to see usage instructions for this script. You will enter parameters according to these usage instructions in the next step.
- Type the following parameters and press Enter. You will be prompted to create a password for Geoportal User. Use the password geoportal, unless your system requires a stronger password.
grants_pg localhost 5432 postgres geoportal postgres geoportal - Enter the password for the new role (geoportal). Enter the password again (geoportal).
- Upon the completion of the script, it will generate a text file, grants_pg.txt, and invoke a text editor to display this file, showing the results of the script.
Add an ArcGIS Server to the geoportal.
Populating Geoportal Schema in PostgreSQL
The previous section created the geoportal schema in the PostgreSQL database. This section will populate that schema with the tables the geoportal needs to function.
- At the command prompt, type create_schema_pg to see usage instructions for this script. You will enter parameters according to these usage instructions in the next step.
- Type the following parameters:
create_schema_pg localhost 5432 postgres geoportal
For geoportal10 user, enter the same password you designated for the geoportal user when you ran the grants_pg script—in most cases, this will be geoportal. Upon the completion of the script, it will generate a text file, geoportal_schema.txt, and invoke a text editor to display the results of the script.
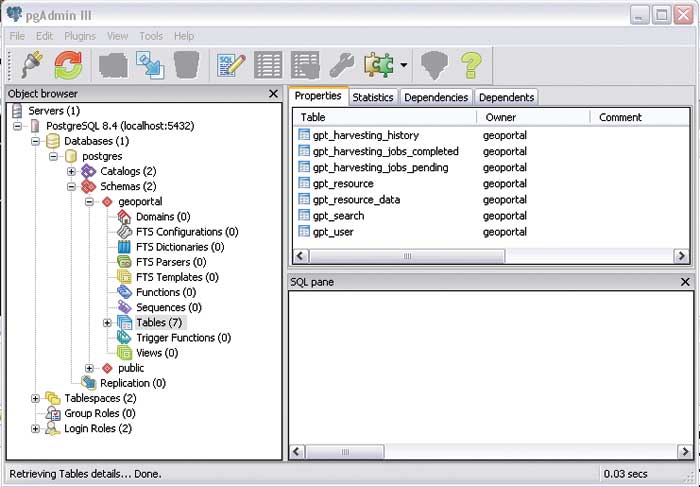
Verify Geoportal Tables Were Generated Correctly
- Open Postgres System Administrator.
- Click Start > All Programs > PostgreSQL 8.4 > pgAdmin III.
- Double-click PostgreSQL 8.4 (localhost:5432).
- Enter postgres, the password for postgres user.
- In the table tree, navigate to Databases > postgres > Schemas > geoportal > Tables.
- Verify that Tables contains the following seven tables:
gpt_harvesting_history

gpt_harvesting_jobs_completed

gpt_harvesting_jobs_pending

gpt_resource

gpt_resource_data

gpt_search

gpt_user
8. Deploy the Geoportal Web Application
Copy geoportal.war from
c:\geoportal\Web Applications\Geoportal
to
c:\Program Files\Apache Software Foundation\Tomcat 6.0\webapps
Apache Tomcat should automatically create a new folder in the webapps folder called geoportal. This is the geoportal website. If the folder is not created, open the Services window (My Computer > Manage) and restart the Apache Tomcat 6 service. Open a web browser and go to http://localhost:8080/geoportal. The default geoportal home page should appear.
9. Configure the gpt.xml File
The PDF files downloaded from the ArcUser website at the beginning of this exercise contain Tables 2 and 3. Look at the highlighted lines in Table 2 for the required changes to the gpt.xml file. (Be sure to pay attention to indentation when commenting out sections.)
- In Windows Explorer, navigate to C:\Program Files\Apache Software Foundation\Tomcat 6.0\webapps\geoportal\WEB-INF\classes\gpt\config.
- Open gpt.xml in Notepad.
- Make the changes shown in Table 2 in the PDF file to the gpt.xml file.
- Save and close gpt.xml.
10. Modify the Java Database Connectivity (JDBC) .jar File
- Copy postgresql-8.4-701.jdbc4.jar to C:\Program Files\Apache Software Foundation\Tomcat 6.0\lib.
- Copy geoportal.xml from C:\Geoportal\Other\JNDI Configuration to C:\Program Files\Apache Software Foundation\Tomcat 6.0\conf\Catalina\localhost.
- Open geoportal.xml with Notepad and make the changes shown in Table 3 in the PDF file. Note that for the password parameter, this is the password for your geoportal user. If you used a strong password when setting up the geoportal, use that password.
- Save and close geoportal.xml.
- Restart the Apache Tomcat 6 service.
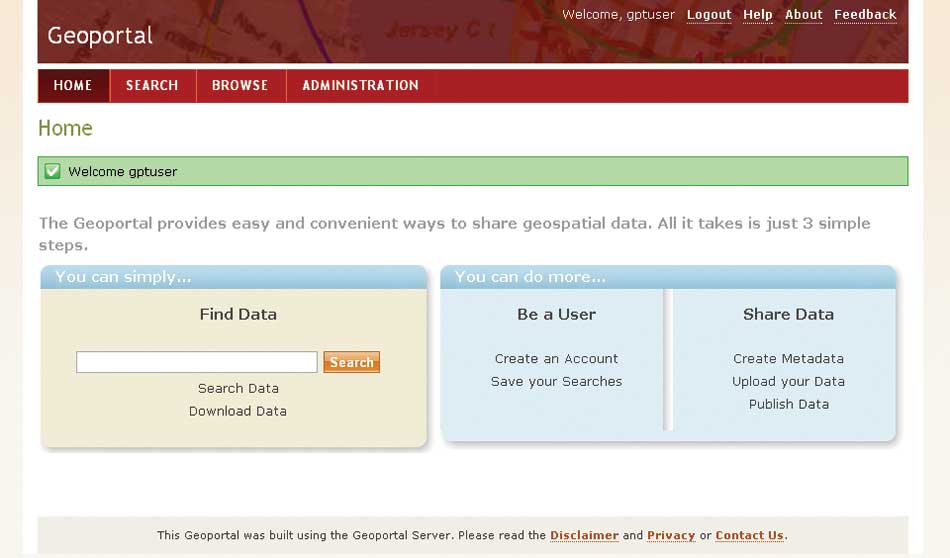
11. Log In to the Geoportal
Your geoportal is now up and running. Open a web browser and go to http://localhost:8080/geoportal to access the geoportal's user interface. You can log in to your geoportal with the gptuser user name and gptuser password. You have logged in successfully when a green banner saying "Welcome gptuser" and the Administration tab appear. Go to geoportal.sourceforge.net for information on how to register resources with your geoportal.
After adding an ArcGIS Server, synchronize it.
12. Register an ArcGIS Server with the Geoportal
To register an ArcGIS Server and its associated services with your geoportal, use the following procedure. The ArcGIS Server can be your own or one that is publicly available. (Note: ArcGIS Server is not required to set up or manage a geoportal server. Esri Geoportal Server supports a wide range of geospatial services, including OGC services [WMS, WCS, WFS, etc.], GeoRSS, ArcGIS services, Open Archive Initiative [OAI] services, and even web-accessible folders.)
- Log in to your geoportal. Click Administration. Click Add. Make sure Register resource on the network is selected and click Proceed.
- Select Protocol Type ArcGIS.
- In REST URL, type http://services.arcgisonline.com/ArcGIS/rest/services/.
- In SOAP URL, type http://services.arcgisonline.com/ArcGIS/services/.
- In title, type Services from ArcGIS Online. Click Test to verify the connection. A green banner with "Connection successfully verified" should appear.
- Scroll down, keeping all other defaults, and click Save. A green banner with Resource data saved successfully should appear.
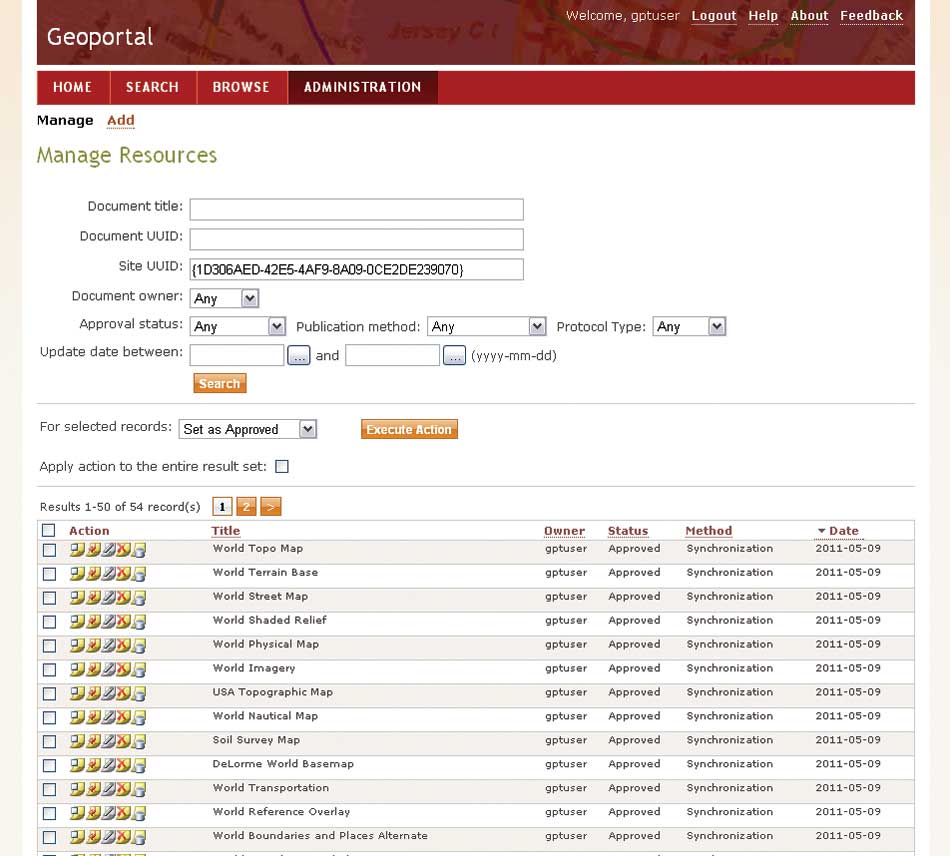
- Click Manage at the top of the Administration tab. Services from ArcGIS Online should be listed. Notice that the fifth icon (Synchronize content) has been grayed out.
- Check the box to the left of the record. Above the records list, in For selected records, choose Set as Approved and click Execute Action. The page should reload, and a green banner should display the message "1 record(s) were updated".
- The fifth icon (Synchronize content) should now be in color; click that icon. A dialog box entitled The page at localhost 8080 says… opens up. Click OK. A green banner that indicates one resource has been qualified for synchronization should appear. Wait a few moments while the geoportal synchronizes services from the registered ArcGIS Server.
- After a few moments, click the last icon (Show documents acquired from this repository). The returned documents are metadata records created for the services hosted on the registered ArcGIS Server and now discoverable through your geoportal.
Conclusion
This tutorial walks through the process of setting up an Esri Geoportal Server using an open source web servlet and database. For testing purposes, simple authentication was used, rather than LDAP authentication. The full functionality of user-based roles in the Esri Geoportal Server requires an LDAP-enabled Directory Server. If an existing Directory Server is not available, several open source directory servers can be used. To learn more about configuring a Directory Server and other aspects of installing and using the Esri Geoportal Server, see the Geoportal Server 1.1 Installation Guide part of the documentation that is included with the Esri Geoportal Server download. Also see the Esri Geoportal Server site at www.esriurl.com/geoportalserver.