|
The first
article in this series in the April–June issue of ArcUser described
the types of data available at the U.S. Geological Survey's Earth
Resource Observation Systems (EROS) Internet data site. The next
article in the July–September issue provided step-by-step instructions
for locating and downloading USGS data and using a free utility
to convert optional format 1:100,000 scale Digital Line Graphics
(DLG-O) vector data to Drawing Exchange Format (DXF) files that
are easily loaded into ArcView GIS.
With this installment,
data converted from DLG-O data to DXF will be loaded into ArcView
GIS for display, editing, and thematic mapping. These data, describing
hypsography (or contours), hydrography, roads, railroads, public
lands, and boundaries, will be classified and thematically displayed.
The data used
in this article come from a very interesting part of the world--Bright
Angel Creek in the Grand Canyon. However, the data development and
modeling procedures presented here will work with most 1:100,000
DLG-O USGS data for the continental United States once these data
are converted to a DXF format.
Downloading
and Converting Data: A Brief Review
Before reviewing
these steps, a few words about hardware would be in order. A Pentium
class PC with 32 MB of RAM and 100 MB of free hard drive space are
the base system requirements to comfortably perform the operations
described in this article. Though completed two-dimensional models
take up between 20 MB and 50 MB, additional space is required to
store the downloaded DLG-O files while these files are converted
and the resultant DXF files are verified.
To download
USGS data, see the Jump Station page at the ArcUser magazine Web
site (www.esri.com/arcuser) for URLs for the USGS EROS Web site.
Once at the USGS site, choose "FTP via Graphic" and click
on the map within northern Arizona. Select the Grand Canyon quadrangle
(GC4), then select Grand Canyon East. The North and South Bright
Angel trails and Phantom Ranch are located in Tile 8 in the southeastern
15' division. It is helpful to refer to a paper copy of the Grand
Canyon 1:100,000 quadrangle to familiarize yourself with the terrain
to be modeled.
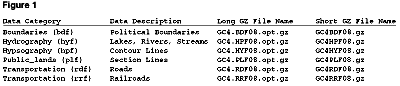
Within GC4 Tile
8, data are available in six categories. The recommended data sets
are listed in Figure 1 followed by the suggested shortened name
to assign to each zipped type when downloading.
Before downloading,
create a project directory called GC4FILES to receive the files,
then download the six data sets, shortening names as indicated above.
The hypsography set is rather large, so be patient. After downloading,
use WinZip or another GZ utility to extract each DLG-O file. Remember
to append the DLG extension to each file as it is extracted.
Next, use DLGLX149.exe,
a DOS freeware utility, to convert the unzipped DLG-O files to DXF
files in version 12 format. This utility may be used interactively
or in batch mode. If using this utility in batch mode, the first
line of a batch file to convert DLG-O files to DXF format should
read
dlglx149 /header=12
/no=lines /type=o GC4bdF08.dlg GC4bdF08.dxf 0.
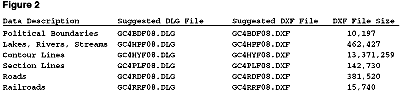
Copy this line
five more times and edit file names to process each data set. Unzipped
DLG-O files and converted DXF files are listed in Figure 2 with
the size of each DXF file. Call up a directory of the files in your
project directory to check the file sizes. Six DXF files identical
or very close in size to the files shown in Figure 2 should have
been created by this process. The new DXF files should reside in
the same directory as the DLG and GZ files. Once the files are converted
to DXF, they may be read directly into ArcView GIS with the CAD
reader extension. If disk space is short, you may delete GZ and
DLG files after verifying that all DXF files were properly converted.
Detailed instructions
for obtaining and using the DOS conversion utility are given in
the previous terrain modeling article, which ran in the July–September
issue and is available at the ArcUser magazine Web site at www.esri.com/arcuser.
Loading and
Editing Two-Dimensional Data
Begin an ArcView
GIS session and set the working directory to the drive and directory
where the Grand Canyon DXF files are stored. Be sure to load the
CAD reader extension by choosing File, then Extensions from the
menu, and then checking the box for CAD reader. Open a new view
and select Properties from the View menu. In the dialog box that
appears set Map Units to meters and Distance Units to miles or kilometers.
Click on the
Add Themes button. With CAD reader active, the six DXF files located
in a file folder will be visible. Click on a folder to open it and
note that there are four data types inside: lines, points, polygons,
and annotation. The line data are the only data type needed for
modeling. Double clicking on a DXF folder without opening it automatically
loads the line set. Load all six data sets and arrange them in the
legend window with boundaries on top, followed by public lands,
railroads, roads, hydrology, and hypsography.
Turn each theme
on, starting from the bottom, and watch the map draw. Notice that
the layers are automatically displayed in the legend as solid lines
and bright colors with a number value. By default, CAD reader applies
the AutoCAD pen colors to the legend.
Double click
on each theme in the legend to open the Legend Editor. Under Legend
Type choose Unique Value and in the drop-down box next to Values
Field, select Layer. One or more brief alphanumeric codes will appear
in the Value column of the grid. These codes can be joined to a
lookup table to better explain the data types. Notice that there
is a value at the bottom of the Value column that repeats the name
of the original DXF file.
Apply a distinctive
color scheme, such as Minerals, from the selections under Color
Ramps. After modifying the legend for each theme, exit the Legend
Editor. Turn each theme on beginning with hypsography at the bottom.
Sit back and watch the map reappear. This is a good time to save
your project for the first time.
Now turn off
all the themes. Display one theme at a time. Using the Identify
tool, notice that boundary lines surrounding the themes for hypsography,
hydrography, railroads, and roads are associated with the file name
listed at the bottom of the identify box. To hide these boundary
lines, select Theme, and then Properties, from the menu. The file
name layer contains features that ArcView GIS cannot identify as
belonging to a named layer. Use a new Drawing option, located just
below Definition in the Theme Properties dialog, to filter out these
nonspecific features located in the file name layer. The Drawing
option is available only when the CAD reader extension is loaded
in ArcView GIS. Select all layers except for the bottom one, which
is the file name, and click OK.
Two data sets,
public lands and boundaries, are coded inconsistently and require
extensive editing to be useful for modeling. Do not use the Drawing
option to filter these themes. While in Theme Properties, change
the name for each theme to a friendlier alias. Click OK to close
Theme Properties.
Display a table
for each theme and observe the table structure. The primary data
field for most themes is the Layer field. Notice that the hypsography
data also include valuable information in the Elevation field. In
the next article in this series, information from the elevation
field will be used to create a triangulated irregular network (TIN)
with ArcView 3D Analyst.
Remember to
carefully review and, when necessary, edit data that will be used
to create models. Sort the data in hypsography table in ascending
order and verify that there are no zero or excessively high values.
As with any data, some DLG-O files contain incomplete or improperly
coded data and editing may be necessary. Elevation values should
range between 700 and 2,600 meters for the data from GC4 Tile 8.
While viewing
tables for hypsography, hydrography, roads, and railroads, check
the Layer field to verify that filtering the data using the Drawing
option was successful and that the Value field does not contain
the name of the DXF file used to create the theme. Remember that
boundaries and public lands are exceptions and some boundaries and
public lands records will contain the original DXF file name. Save
the project again before continuing on to the next step.
Thematic
Mapping and Presentation of Two-Dimensional Data
Once all six
data types are loaded and edited, we can use the thematic mapping
capabilities of ArcView GIS to create a meaningful map in our view.
Data attributes can be applied to customize our map. Hypsography
is an interesting theme to begin with since the Elevation field
will create a topographic color ramp based on the contour lines.
- Double clickon the hypsography theme in the legend to open the Legend Editor.
- Select Graduated Color as a Legend Type.
- Choose Elevation as the Classification Field.
- Click the Classify button to bring up the Classification dialog.
- Set the number of classes to five. Click OK.
- Select Elevation #1 located near the end of list of choices under Color Ramps.
- Type in elevation ranges in the Value column. Each range spans
500 meters, beginning with 500–1,000 and ending with 2,500–3,000.
- Tell the Legend Editor to apply the color ramp and close the Legend Editor.
- Make hypsography the only active theme and press the Zoom to Active Theme button.
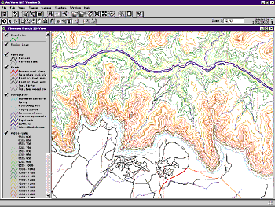
Now you can
study the model. The low central area, colored light blue, represents
topography at and near the Colorado River. The major southwest flowing
drainage system in the northeast map quarter is the North Bright
Angel Canyon, eroded along the Bright Angel Fault. Other North Rim
canyons run parallel to Bright Angel Creek. Notice that South Rim
canyons are shorter and steeper. Major hiking trails in the Canyon
use the Bright Angel and other drainages to establish preferred
routes. Save the project to preserve the new hypsography theme.
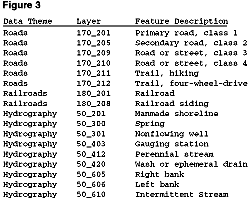 The
hydrography, roads, and railroads themes are very interesting and
usually map well. Build a legend for the hydrography, roads, and
railroads themes by applying the alphanumeric code stored in the
Layer field to distinguish between data types. The table in Figure
3 explains the meaning of each type. The
hydrography, roads, and railroads themes are very interesting and
usually map well. Build a legend for the hydrography, roads, and
railroads themes by applying the alphanumeric code stored in the
Layer field to distinguish between data types. The table in Figure
3 explains the meaning of each type.
To classify
legends for the roads, railroads, and hydrology themes, open the
Legend Editor for each theme. As before, select Unique Value for
the Legend Type and choose Layer in the Values Field. After the
legend builds, enter the correct feature description (e.g., Primary
road, class 1, Trail, hiking) from the list in Figure 3 in the Label
column, matching each data theme with the appropriate value. Select
representative line colors and styles for each legend item. Make
each theme visible and stack them in your favorite order. Boundaries
and public lands will require extensive editing before mapping these
themes. Future articles will show how these data can be edited so
they are usable. The finished map could look similar to the illustration
in Figure 4. Save your project.
Now it's time
to step back and admire your Bright Angel map. Observe relationships
between hiking trails and canyons. Find the railroad spur leading
up from Williams, Arizona. Calculate the elevation differences between
the Colorado River and the Canyon Rims. You can determine the average
slopes of your favorite hiking trail.
Summary
 Using these steps you can load, analyze, edit, and present 1:100,000
scale USGS DLG-O data in ArcView GIS. After completing a Grand Canyon
model, you can apply these techniques to USGS data for other areas
to build your own models.
Using these steps you can load, analyze, edit, and present 1:100,000
scale USGS DLG-O data in ArcView GIS. After completing a Grand Canyon
model, you can apply these techniques to USGS data for other areas
to build your own models.
If you have
room on your hard drive, keep the Bright Angel model because a future
article will use ArcView 3D Analyst to generate a three-dimensional
TIN using the hypsography theme. Two-dimensional data will be placed
on the TIN to create a very attractive three-dimensional model.
Stay tuned for additional data acquisition and modeling solutions
and an explanation of how to use the Join command to automatically
tie text labels to alpha codes.
Visit the Mining
Solutions Web site at www.esri.com/mining
for the dates and times of seminars teaching terrain modeling using
ArcView GIS.
|